Everything About Laser Treatment: Must Knows and How to Care for a Burn From It

Published on: 03 September 2018 Last Updated on: 29 October 2024
Laser Treatment

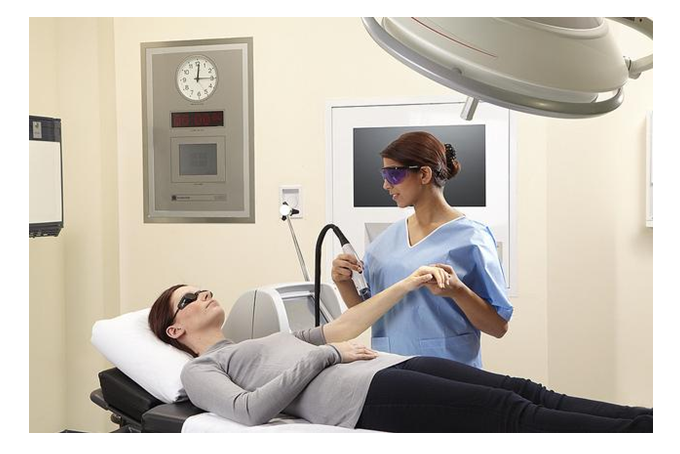
One of the most significant risks of undergoing laser treatments is the chance of burns because they are undoubtedly painful and can also leave permanent scars in some cases. The leading cause of this accident is mostly lack of experience. Also, some laser treatment machines that cause burns are not approved by the Food and Drug Administration (FDA).

Accidents like these are most of the time handled by an operator that is not well-experienced in giving this kind of treatment. That is why before you go for the cheap offer or a DIY solution, think of the risk you’re putting yourself into first.

So far, lasers and electrolysis are some of the best methods for removing stubborn hair permanently. Although, you also need to think that there are chances that it may give you some side effects like discoloration, irritation, skin rashes, and even burns at some point.

“Must Knows” In Laser Hair Treatment Burns

Laser Hair Treatment Burns

Some of the most common causes of the not-so-good effects of the said treatment include wrong procedure implementation, inexperienced technicians, wrong choice of treatment, improper care of the treated area after the laser hair removal treatment, and harsh and aggressive attitude while doing the procedure all by yourself while at home.

Burns happen when the laser energy is getting absorbed opposing the proper way of targeting the follicles of the hair and not directly to the skin. The typical signs of laser treatment burns include but are not limited to severe swelling, redness, and eventually, discoloration of the burned part of the surface.

Despite this risk, laser hair removal treatment has long been proven safe by many specialists. However, it is essential that you know what to do when you notice some adverse effects like burns. Most of the cases of burns recorded are only minor and usually subsides in a short period.

It is vital that you get checked by a skincare specialist or clinic first to lessen the chances of getting laser burns. Doing so will determine if you’re a suitable patient for that kind of treatment. Ask questions if necessary before deciding whether you’ll go with it or not.

Always make sure that your specialist or the clinic where you’ll be undergoing the said treatment is fully equipped and has the right system in performing laser hair removal. You have to ensure that the specialist says that you qualify for the procedure to avoid offers promising low prices and services that are too good to be true. Always think that this kind of treatment is, but if you find the right laser treatment facility, it will all be worth it.

Avoiding Laser Hair Burns

Laser Hair Burns

Here are some tips that will help you possible avoid getting burns from laser hair treatment:

  1. Find the right clinic. Make sure they are experts in the field of laser hair treatment. Doing so will lessen your chances of getting this unfavorable skin issue.
  2. Make sure that the machine the specialist will be using suits your skin type and color. Aside from that, you need to know if the machine is approved by the Food and Drug Administration (FDA).
  3. Some machines work for different skin types and colors like the Soprano Laser. But there are also machines that have their specialty. Some are only good for whiter skin color and some only work for darker shades of skin.
  4. Since using the machine is risky, not everyone can operate this machine. Unless these people are well-experienced and are skilled in driving the device, they are prohibited from using it. If you can, find a licensed technician to put your mind at ease.

What To Do If You’ve Got Burns From Laser Hair Treatment

  1. Do not touch the affected area with your bare hands. Wrap ice in a towel instead and apply it to the burned part of the skin for fifteen to twenty minutes. Repeat the procedure for the next hour or two. Applying a cold compress helps in eliminating the pain of the burn instantly.
  2. Get a hydrocortisone cream and apply a thin layer to the affected area. It will help reduce swelling and soothe that part of the skin.
  3. Drink a lot of water. Practically, that part of the skin is dehydrated that is why you have to replenish it with water intake.

Takeaway :

Everyone knows that laser hair treatment gives beautiful results when done with the touch of licensed professionals. This kind of process is one of the best since it does not only remove unwanted hairs but also prevents them from growing again. Although it sounds like a perfect treatment, adverse side effects and risks still happen.

Always remember that prevention is better than cure. Put in mind that laser hair removal will not give you the result that you want to achieve unless you take extra caution and leave the whole meticulous process of the treatment to the specialist.

Read Also:

Content Rally wrapped around an online publication where you can publish your own intellectuals. It is a publishing platform designed to make great stories by content creators. This is your era, your place to be online. So come forward share your views, thoughts and ideas via Content Rally.

View all posts

Leave a Reply

Your email address will not be published. Required fields are marked *

Related

Simple Exercises That Can Relieve Back Pain

7 Simple Exercises That Can Relieve Back Pain In No Time

Back pain can be very excruciating. This leaves sufferers with no option than to find solutions to the problem. The pain that shoots across the back whenever you bend or try to stand up is not something you should leave for long. It is true that drugs can be a relief. Yet, there are other ways to put it off without taking daily dosages. The answer lies in exercises. These simple exercises can help you to get back on track after moments of excruciating pains. 1. Engage in Side Plank to Relieve Back Pain: This exercise helps you to strengthen the lower back and the waist. Also, it builds up the strength of the stabilizing muscles. For sure, you can do away with back pain after some weeks of the side plank exercise. So, let’s see how you can pull it off. Procedure: Lay on your right side. It will better to lie on the floor with the right side of the body. Attempt lifting up the body while supporting the frame with the right hand rooted to the floor. While lifting up, clench the stomach muscles. This helps you to maintain stability. Make sure to stay in the position for 40-60 seconds. Gently lower the body to the floor, and repeat the process over again. 2. Wall Sits can Relieve Back Pain: Break away from the boredom of sitting for long hours. Kick-start your back pain relief with the wall sit exercise. These tips will help you pull it off. Stand with your back against the wall at a distance of 10-12 inches. Lean back into the wall until your back flattens against it. Slowly slide down the wall until your knees get a slight bend. Hold on to the position for a count of 10. Slide back up the wall, and repeat for 12 more times. 3. Bird Dog is a Relief for Back Pain: This is a nice way to mobile the back. To get started, get on all fours. Make sure your head is in line with the neutrally-positioned spine. Procedure: Get on all fours. Let the knees, hands, and the tip of the feet are touching the ground. Raise the opposite hand and leg in a horizontal position, and hold the position for a count of 3. Increase the time-frame from 3 to 10. While at it, try to raise the opposite legs and hands. Remember to keep the elbows locked, and the stomach tightened. 4. Hip Bridge Relieves Back Pain: This exercise helps to keep pressure off the back and strengthen the lower back muscles. Here are tips to get it right. Lie on your back and keep the legs slightly apart. Prop up the buttocks to lift up the body. Maintain this until it gets to the shoulder length. At the count of 5, lift the body down to the floor. You can try up to 12 times per session to get the best result. 5. Hamstring Stretches reduce Back Pain: The hamstring muscles located at the back of the legs, tend to be stiff during back pain. It is important to stretch it out, and in extension, relieve the pain at the back. This is how to do it: Lie on your back and bend one knee. Loop a towel under the ball of the raised foot. Straighten the knee and pull back on the towel. Try not to exert more force when you feel a gentle stretch down the back of the leg. Try to maintain the position for 30 seconds. Repeat the process four times on each leg. 6. Hip Stretch puts off Back Pain: There is no doubt that this exercise gets to the core point in the body. Also, it is a nice way to get relief from back pain. These practical steps will put you through: Kneel with one knee on the floor. Tilt the other foot forward. Push the hips forward while keeping the back in an upright posture. Hold the position for 30 seconds. Change positions and repeat with the other knee. Repeat the process twice for each knee. 7. Lower Back Stretch can Relieve Back Pain: Have you always wanted to get rid of back pain? A simple stretch at the lower back can do a lot of good. Try your hands at the lower back stretch exercise by putting these steps to work: Kneel with your knees directly under the hips, and the hands directly under the shoulders. Keep the spine in a neutral position. Do not lock the elbows. Now, keep the head in line with the back of the shoulders and the spine. Take the bottom back towards the heels. Maintain the position for 30 seconds. Get back to the first formation and start all over again. Repeat the process for 8 times per session. Get Relief for Back Pain: There is no one who wants to experience pain. It gets worse when it has to do with the excruciating shot that passes across the back. Without taking any drugs, the above exercises will help you get rid of back pain. Get on all fours, and stretch the body as you can to get relief from back pain. If you want to learn more about back pain relief, expert tips and helpful information about chronic pain, just visit Freeyourspine.info. Read Also: Can A Mattress Cause Back Pain? Best Mattress For Back Pain How Activity Mirrors Add Value To Exercise Place! What Are Popular Mind And Body Exercises Available At A Gym? Top 10 Muscle And Strength Building Exercise At Home What Are Virtual Reality Workouts And How Will They Affect Exercise? Easy Ways To Prevent Back Pain With A Seat Cushion When You Are Seated All Day Long

READ MOREDetails
Invisalign

The Process of Invisalign

Whenever you are up to for teeth whitening procedure the most part you should be careful about is choosing the best dentist for this purpose. There are many dentists out there who are not experienced, but still, they are self-labeled as experienced dentists. Among the dentists, there are only a few ones who are trained and well experienced to provide safe and quality services. Make it sure that you search about the dentist before the one for you and select the right dentist of Invisalign Calgary or from any other area. What Is Invisalign? Invisalign are self-made aligners that are replaced every two weeks for the period of six or double months. They might be used for a longer time if the teeth are too much misaligned. These are similar to mouth retainers; aligner is mainly used for teeth treatments and known as one of the dental ways to move and properly fix them on their right place to have the beautiful and desired smile. What Is the Process of Invisalign? The process is very easy and pain-free. It has only five simple steps mentioned below: 1. Dentist’s Consultation: The first step of the procedure is your consultation with one of the Invisalign Calgary dentist. During this consultation, the dentist examines your teeth thoroughly and then decide what you are in a serious need of Invisalign or not. The patients are always welcomed by the dentists to ask the questions if they have some in their minds regarding the treatment. Questions might be like the cost of this procedure, the duration, or are there any side effects of this treatment or not. 2. Customized Treatment: After the first step, the next is taking the x-rays marks of your teeth to know that from where your teeth need more alignment. This process is fully customized. This step is important because on the basis of the x-ray the dentists decided that which treatment will be the best one for you. After this step, the dentist will give you an idea of how much it will take for the alignment of your teeth, but the best results you’ll always get are after a year. 3. Get Your Invisalign Aligners: Once your overall treatment plan is made, the dentist makes a set of customized aligners that you can wear for the proper alignment of your teeth. The best thing about the aligner is that they are smooth and made of plastic and they won’t even disturb you while sleeping or eating something. The aligners should be worn for at least 20 to 22 hours daily as if you require the best result in less time. You can also remove the aligners while eating something or brushing your teeth. 4. Change Aligners After Every Two Week: The new aligner means a step forward to better teeth. The aligners are required to be changed within every two weeks. The dentists provide the patients with a set of aligner after two weeks. 5. Smile Confidently: After the complete procedure, you are ready to smile with the best teeth without any defect. It is necessary to take care of your teeth even if the treatment is finished to have long-lasting effects. The patients are recommended to keep using the retainers to secure the position of their teeth. Read Also: How To Choose The Best Fort Lauderdale Dental Office Dental Health: 6 Essential Dental Care Tips You Need To Know 5 Ways To Prevent Severe Dental Problems

READ MOREDetails
Yoga at Home

How to Make Doing Yoga at Home Interesting

While doing yoga at home is extremely convenient, a daily practice can become stifled over time and feel just as exciting as doing the dishes. The good news is there are several things you can do to spice up yoga sessions and get enough motivation to have a steady home practice. Here are some useful ideas. Sanctify a Spot You’re much more likely to stay committed to your home practice if you have a space that’s dedicated to yoga. Choose a specific spot in your home and reserve it specifically for your practice. Declutter it by removing items that are non-yoga related. You won’t fully concentrate on yoga if you can see a stack of emails, books, or toys. Don’t forget to move around furniture and objects that can hinder your stretches during asanas. Space needs to set the tone for your practice, so decorate it with intention. Candles, fresh flowers, and small statues are some of the decorative pieces that can transform your space into a little studio you’ll love and crave to be in. Change the Setting What if you already have a dedicated spot for doing yoga but are finding practicing there less exciting? Well, alter the setting. If you practice in the same place every day, the familiar surroundings can trigger a thought pattern that allows boredom to set in. If you usually practice without mirrors, incorporate them into your space. They’ll help you perfect your alignment. If you usually use mirrors, eliminate them. Take the chance to tap more into your instincts and focus on creating a more intense connection to your breath and self. A fantastic idea to break monotony is taking your yoga practice outside. Mother Nature has a unique way of awakening the senses, replenishing depleted energy, and reigniting your love for the practice. Be Flexible With Time You’ll get maximum benefits from yoga if you practice consistently. However, consistency doesn’t imply having a set time for practice. You can practice yoga at any time and still reap its benefits. The important thing is to set aside time each day and require a minimum session duration for yourself, for example, 20 minutes in the morning or evening. Flexibility with time allows you to attend to your family or work or catch your best TV show without feeling any guilt. For many people, the ideal time for practice is late evening or early morning. Just be sure to tailor your routine to the specific time of day you choose to practice. For example, morning sessions are better if they include plenty of hip, chest, and shoulder openers. For evening sessions, end them with supine twists and an extended savasana, which will slow your systems down for sweeter slumber. Spice Your Style The beauty of doing yoga at home is that you can choose to practice any style you want. There are countless online classes to give you insights into different yoga styles. If you feel your current style is missing something, don’t be afraid to switch or mix it up. Look for a new style that interests you and incorporates it into your practice. A great way to take stagnation out of your sessions is by occasionally throwing in new and challenging asanas to your routine. Believe it or not, all the falling and failing as you attempt new balance poses or handstands will make your sessions more purposeful and engaging. The challenges will give you something to look forward to and work towards. Upgrade Your Yoga Tools New tools can put the fun back in your yoga practice. There are countless tools and toys you can purchase to benefit your practice, including a new mat, yoga wheel, yoga swing, mala beads, singing bowls, crystals, and essential oils. An essential oil diffuser combined with relaxing music and the rosy glow of a salt lamp or candlelight can increase mindfulness and transform your practice. Just make sure you check the reviews of different types of essential oil diffusers so that you can choose the right one for your home yoga space. Create a Family Yoga Practice Yoga is for everyone regardless of his or her size or age. Taking the time to explore the breathing exercises and poses can create a deeper bond between family members in addition to providing healthy fun, greater calm, and spiritual connectivity. Family yoga should involve lots of creative play, laughter, and physical and verbal interaction. For even more fun, parents can allow kids to climb under, around, or on top of them as they practice. Yoga helps keep your mind and body healthy. With these tips, you’ll stay happy, balanced, and consistent in your home practice. Read Also: The Miraculous Benefits Of Aqua Yoga Yoga For Pregnant Women Follow These 5 Yoga Poses To Reduce Stubborn Belly Fat

READ MOREDetails