Published on: 10 August 2020
Last Updated on: 12 September 2024
There are one thing movies and TVs all agree on – lofts are cool. If there is a loft in a TV show or a movie, you can bet it will be chic and stylish, furnished in the latest fashion, exuding both the minimalism of the upper class and the industrial design of the hipster movement.
Generally speaking, a loft can also be the small attic apartment directly under the roof of the building, but we will keep to the first definition of the loft. We asked real estate pros from Neuman & Neuman to tell us what advantages and disadvantages you may expect if you opt to live in a loft.
1. High Ceilings
As mentioned before, we will focus on the apartments on the top floor which have a lot of free space in which you can adapt to your liking, usually including the attic. That means that the height of the ceilings will be considerably higher than in other apartments, even in that same building.
Naturally, what you do with all that extra vertical space is up to you, some people enjoy having a completely open plan and admire the height of the ceiling, whereas other construct landings and floors within the apartment, creating smaller separate units with or without physical walls.
2. A Lot of Natural Light
Being on the top floor of a building comes with some perks, and having access to a lot more natural light than others is one of them. In cases when a building or the loft itself is adapted from a different purpose into a living unit, ceiling windows may exist already, or you may install them to give yourself that coveted sunlight.
In other cases, ceiling windows may not be an option, due to the building itself, but with the vertical dimension of your home a lot bigger than a regular apartment, you may have a lot more room for regular wall windows which a door interior designer will know how to incorporate in your home’s design.
3. An Amazing View
Finally, living on the top floor of a building means that your view of the surroundings promises to be spectacular. If you are fortunate enough to have a terrace or a balcony – all the better. If not, I’m sure that the view from your many large windows is just as spectacular as ever.
The view factor is particularly appealing in revitalized buildings in the city centers, like in San Diego’s Little Italy district, or Brooklyn in New York – which makes the prices of these loft properties go up in recent times, especially since they’re becoming more popular with the younger population.
4. Disadvantages of Lofts
Even though lofts look amazing and have a lot of advantages, there are some drawbacks as well. One of the biggest potential problems is that lofts tend to be, at least partly, repurposed old buildings. That means that they were not built for living and that the insulation is not great. And having so many large windows isn’t exactly helping, either.
This can potentially increase your heating and air conditioning bills. However, if you spend some money on adaptation and adding insulation, you can increase your home’s energy efficiency considerably.
Another problem may be the echo and the noise, especially if you opt for a completely open plan. The cavernous nature of lofts means that the sound will reverberate and there’s not much you can do about it. Having drapes and cushioned furniture may reduce this problem, but this is one thing you will have to learn to live with if you go for buying or renting a loft.
Content Rally wrapped around an online publication where you can publish your own intellectuals. It is a publishing platform designed to make great stories by content creators. This is your era, your place to be online. So come forward share your views, thoughts and ideas via Content Rally.
Sunflowers are not only beautiful and cheerful, but they also produce delicious and nutritious seeds that you can enjoy as a snack or use in various recipes. Harvesting sunflower seeds is a fun and easy activity that you can do with your whole family. It is also a great way to teach your kids about nature, gardening, and healthy eating.
In this article, I will show you how to harvest sunflower seeds in a few simple steps, as well as some tips and tricks to make the most of your sunflower harvest. If you enjoyed reading my blog on harvesting lettuce, you will enjoy reading this one!
So, if that is what you are interested in knowing, I have you covered! Keep reading this blog till the end to learn more…
How to Grow Sunflower Seeds: A Simple and Rewarding Gardening Project?
Sunflowers are one of the most iconic and cheerful flowers in the world. They are also one of the easiest and most rewarding plants to grow from seeds.
Sunflowers can brighten up your garden, attract pollinators, provide shade, and produce edible seeds that you can harvest and enjoy.
In this part of the article, I will show you how to grow sunflower seeds in a few simple steps, as well as some tips and tricks to make the most of your sunflower growing experience.
How to Choose Sunflower Seeds?
The first step to growing sunflower seeds is to choose the right seeds for your garden. Sunflowers come in a wide range of sizes, colors, shapes, and types. Some of the most common types of sunflowers are:
Giant sunflowers
These are the tallest and largest sunflowers, reaching up to 15 feet in height and 12 inches in diameter. They produce huge and heavy flower heads that are filled with large and plump seeds. They are ideal for creating a dramatic and impressive display in your garden, as well as for harvesting large quantities of seeds. Some examples of giant sunflowers are Mammoth, Titan, and Kong.
Dwarf sunflowers
These are the smallest and shortest sunflowers, growing up to 3 feet in height and 6 inches in diameter. They produce smaller and lighter flower heads that are easier to manage and maintain. They are ideal for growing in containers, pots, or small spaces, as well as for adding a splash of color and charm to your garden. Some examples of dwarf sunflowers are Teddy Bear, Sunny Smile, and Little Becka.
Colored sunflowers
These are the most diverse and colorful sunflowers, ranging from yellow, orange, red, pink, purple, brown, and even green. They produce medium-sized flower heads that are attractive and eye-catching. They are ideal for creating a vibrant and varied display in your garden, as well as for cutting and arranging in bouquets or vases. Some examples of colored sunflowers are Autumn Beauty, Moulin Rouge, and Lemon Queen.
Things to Consider While Choosing Sunflower Seed
When choosing sunflower seeds, there are several things that you need to keep in mind. For instance, you should also consider the following factors:
Climate and season of your area
Sunflowers are warm-season plants that need full sun and warm temperatures to grow and bloom. They are best planted in late spring or early summer, after the last frost, when the soil is warm and moist. If you live in a cold or frost-prone area, you can start your seeds indoors and transplant them outdoors when the weather is favorable.
Soil and water conditions of your garden
Sunflowers are adaptable and tolerant plants that can grow in most types of soil, as long as they are well-drained and fertile. They prefer slightly acidic to neutral soil with a pH of 6.0 to 7.5. They also need regular watering, especially during the germination and flowering stages. However, they can withstand some drought and dryness once they are established.
Space and support available in your garden
Sunflowers are large and sturdy plants that need ample space and support to grow and thrive. They should be planted at least 2 to 3 feet apart from each other and from other plants, to avoid overcrowding and competition. They should also be staked or tied to a fence, a trellis, or a pole, to prevent them from bending or breaking under their own weight.
How to Plant Sunflower Seeds?
Once you have chosen your sunflower seeds, you can proceed to the next step. Planting sunflower seeds is a simple process that involves preparing, sowing, and caring for the seeds. Here is how to do it:
Prepare the Soil
Prepare the soil by loosening it with a fork or a spade. Ensure that you remove debris, weeds, or rocks. You can also enrich your soil by adding some compost, manure, or fertilizer, to boost its fertility and drainage. Make sure the soil is moist but not soggy, and has a temperature of at least 50°F.
Sow the Seeds
Sow the seeds by making holes or furrows in the soil, about 1 to 2 inches deep and 2 to 3 feet apart. You can use a ruler, a stick, or your finger to make the holes or furrows. Drop one or two seeds in each hole or furrow, and cover them lightly with soil. You can also sprinkle some water over the seeds to help them settle in the soil.
Nurture
Care for the seeds by watering them regularly, but not excessively, to keep the soil moist but not wet. You can also mulch the soil with straw, grass clippings, or leaves, to retain moisture and prevent weeds. You should also protect the seeds from birds, squirrels, or other animals, by covering them with a net, a cage, or a cloche. You should also thin the seedlings when they are about 4 to 6 inches tall, by removing the weaker or smaller ones, and leaving only the strongest and healthiest ones.
How to Grow Sunflower Seeds?
After planting your sunflower seeds, you can watch them grow and enjoy their beauty and bounty. Growing sunflower seeds is a rewarding and satisfying experience that requires minimal maintenance and care. Here are some tips and tricks to grow sunflower seeds successfully:
Water
Water your sunflowers regularly, but not excessively, to keep the soil moist but not wet. Sunflowers need about 1 to 2 inches of water per week, depending on the weather and the soil conditions. You can use a hose, a sprinkler, or a drip irrigation system to water your sunflowers. You should water them in the morning or evening, and avoid wetting the leaves or the flower heads, to prevent fungal diseases.
Fertilizer
Fertilize your sunflowers occasionally, but not excessively, to boost their growth and flowering. Sunflowers need a balanced fertilizer that contains nitrogen, phosphorus, and potassium, such as a 10-10-10 or a 20-20-20 formula. You can apply the fertilizer once or twice during the growing season, following the instructions on the label. You should avoid over-fertilizing your sunflowers, as this can cause them to grow too tall and weak, and make them prone to pests and diseases.
Pruning
Prune your sunflowers occasionally, but not excessively, to improve their shape and health. Sunflowers do not need much pruning, as they are naturally self-pruning and self-cleaning. However, you can prune them to remove any dead, damaged, or diseased leaves, stems, or flowers, to prevent infection and improve air circulation. You can also prune them to control their height and spread, by pinching or cutting off the tips of the main stem or the side branches.
You should use clean and sharp scissors or pruners to prune your sunflowers and do it in the morning or evening when the plants are less stressed.
When to Harvest Sunflower Seeds?
The first step to harvesting sunflower seeds is to know when they are ready. Sunflowers typically bloom in the summer and their seeds mature in late summer or early fall. You can tell when your sunflowers are ready to harvest by looking at their appearance and feel. Here are some signs that your sunflowers are ready to harvest:
Petals have fallen off or turned brown.
The back of the flower head has turned yellow or brown.
Seeds have developed black and white stripes.
The seeds are plump and firm to the touch.
If you are not sure if your sunflowers are ready to harvest, you can do a simple test by rubbing your thumb over the seeds. If they come off easily, they are ready to harvest. If they are still attached to the flower head, they need more time to ripen.
How to Harvest Sunflower Seeds?
Once you have determined that your sunflowers are ready to harvest, you can proceed to the next step. Harvesting sunflower seeds is a simple process that involves cutting, drying, and storing the seeds. Here is how to do it:
Cut the flower heads from the stems using a sharp knife or scissors. Leave about 12 inches of stem attached to the flower head for easier handling.
Place the flower heads in a dry and well-ventilated area, such as a garage, shed, or porch. You can hang them upside down or lay them flat on a screen or rack. Make sure they are not touching each other to prevent mold and rot.
Let the flower heads dry for about two weeks or until the seeds are completely dry and hard. You can check the dryness by biting or cracking a seed. If it is crunchy and not moist, it is dry enough.
Remove the seeds from the flower heads by rubbing them gently with your hands or a soft brush. You can also use a fork or a spoon to scrape them off. Discard any debris, such as petals, leaves, or insects.
Store the seeds in an airtight container, such as a glass jar, a plastic bag, or a metal tin. Label the container with the date and the variety of sunflower. Keep the container in a cool and dark place, such as a pantry, a cupboard, or a basement.
How to Enjoy Sunflower Seeds?
Now that you have harvested your sunflower seeds, you can enjoy them in various ways. You can eat them raw or roasted, salted or unsalted, shelled or unshelled. You can also use them in salads, soups, breads, muffins, granola, trail mix, pesto, butter, and more.
Sunflower seeds are rich in protein, fiber, healthy fats, vitamins, minerals, and antioxidants. They can help manage high cholesterol, blood pressure, and inflammation and boost your immune system, brain function, and mood. Here are some tips and tricks to enjoy your sunflower seeds:
Roast
To roast your sunflower seeds, spread them in a single layer on a baking sheet and bake them in a preheated oven at 300°F for about 15 to 20 minutes, stirring occasionally, until golden and crisp. You can season them with salt, pepper, garlic, onion, paprika, cumin, or any other spices you like.
Shell
To shell your sunflower seeds, you can use your teeth, your fingers, or a nutcracker. You can also soak them in water for a few hours to make them easier to shell. To remove the shells, you can blow them away with a fan, a hair dryer, or your mouth, or you can shake them in a colander or a sieve.
Sunflower Seed Butter
To make sunflower seed butter, you need to blend the shelled and roasted sunflower seeds in a blender until it turns smooth and creamy. You can add a little oil, honey, salt, or vanilla to enhance the flavor and texture. You can use sunflower seed butter as a spread for toast, crackers, or fruit, or as a dip for pretzels, celery, or carrots.
Pesto
To make sunflower seed pesto, blend roasted and shelled sunflower seeds with fresh basil, garlic, olive oil, lemon juice, salt, and pepper in a food processor or a blender until smooth and thick. You can use sunflower seed pesto as a sauce for pasta, pizza, or sandwiches, or as a dressing for salads or roasted vegetables.
Wrapping It Up!
Harvesting sunflower seeds is a fun and easy activity that you can do with your whole family. It is also a great way to enjoy the beauty and bounty of nature, as well as the health benefits of sunflower seeds. By following the steps and tips in this article, you know how to harvest sunflower seeds in a few simple steps, as well as enjoy them in various ways. I hope you found this article helpful and informative.
If there are any other queries related to the same, please feel free to let me know. All that yo need to do is scroll down till you reach the bottom of the page. Then leave your comments and suggestions in the box below. And I will be ether to answer them all for you!
Learn More About:
Best Material for Garden Sheds: A Guide for Everyone
Asparagus 101: When, How, And How Often To Harvest?
Best Gardening Tips For Beginners: Adopting A Relaxing Hobby
Trees are an essential component of any great urban landscape. They not only add a touch of beauty to a property but also help urban dwellers by providing cleaner air, cool down buildings and their surroundings, and providing a natural carbon sink. Trees can affect both the micro and the microclimates of an urban area, making them an integral part of any city’s transformational plan. If you want to transform your urban property into an enduring beauty, it’s time to start planting the best trees.
However, while trees will work great for your landscape, they have to endure a harsh environment that can cause lasting damage. Trees have to withstand car accidents and vandalism, increasing microclimate temperatures, paved surroundings, exposure to de-icing salt, wind, and the reflecting glare from buildings. This is where tree grates come in handy.
If you have an urban area or property you would like to landscape, this article explores the role of tree grating, types of grates, and how to expand these installations.
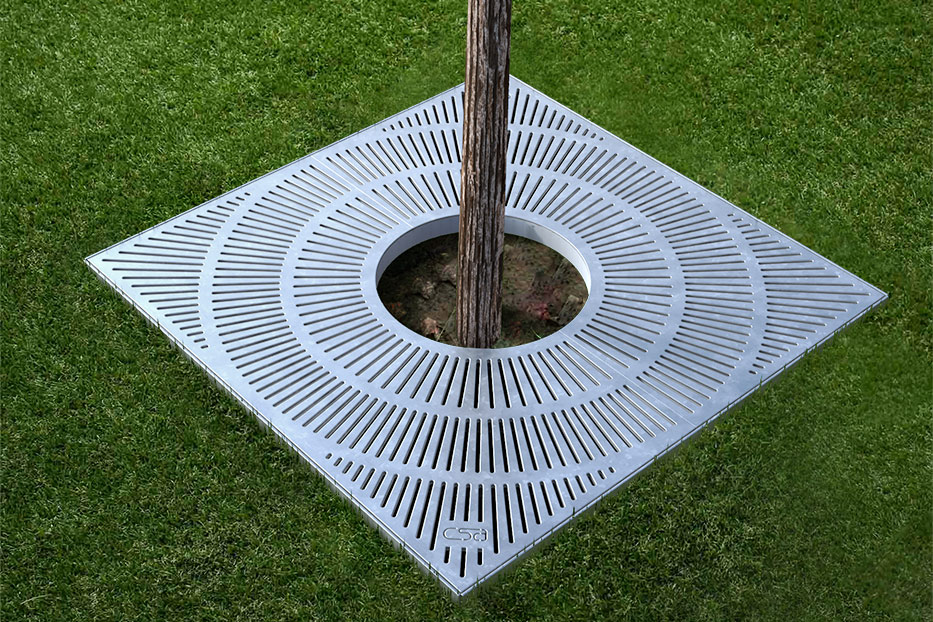
Introducing Tree Grating in Urban Landscaping
A tree grate is a ubiquitous feature in most cities but most people don’t give these landscaping features a lot of thought. This is despite the fact these installations play a critical role in protecting trees from abrasion caused by bustling urban life.
The landscaping installation protects roots that would otherwise become exposed and vulnerable to damage. The grating provides an ideal pit where roots can thrive without any dangers from pedestrians, exposure to glare, de-icing salt, and other harmful materials.
Tree grilles create a greater surface area for natural or supplemental irrigation. These root coverings also facilitate better air circulation within the covered space. Tree grating protects the soil, the rooting system, and sometimes the trunk.
If trees are left to grow without this physical protection, they might not withstand the harsh urban environment. While most people enjoy the beautiful landscaping, they don’t make any efforts to protect these trees.
Other reasons to install tree gratings include:
Enhanced aesthetics: You can choose a tree grate that increases the visual appeal of your landscape. Most of the products on the market are visually appealing and are designed to improve curb appeal. These installations are easy to customize to suit your landscaping needs.
Improving safety: Grates also protect pedestrians against injuries that would be caused by exposed roots.
Landscaping maintenance: Maintaining a green landscape is not easy due to litter build-up from trees. However, grates help by preventing weed build-up around the tree and also make it easier to maintain the area around the trees.
Diverse styling options: You can choose grates in multiple sizes, shapes, materials, and designs. This makes it easier to find that perfect grating system that suits your landscape.
Flexibility: The best grates for your trees should accommodate the tree’s growth. Expanding the tree grates is an important step in maintaining your green landscape. This gives room to your trees to thrive at their different stages of growth.
You can choose grates for your trees from different materials including cast iron tree grates, natural stone, steel, recycled plastic, concrete tree grates, and other materials.
When choosing any tree grilles, consider:
The durability of the material
Theft and vandal-resistance
ADA (Americans with disabilities act) compliance
Ease of customization
Eco-friendly materials
Ease of installation and expansion
The versatility of the tree grills for different tree species.
Steps to Expand a Tree Grate
When designing and installing a tree grate, it’s important to appreciate that the tree will continue growing. This necessitates changes to the tree grille to accommodate such growth.
If a tree grate is not expandable, it might cause more harm than good to the tree. For this reason, always assess how expandable any tree grille is before you buy it.
The best tree grills are easy to expand by removing the inner center rings. This means you can continue expanding the grates as the tree continues to grow. When shopping for a grate, look for one designed for expansion.
Here are the steps for expanding a tree grate:
Check the rate of the tree’s growth and identify the grate rings you should cut.
Depending on the material, use a portable hard wheel grinder with an abrasive wheel (aluminum oxide) to cut off the marked rings.
Cut through with the wheel on thin areas of the grate casting
For thicker areas of the grating, (including casting edges or areas with heavy support ribs) cut halfway through the casting with the grinder.
Use a heavy hammer to remove the marked areas and they should break at the core line. Before applying the sharp blow, ensure there’s sufficient support behind the casting.
Continue the process for all the grates and leave enough room for the tree trunk to grow.
Final Thoughts
Using trees for landscaping has both functional and aesthetical purposes. Tree grates are crucial for green landscaping as they protect your trees against physical damage. These installations fuse aesthetics with function to add visual appeal to an area while also protecting tree roots, managing floodwater and maintaining beautiful, neat and safe sidewalks. With time, you should expand these grates to allow more room for tree trunks’ growth.
Read Also:
How to Safely Prune Your Trees
Create A Stunning Outdoor Space With These Residential Landscape Lighting Tips
5 Essential Tips to Designing a Beautiful Front Yard Garden
Rug layering, a trend that has gained popularity in interior design, can be perceived as both artsy and deliberate or, alternatively, as a bit sloppy, depending on the execution and context. When done with care and a discerning eye, rug layering can add depth, texture, and visual interest to a space, elevating it to a more eclectic and personalized level.
The key to artful layers
Artful layering involves combining rugs of varying patterns, textures, or sizes in a way that complements the overall design scheme, creating a harmonious and intentional aesthetic. Starting with a Large selection of stylish rugs is the best way to move forward in a stylish and purposeful way by allowing for a dynamic interplay of colors and materials, contributing to a space that feels curated and thoughtfully designed.
While a good rug collection is the best way to nail this trend, some thought and artistic design is still required in the process. If not executed thoughtfully, rug layering runs the risk of appearing haphazard or messy. The key to avoiding a sloppy look lies in keeping a sense of cohesion and balance. It's essential to consider the color palette, scale, and patterns of the layered rugs, making sure they work together rather than clash.
Proper placement is also crucial; overlapping rugs in a purposeful manner can create zones within a room, defining different functional areas and enhancing the overall design. Without this intentional approach, however, rug layering may come across as disorganized and lacking in visual harmony.
If you would like to add additional warmth to your home, and perhaps find a way to tie your rooms and decor together, then blankets are a great way to do that. They blend in easily and provide both aesthetic and practical value.
Why add warmth with rugs and blankets?
Rugs and blankets play crucial roles in enhancing the comfort, aesthetics, and functionality of a home. Rugs, with their diverse textures and patterns, serve as versatile decor elements that can tie together various design elements within a room. They not only add warmth to hard flooring surfaces but also define and delineate living spaces. Whether it's a luxurious Persian rug in the living room or a cozy sheepskin rug in the bedroom, these floor coverings contribute to the overall ambiance of a home.
Similarly, blankets are multifunctional essentials that go beyond providing warmth. They introduce layers to interior design, allowing homeowners to infuse colors and textures that complement their style. Blankets draped over sofas or neatly folded beds serve as both decorative and functional accessories. In addition to their aesthetic value, blankets offer a sense of coziness, inviting individuals to snuggle up during chilly evenings. Together, rugs and blankets contribute to a home's atmosphere, creating a welcoming and personalized space where style meets comfort.
Ultimately, the method of rug layering chosen is really dependent on individual taste. For those who appreciate a more eclectic and bohemian look, carefully layered rugs may be considered artsy and avant-garde. The key here is to strike a balance that aligns with the overall design vision and the desired atmosphere of the space.
Read Also:
Home Decoration At Its Best: 7 Key Ideas To Recreate Your Home
Top Home Remedies To Make A Floor Non-Slip
Ideas for Modern Flooring Designs for Home Improvement Plans