Five Essential Components For Your Outdoor Kitchen

by

20 February 2023

Home Improvement

Outdoor Kitchen

Outdoor dining continues to gain popularity, with more people seeking kitchen convenience beyond the walls of their homes.

Planning a patio kitchen requires mindful consideration of how the space will be used and its desired features tailored to individual needs.

From grills to countertops and shelves, plenty of options are available so that your outdoor cooking experience is just as comprehensive as indoors.

Checkout Five Essential Components For Your Outdoor Kitchen

Essential Components For Your Outdoor Kitchen

Here are a few essential outdoor kitchen components that your home must have.
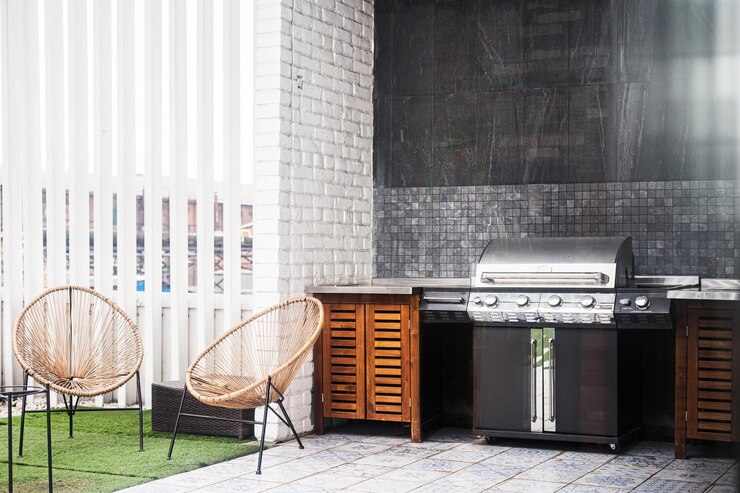
1. Grill

The centerpiece of any outdoor kitchen is the grill. Without a grill, an outdoor kitchen isn’t an outdoor kitchen. It’s just a space with some appliances in it. When deciding on a grill for your outdoor kitchen, think about the size, power output, and fuel type that best suit your needs.

Do you want something small enough to fit on a countertop or large enough to cook meals for large groups? Would you prefer gas or charcoal? You can visit orchardovens.co.uk to help narrow your choices, so you find the perfect grill for your home.

2. Cabinets

Cabinets are an absolute must when planning an outdoor kitchen. Not only do they provide extra space to store essential cooking items, but they also add a chic touch to your outdoor cooking area.

When shopping for cabinets, make sure you opt for ones that can withstand extreme temperatures and other weather conditions. Also, installing additional drawers in the cabinets will give you more organized storage options and enable easy access to any needed items.

3. Sink

When designing your perfect outdoor kitchen setup, it’s important not to overlook the sink. A corrosion-resistant material like stainless steel is a great choice to ensure the unit retains its durability despite being exposed to the elements. Be sure to consider how much counter space you have so you can choose a sink size that is both functional and fits well within your layout.

4. Kitchen island

A kitchen island is another great addition to any outdoor kitchen setup. Not only does it provide extra counter space, but it adds visual interest to the area as well.

Look for island designs that feature built-in cabinets or drawers to store utensils and other cooking essentials within easy reach while cooking outdoors. If seating is important, look for islands with barstools attached so family members and guests can sit down during meal preparation or serving time.

5. Task lighting

Task lighting is an essential part of any outdoor kitchen set up for entertaining amidst dimmer natural light or preparing food during nighttime. When selecting lighting options to suit your needs, select ones that project both adequate brightness and a soft hue.

Lights that are too bright might prove irritating or uncomfortable when using the area at night, while lights that are too faint might compromise vision when moving around the kitchen area. Pick fixtures fit to fulfill both illuminating and decorative purposes.

Conclusion

These five components are essential when designing an outdoor kitchen space, but don’t forget smaller details like seating areas or tables. With careful consideration of each design element, you can create a functional yet stylish backyard getaway that provides hours of entertainment with family and friends.

Read Also:

Arnab is a professional blogger, having an enormous interest in writing blogs and other jones of calligraphies. In terms of his professional commitments, He carries out sharing sentient blogs.

View all posts

Leave a Reply

Your email address will not be published. Required fields are marked *

Related

Toilet Flush Button

Toilet Flush Button: Understanding The Nuts And Bolts

Though our bathrooms play a critical role in daily life, they're often forgotten until a problem arises. Of all its components, one that stands out is the toilet flush button's use - and understanding. This article looks closely at its workings, maintenance needs and replacement considerations. The Fundamentals Of The Toilet Flush Button What Exactly Is A Toilet Flush Button? A toilet flush button is the mechanism responsible for initiating the flushing process in your toilet system. Situated on the tank's exterior, we press or push this component when using our toilet to flush out its contents into the sewage system. By activating this flush button, we begin an action chain within our bathroom that sends water from its tank into our bowl to flush away its contents into sewer lines. How Does The Flush Button Work? The magic of the toilet flush button lies in its ability to control a more complicated mechanism. Pressing it lifts a lever connected to a chain inside the tank; that chain connects to a flapper (or flush valve seal), covering up drain holes at the bottom. When the flapper is raised, water stored in the tank begins rushing from its source into the bowl through its drain hole and siphon tube into the sewage system. As soon as this process completes, however, the flapper falls back down, sealing off its drain hole once more - and replenishing its supply in readiness for another flush cycle. Maintenance Of The Toilet Flush Button Regular Cleaning Regular cleaning of your toilet flush button is vital to its optimal operation, as dirt can clog the switch and make it less responsive, leading to inconvenient situations for users. A non-abrasive cleaner and soft cloth should be used for exterior cleaning; internal components should be checked regularly to avoid build-up and potential mechanical problems. Checking For Wear And Tear Given how often flush buttons are used, wear and tear are inevitable. Look for signs of damage, such as cracks or looseness. If the control becomes less responsive when pressed or sticks down without returning up when released, this may indicate internal components need to be reviewed for potential problems. Troubleshooting Common Problems Is The Button Hard To Press, Or Is It Sticking A toilet flush button that is difficult to press or sticks down often points to a problem with the connected lever or chain inside the tank. It could be that the chain is too tight or too slack, or the lever needs to be aligned or fixed. A careful inspection and adjustment of these components usually solve the issue. The Button Doesn't Activate The Flush If the button doesn't activate the flush, the issue could be that the switch is no longer effectively connected to the lever, or the flapper isn't lifting. A look inside the tank should reveal the issue. The button, lever, or flapper may need to be replaced. Replacing The Toilet Flush Button When Should You Replace The Button? As with any mechanical component, toilet flush buttons have a finite lifespan. Over time and through regular use, their controller may wear out or become damaged, requiring replacement. Signs to replace it include physical damage to its housing and sticky buttons or ones that no longer activate flushing actions. Looking for a portable toilet rental might also be necessary if you need to fix your toilet for a couple of days. Toilet Flush Buttons: More Than Meets The Eye Though seemingly simple, toilet flush buttons are critical in maintaining sanitation in homes and public spaces. Understanding their inner workings helps us better appreciate their importance, maintain them properly, and effectively troubleshoot any potential issues with them. So next time you press one, remember its critical function while giving it some love and consideration. Conclusion: Understanding how a toilet flush button works may initially seem complicated, but understanding its mechanics is crucial to efficient bathroom operations and sanitation practices. Knowing their inner workings could save us from future inconvenience or repair costs. Maintaining the toilet flush button regularly is vital to prolonging its lifespan and guaranteeing reliable performance within a plumbing system, thus streamlining home maintenance. By periodically inspecting it for signs of wear and tear, individuals can identify and address potential issues early on and prevent more significant ones from developing into larger problems later. By taking proactive measures like this one, individuals save both time and money on costly repairs and ensure an effortless toilet operation experience. Maintaining a flush button is an accessible DIY project for anyone, provided they possess basic knowledge and the appropriate tools. Even if it eventually succumbs to wear or damage despite regular maintenance efforts, replacing the button remains straightforward, making this an achievable DIY project for homeowners. Read Also : Mirror Decorating Ideas To Style Your Bathroom Using Feng Shui In Your Bathroom Design The Different Kinds Of Toilets

READ MOREDetails
Cleaning Your Home

Cleaning Your Home with Pets – The Most Common Problems

For most of us, pets are a part of the family, we love them, talk to them and generally pamper them. However, they don’t always return the favor by behaving as we would want them to – after all, they are animals and different species, so some of their habits and instincts may clash with our ideas. Professional maids and cleaners from That’s Clean Maids share some of the most common issues that pet owners come across and how to deal with them in terms of cleaning your home. Hairs, Hairs Everywhere Probably one of the biggest concerns for people who live with pets are hairs; no matter how long your pets’ hair is, they will shed, and you will need to clean it out of your carpets and furniture. This can become even more problematic if a member of the family develops an allergy to animal hair. One way to ensure a reduced amount of hair needs to be cleaned out of your furniture is to groom your pet regularly. The frequency of grooming can depend on the species and breed of your pet, as well as the season and other factors. One thing is certain, though – with proper grooming, your pet will shed less on your carpet and furniture, making cleaning so much easier. Air Quality Concerns Another related issue is the air quality in your home. There are numerous things that can affect the quality of air in your home, and pet hair and pet dander are a part of it. Animals, just like humans shed skin cells and hair, and it is not much you can do about it. What you can do, however, is change your cleaning routines and habits to counteract the problem of pet dander and hair. Once again, this issue is not a big problem for most people, but particularly cleanliness-oriented people, as well as those with allergies, may be interested in this one. Keeping your pets away from areas where you sleep is a good start, but you should also make sure to vacuum the house regularly, as well as keep the air conditioning unit in good condition. That means cleaning the vents and changing the air filter as often as the manufacturer recommends. Ensure Your Pets Don’t Bring In Dirt If you have a dog, you need to walk them regularly, and that means going out. Cats can be strictly indoor animals, or they can have access to the great outdoors. With both dogs and outdoor cats, there’s one thing you should be wary of – dirt they can bring in on their paws. Dirt is seldom just dirt, it can also be full of pathogens that you would rather not have in your home. When it comes to dogs, the issue can be quite simple – wipe their paws with a wet wipe (one suitable for pets, of course), and you are good unless they rolled around in the mud or something. On the other hand, cats are much more independent and come and go as they please. Still, you can put a little disinfecting tray in front of the cat flap (once again, make sure that the solution is not harmful to your pet). Scratches on the Floor and Furniture Cats need to scratch things as a part of their instinct. If you don’t provide a scratching post, chances are that your furniture will suffer for it. Similarly, dogs whose claws are not trimmed can do quite a lot of damage to your hardwood floors. In order to mitigate those problems, keep your pets’ claws trimmed, and give your cat plenty of things to scratch. Read Also: Top Home Cleaning Tips Home Maintenance Plans And Cleaning Tips During Covid-19 How Cleaning Helps Us Feel Better and Why We Don’t Do It

READ MOREDetails
Fixer-Upper Improvement Ideas

Top Fixer-Upper Improvement Ideas That Make A Huge Impact

Real estate investors understand that fixer-upper properties carry huge potential. Yes, they may look bad initially, but their property value will steadily increase with the right improvements and renovations. Buyers know this and take advantage by acquiring such properties for less and investing enough in the renovations to increase the value.  Renovating a fixer-upper is a huge financial endeavor. It’s labor-intensive, and it might take some time before things look good as envisioned. Homeowners who want to improve their fixer-uppers must work with a reputable and experienced contractor to address issues that may crop up during the project. They must also look for a good skip-hire company to help eliminate the waste produced by the project. If you’re looking for such a company, you can check out betaskips.co.uk to determine how they can assist you. They can provide adequate-sized skips at reasonable rates, so you wouldn’t have to worry about waste disposal.  Checkout Top Six Fixer-Upper Improvement Ideas That Make A Huge Impact Here are some home improvement ideas that can make a huge impact. 1. Replace the front door If your front door isn't stable and the door frame isn't secure enough, it's time to replace them. A good front door will help you save energy costs and improve security and kerb appeal. You can also repaint the door with a suitable colored paint that will reflect your personality.  2. Paint the exterior Chipped, peeling, or faded exterior paint doesn’t look good and will greatly affect the property value. Potential buyers look into such details and will be discerning when it comes to that. It will be best to paint the exterior walls with good weather-proof paint to ensure durability and better kerb appeal. It will take a bit of change to finish the job, but it will be worth it.  3. Light up the property One of the best ways to improve a fixer-upper is to ensure that it has adequate lighting fixtures inside and outside the house. For example, you can use strings of LED lights or strips for the front and back yard. You can also use solar-powered lamps to illuminate pathways. Inside the house, make sure that you have enough lighting fixtures in every room to guarantee safety. 4. Repaint the cabinets If your budget doesn't accommodate new cabinetry, you can repaint the existing ones with a color scheme that would make them pop. It will help improve the design cohesion and will also define the area. Bright-colored paint will brighten up the space and energize people.  5. Install a backsplash  Backsplashes may be a minor installation, but they can help make the kitchen area look better. When cooking, these backsplashes will also protect the walls from messy and greasy splashes. Install ones that complement the countertops or tiles for design unity.  6. Install better windows Another way to improve property valuation is to install more secure windows. Typically windows in fixer-uppers have rotted frames and aren't properly secured from theft, so it would be better if you had a professional window installer replace them with newer ones. Endnotes If you buy a fixer-upper house, you will spend some money getting them into shape. You might spend a lot, but the results will be worth it in the long run.  Read Also: Ideas for Modern Flooring Designs for Home Improvement Plans Important Things to Know Before Starting a Home Improvement Project Home Sweet Home Improvement: How to Find the Best Home Improvement Loans

READ MOREDetails