Vampire Appliances And Electronic Costs

by

05 November 2019

Gadgets

Vampire Appliances

Can you imagine spending a day without your electronic devices? It is possible, but it’s not convenient. Electronics help us to get our job done faster, and more effective; they entertain and keep us healthy. The only scary thing is paying off the electricity bills. During the winter season, energy bills are set to skyrocket.

The worse thing is that most people keep paying for devices they don’t use during the day. Ladies and gentlemen, it’s time to learn more about the c and stop paying for nothing.

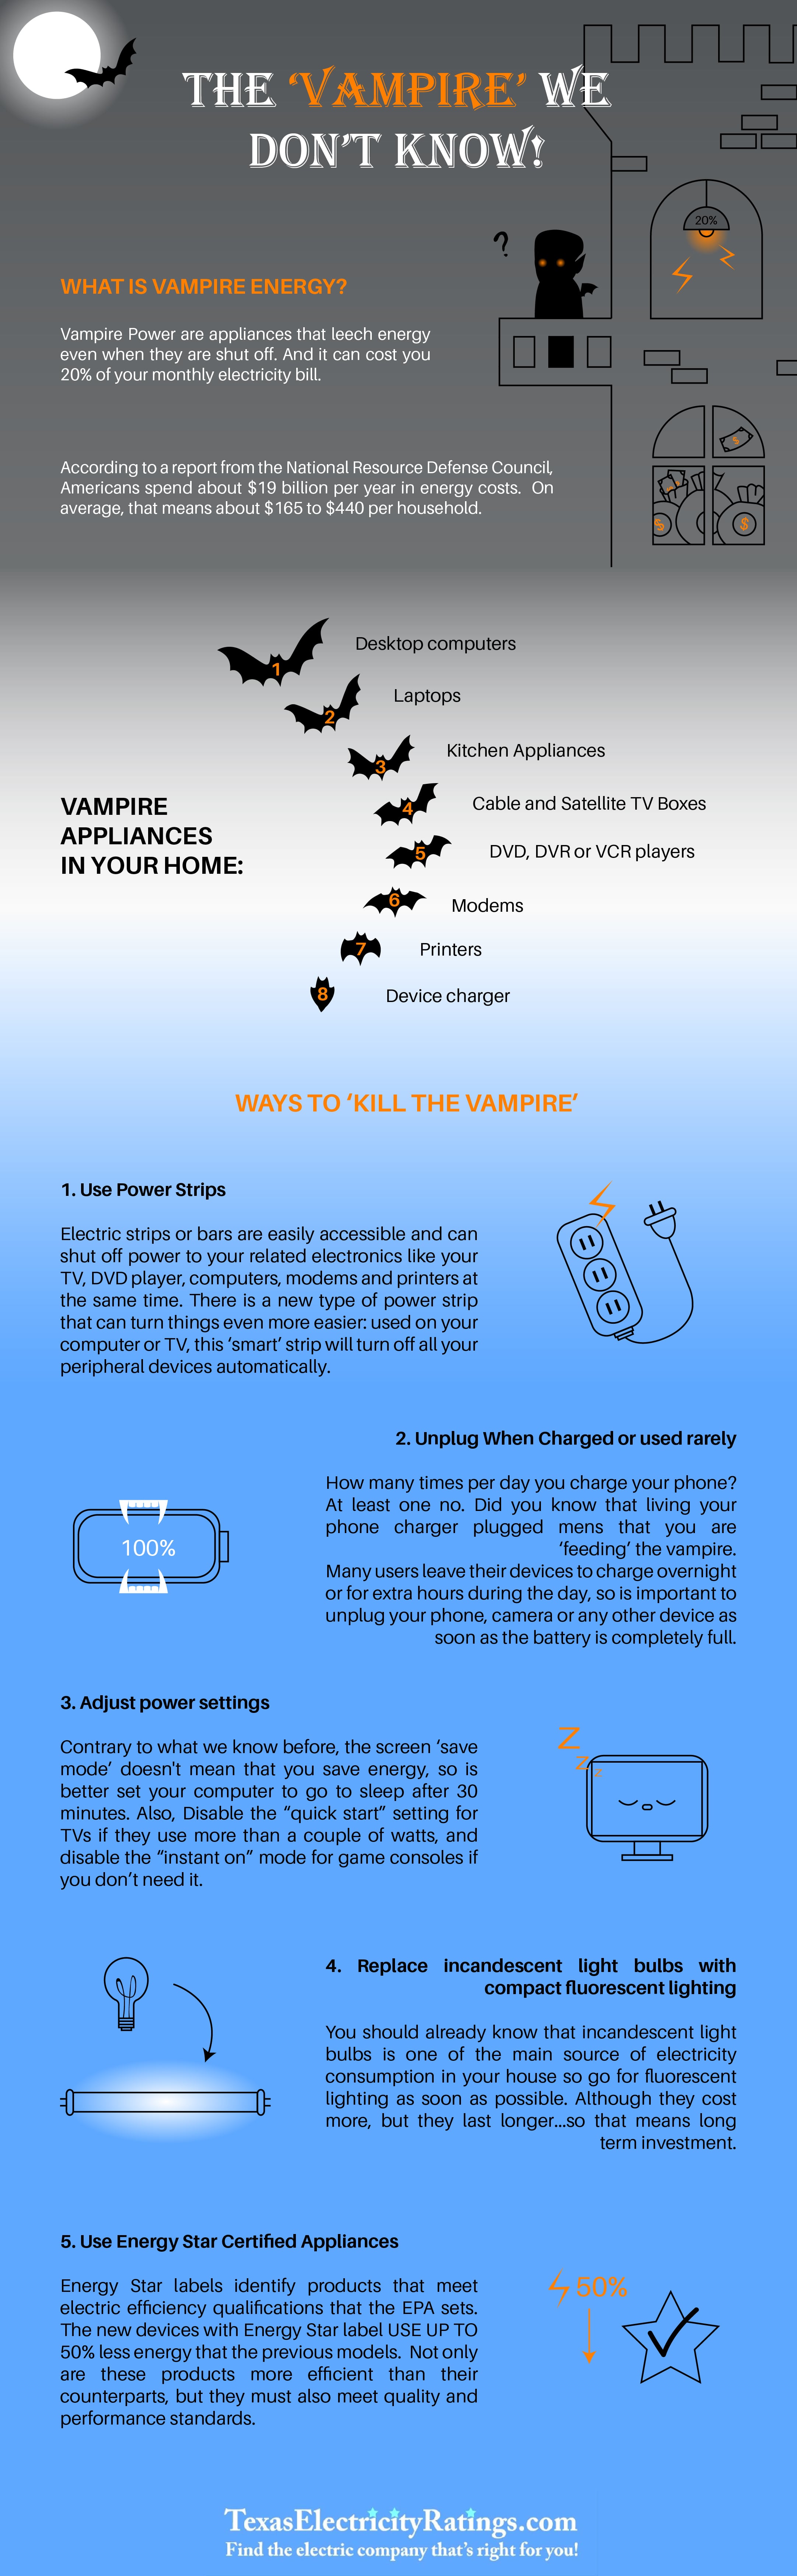
Vampire Appliances And Electronic Costs:

Vampire appliances are devices you leave plugged in. According to the latest statistics, every house owner in the United States pays around $200 monthly for electronics they don’t use. Yes, your favorite coffee machine, microwave, electric toothbrush, and desktop secretly ‘steal your money.’

If you want to get rid of these vampires in your house and lower your monthly electricity bill, check out these practical tips:

First of all, consider replacing your current bulbs. You might want to invest in fluorescent lighting to lower your bills. It’s important to mention that they are also eco-friendly.

Secondly, start using power strips. It will allow you to switch off your electronics faster and save a few bucks. Use power strips for devices such as a printer, modem, DVD player, and TV.

Before you leave your flat, make sure to unplug all the electronics. Leaving your phone charger can feed the vampire and increase your bill.

Also, you might want to adjust your power setting so that your desktop will go into the sleep mode every time you leave the house. These simple tips will help you save hundreds of dollars within a year.

To learn more about it, check out recommendations in the infographic provided by Texas energy:


Vampire

Read Also:

Content Rally wrapped around an online publication where you can publish your own intellectuals. It is a publishing platform designed to make great stories by content creators. This is your era, your place to be online. So come forward share your views, thoughts and ideas via Content Rally.

View all posts

Leave a Reply

Your email address will not be published. Required fields are marked *

Related

Fujifilm digital camera

14 Reasons a Fujifilm digital camera is the best choice!?

Fujifilm digital cameras are all about capturing moments, and creating that perfect picture in your mind. We've listed 14 reasons why should you buy a Fujifilm digital camera from Georges Cameras and why it is the best choice for you! 1. Quality Fujifilm has created a range of digital cameras that are lightweight and durable to make sure you never miss a moment, with exceptional image quality. 2. Easy to use We've created our digital cameras to be easy to use so that you can spend less time setting up and more time capturing those special moments in life. 3. Lenses Our lenses are designed to suit any shooting condition or style. As we continue to create new lenses, we hope that you will always find something new and exciting to capture those special moments with. 4. Innovation We continue to innovate and create new products that will evolve how people see pictures in the future (and the past). Our industry leading technology allows us to deliver quality products that can help each of our customers rediscover their passion for photography. 5. Image quality Fujifilm produces cameras that take incredibly detailed pictures in all conditions. The X-T1, for instance, is perfect if you're going from indoor to outdoor photography. 6. Portability If you're planning on hiking to get the perfect shot, then you need a compact camera that can fit in your bag or pocket. The X-M1 or X-Q2 would be great choices. 7. Price Are you just starting out with photography and don't want to spend a lot of money? If so, then you should check out the X-A2 or the X-A3. These cameras will let you see if photography is right for you before making a large investment. 8. Quick and easy to use There are a number of features that make Fujifilm digital camera the best choice. The first is that they are packed full of features but at the same time they are an easy-to-use digital camera. This is ideal for those who want a high quality, reliable camera without having to spend a lot of time learning how to use it. 9. Affordable and reliable When looking for a digital camera it is important to find one which is both affordable and reliable. A Fujifilm digital camera ticks both of these boxes as they offer a range of models suitable for beginners through to professional photographers at reasonable prices. 10. Great image quality Fujifilm digital cameras take high quality photographs with their state-of-the-art technology. The cameras utilize the latest Super CCD sensors which produce truly amazing images with bright, vivid colors and natural tones. When you choose a Fujifilm digital camera you know you will be getting outstanding picture quality every time you shoot. 11. They offer Lenses for all types of shooting Fujifilm has developed lenses that work well in just about every environment. They have close up lenses, mid-range lenses and wide-angle lenses, so you can capture as much or as little of your subject as you would like. These different lens options allow you to be more versatile with your photography style and take pictures in any type of situation. 12. The ability to be creative Film allows you to be the artist, the creator behind each picture. You have total control over the final image and there is no post processing needed. You choose the film stock and you choose the moments that are captured. 13. The look of film is timeless There's no denying that it's a beautiful medium to shoot with and unlike digital, it won't become obsolete in three years’ time. Digital will one day be replaced by an even newer technology, but film will always have its place in this world. 14. It's tangible! Having your images developed on film gives you something to hold in your hand and admire for years to come. Film has a weight to it that digital will never have and when you see those images for real, printed out on paper, there's just nothing like it. Read Also: 5 Reasons You Absolutely Need A Real Camera Deciphering the Myths About Home Security Cameras Best Deer Hunting Trail Camera Tips for Scouting Wildlife

READ MOREDetails
Lifting Equipment

Guide On Choosing the Best Load Lifting Equipment

One of the primary duties of the employer is to create a safe working environment for employees. One of the ways to achieve this objective is by choosing the right rigging and lifting equipment. However, most business owners have a challenge when it comes to making this decision. Will you go for the wire rope, marine rope, or chain sling? You need to get the answers to these questions for you to make an educated decision. Anyone who is working in an environment that has heavy loads should choose the right lifting equipment and hooks. Here are some of the tips that will help you to make the right choice. 1. Understand Your Unique Needs: Start by making a list of what you expect the lifting equipment to deliver. Make sure you put the essential requirement top on your list. In case you have a budget constraint, it is advisable to buy the highest quality equipment at that cost. It is not a good idea to purchase lifting equipment for convenience. Low-quality lifting items can pose a high risk in the workplaces. 2. Temperature: The first element that you will have to put into consideration is the temperature. You cannot overlook this factor when looking for the best lifting equipment in the workplace. Temperature affects several rigging equipment. For instance, the metallic core rope slings will not function properly below 40 degrees Fahrenheit or above 400. Therefore, you have to determine that temperature that your equipment will be working with before you make a purchase decision. Another example is the Elebia autohooks for industry that is designed for transporting and lifting bell furnaces. Look at the specifications of the equipment that you choose and make sure that it matches your needs. The recommended temperature is readily available in the product manual. 3. Look at the Load Limits: The other factor that you need to pay close attention to is the load limit. The term working load limit refers to the maximum weight that the piece of equipment can safely lift. Therefore, you have to pay serious consideration to this element before you make a purchase. Calculate the required weight for performing specific tasks and then buy equipment that does not exceed that limit. For instance, you can use the Elebia autohooks for the industry in oversized lifting points of up to 100mm such as the rods that are between plates, lifting bails, holes on a plate, chain slings among other oversized lifting points. Buying lifting equipment that cannot hold the weight can lead to serious accidents in the workplace. It is safer to buy equipment that can accommodate a higher weight than your load. 4. Evaluate the Durability of the Equipment: Lifting and rigging equipment tend to go through a high level of tear and wear over time. These tools perform high impact and high energy tasks from time to time. Therefore, equipment that is not incredibly durable will not stand up to the job. You have to pay close attention to quality as you make your purchase decision. Don’t run for the most economical options in the market as you may end up spending more regarding the repair and replacement costs. The available user reviews will help you to determine the products that will last you for an extended period. It makes more economic sense to buy a new product at a higher price than spending a lot on routine repairs or replacement in the long run. Regular inspections and maintenance of your equipment will help to boost its innate longevity, and you should not overlook this point. Therefore, buy your rigging equipment from reputable manufacturers in the market. Selecting the right rigging and lifting equipment will make sure that you have a safe working environment. Understanding your needs, working temperature, workload limits, and durability of the lifting tool will help you to make the right purchase decision. Read Also: Maintaining Productivity: The Basics Of Industrial Safety Get The Best Assistive Technology: A Telecare Equipment A List Of The Essential AV Equipment You Need For Your Event

READ MOREDetails
aeropress machine

How to Make Coffee with Aeropress Machine

 The Aero press is one of the most straightforward gadgets that you can use to make your morning coffee faster. Invented in 2009 by Engineer Allan Adler, the Aeropress machine has gained popularity due to its small size, high portability and efficient speed in brewing coffee. Due to its portability, you can carry the device to your camping escapade, fishing, or any sporting coffee. With the Aeropress machine, you can have your coffee anywhere at any time. How to assemble an Aeropress machine Remember, you can buy your Aeropress coffee maker from a trustworthy place. Some of the accessories that come with the coffee machine include: The Aeropress device which is a plastic plunger Cap that should get placed at the end of the AeroPress device The fillers which should be used alongside the cap A scoop that should be used to measure the coffee A funnel to put the beans and neatly organize them in the chamber Paddle to be used in stirring the coffee Once you have acquired all the accessories of the AeroPress machine, here is how to assemble the machine: Step 1: Push the plunger of the machine out of the chamber Step2: Remove the filter and put it in the filter cap Step3: By twisting the filter cap, put it into the chamber Step4:  Put the chamber on top of a stand. Put the chamber on a sturdy mug and ensure it stands firmly. Put the ground coffee in the chamber. Step5: Share properly to ensure the coffee is leveled correctly. Step 6:  Add water to the chamber. Ensure the water fill up to level 1. At this point, you are ready to brew the coffee. If you want hot coffee, use hot water, but if you need cold coffee, use cold water. Remember, with the AeroPress machine, the coffee taste is determined purely by the water's temperature. If you use boiling water, it will make your coffee bitter. The manufacturer's recommendation is to use water at 175 degrees. Though it is not practical to achieve the exact temperature, you can boil the water and allow it to cool down before using it. Also, ensure that you use high-quality coffee bean; preferably, coffee beans that have been ground recently. The coffee bean should be finely ground. How to brew coffee If you have everything in place, the process of brewing coffee should take less than two minutes. There are two ways to make coffee using the AeroPress machine; the inverted way, and the usual way. Both methods make delicious coffee, but one is faster. Equipment required Electric stove and kettle The AeroPress machine; stirrer, funnel, and scoop A coffee grinder Small pitcher, or a mug Timer Original method Start by boiling the water. Remember, boil the water and let it cool for a minute since the coffee maker works best at a temperature of 175 degrees. Grind your beans. Depending on the amount of coffee that you want to make, grind the beans accordingly. For the two cups, grind at least two spoonfuls of coffee. Remember, you must grind the coffee until its fine. Ensure the filter is wet. After assembling the Aeropress machine, put paper filler inside the cap. Place the device on top of a mug and dab the filter with warm water. Place the warm funnel on top of a mug and dispense the coffee. After pouring the coffee, remove the funnel. Add warm water. Ensure you add the water until it gets to the marked line in the machine. Remember, the water should be recently boiled and cooled. Using a spoon or a paddle stirrer, stir the coffee until it dissolves. Insert the plunger by pressing it down till a hiss is heard. If you fill any resistance, pause briefly. Push the plunger gently until it reaches the ground. 8. Remove filler cap while pushing the plunger. This should eject the used coffee while rinsing the seal. Dilute and taste your coffee. Depending on how you want your coffee to taste, add more water. The Aeropress machine makes concentrated coffee. Thus you can split the concentrated coffee and make more cups. Reverse method Reverse method is similar to the standard process but with few adjustments. Here is the method: Start by assembling the Aeropress machine. Remember, in this method, and the machine must get assembled in an upside-down manner. Put the plunger in the chamber, flip the device upside-down, and don't put the cap and the filter. Put the funnel and pour the ground coffee. Use fine coffee grits enough for the amount of coffee needed. Next, add boiled water until you fill the filter. Remember, you should boil the water and let it cool for a few minutes. using a spoon or a paddle, stir the coffee gently. Steep the coffee for at least one minute. Place the paper cap and tightly screw it into the chamber Carefully, flip over the machine. Remember, this should get done accurately and quickly. After flipping, place the device on a mug Taste the coffee and dilute as desired. Remember, both ways make concentrated coffee, thus add water until you get the desired coffee. The Aeropress machine features as the most resourceful and most efficient coffee maker. It is less fussy and makes minimum noise; hence, you can use in places that require minimum noise. The machine is also highly affordable, with some brand costing less than twenty dollars on amazon. It is light and highly durable; thus, it can last long and give you value for money. It is easy to assemble and clean, even if you don't have any technical knowledge. The only downside of this machine is that you can only make two cups of coffee. Thus, if you are hosting a party, or your household has more than two people, then you will be forced to make the coffee several times. How to make coffee: [embed]https://www.youtube.com/watch?v=jlCUYNe9pes&t=100s[/embed] Read Also: 10 Best Coffee Places In The US How You Can Create A Coffee House Experience In Your Own Home 7 Fantastically Unusual Uses Of Old Coffee Beans Monthly Best Coffee Subscription

READ MOREDetails