Las Vegas Electricians Share Fun Lighting Ideas for Your Home

Published on: 28 November 2018 Last Updated on: 13 October 2020
Lighting Ideas

Callidus Nevada electrician service providers have made calls to a significant number of homes in Las Vegas. This gave them the unique opportunity to get a glimpse at the different home lighting styles and preferences of the city’s residents. In the same process, they were able to pick out fun lighting ideas and methods that are beneficial in terms of both form and functionality.

Below are a few fun lighting ideas that these Las Vegas electricians want to share for your home:

1. Switch to LED Light Bulbs:

Switch to LED Light Bulbs

Anything that will help you save money easily will be fun, wouldn’t it? Ditching your incandescent and compact fluorescent lamp (CFL) light bulbs in favor of light-emitting diode (LED) lights can help you reduce your electric bills and save hundreds of dollars in a year. LED lights use 90 percent less energy to give off the same brightness as their incandescent counterparts.

Technology has come a long way in LED lights that they now come in a variety of colors apart from cool white. You can even have several color options in a single LED light bulb. While you may need to cough up some cash initially to go full-on LED in your home, it will be a very wise investment. Apart from the savings that you will make on your electricity bills, LEDs also last considerably longer than incandescent and CFL lights.

2. Think Beyond Overhead Lighting:

Beyond Overhead Lighting

Overhead lighting does a very good job of lighting up a room and comes very handy for a variety of uses and occasions. However, relying solely on overhead lights can be impractical in some situations, and it can get boring over time. For instance, some shadows may fall in areas where you may especially need more light such as the stairs, kitchen counter, or couch where you do your reading.

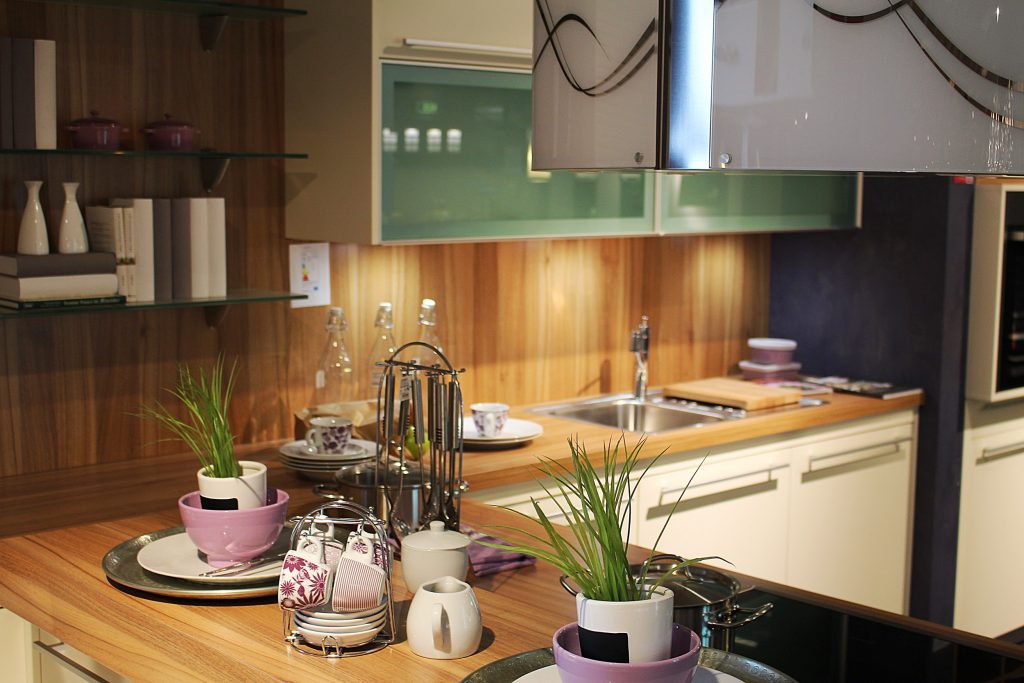
Overhead or ambient lighting can get boring in the sense that it is constant. It may light a room, but it does very little to change the mood and character of a room. This is why you need to consider what experts call the “three layers of light” when installing lights.

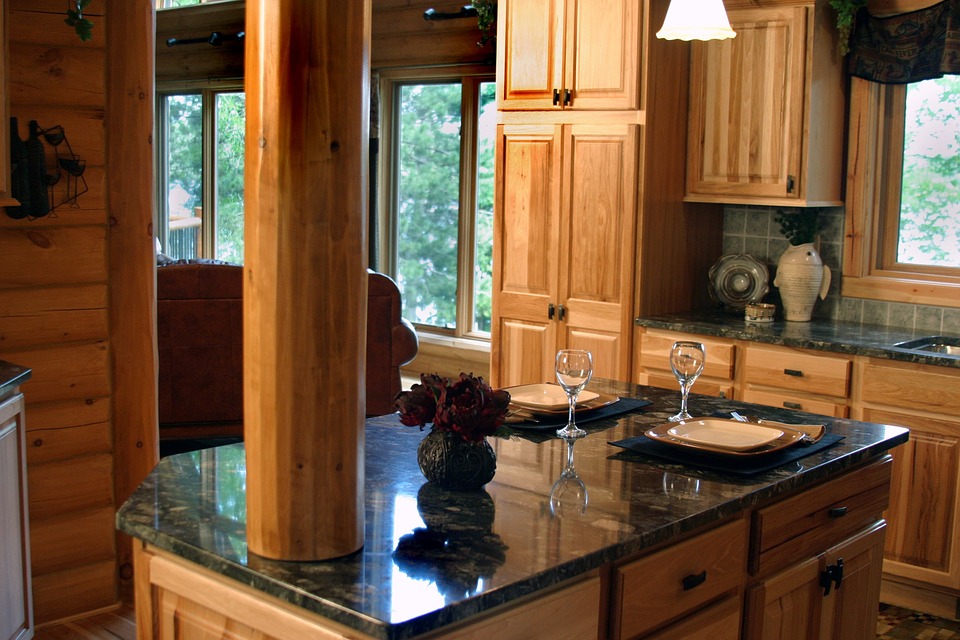
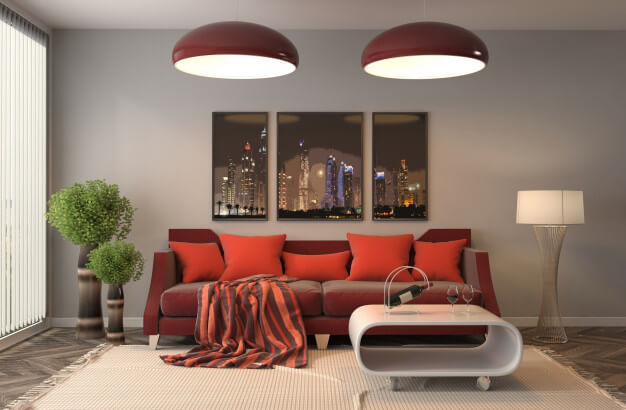
Overhead or ambient lighting is the main layer of light in a room. It provides general illumination in the whole area. Examples of these types of lights are fixtures like chandeliers, recessed lights, and troffers. The second layer of light is accent lighting, and they come in the form of wall sconces, path lights, and recessed wall lightings. Accent lighting is generally for decorative purposes.

The third layer of light is task lighting and, as its name suggests, you use it to light up specific areas for certain tasks. Examples include reading lamps, vanity lights, under-cabinet lighting, and pendulum lights above a kitchen island. The second and third layers of lighting provide a room with character, and they can empower you to change the look and mood of the room at the flip of a switch. With power-saving LED lights and strip lights at your disposal, the combination of the three layers of lighting can present you with a myriad of ways that you can play with the layers to suit your taste.

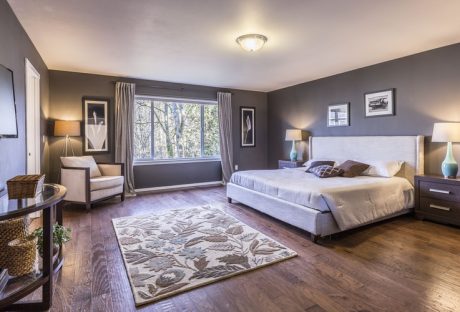
3. Don’t Forget Natural Lighting:

Don’t Forget Natural Lighting

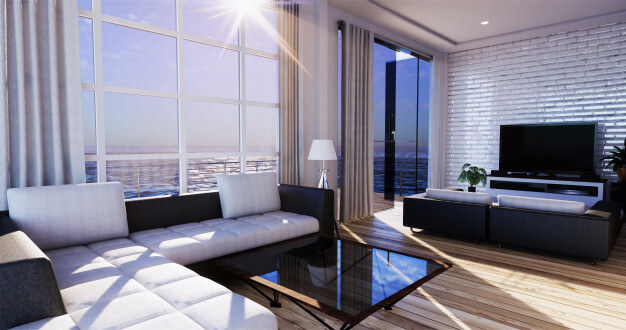
If you live in Nevada or anywhere that is sunny for most of the year, you will do well to make use of the abundance of outdoor lighting. Not only will this liven up a room, but it can also likewise help you lower your electricity bill as well.

Use sheer curtains to let in more light. You can also do away with the window treatments to maximize the light coming from the outside. Bare windows will also give the room the illusion of being more spacious.

Just like ambient lighting, outdoor lighting is also constant and may cast permanent shadows in certain parts of your home. While shadows do add some drama and depth to a room, you can install wall sconces in the darker areas as an option.

As you may have already realized, most of the lighting ideas here are quite simple, and the results can be dramatic. You may even take on some of the more labor-intensive tips above on your own if you are handy enough. For some other lighting ideas, however, you may need to acquire the services of reputable Las Vegas electricians, especially when installing lighting fixtures.

Take a long good look in and around your home and see how where you can improve and make your lighting more interesting. It just may be the right time for you to see your home in a new light — pun intended.

Read Also:

Content Rally wrapped around an online publication where you can publish your own intellectuals. It is a publishing platform designed to make great stories by content creators. This is your era, your place to be online. So come forward share your views, thoughts and ideas via Content Rally.

View all posts

Leave a Reply

Your email address will not be published. Required fields are marked *

Related

house painting

5 Interior House Painting Tips

Owning a house which you can modify according to your personal desire, is always something permanent and something incredibly profound. A home with well-painted walls and beams should tell the story of who you are and what you love. New paint with vibrant colors can change your mood, and make your home your favorite place to live in. Interior house painting can be a very intimidating and challenging task if you decide to take it upon yourself. You have two options, to either do it by yourself or hire a professional painting company to look over the project. If you opt with the first choice, these tips and techniques will help you to paint your own home, according to your likings, within a very friendly budget. When you want to paint your Boynton Beach home, be sure to give Gustafson Painting a call. The following steps are a guide on how to paint a house to meet your expectations: 1. Self Choosing Colors: The critical step, to begin with, is to choose a color which you like. Or at least you should have a good idea of what color combination suits your home, i.e. which colors you would like to paint to your rooms and which colors to paint washrooms, kitchen, etc. Select the color palettes and plan out which color combination gives your rooms the vibrant energy. Every color has its functions, e.g. Blue, green and purple are all relaxing colors. Moreover, other deep and shocking colors such as red, pink and yellow can be used in rooms which are mostly in use during the day, giving your rooms a lively, gaudy look. 2. Gathering Tools and Equipment: After this, you have to pick all the tools and equipment which are needed for painting the house; which includes sanding and scraping tools, wire brush, respirator, paint rollers, plastic sheets to cover the carpets and your valuable stuff, work gloves, drop cloth, ladder and scotch tape. This will ensure you are ready and won't have to leave your task in between, to search for something. 3. Repairing Damaged Parts: Once you have organized everything, the next step is to remove any dirt and dust buildups from the walls by using a pressure washer. After this, you can apply epoxy filler to cracks and fractures by using a putty knife. Allow it to let it dry. Once this is done, fill the gap around windows, doors, and ceilings to ensure a better coat of paint. When this is dried up, then feel the wall with your hand to ensure if there are any uneven spots left behind. Then, apply the primer to prepare the walls for paint when all damaged parts are repaired. 4. Brush the Walls: Before painting the walls with a roller, you should brush the walls. To brush the walls, mean to paint the corner of walls, ceilings, and trims. You can choose from paintbrushes which come in many shapes and sizes. The traditional method to paint the walls through brush is by the use of metal cans, which can be very difficult for you to carry along with the brush and can result in poor results. But nowadays, there are proper paint pails which will make the whole task a lot easier for you. 5. Ready to Paint Ahead! Finally, you are ready to paint with the rollers. But wait, before this you should mix a primer with paint to give a fresh and everlasting look. If you paint without using a primer, then the paint would peel off. For this, you have to scrap all the paint away, clean the surface before applying the first coat and after that, apply the second coat of your own choice. This is one way when you do not use a primer. But if you are using a primer with paint, then it will not cause any problem even if the first coat is not applied. And the most important order of painting as suggested by the experts of house painters in San Diego is that you should paint the trim first, then ceilings, and then walls. It will provide better adhesion throughout and will enhance the ability of the topcoat. Another pro tip is that don’t forget to open the windows and doors of your house during painting, as it provides better ventilation and the paint dries off quickly and efficiently. At the end of the painting, do the cleanup. Wash all the brushes and other stuff which you have used in the process. At last, give your house a final touch by placing all of the favorite furniture in place, to give your dream house a new look! With these interior house painting tips from the most experienced of the San Diego painting company, you will get pro results for your residence! Read Also: Find The Right Painters For Your Ann Arbor Home This Painting Season 5 Factors To Consider In Choosing The Right Floor Colors Roofing Painting Contractor Leads: Four Questions To Ask Before Hiring One

READ MOREDetails
bedroom house plans

Living Ideas In Small Bedroom House Plans With Efficient House Designs

In small bedroom house plans, a one-bedroom house plan is for individuals who want to live alone due to some reasons. Small bedroom plans can be done according to the couple’s interests and their preferences on behalf of the limited space. Get useful inspirations about one-bedroom house plans, which have great importance for small families or couples.  In small home planning, normally guest houses, accessory dwelling units, and retirement home ideas are best. Living in all-bedroom house plans normally represents budget-friendly ideas that require less maintenance. There are several reasons to choose the small house plans.  Why Are People Driving To One Bedroom House Plans? Choices of the different options for perfect bedroom house plans depend upon the personal interests of the people and their preferences to proceed with standards approaching styles. Every time the big space in your bedroom designs plans is not necessarily. Modern people, especially those leading a fast life, are more likely to choose a small cozy, well-ventilated, balanced interior room as their bedroom. Here are some advantages of the small one-bedroom house plan for the modern fast-forwarding people. The less square footage planning can be done with the help of experienced and well-acknowledging experts who know planning very well.  Some people live alone due to their job purpose, so they need small bedroom house plans instead of large spaces. So buying small house plans and design small living houses can be cost-effective for such people who want to live alone and take an interest in living in a peaceful environment.  Less maintenance and fewer expenses are required for modern 1 bedroom house floor plans to meet your objectives as well as to live with peace.  You do not need to waste money on the decorations of unused home areas. Because the small house plans can cover the empathy space and match your interest’s levels, the compact house plans are minimizing the cost of unused decorative items. Planning of a single person or living with your spouse can be a cost-effective and wise decision-making plan to achieve your objectives and to approach with smart choices to get the best and verified response at the time of your needs.  One Bedroom Design Is Always Meet Up the Objectives  One-bedroom homes are considered more effective and safer as compared to multiple-story homes. Due to having lots of expensive materials, bigger home plans are not considered the best and perfect as small homes.  Bigger homes are for the luxury life, and more space means more time for maintenance. And fewer working professionals have extra time during your working age. This is the main reason working professionals and students always keep voting for the one-bedroom house plans. Here are the points which make the one-bedroom house plans the most robust one. 1 The bedroom house plan is an instant and reliable source for interested communities to meet their objectives and then proceed with easy and simple approaching plans.  Get some help from professional house planners who have the experience to design small homes. Getting started with small house plans with efficient house design can be cost-effective and a nice plan to proceed with smart choices.  One-bedroom home ideas need less space but proper planning to design homes according to the interests and trust levels of the interested people.  Style of 1 bedroom house plans can always impress its residents to meet with their objectives and then proceed through fast and easily accessible resources.  You have to know how to get satisfied and how to match up with your innovative interior interests. The straightforward strategies are always the most effective way to improve your modern small bedroom house plans. Conclusion: From the modern-day aspects, the small is beautiful. This is the reason the tiny house and one-bedroom house concepts are introduced. Good ventilation, well Insulated, Thermal Windows, and Airtight Construction can play a vital role in meeting your objectives. There is a massive range of ideas and valuable inspirations that can proceed to approach the intelligent feature small bedroom house plans and make sure how to get satisfied from the practical, inspiring feature plans.  Read Also: Five Bedroom Rug Ideas – Area Rugs and Decorating Ideas 3 Tips on How To Plan The Best Cheap and Fabulous DIY Bedroom Makeover Seven Simple Ways for Achieving Cozy Bedroom Environment

READ MOREDetails
Drywall

Elevate Your Home With Unique Ceiling Textures

Drywalls are those construction materials that are used to create walls and ceilings in your home. Not all that, but drywalls also come in handy if you want to create design features like eaves, arches, or any mind-blowing architectural requirements!!! Do you know the best part about drywalls? These are super easy to install, highly durable, and only require simple repairs when damaged. So, drywall is a flat component composed of calcium sulfate dihydrate, typically between thick sheets of backer paper, and facer, used to construct interior ceilings. Let’s talk about the ceiling textures and the drywall options you can choose for your home!!! The Ceiling Textures And Your Drywall Options Decorating your home can be a real challenge for many !!! Therefore, choosing the right drywall finish or texture can prove to be a hard nut to crack. And it’s very natural to get in a state of indecision if you are handpicking it for your new home or renovation project. There are so many options that it feels like you are “searching for a pearl in an ocean.” Making up your mind about whether or not to go texturing your ceiling can be a tough job. And even if you choose to texture your ceilings, there are chances you’ll be confused about which one to go for!!!! And remember, getting the drywall right is the first step of tiling projects?”. But No Need to Worry!! This article will guide you in choosing the perfect texture and drywall option for your ceilings to look more elegant than ever!! 1. Sheetrock Texture: Old Is Gold Sheetrock ceiling texture is a drywall ceiling texture that has been famous since 1917. The reason this drywall texture is so awesomely renowned is because of the artistic look that it gives to your ceiling And the best part is you don’t need to use any sort of spray paint in this case. You can achieve this texture by using your artistic hand technique and without using any special brushes. This texture is perfect for any room. There are no restrictions on the use of this ceiling texture. 2. Stipple Brush Texture: A Test Of Your Skill This texture is not as easy as it seems. You need skills to create this texture. To create this texture, you need a roller and slap brush. The fascinating fact about this texture is it can cover the bumps and holes on your ceiling. And if you have the skills, then this texture can surely make your ceiling look gorgeous than ever!! 3. Swirl Texture: Creativity Taken To A New Level To achieve this texture, you need either a roller or sprayer. You can also do this by using a technique called “the basic swirl” method. But one thing that you need to keep in mind is while creating this texture, you’ll need a lot of patience to get the best result. And the difficult part is you need to create the pattern before the mud dries. So, make sure to have a helping hand by your side. Overall, the texture can really give that awesome look on your ceilings if you do it in the right way!!! 4. Orange Peel Texture: A Color Of Choice The name suggests all the colors of orange skin, but sometimes it’s also called “an eggshell” ceiling texture. If you really love this color, then this can be on the top of your favorite lists. To create this texture, you need to apply thin mud to the ceiling using a spray gun set at very high pressure. The more artistic mind you have, the more artistic look it has got!!!! 5. Smooth Textures: Choice Of Many If you are someone who wants the best at a cheap cost, then this texture is just the right choice for you. Moreover, you don’t need to have many skills to create this texture design. The look of this texture is just mind-blowing, and if you are someone who likes things to be consistently gorgeous, then this is the texture you can have for your ceiling. This texture is effortless to remove and is also perfectly suited for any room. 6. Tree Bark Texture: Beauty Of Nature If you are someone who loves nature and wants to bring the reflection of nature inside your home, then this textured style is just the option you can have. This ceiling has the look of a tree. You can create this texture just by using a heavy roller. The texture might look simply, but it’s very artistic and can surely catch the eyes of many. If you have a farmhouse, then this texture will double the beauty!!!!! 7. Slap Brush Texture: Slap The Beauty Out Artistic, gorgeous, beautiful, and elegant are the nicknames you can give to this texture. A complete package of beauty!!!! To get this texture, you’ll need a brush with very stiff bristles and thin mud. Firstly, you have to cover your ceiling with mud using a roller, then take the brush and slap the ceiling from the edge. This can be a hard nut to crack because if you don’t get it right on the first shot, the whole ceiling might end up looking messy. 8. Popcorn Texture: Cottage Cheese This texture, also known as the “cottage cheese” or “acoustic” ceiling texture, is probably one of the most famous ceiling textures ever!!! If you look closely, you’ll see it’s kind of a look-alike of “popcorn.” That’s why it’s called “popcorn texture.” To achieve the correct texture, you need to use a sprayer to apply to your ceiling. This contains Styrofoam with mud which gives that puffy effect. But it will require you to have a lot of skill to achieve this effect. That’s because the “popcorn texture” is both challenging to apply and remove. I hope this article will help you to know about the needs of ceiling textures and drywall options. And now I believe you’ll be able to get yourself the perfect texture for your ceilings. How Can I Remove Old Ceiling Textures Safely? Removing old ceiling textures can be a big job, but it doesn’t have to be intimidating! If you want to update your ceiling and get rid of that outdated texture, I’m here to help. No matter if you have popcorn, stipple, or another type of texture, this process takes a little bit of care, but don’t worry! Here’s a step-by-step guide on how to remove an old ceiling texture without breaking your back or the bank. Step 1: Test For Asbestos Before you get out any tools…safety first!  Remember, many older ceilings (especially those with popcorn texture installed prior to 1980) contain asbestos. Before doing anything else, have your ceiling tested for asbestos. You can hire a pro to test the ceiling or buy a self-test kit. If asbestos is present, halt all work and consult pros immediately. Asbestos removal is not a do-it-yourself job because it poses serious health risks if mishandled. Step 2: Clear The Room If there’s no asbestos present, it’s time to get the room ready. Cover all the furniture. You’d be amazed at how far a fine mist of water, compound, and paint can travel! Also, plastic should be removed from the floors, and tape should be around any ceiling fans or lights that are not being removed. I can personally tell you we didn’t do this. We found dried white dust on our bedspread when we were stripping the wallpaper in our bedroom, and we had to clean up all the residual dust a little too late. It was wild! Step 3: Soften The Texture For Better Finish Here’s where the fun starts! To make that texture easier to remove, you’ll need to soften it. Fill a spray bottle with warm water and mist the ceiling. You don’t want to drench it. If you put too much water on the ceiling, it could end up damaging the drywall underneath. Allow the water to sit for about 15–20 minutes or so, giving it time to penetrate and loosen up that texture material. Don’t rush this step. It’ll only cause more work for you in the long run. Step 4: Clean Your Work Grab a wide putty knife or scraper and start scraping off the texture. Do small sections at a time, and scrape at a shallow angle so that you don’t gouge the drywall underneath. If it’s not coming off well, spray some more with the water bottle and let it sit for a little longer. This step can be kind of messy and time-consuming, but have patience because, in the end, you will have a nice smooth ceiling. Step 5: Patch & Sand Once the texture is gone, you may notice a few dings or dents in the ceiling. Don’t worry! Just fill them with some joint compound, sand it smooth, wipe away any dust and you’re ready for a new ceiling. And that’s it! A fresh, smooth ceiling in no time! Read Also: Here’s How to Turn Your Garage into a Bedroom on a Budget! Turn your attic into a living space

READ MOREDetails