Published on: 30 March 2021
Last Updated on: 22 November 2024
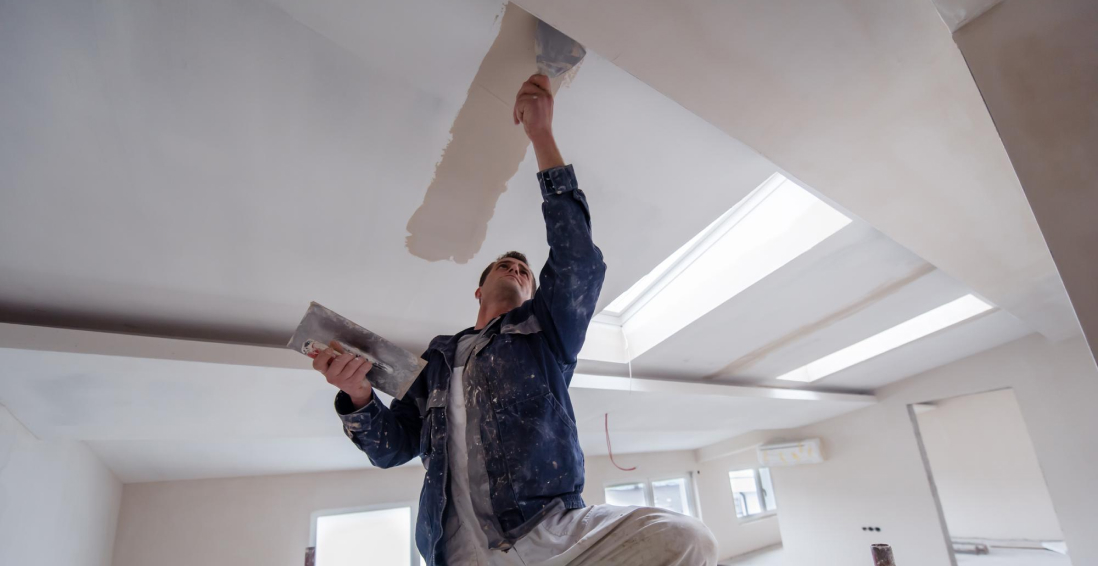
Drywalls are those construction materials that are used to create walls and ceilings in your home. Not all that, but drywalls also come in handy if you want to create design features like eaves, arches, or any mind-blowing architectural requirements!!!
Do you know the best part about drywalls?
These are super easy to install, highly durable, and only require simple repairs when damaged.
So, drywall is a flat component composed of calcium sulfate dihydrate, typically between thick sheets of backer paper, and facer, used to construct interior ceilings.
Let’s talk about the ceiling textures and the drywall options you can choose for your home!!!
The Ceiling Textures And Your Drywall Options
Decorating your home can be a real challenge for many !!!
Therefore, choosing the right drywall finish or texture can prove to be a hard nut to crack.
And it’s very natural to get in a state of indecision if you are handpicking it for your new home or renovation project. There are so many options that it feels like you are “searching for a pearl in an ocean.”
Making up your mind about whether or not to go texturing your ceiling can be a tough job. And even if you choose to texture your ceilings, there are chances you’ll be confused about which one to go for!!!! And remember, getting the drywall right is the first step of tiling projects?”.
But No Need to Worry!!
This article will guide you in choosing the perfect texture and drywall option for your ceilings to look more elegant than ever!!
1. Sheetrock Texture: Old Is Gold
Sheetrock ceiling texture is a drywall ceiling texture that has been famous since 1917. The reason this drywall texture is so awesomely renowned is because of the artistic look that it gives to your ceiling
And the best part is you don’t need to use any sort of spray paint in this case. You can achieve this texture by using your artistic hand technique and without using any special brushes.
This texture is perfect for any room. There are no restrictions on the use of this ceiling texture.
2. Stipple Brush Texture: A Test Of Your Skill
This texture is not as easy as it seems. You need skills to create this texture.
To create this texture, you need a roller and slap brush.
The fascinating fact about this texture is it can cover the bumps and holes on your ceiling. And if you have the skills, then this texture can surely make your ceiling look gorgeous than ever!!
3. Swirl Texture: Creativity Taken To A New Level
To achieve this texture, you need either a roller or sprayer.
You can also do this by using a technique called “the basic swirl” method.
But one thing that you need to keep in mind is while creating this texture, you’ll need a lot of patience to get the best result.
And the difficult part is you need to create the pattern before the mud dries. So, make sure to have a helping hand by your side.
Overall, the texture can really give that awesome look on your ceilings if you do it in the right way!!!
4. Orange Peel Texture: A Color Of Choice
The name suggests all the colors of orange skin, but sometimes it’s also called “an eggshell” ceiling texture.
If you really love this color, then this can be on the top of your favorite lists.
To create this texture, you need to apply thin mud to the ceiling using a spray gun set at very high pressure.
The more artistic mind you have, the more artistic look it has got!!!!
5. Smooth Textures: Choice Of Many
If you are someone who wants the best at a cheap cost, then this texture is just the right choice for you. Moreover, you don’t need to have many skills to create this texture design.
The look of this texture is just mind-blowing, and if you are someone who likes things to be consistently gorgeous, then this is the texture you can have for your ceiling.
This texture is effortless to remove and is also perfectly suited for any room.
6. Tree Bark Texture: Beauty Of Nature
If you are someone who loves nature and wants to bring the reflection of nature inside your home, then this textured style is just the option you can have.
This ceiling has the look of a tree. You can create this texture just by using a heavy roller. The texture might look simply, but it’s very artistic and can surely catch the eyes of many.
If you have a farmhouse, then this texture will double the beauty!!!!!
7. Slap Brush Texture: Slap The Beauty Out
Artistic, gorgeous, beautiful, and elegant are the nicknames you can give to this texture. A complete package of beauty!!!!
To get this texture, you’ll need a brush with very stiff bristles and thin mud.
Firstly, you have to cover your ceiling with mud using a roller, then take the brush and slap the ceiling from the edge.
This can be a hard nut to crack because if you don’t get it right on the first shot, the whole ceiling might end up looking messy.
8. Popcorn Texture: Cottage Cheese
This texture, also known as the “cottage cheese” or “acoustic” ceiling texture, is probably one of the most famous ceiling textures ever!!!
If you look closely, you’ll see it’s kind of a look-alike of “popcorn.” That’s why it’s called “popcorn texture.”
To achieve the correct texture, you need to use a sprayer to apply to your ceiling. This contains Styrofoam with mud which gives that puffy effect.
But it will require you to have a lot of skill to achieve this effect. That’s because the “popcorn texture” is both challenging to apply and remove.
I hope this article will help you to know about the needs of ceiling textures and drywall options. And now I believe you’ll be able to get yourself the perfect texture for your ceilings.
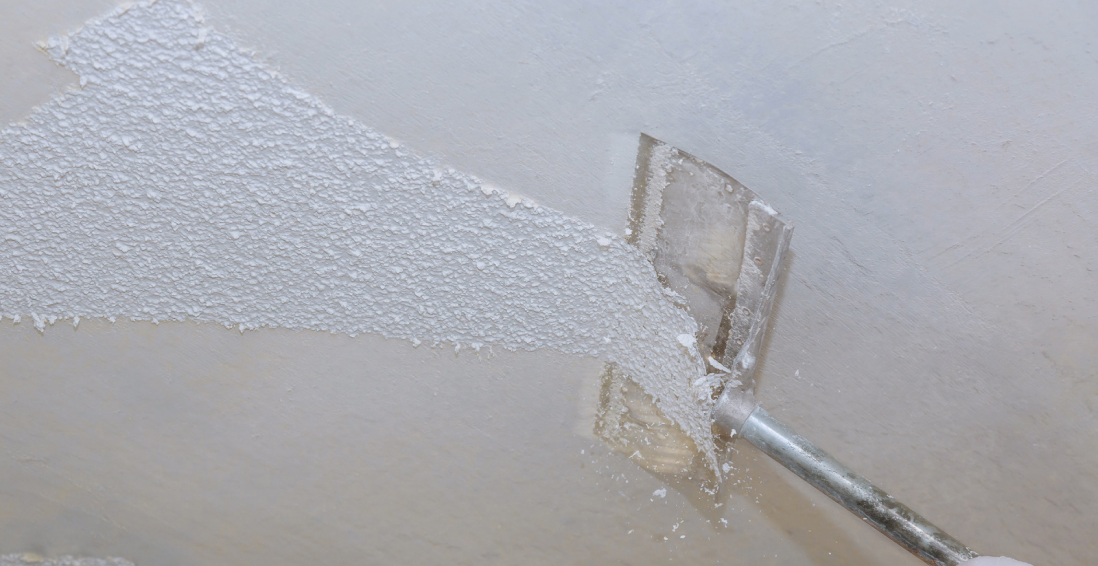
How Can I Remove Old Ceiling Textures Safely?
Removing old ceiling textures can be a big job, but it doesn’t have to be intimidating! If you want to update your ceiling and get rid of that outdated texture, I’m here to help.
No matter if you have popcorn, stipple, or another type of texture, this process takes a little bit of care, but don’t worry!
Here’s a step-by-step guide on how to remove an old ceiling texture without breaking your back or the bank.
Step 1: Test For Asbestos
Before you get out any tools…safety first! Remember, many older ceilings (especially those with popcorn texture installed prior to 1980) contain asbestos. Before doing anything else, have your ceiling tested for asbestos.
You can hire a pro to test the ceiling or buy a self-test kit.
If asbestos is present, halt all work and consult pros immediately. Asbestos removal is not a do-it-yourself job because it poses serious health risks if mishandled.
Step 2: Clear The Room
If there’s no asbestos present, it’s time to get the room ready. Cover all the furniture. You’d be amazed at how far a fine mist of water, compound, and paint can travel!
Also, plastic should be removed from the floors, and tape should be around any ceiling fans or lights that are not being removed. I can personally tell you we didn’t do this.
We found dried white dust on our bedspread when we were stripping the wallpaper in our bedroom, and we had to clean up all the residual dust a little too late. It was wild!
Step 3: Soften The Texture For Better Finish
Here’s where the fun starts! To make that texture easier to remove, you’ll need to soften it.
Fill a spray bottle with warm water and mist the ceiling. You don’t want to drench it. If you put too much water on the ceiling, it could end up damaging the drywall underneath.
Allow the water to sit for about 15–20 minutes or so, giving it time to penetrate and loosen up that texture material. Don’t rush this step. It’ll only cause more work for you in the long run.
Step 4: Clean Your Work
Grab a wide putty knife or scraper and start scraping off the texture. Do small sections at a time, and scrape at a shallow angle so that you don’t gouge the drywall underneath.
If it’s not coming off well, spray some more with the water bottle and let it sit for a little longer.
This step can be kind of messy and time-consuming, but have patience because, in the end, you will have a nice smooth ceiling.
Step 5: Patch & Sand
Once the texture is gone, you may notice a few dings or dents in the ceiling.
Don’t worry! Just fill them with some joint compound, sand it smooth, wipe away any dust and you’re ready for a new ceiling.
And that’s it!
A fresh, smooth ceiling in no time!
Read Also:
A passionate writer and an avid reader, Soumava is academically inclined and loves writing on topics requiring deep research. Having 3+ years of experience, Soumava also loves writing blogs in other domains, including digital marketing, business, technology, travel, and sports.
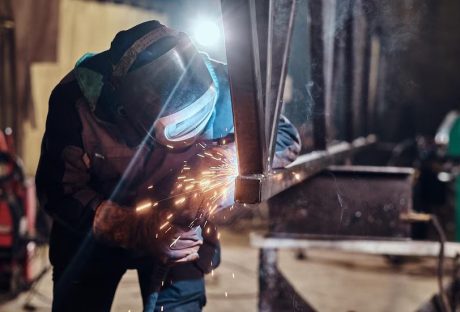
Welding is a fulfilling and challenging job, requiring expert knowledge, a steady hand, and, most importantly, the right tools.
If you’re starting up a welding business or just want to make sure you’re kitted out for your at-home welding projects, you’ll need to ensure you’ve got the right supplies and tools from a store similar to weldingsuppliesfromioc.com.
We’ll provide you with the essential shortlist of supplies you’ll need for your next welding project.
A Welding Machine
Of course, you need a welder to do any welding. A welder is, in essence, a piece of machinery that uses heat to combine two or more metal parts. There are a variety of welding machines out there that use different combination methods to get the job done.
One may be preferable over another, depending on the welding project you are doing. Stick welders, MIG welders, and TIG welders are just a few examples, each with its own unique methodology.
No welding machine kit is complete without a welding electrode, torch, filler material, and shielding gas. These are all essential to the function of a welder and imperative for safety while operating the equipment.
Always ensure that your welding equipment is high-quality before you start projects, either for work or for a hobby. Welding is dangerous, and choosing a welder you’re unfamiliar with can be downright dangerous.
Soldering Helmet
The most recognizable tool of any welder, the helmet keeps your face, especially your eyes, safe while you weld. It also helps to keep your skin protected from the intense heat.
Soldering without a helmet is foolhardy and incurs a much greater risk of injury, so this essential piece of equipment should always be in your workshop. Shop around to find a helmet that fits you comfortably and lets you see what you’re working on.
Welding Jacket
The jacket does for your body what the helmet does for your face; these are made from fire-resistant materials to protect welders from the extreme heat that a welding torch generates. The last thing you want is a piece of molten metal landing on your arm, so choose a suitably high-quality jacket to protect your skin.
Protective Gloves
The last of the holy trinity of heat protection, the welding gloves serve to protect your hands from injury while you work. As you weld, you’re working closely with hot metal and a dangerous welding tool, regardless of what type of welding you’re using.
Heavy welding gloves, in particular, allow you to pick up hot metal objects for a few seconds without being burned, which can be helpful for beginners getting started in MIG welding. On the other hand, thinner gloves allow more precise control over welding. Precision is paramount in some types of welding—TIG welding, for example, which relies on meticulous lines to create a clean, finished look. Choose a glove that represents your experience level, but always prioritize safety.
Reinforced Boots
Your feet are susceptible to injury as you weld, and it’s better not to tempt fate by playing hopscotch with raining molten metal. Welding boots should be tough and durable, with thick leather and steel-reinforced toes. These will give you some staunch protection against wayward molten metal and some degree of protection against other heavy objects that could otherwise fall and crush your feet.
An Apron
A welding apron protects your lower body from the sparks and heat welding produces. Generally, they feature adjustable straps so that you can tighten them to your comfort. Welding aprons are made from the same material as a welding jacket, providing additional protection for the legs and underlying clothing.
Magnets
Next, you’ll want to put some consideration into workplace efficiency. One underutilized but valuable tool you can use is a welding magnet. These helpful magnets allow you to pin components in place, rotate them, and secure your workpiece. You can get different welding magnets for different sizes of projects, but the bottom line is that it allows you a much easier time working with hot metal confidently and efficiently.
Welding Cart
Another essential item for welding projects is a cart. Just as with any project that requires heavy and cumbersome equipment, welding tends to require lots of clothing, tools, and components.
A welding cart offers a lightweight solution to this problem, giving you space to store your welder and welding accessories regardless of where you work. If you’re on the go with your welding projects, then this is definitely an item you’ll want to invest in for your long-term success.
Workstation Table
Every welder needs a surface to work on, and, as you might guess, not just any table will do. A welding table is a customized workbench made from metal or other heat-resistant materials. These tables feature built-in holes that you can use to clamp down a workpiece and hold metal parts in place while you are in the process of welding.
Chipping Hammer
A chipping hammer is a specialty tool welders use to remove impurities from the surface of the welded metal, often called slag. The hammer contains a sharp, chisel-like tip that can knock off slag from the surface of a workpiece.
Angle Grinder
An angle grinder is a tool for preparing the metal surface for welding using abrasive force. The rotating disc smooths the surface, removing imperfections that may contaminate the workpiece and giving the welder a clean surface to work on.
Wire Brush
A wire brush also helps clean the surface of the metal before welding. They come in different shapes and sizes depending on the size of your workpiece, some with long handles for access to crevices and others with shorter handles for easier control. The bristles need to be abrasive to clean the surface of the metal effectively.
The Bottom Line
Every welder needs these essential tools before they start working. Some of these supplies are necessary to begin welding in the first place, while others are important for human safety or for work efficiency. Kit yourself out with these essentials, and you’ll be all set to tackle beginner welding projects immediately.
Read Also:
Welding As A Career Choice
Is Metal Fabrications A Good Career Path In 2021?
Simple Ways To Automate Your Small Business Processes
In small bedroom house plans, a one-bedroom house plan is for individuals who want to live alone due to some reasons. Small bedroom plans can be done according to the couple’s interests and their preferences on behalf of the limited space. Get useful inspirations about one-bedroom house plans, which have great importance for small families or couples.
In small home planning, normally guest houses, accessory dwelling units, and retirement home ideas are best. Living in all-bedroom house plans normally represents budget-friendly ideas that require less maintenance. There are several reasons to choose the small house plans.
Why Are People Driving To One Bedroom House Plans?
Choices of the different options for perfect bedroom house plans depend upon the personal interests of the people and their preferences to proceed with standards approaching styles. Every time the big space in your bedroom designs plans is not necessarily.
Modern people, especially those leading a fast life, are more likely to choose a small cozy, well-ventilated, balanced interior room as their bedroom.
Here are some advantages of the small one-bedroom house plan for the modern fast-forwarding people.
The less square footage planning can be done with the help of experienced and well-acknowledging experts who know planning very well.
Some people live alone due to their job purpose, so they need small bedroom house plans instead of large spaces. So buying small house plans and design small living houses can be cost-effective for such people who want to live alone and take an interest in living in a peaceful environment.
Less maintenance and fewer expenses are required for modern 1 bedroom house floor plans to meet your objectives as well as to live with peace.
You do not need to waste money on the decorations of unused home areas. Because the small house plans can cover the empathy space and match your interest’s levels, the compact house plans are minimizing the cost of unused decorative items.
Planning of a single person or living with your spouse can be a cost-effective and wise decision-making plan to achieve your objectives and to approach with smart choices to get the best and verified response at the time of your needs.
One Bedroom Design Is Always Meet Up the Objectives
One-bedroom homes are considered more effective and safer as compared to multiple-story homes. Due to having lots of expensive materials, bigger home plans are not considered the best and perfect as small homes.
Bigger homes are for the luxury life, and more space means more time for maintenance. And fewer working professionals have extra time during your working age. This is the main reason working professionals and students always keep voting for the one-bedroom house plans.
Here are the points which make the one-bedroom house plans the most robust one.
1 The bedroom house plan is an instant and reliable source for interested communities to meet their objectives and then proceed with easy and simple approaching plans.
Get some help from professional house planners who have the experience to design small homes. Getting started with small house plans with efficient house design can be cost-effective and a nice plan to proceed with smart choices.
One-bedroom home ideas need less space but proper planning to design homes according to the interests and trust levels of the interested people.
Style of 1 bedroom house plans can always impress its residents to meet with their objectives and then proceed through fast and easily accessible resources.
You have to know how to get satisfied and how to match up with your innovative interior interests. The straightforward strategies are always the most effective way to improve your modern small bedroom house plans.
Conclusion:
From the modern-day aspects, the small is beautiful. This is the reason the tiny house and one-bedroom house concepts are introduced. Good ventilation, well Insulated, Thermal Windows, and Airtight Construction can play a vital role in meeting your objectives.
There is a massive range of ideas and valuable inspirations that can proceed to approach the intelligent feature small bedroom house plans and make sure how to get satisfied from the practical, inspiring feature plans.
Read Also:
Five Bedroom Rug Ideas – Area Rugs and Decorating Ideas
3 Tips on How To Plan The Best Cheap and Fabulous DIY Bedroom Makeover
Seven Simple Ways for Achieving Cozy Bedroom Environment
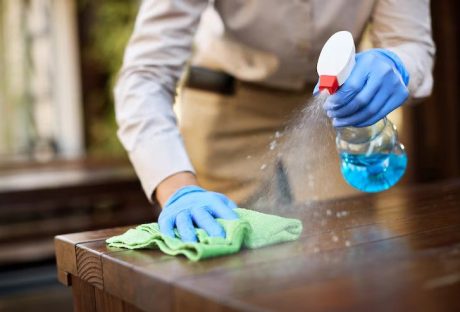
Maintaining a clean and organized workplace is a must for your well-being and productivity. However, it is no secret that office cleaning is a daunting task.
There are so many things you need to consider, not to mention different areas and surfaces require different cleaning methods. Often, different methods require different cleaning equipment and cleaning supplies.
In this entry, we will share with you the best practices and processes that the best commercial cleaning services use in their office cleaning service. Here's a commercial cleaning checklist to keep your workplace spotlessly clean.
The basics of office cleaning services
Before diving into the checklist, it is important that you understand the basic processes of commercial cleaning and how commercial cleaning companies deliver these practices.
Most of these things are pretty self-explanatory. However, there is a reason why professional cleaners from commercial cleaning companies are efficient in their job – they know how to do things right. Knowing these practices will help you understand how to do them right too.
Dusting
Dirt, dust, and allergen particles accumulate quickly. If not removed from the business premises, these particles can get mixed into the indoor air and cause various health problems such as allergies, respiratory problems, headaches, etc.
Commercial cleaning plans for office cleaning often include exhaustive dusting of all surfaces. This includes desks, shelves, electronics, windowsills, etc. A good commercial cleaning company uses microfiber cloth and a feather duster to remove dust effectively and safely.
Vacuuming
Vacuuming is the most efficient way to keep workplaces clean. It removes dirt, dust, and various outdoor debris from carpets, mats, rugs, etc.
The advantage of hiring cleaning services is that a commercial cleaning company has access to industrial-grade and powerful vacuum cleaning machines that can truly and efficiently remove dirt, dust, and various debris.
Nevertheless, when vacuuming your workplace, include cleaning the hard-to-reach areas, such as under the desks, tables, and chairs. Since they are hard to reach, these spots often trap foreign debris.
Mopping
Mopping is the best way to keep hard floors clean and shiny. It removes dirt, dust, and grime buildup from the floor. However, there is more to mopping than simply sliding the mop head back and forth on the surface of the floor.
When mopping the floor, use a cleaning solution that is recommended for the type of floor you have.
To ensure that all areas are covered, you need to mop in a back-and-forth motion.
Trash removal and disposal
No building maintenance will ever be complete without taking the trash out.
When removing trash from your commercial premises, make sure to replace the bin liners as well. And when replacing the liner, make sure you clean the interior of the trash bin.
Commercial cleaning services often include weekly disinfection of the trash bin. This is incredibly important in preventing bacteria buildup and odour in your trash bin.
Disinfecting surfaces
Another crucial aspect of commercial cleaning is surface disinfection. Disinfecting surfaces helps prevent the spread of disease-causing germs and bacteria in the workplace.
When disinfecting your workplace, make sure you use a disinfectant spray or antibacterial wipes to clean surfaces. This includes desks, chairs, tables, countertops, light switches, office appliances buttons, and doorknobs. Commercial cleaning services often include disinfection and sanitation of surfaces in their cleaning service.
Also, commercial cleaners, in particular, pay close attention to high-touch areas and surfaces, which are often breeding grounds for bacteria. These surfaces include hand railings, elevator buttons, light switches, and more.
Bathroom cleaning
Bathrooms are often the dirties and smelliest areas for commercial spaces. With that said, it is not surprising that they have become breeding grounds for bacteria and germs.
When cleaning bathrooms, make sure you clean and disinfect high-touch spots and items such as faucets, sinks, toilets, and even mirrors.
Commercial cleaners often include towel replacement, hand soap refill, and bathroom supplies restocking to ensure your office bathrooms are clean and convenient to use.
Breakroom cleaning
The breakroom is where employees often gather to chit-chat, eat their food, drink their beverages, and rest. For this reason, breakrooms can become breeding grounds for bacteria and germs. Thus, when taking care of your breakrooms, make sure you include the appliances, countertops, sink, tables, and chairs.
Glass window cleaning
Often, business owners neglect their windows, thinking they cannot clean surfaces they can’t reach. This is particularly true for tall building establishments.
Professional commercial cleaners, however, have access to the right cleaning equipment and materials you need for a thorough and efficient window cleaning. They have tall ladders, power washers, longer hoses, and the right safety equipment and gears for a thorough clean.
Floor care
Floors, whatever type of flooring material it uses, must be swept daily to remove dirt and debris. Moreover, make sure you use the right floor cleaner that is recommended for the type of flooring material your business premises has.
Carpet and upholstery cleaning
Carpets and rugs are basically dirt traps. Aside from completing the look of a certain room, carpets function as dirt traps to minimize and even stop dirt and dust from entering the premises.
While regular vacuuming can help, most office vacuums are not strong enough to rid carpets of deep-seated stains and bacteria. This is why commercial cleaning services invest in high-quality equipment so they can tackle difficult cleaning jobs like deep carpet cleaning.
And like carpets and rugs, upholstered furniture is dirt, dust, and allergen traps too. Regular vacuuming of upholstery removes foreign debris. However, to ensure your carpets are actually clean, fresh, and disinfected, you can ask professional cleaners to take care of them.
Most commercial cleaning service companies would suggest deep cleaning for carpets and furniture upholstery once or twice a year.
Air vent cleaning
Another incredibly important process for comprehensive commercial cleaning services includes air vent cleaning.
Air vents accumulate allergens, dust, and foreign debris over time. When there is too much buildup of these particles in your air vent system, your indoor air quality will drop, leading to health issues such as respiratory problems such as asthma attacks.
The Ultimate Commercial Cleaning Checklist for Your Workplace
Daily Tasks:
Desk and Surfaces
Wipe down your desk and other surfaces daily with a disinfectant spray or wipe to remove any dirt, dust, or germs.
Trash
Empty your trash can daily, and ensure all rubbish is disposed of correctly.
Floors
Sweep or vacuum your floors daily to remove any dirt or debris.
Kitchen/Breakroom
Clean and sanitize all surfaces, including countertops, sinks, and appliances, daily.
Weekly Tasks:
Dusting
Dust all surfaces, including shelves, pictures, and light fixtures.
Glass and Mirrors
Clean all glass surfaces, including windows and mirrors, to remove any fingerprints or smudges.
Upholstery
Vacuum all upholstery, including chairs and couches, to remove any dirt or debris.
Disinfecting
Disinfect all high-touch areas, including doorknobs, light switches, and handles.
Floors
Mop or steam-clean your floors weekly to remove any stains or buildup.
Monthly Tasks:
Windows
Clean your windows inside and out to let in more natural light and improve the appearance of your workspace.
Carpets
Have your carpets cleaned by professionals to remove any deep-seated stains and odours.
Deep Cleaning
Perform a deep clean and complete disinfection of your entire workspace, including hard-to-reach areas and appliances.
Office Equipment
Clean and sanitize all office equipment, including computers, printers, and phones.
Restrooms
Thoroughly clean and sanitize your restroom, including the toilet, sink, and floors.
Seasonal Tasks:
Outdoor Maintenance
If you have an outdoor space, clean and maintain it seasonally to keep it looking its best.
HVAC Maintenance
Have your HVAC system inspected and cleaned seasonally to ensure proper airflow and reduce allergens.
Furniture Maintenance
Have any upholstered furniture professionally cleaned seasonally to extend its lifespan?
The Takeaway
As you can see, office cleaning is not a one-time thing. It is a continuous never-ending process. You can save yourself from all these troubles and opt for professional office cleaning instead.
Cleanworks cleaning services is one of the few professional commercial cleaning companies that actually deliver the highest quality professional service. They have been in the industry of professional commercial cleaning for more than two decades, thus they have the track record to say they have “been there, done that”.
Cleanworks cleaning services have a fully trained, extensively experienced, and completely equipped cleaning team to handle all sorts of cleaning. Their office cleaners are fully insured and up-to-date with the latest local cleaning requirements and COVID cleaning guidelines.
Call Cleanworks commercial cleaning services now and get free quotes for your commercial cleaning needs. Their professional staff will be more than willing to help you.
Read Also:
Why Is A Janitorial Service For Commercial Establishments?
10 Pro Tips To Minimize Commercial Door Repair & Maintenance Cost
The Hidden Damages In Workspaces: 5 Steps To Reduce The Risk Of Workplace Injuries!