Tips for Painting Interior Doors

Published on: 12 April 2021 Last Updated on: 27 December 2024
Painting Interior Doors

Freshly painted doors can enhance the makeover of any house. You can paint your doors on your own or hire a professional painter to do it for you.

Many people prefer painting their doors themselves as they want to enjoy painting them on their own. However, if you don’t have any experience or want high-quality paintwork, you should always hire professionals for complete painting service.

If you choose to paint or spray paint your interior doors, you need to know some tips and skills to do the job right. Let us explore some tips by professional painters that you can use to paint your doors.

Remove or cover the door handles:

Paint can stain the door handles and locks. So, it is better to remove them or cover them with painter’s tape to prevent them from getting stained. You will need a screwdriver with multiple heads to remove the handles and locks.

Call a locksmith to remove the inbuilt lock systems as they are difficult to remove. Removing these things will make it easy to clean, sand and then paint the doors.

Fill the cracks and holes:

Fill the cracks and holes

If there are any holes or cracks in your doors, you can fill them with a wood filler, gypsum plaster, or a filling compound. Put a small amount of wood filler or filling compound on a putty knife and put it into the hole or crack uniformly. Place it as uniformly as possible and leave it to dry for at least two hours.

Check the filling the next day, and it requires more filling, add the required amount of filling compound to fill the space completely.
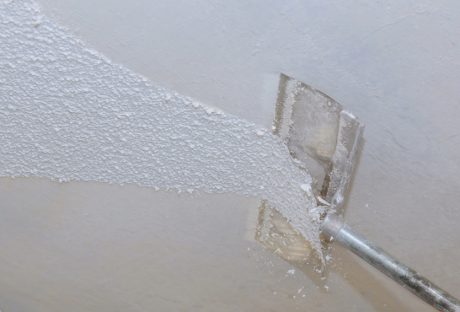
Sand the surfaces:

The old paint gets worn and imperfections develop with time on the door surfaces. That is the reason why homeowners want to repaint their doors. Sanding removes the worn paint and imperfections easily and prepares the surfaces for a clean and uniform finish.

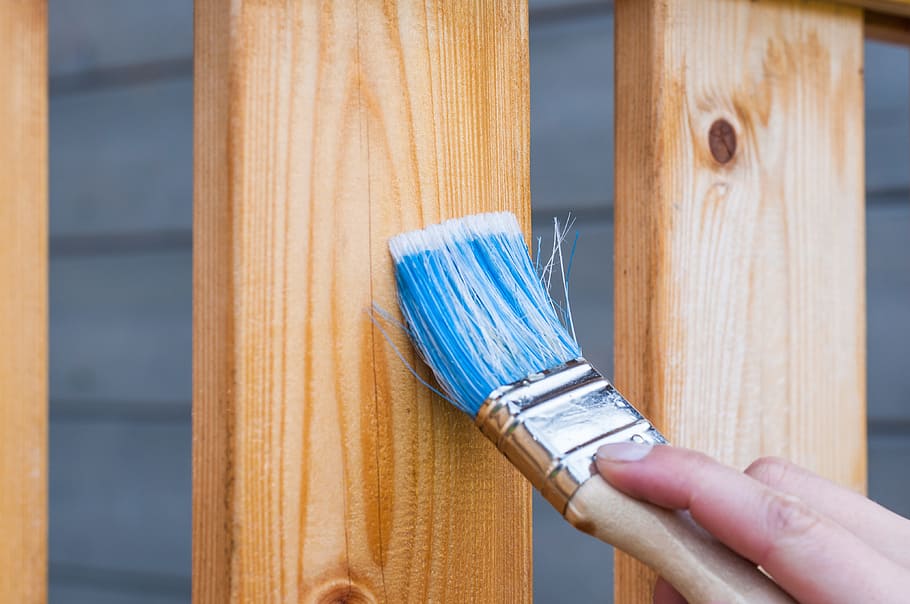
Start painting with a Roller:

If you have already chosen the paint color, mix several cans in a bucket so that you can have the same shade on every door. Sometimes, the shade in different cars can vary a little, although not noticeable in the interiors in low light.

Use a 4-inch roller to apply a thin layer of paint on the door starting from an edge. If you want to paint the trim first, you can use a 2-inch brush.

To remove any lines, move the lightly loaded brush or roller from bottom to top. Using this technique will help you paint quickly and uniformly while leaving a wet edge.

Painting a paneled door:

Painting a paneled door

Many homes have paneled doors and the technique to paint them is different from painting a flat door. Paint every panel beginning from the upper left side downwards in a sequence.

Always use a brush of appropriate width to paint a paneled door. Don’t worry if you paint a bit outside the edges of a panel. Once the edges are painted, use a small roller to paint the space between the panels.

If the rollers of appropriate size are not available, use a 2-to-4-inch brush to paint the center of the panels.

Minimize the drying time:

Paint in light and uniform coats to minimize the drying time. Thick coats of paint take a bit longer to dry and may look nonuniform after drying.

If you are using a brush, you should dip its bristles halfway in the paint and tap the brush against the container edge slightly to remove the excess paint.

If you plan to use a roller, place it in a pan and use the back-and-forth strokes to paint uniformly without soaking it.

Let the paint dry before installing knobs and locks:

Let the paint dry completely before installing the doorknobs and locks. Also, tell your kids and family members not to touch the doors until they dry completely.

Once they dry up completely, you can install the accessories and start using the doors as you use them normally.

Final Words:

Painting the doors is not difficult, even if you are painting them for the first time. All you need to do is to follow the correct sequence of steps, use the right size of tools and prepare the surfaces before grabbing a brush or roller. Following these tips can help you to paint your interior doors easily and conveniently.

Read Also:

Content Rally wrapped around an online publication where you can publish your own intellectuals. It is a publishing platform designed to make great stories by content creators. This is your era, your place to be online. So come forward share your views, thoughts and ideas via Content Rally.

View all posts

Leave a Reply

Your email address will not be published. Required fields are marked *

Related

modular kitchen

Design your Kitchen According to Your Budget and Work in Organized Manner

Indian kitchens have changed considerably over time. It is no longer the space at the corner of the house, dingy lit and oils all over. With the advancement of technology and the change of taste, kitchens are becoming smart to work in an organized manner. Another factor to have an organized kitchen is the space crunch as more and more people are living in multistoried apartments. The concept of having a house is changing fast. With a crisis in space and to work in an organized manner, people are planning the design of the kitchen to use it comfortably. One of the latest styles that people are following is making their kitchen modular. However, beautiful modular kitchen cost varies on many factors and let us discuss them so that you can stay within your budget and do not go overboard. Design your Kitchen According to Your Budget and Work in Organized Manner: The cost range: Modular kitchens are nothing but a well-organized kitchen having modules to hold the kitchen utensils, the grocery storing jars, the washing area of the tools, and many more. They also include accommodating the electrical kitchen appliances and gadgets to make the best use of them at the time of need. Modular kitchen cost starts at around 1.5 lakh and can go up to any limits. One can even spend about 20 lakhs to have a modular kitchen, and it depends on the financial capacity of the person and the taste. However, one should consider some of the essential factors that are difficult to avoid while determining the modular kitchen cost before venturing into the project. The cost determiners: 1. The area of the kitchen: The sink in the kitchen and the taps should be of the right size and design to fulfill specific purposes of use. One can have a porcelain sink, glass sink, or 27-inch stainless steel sink in different variety of shapes and sizes. The taps are available in many designs. They all add up to the cost of the modular kitchen. Modular kitchen cost grossly depends on the covered area of the kitchen. The price rises considerably if the kitchen area is significant. Again, the shape of the kitchen is another factor that influences the cost. Many people have an open kitchen, and the cost of making them modular increases considerably as visitors and guests can see them. These types of open kitchens, therefore, need to be specially designed and organized so that they look neat and clean and goes with other aesthetic designs of the interior. 2. The interior designer charges: It is almost impossible to have a modular kitchen without consulting an expert interior designer. It is the designer who measures the area, brainstorms with the user about the load on the kitchen and the style, suggests the right materials to do the modules, and chalks out the layout plan. They even graphically show the exact view of the kitchen after the final finish using special designing software. However, all these come with a charge, and one has to pay the designer. Gone are the days when one used to rely on the local mason, carpenter, and electricians to decorate and organize the home and the kitchen area. It is time to take trained professional help before designing or rebuilding your kitchen. 3. The quality of the material used: The quality of the material used to make a kitchen modular is another factor that comes into consideration for the cost. There are materials to fit every pocket and solely depend on the budget and the taste. For example, the tiles for use are available in various grades and shades, and prices. The tabletop can be of granite, marble, or any other alternative material. Each of these variables changes the cost of making the kitchen modular. 4. The appliances and the gadgets used: The instruments and the electrical devices used in the kitchen are part of making the kitchen modular. The type of chimney used the size of the refrigerator, the capacity of the microwave oven, the mixer grinders, and dishwashers add up to the modular kitchen cost. It depends on the personal taste of the user and the size of the family. The rich and affluent can spend many lakhs on them, whereas the middle class can do with the essential items. 5. The plumbing cost: One of the high costs of making the kitchen modular is the plumbing cost. The laying of pipelines for freshwater and the drainage should be correct so that there is no bottleneck for water flow. The sink in the kitchen and the taps should be of the right size and design to fulfill specific purposes of use. One can have a porcelain sink, glass sink, or 27-inch stainless steel sink in different variety of shapes and sizes. The taps are available in many designs. They all add up to the cost of the modular kitchen. 6. The cost of electrical wiring and lighting: Proper electrical wiring should be done in the kitchen to run all electrical appliances and light up the area. Sometimes the modules also need lights while using. So making electrical provisions is part of transferring the basic kitchen to modular. Overview: The cost of a modular kitchen cannot be ascertained. The above factors play a pivotal role in making the budget. However, one can have the simplest modular kitchen at a price of around 1.5 lakhs. There is no upper end of the cost, and it only depends on the financial capacity and taste of an individual. Read Also: The Best Countertops To Help Revamp Your Kitchen 3 Trendy Lighting Ideas For Your Kitchen Island How To Find The Best Wholesale Kitchen Cabinets 7 Unique Kitchen Design Ideas That Your Family Will Enjoy

READ MOREDetails
Drywall

Elevate Your Home With Unique Ceiling Textures

Drywalls are those construction materials that are used to create walls and ceilings in your home. Not all that, but drywalls also come in handy if you want to create design features like eaves, arches, or any mind-blowing architectural requirements!!! Do you know the best part about drywalls? These are super easy to install, highly durable, and only require simple repairs when damaged. So, drywall is a flat component composed of calcium sulfate dihydrate, typically between thick sheets of backer paper, and facer, used to construct interior ceilings. Let’s talk about the ceiling textures and the drywall options you can choose for your home!!! The Ceiling Textures And Your Drywall Options Decorating your home can be a real challenge for many !!! Therefore, choosing the right drywall finish or texture can prove to be a hard nut to crack. And it’s very natural to get in a state of indecision if you are handpicking it for your new home or renovation project. There are so many options that it feels like you are “searching for a pearl in an ocean.” Making up your mind about whether or not to go texturing your ceiling can be a tough job. And even if you choose to texture your ceilings, there are chances you’ll be confused about which one to go for!!!! And remember, getting the drywall right is the first step of tiling projects?”. But No Need to Worry!! This article will guide you in choosing the perfect texture and drywall option for your ceilings to look more elegant than ever!! 1. Sheetrock Texture: Old Is Gold Sheetrock ceiling texture is a drywall ceiling texture that has been famous since 1917. The reason this drywall texture is so awesomely renowned is because of the artistic look that it gives to your ceiling And the best part is you don’t need to use any sort of spray paint in this case. You can achieve this texture by using your artistic hand technique and without using any special brushes. This texture is perfect for any room. There are no restrictions on the use of this ceiling texture. 2. Stipple Brush Texture: A Test Of Your Skill This texture is not as easy as it seems. You need skills to create this texture. To create this texture, you need a roller and slap brush. The fascinating fact about this texture is it can cover the bumps and holes on your ceiling. And if you have the skills, then this texture can surely make your ceiling look gorgeous than ever!! 3. Swirl Texture: Creativity Taken To A New Level To achieve this texture, you need either a roller or sprayer. You can also do this by using a technique called “the basic swirl” method. But one thing that you need to keep in mind is while creating this texture, you’ll need a lot of patience to get the best result. And the difficult part is you need to create the pattern before the mud dries. So, make sure to have a helping hand by your side. Overall, the texture can really give that awesome look on your ceilings if you do it in the right way!!! 4. Orange Peel Texture: A Color Of Choice The name suggests all the colors of orange skin, but sometimes it’s also called “an eggshell” ceiling texture. If you really love this color, then this can be on the top of your favorite lists. To create this texture, you need to apply thin mud to the ceiling using a spray gun set at very high pressure. The more artistic mind you have, the more artistic look it has got!!!! 5. Smooth Textures: Choice Of Many If you are someone who wants the best at a cheap cost, then this texture is just the right choice for you. Moreover, you don’t need to have many skills to create this texture design. The look of this texture is just mind-blowing, and if you are someone who likes things to be consistently gorgeous, then this is the texture you can have for your ceiling. This texture is effortless to remove and is also perfectly suited for any room. 6. Tree Bark Texture: Beauty Of Nature If you are someone who loves nature and wants to bring the reflection of nature inside your home, then this textured style is just the option you can have. This ceiling has the look of a tree. You can create this texture just by using a heavy roller. The texture might look simply, but it’s very artistic and can surely catch the eyes of many. If you have a farmhouse, then this texture will double the beauty!!!!! 7. Slap Brush Texture: Slap The Beauty Out Artistic, gorgeous, beautiful, and elegant are the nicknames you can give to this texture. A complete package of beauty!!!! To get this texture, you’ll need a brush with very stiff bristles and thin mud. Firstly, you have to cover your ceiling with mud using a roller, then take the brush and slap the ceiling from the edge. This can be a hard nut to crack because if you don’t get it right on the first shot, the whole ceiling might end up looking messy. 8. Popcorn Texture: Cottage Cheese This texture, also known as the “cottage cheese” or “acoustic” ceiling texture, is probably one of the most famous ceiling textures ever!!! If you look closely, you’ll see it’s kind of a look-alike of “popcorn.” That’s why it’s called “popcorn texture.” To achieve the correct texture, you need to use a sprayer to apply to your ceiling. This contains Styrofoam with mud which gives that puffy effect. But it will require you to have a lot of skill to achieve this effect. That’s because the “popcorn texture” is both challenging to apply and remove. I hope this article will help you to know about the needs of ceiling textures and drywall options. And now I believe you’ll be able to get yourself the perfect texture for your ceilings. How Can I Remove Old Ceiling Textures Safely? Removing old ceiling textures can be a big job, but it doesn’t have to be intimidating! If you want to update your ceiling and get rid of that outdated texture, I’m here to help. No matter if you have popcorn, stipple, or another type of texture, this process takes a little bit of care, but don’t worry! Here’s a step-by-step guide on how to remove an old ceiling texture without breaking your back or the bank. Step 1: Test For Asbestos Before you get out any tools…safety first!  Remember, many older ceilings (especially those with popcorn texture installed prior to 1980) contain asbestos. Before doing anything else, have your ceiling tested for asbestos. You can hire a pro to test the ceiling or buy a self-test kit. If asbestos is present, halt all work and consult pros immediately. Asbestos removal is not a do-it-yourself job because it poses serious health risks if mishandled. Step 2: Clear The Room If there’s no asbestos present, it’s time to get the room ready. Cover all the furniture. You’d be amazed at how far a fine mist of water, compound, and paint can travel! Also, plastic should be removed from the floors, and tape should be around any ceiling fans or lights that are not being removed. I can personally tell you we didn’t do this. We found dried white dust on our bedspread when we were stripping the wallpaper in our bedroom, and we had to clean up all the residual dust a little too late. It was wild! Step 3: Soften The Texture For Better Finish Here’s where the fun starts! To make that texture easier to remove, you’ll need to soften it. Fill a spray bottle with warm water and mist the ceiling. You don’t want to drench it. If you put too much water on the ceiling, it could end up damaging the drywall underneath. Allow the water to sit for about 15–20 minutes or so, giving it time to penetrate and loosen up that texture material. Don’t rush this step. It’ll only cause more work for you in the long run. Step 4: Clean Your Work Grab a wide putty knife or scraper and start scraping off the texture. Do small sections at a time, and scrape at a shallow angle so that you don’t gouge the drywall underneath. If it’s not coming off well, spray some more with the water bottle and let it sit for a little longer. This step can be kind of messy and time-consuming, but have patience because, in the end, you will have a nice smooth ceiling. Step 5: Patch & Sand Once the texture is gone, you may notice a few dings or dents in the ceiling. Don’t worry! Just fill them with some joint compound, sand it smooth, wipe away any dust and you’re ready for a new ceiling. And that’s it! A fresh, smooth ceiling in no time! Read Also: Here’s How to Turn Your Garage into a Bedroom on a Budget! Turn your attic into a living space

READ MOREDetails
Package Units

Here’s What Makes Package Units Better than the Other ACs

Package ACs are generally used as an all-in-one HVAC system for spaces like homes, industrial sites, warehouses, and events that do not have enough space for a furnace or an air handler. They are available at fixed-rate capacities. Some package unit has a rating capacity of 3, 5, or 7 and highly rated ones like 10 or 15 tons. Though they are commonly used in homes and small spaces, package units are also suitable for restaurants, telephone exchanges, and bigger venues. As the name suggests, all vital components found in a heating and cooling system are located in a single casing. All the crucial fixings, including the compressor, air handlers, cooling coil, and air filters, are housed in the unit, providing both heating and cooling capacities. Here’s What Makes a Package Unit Different from Other ACs One of the distinguishing features of a packaged air conditioner unit is the casing which is found on the outside of a house or building. The cabinet is directly connected to the existing ventilation system which circulates the chemical refrigerant inside. This setup is different from typical air conditioners of most homes in the country where the coils are located in a separate unit and connected through the refrigerant line. Split-type ACs have their evaporator coils indoors while the condenser coils are found outside of the structure. And because the unit is located outside the premise of a building, package units primarily act as space savers. They also offer the versatility of installation, especially for homes and buildings with limited backyard spaces. Package ACs can also be set up on the roof in the absence of suitable yard space. Why Should You Opt for a Packaged HVAC Unit? There are specific considerations when opting for package units rather than other cooling and heating alternatives. For one, a packaged AC offers convenient maintenance because all components are found in a single place. A technician only visits a single spot and services everything from there. Packaged air conditioners also emit a significantly lower indoor noise compared to a split-type AC and other alternatives. A well-maintained unit will not make enough noise to disturb your family; thus, providing your family the tranquility and comforts of ideal living space. Additionally, packaged air conditioners do not only provide sufficient cooling for small spaces, but they are also outfitted with heating coils. The combination of both an air conditioner and a central heating system removes the need for an additional indoor furnace. Different Types of Packaged Units There are several package units available in the market, and each has its advantages and flaws. As such, selecting the ideal AC unit has to go along with the area you live to avoid any inconvenience. Package AC A package unit has the air conditioner and air handler housed in a single casing. They can also be outfitted with heating capacities, so adding heating strips would provide you both with a cooling and heating system. Gas and Electric Package Systems This type of HVAC system runs on gas and combines the functions of an air conditioner and a gas furnace. This option is ideal for homeowners who do not have an existing heater. Dual-Fuel Systems If you live in an area where temperatures drop below negative three degrees, a dual-fuel system is the best HVAC system to install. It can turn your gas furnace on when the temperature drops the ideal warmth, helping you save on your utility bill. Talk with a professional to help you decide on the ideal AC unit to outfit your home or warehouse.  There are various types of package units with different capacities to outfit your space and give you the right warmth or cooling you need. Featured image Read Also: Here Are Some Things That You Should Know When You Use Storage Units Winter is Going! A Monthly Home Maintenance Checklist to Get You Ready for Spring 10 Amazing Air Conditioner to Try Right Now

READ MOREDetails