Elevate Your Home With Unique Ceiling Textures

Published on: 30 March 2021 Last Updated on: 22 November 2024
Drywall

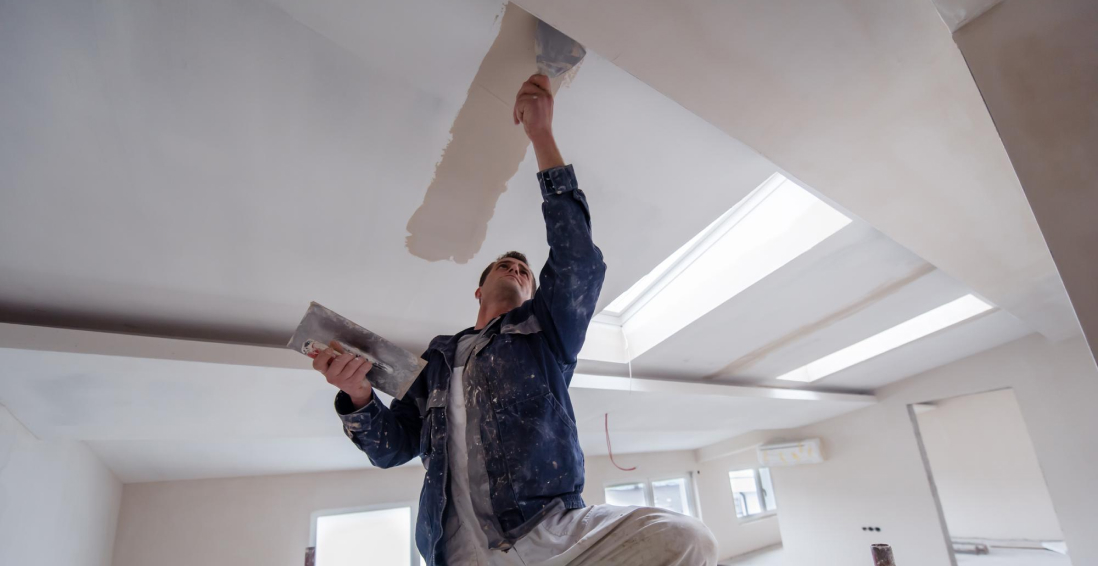
Drywalls are those construction materials that are used to create walls and ceilings in your home. Not all that, but drywalls also come in handy if you want to create design features like eaves, arches, or any mind-blowing architectural requirements!!!

Do you know the best part about drywalls?

These are super easy to install, highly durable, and only require simple repairs when damaged.

So, drywall is a flat component composed of calcium sulfate dihydrate, typically between thick sheets of backer paper, and facer, used to construct interior ceilings.

Let’s talk about the ceiling textures and the drywall options you can choose for your home!!!

The Ceiling Textures And Your Drywall Options

Decorating your home can be a real challenge for many !!!

Therefore, choosing the right drywall finish or texture can prove to be a hard nut to crack.

And it’s very natural to get in a state of indecision if you are handpicking it for your new home or renovation project. There are so many options that it feels like you are “searching for a pearl in an ocean.”

Making up your mind about whether or not to go texturing your ceiling can be a tough job. And even if you choose to texture your ceilings, there are chances you’ll be confused about which one to go for!!!! And remember, getting the drywall right is the first step of tiling projects?”.

But No Need to Worry!!

This article will guide you in choosing the perfect texture and drywall option for your ceilings to look more elegant than ever!!

1. Sheetrock Texture: Old Is Gold

Sheetrock ceiling texture is a drywall ceiling texture that has been famous since 1917. The reason this drywall texture is so awesomely renowned is because of the artistic look that it gives to your ceiling

And the best part is you don’t need to use any sort of spray paint in this case. You can achieve this texture by using your artistic hand technique and without using any special brushes.

This texture is perfect for any room. There are no restrictions on the use of this ceiling texture.

2. Stipple Brush Texture: A Test Of Your Skill

This texture is not as easy as it seems. You need skills to create this texture.

To create this texture, you need a roller and slap brush.

The fascinating fact about this texture is it can cover the bumps and holes on your ceiling. And if you have the skills, then this texture can surely make your ceiling look gorgeous than ever!!

3. Swirl Texture: Creativity Taken To A New Level

To achieve this texture, you need either a roller or sprayer.

You can also do this by using a technique called “the basic swirl” method.

But one thing that you need to keep in mind is while creating this texture, you’ll need a lot of patience to get the best result.

And the difficult part is you need to create the pattern before the mud dries. So, make sure to have a helping hand by your side.

Overall, the texture can really give that awesome look on your ceilings if you do it in the right way!!!

4. Orange Peel Texture: A Color Of Choice

The name suggests all the colors of orange skin, but sometimes it’s also called “an eggshell” ceiling texture.

If you really love this color, then this can be on the top of your favorite lists.

To create this texture, you need to apply thin mud to the ceiling using a spray gun set at very high pressure.

The more artistic mind you have, the more artistic look it has got!!!!

5. Smooth Textures: Choice Of Many

If you are someone who wants the best at a cheap cost, then this texture is just the right choice for you. Moreover, you don’t need to have many skills to create this texture design.

The look of this texture is just mind-blowing, and if you are someone who likes things to be consistently gorgeous, then this is the texture you can have for your ceiling.

This texture is effortless to remove and is also perfectly suited for any room.

6. Tree Bark Texture: Beauty Of Nature

If you are someone who loves nature and wants to bring the reflection of nature inside your home, then this textured style is just the option you can have.

This ceiling has the look of a tree. You can create this texture just by using a heavy roller. The texture might look simply, but it’s very artistic and can surely catch the eyes of many.

If you have a farmhouse, then this texture will double the beauty!!!!!

7. Slap Brush Texture: Slap The Beauty Out

Artistic, gorgeous, beautiful, and elegant are the nicknames you can give to this texture. A complete package of beauty!!!!

To get this texture, you’ll need a brush with very stiff bristles and thin mud.

Firstly, you have to cover your ceiling with mud using a roller, then take the brush and slap the ceiling from the edge.

This can be a hard nut to crack because if you don’t get it right on the first shot, the whole ceiling might end up looking messy.

8. Popcorn Texture: Cottage Cheese

This texture, also known as the “cottage cheese” or “acoustic” ceiling texture, is probably one of the most famous ceiling textures ever!!!

If you look closely, you’ll see it’s kind of a look-alike of “popcorn.” That’s why it’s called “popcorn texture.”

To achieve the correct texture, you need to use a sprayer to apply to your ceiling. This contains Styrofoam with mud which gives that puffy effect.

But it will require you to have a lot of skill to achieve this effect. That’s because the “popcorn texture” is both challenging to apply and remove.

I hope this article will help you to know about the needs of ceiling textures and drywall options. And now I believe you’ll be able to get yourself the perfect texture for your ceilings.

The Ceiling Textures And Your Drywall Options

How Can I Remove Old Ceiling Textures Safely?

Removing old ceiling textures can be a big job, but it doesn’t have to be intimidating! If you want to update your ceiling and get rid of that outdated texture, I’m here to help.

No matter if you have popcorn, stipple, or another type of texture, this process takes a little bit of care, but don’t worry!

Here’s a step-by-step guide on how to remove an old ceiling texture without breaking your back or the bank.

Step 1: Test For Asbestos

Before you get out any tools…safety first!  Remember, many older ceilings (especially those with popcorn texture installed prior to 1980) contain asbestos. Before doing anything else, have your ceiling tested for asbestos.

You can hire a pro to test the ceiling or buy a self-test kit.

If asbestos is present, halt all work and consult pros immediately. Asbestos removal is not a do-it-yourself job because it poses serious health risks if mishandled.

Step 2: Clear The Room

If there’s no asbestos present, it’s time to get the room ready. Cover all the furniture. You’d be amazed at how far a fine mist of water, compound, and paint can travel!

Also, plastic should be removed from the floors, and tape should be around any ceiling fans or lights that are not being removed. I can personally tell you we didn’t do this.

We found dried white dust on our bedspread when we were stripping the wallpaper in our bedroom, and we had to clean up all the residual dust a little too late. It was wild!

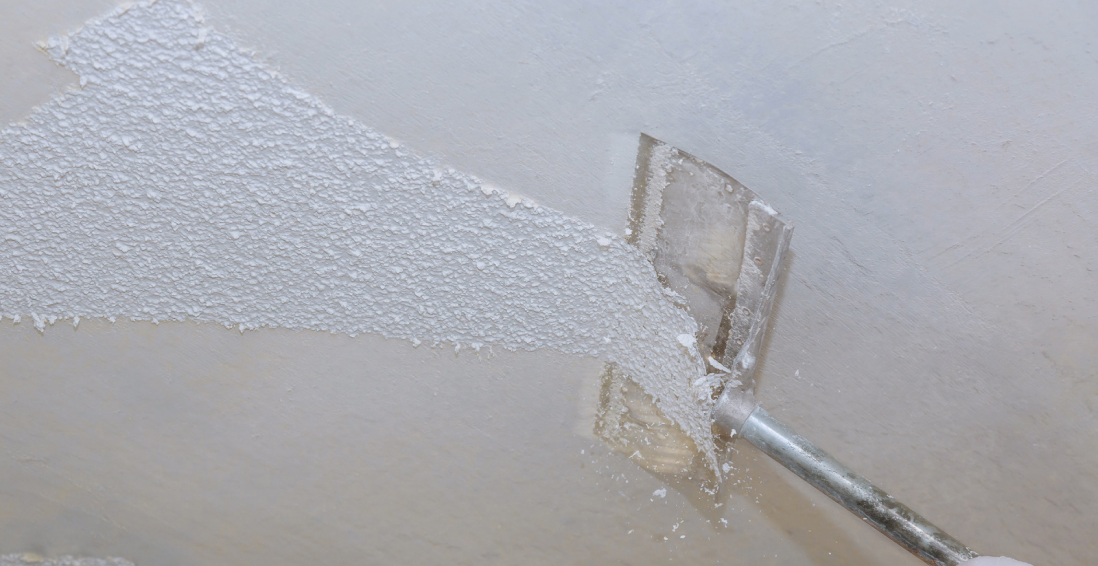
Step 3: Soften The Texture For Better Finish

Here’s where the fun starts! To make that texture easier to remove, you’ll need to soften it.

Fill a spray bottle with warm water and mist the ceiling. You don’t want to drench it. If you put too much water on the ceiling, it could end up damaging the drywall underneath.

Allow the water to sit for about 15–20 minutes or so, giving it time to penetrate and loosen up that texture material. Don’t rush this step. It’ll only cause more work for you in the long run.

Step 4: Clean Your Work

Grab a wide putty knife or scraper and start scraping off the texture. Do small sections at a time, and scrape at a shallow angle so that you don’t gouge the drywall underneath.

If it’s not coming off well, spray some more with the water bottle and let it sit for a little longer.

This step can be kind of messy and time-consuming, but have patience because, in the end, you will have a nice smooth ceiling.

Step 5: Patch & Sand

Once the texture is gone, you may notice a few dings or dents in the ceiling.

Don’t worry! Just fill them with some joint compound, sand it smooth, wipe away any dust and you’re ready for a new ceiling.

And that’s it!

A fresh, smooth ceiling in no time!

Read Also:

A passionate writer and an avid reader, Soumava is academically inclined and loves writing on topics requiring deep research. Having 3+ years of experience, Soumava also loves writing blogs in other domains, including digital marketing, business, technology, travel, and sports.

View all posts

Leave a Reply

Your email address will not be published. Required fields are marked *

Related

Build A Sturdy House

Making Your Home Strong From Within: Tips To Build A Sturdy House

The holiday season is coming, so is the time to build a sturdy house that can withstand the harsh winters. Furthermore, with holidays around, you would look to have a house where kids can play and have some fun.  Also, with family and friends coming over, it is the best time to invest some time and money to enter the new year in a new house. The house will keep your whole family safe and cozy in winter and cool in summer.  Therefore, in this section, we will discuss how to build a strong home with a strong foundation. Mainly, the focus will be laid on houses absorbing minor earthquakes and storms. So, you need to shift your attention to the next part.  Tips To Build A Sturdy Home  With the holiday season coming faster than ever, you need to make some plans to build a beautiful house. Therefore, it is the best time to invest your money to build the best house for you and your family. Consequently, you need to make proper planning and prepare a future understanding of the house.  That's why we will give you some tips to build a sturdy home for yourself -  1. Getting Proper Permits  One of the things that you need to do is go to the local housing departments, where you can get a housing permit to build a proper house. You need to know how to build a house in a legal way so that government people won’t knock on your door unnecessarily. Therefore, you need to get all the permits that will get you going in the process of building a good house -  Pouring Foundation  Construction Permit  Installing home systems like heating and cooling  Installation of wires and plumbing materials  Adding other utilities to the house Once you get all the permits done, you can then start building your house properly. For this, you might need a contractor builder who will get all the permits for you. Consequently, they all bring all the necessary things to build the house.  2. Getting The Right Builder  Another thing that you need to do is get the right builder.  This will ensure that you get to build a sturdy house. Consequently, they will ensure that they can give you the right foundation for you to build a great structure. Moreover, you should discuss it with them, where you can sit and discuss the project.  Hence, you can discuss the type of house you want yourself, especially everything from the roof to the ground, and you can showcase proper planning.  Then, they can put the blueprint into action and build a big house for you. For this, you need to do some internet research. It will help you to hire the best house to enter the new house.  And if you are looking for a roofing contractor, you can visit Gj Keller’s website. You can gain access to the service from the site.  3. Building A Budget  One of the important things that you need to do is decide on a budget. It is the thing that will showcase what type of house you want for yourself. It will ensure that you are able to earn a valuable house for you and your family.  Therefore, you need to sit with your partner and discuss some of the aspects of budgets. There, you can decide where you need to invest the money carefully. Mainly, it refers to the building materials, wires, plumbing equipment, and paint.  Consequently, you must fixate your mind on the process of what type of house you want to live in. That will clear your head and then create a proper budget for your dream sturdy house.  4. Always Look Into The Future  Another thing that you need to decide on is always looking into the future while building a house. It's important that you see how you'll accommodate every member of your house. Thus, it would help if you stepped into the future to create the best sturdy home.  Here are a few things you need to look into -  Always have three or more rooms in the house: It will ensure that your house can accommodate every member of the house. Also, keep a spare room for guests.  Have two or more bathrooms: To stay safer, you should always have two bathrooms to make your house more functional    Add some greeneries to your house: You should look to include some house plants and trees in the garden to make your house look beautiful.  Look to install security: From security cameras to space to charge your electric cars. Keep some extra space in the house in case you choose to expand your house in the future. After you set all the things regarding the points mentioned, then you can build a better house for yourself and your family.   5. Choosing The Right Construction Site  Lastly, one of the things you need to do is choose the right construction site. This is because if you want to build over soft soil, the chances of crashing down will increase. Therefore, you need to buy the right plot, especially ensure that the house is not beside any pond or lake.  The soil is soft in that area. So, you need to look into a few things that will help you build the best house, especially for the foundation part -  Basement  Concrete slab  Pier and beam  Crawl space  These things will ensure that you give the proper foundations for your house to grow and welcome all your family members.  The Bottom Line  In the end, we can say that there are many aspects of the house that you need to look into to build a proper house. Therefore, if you follow the tips, you will surely have a sturdy house where you can welcome everyone in the house.  Also, with the holiday season around the corner, the sturdy house will allow your kids and their friends to have fun on Christmas.  Read Also: How to Make Your Student Apartment Feel Like Your Own House? How Do I Know If I Can Afford Buy A House In Valdosta Ga Here’s How We Buy Houses Companies Work

READ MOREDetails
Metal Studs

Why Metal Studs are More Suitable for Your Construction Works

When it comes to building structures, it is preferable to consider using metal studs in place of wooden studs for non-load bearing walls. Research shows that more than 50% of structures are built with metal studs made from cold-formed sheets. However, metal studs conduct cold, but builders prefer using metal studs in place of woods for the following reasons. 1. Metal studs are lighter than wooden studs and convenient to work: Metal studs are lighter in weight than wooden studs because of their hollow shape. This makes them less bulky than wooden studs in terms of transportation and storage. When cutting metal studs using aviation snips, there are no sawdusts, unlike cutting through wooden studs. But it is advisable to protect your hands from sharp ends using gloves, especially during galvanized steel frame building construction. 2. Metal studs are easier to handle: In terms of installation, metal studs weigh far less than wooden studs and are held in place with screws. Therefore, it easy to correct installation blunders with metal studs. 3. Metal studs are less prone to attacks from atmospheric elements: Metal studs are not inclined to stresses and uneven shrinkage. Unlike wooden studs, which are susceptible to such factors with time. Also, metal studs are more resistant to mold and rot, which are common wooden infections. Although metal studs rust with time, this is preventable by installing a vapor barrier on the concrete floor. This explains the durability and sturdiness commonly enjoyed with galvanized steel frame building. 4. Metal studs have a higher tensile strength than wooden studs: Metal studs have a higher tensile strength and flexibility than wooden studs. Therefore, they are preferred for construction in wind prone areas and seismic zones like the Gulf Coast states of the USA. 5. Metal studs are resistant to fire and insect attacks: Metal studs are not prone to insect attacks like carpenter ants and termites, which can cause grave damages to wooden studs. Also, in terms of fire outbreaks, metal studs are fire resistant and do not burn in the case of a fire outbreak, unlike wooden studs. 6. Metal studs have a higher cost advantage: Wooden studs cost 15% lesser than metal studs, but metal studs offer cost advantages in other areas. These advantages cut across warranty call-backs in the sales of metal studs are much reduced because metal studs are not susceptible to shrinkage, and additional stress-related factors. Buildings built with metal studs do not have cracks or nail pops to fix after completion. Therefore, scraps are significantly reduced. Up to 20% wastage is recorded when wooden studs are used in construction. Hence the cost of disposing of discarded materials is decreased considerably. 7. Higher insurance discounts: Owners of buildings built with metal studs enjoy a higher insurance discount due to lower risk factors. Unlike buildings built with wooden studs, which attracts a higher insurance premium because of their higher susceptibility to fire and other environmental factors. Conclusion: Metal studs are preferable for buildings because they are environmentally friendly compared with wooden studs. They can be recycled and are readily available in similar wooden dimensions. Read Also: How To Protect Your Wood Flooring In A Busy Household Hardwood Timber Flooring: Gives A Classic Look To Your Home

READ MOREDetails
kitchen cabinet

How to Choose the Right Kitchen Cabinet Materials for Your Project?

Among the defining factors of your kitchen’s overall look are its cabinets. After all, in kitchen design, the cabinetry often serves as an anchor, the thing that ties every other design elements together to create a seamless look. As such, beyond style, what’s more, important is to choose the right materials for your kitchen cabinet. Reliable flat pack kitchen contractors can offer you a variety of kitchen cabinet material choices. Moreover, they can also recommend suitable materials and even combinations of materials to suit both style and practical function. Here’s a quick look into the most common materials used by cabinet makers. How to Choose the Right Kitchen Cabinet Materials for Your Project: Hardwood Cabinets You could say that hardwood kitchen cabinets are the grandfather of all kitchen cabinets. One of the main draws of using hardwood is that, because it’s a natural material that varies in grain from piece to piece, every kitchen cabinet will be equally unique. There are no two trees that are exactly alike, which means that even cabinets made from the same kind of hardwood will have subtle differences. Another benefit of hardwood is that it’s not only durable. It’s also easy to repair. Even inexperienced carpenters can DIY procedures like sanding, staining, or refinishing. Finally, there’s a wealth of options to choose from. Popular hardwood species include jarrah, marri, birch, cherry, maple, and oak. When it comes to downsides, however, the most common disadvantage people cite is that hardwoods tend to be heavy. As such, if you want pure hardwood cabinets, you have to make sure that there’s a sturdy enough structure to support them. Another drawback of hardwood kitchen cabinets is that they’re expensive, especially if you want fully customized designs. Some Perth kitchen cabinet makers will suggest combining hardwoods with other materials to help drive down the cost. Are hardwood cabinets right for your kitchen? If budget isn’t an issue and you want beautiful, long-lasting cabinets, hardwood is the best choice. Hardwood is also great for busy kitchens since it’s a heavy-duty material. Medium-Density Fibreboard Cabinets Medium-density fibreboard or MDF has gained popularity in the world of cabinetry, especially since IKEA has long been using it for their own kitchen cabinets and other furniture. The material is a composite of recycled wood fibers and wax, bound together by resin. The boards are made through high-pressure CNC milling, resulting in strong and dense material. Indeed, MDF is a versatile substrate, able to be painted, veneered, lacquered, laminated, or treated with almost any process or substance. MDF is also proven to be resistant to cracking and is considerably smoother than plywood. The one downside of MDF is that it needs to be properly sealed. Otherwise, it has a tendency to warp. You can use carpenter’s glue for this purpose, especially if you’re going to paint over the material. For some waterproofing, you can use the wood sealant, varnish, or a coat of moisture-resistant paint. Are MDF cabinets right for your kitchen? Those looking for more affordable yet high-quality alternatives can turn to MDF. Contemporary kitchens and those who love to DIY and customize will also benefit from MDF cabinets. Plywood Cabinets Plywood is made from multiple thin layers or plies of wood that are bound together by a combination of glue, heat, and pressure. The adjacent layers are rotated so that the grains are facing alternate directions. This technique, called cross-graining, enhances the material’s strength in all directions. Moreover, it helps prevent shrinkage and expansion, minimizes splitting of the layers (when nailed at the edges), and reduces warping. Many cabinet makers consider plywood excellent material. Apart from the benefits mentioned above, plywood is also moisture-resistant, light but sturdy, flexible, and easy to install. In case the cabinets get damaged, plywood is also quite easy to repair through DIY methods. Finally, plywood is also much less expensive compared to even the most affordable hardwood. Do remember that making plywood cabinets is all about choosing the right thickness. You’d want to use a thicker material on drawer bottoms, for example, or you risk it cracking or splitting if you put heavier items in it. Your kitchen cabinet maker likely already knows this, of course, but just make sure that you tell them what you need so they use the correct types of material. Also, ask where they source their plywood. Note that some lower-quality products may have gaps between the individual plies. Are our plywood cabinets right for your kitchen? Plywood is ideal if you’re working with a stricter budget but don’t want to compromise on quality. You may also want to consider plywood if you’re making your own cabinets since it’s an easy material to work with. Particleboard Cabinets Particleboard is often compared to plywood. Also called low-density fibreboard (LDF) or chipboard, particleboard is engineered from various recycled wood products like wood chips, sawdust, and wood shavings. These materials are glued together, then pressed and extruded to create sheets. As a final touch, particleboard is laminated or given a wood veneer for a better-looking appearance (as plain particleboard can be, well, plain-looking). The primary advantage of using particleboard for kitchen cabinets is that because it’s made from scrap materials, it’s very cheap. It’s also very lightweight. However, particleboard also tends to be on the lower end of the durability scale, especially when subjected to tension. Moreover, the material is prone to moisture damage and is not built to withstand sagging. Nonetheless, you can still find high-quality particleboards that are quite sturdy. Ask your kitchen cabinet maker to help you find the best ones. Are particleboard cabinets right for your kitchen? If your kitchen doesn’t see too much action and you don’t have any heavy equipment, particleboard cabinets and shelves will more than suffice. Stainless Steel Cabinets Finally, there’s stainless steel. Not many households opt for this material for kitchen cabinets. In fact, these are often seen only in industrial, professional-level kitchens. Nonetheless, stainless steel is an ideal material in the kitchen, both for cabinets and general usages like shelving and racks. It’s durable, doesn’t expand or contract, and resistant to most kinds of damage. Stainless steel can be difficult to clean, however, but it’s very hardy so it can withstand a lot of scrubbing and even harsh chemicals. This makes sterilizing a breeze. Nonetheless, you should also note that stainless steel cabinets tend to be expensive, sometimes costing even more than hardwood. Are stainless cabinets right for your kitchen? Do you consider yourself a chef in your own right? Do you often cook, not just for yourself but also for your family and friends? If you do, then stainless steel kitchen cabinets are perfect for you. Many of these materials, except perhaps for stainless steel, can be customized and combined with plenty of other materials, so the style isn’t the biggest issue. Therefore, in the end, choosing the right kitchen cabinet materials all boils down to two primary considerations: your budget and how often you’re going to use your kitchen. When you focus on these two, the decision will become simpler. Contact kitchens now for quality flat pack kitchens Read Also: Kitchen Renovations Must be Done at Regular Intervals 7 Tips for Getting Rid of Clutter in Your Home Top Secrets That Slash Your Kitchen Remodeling Bill in Half

READ MOREDetails