The Best Multi-Tools For Woodworkers -Top Awesome Inventions

Published on: 25 February 2017 Last Updated on: 11 September 2024
Best Multi-Tools for Woodworkers

Being a woodworker can be rewarding work for a man or woman who enjoys this kind of hobby. It doesn’t have to be just a hobby either as it can be turned into something that can bring another income into your life. Although woodworkers like working with their hands, they have multi-tools and awesome inventions to help ensure the person doing the woodworking can get the job done right, the first time, every time.

How can Multi-Tools Help Woodworkers? 

Multi-tools are useful for woodworkers who want to have a variety of tools at their disposal without compromising on quality, convenience, or performance. They can help woodworkers complete their projects faster, easier, and better.

Multi-tools are versatile devices that can perform multiple functions in a single unit. They can help woodworkers in various ways, such as:

  • Saving space and weight: Multi tools can reduce the need for carrying or storing multiple tools for different tasks. They can fit in a pocket, a belt holster, or a small pouch, making them easy to access and transport.
  • Saving time and effort: Multi tools can simplify the workflow of woodworkers by allowing them to switch between different tools quickly and easily. They can also handle tasks that would otherwise require specialized tools or equipment, such as cutting, drilling, sanding, or scraping.
  • Enhancing creativity and flexibility: Multi tools can enable woodworkers to tackle a wide range of projects, from simple repairs to complex designs. They can also adapt to different materials, shapes, and sizes of wood, as well as other materials such as metal, plastic, or leather.

 Some Common Examples  

Some examples of multi-tools for woodworkers are:

  • Pocket hole jigs: These devices help woodworkers create pocket hole joinery, which is a fast and easy way of joining pieces of wood together using pocket screws.
  • 1-2-3 setup blocks: These metallic blocks help woodworkers take quick and accurate measurements for setting up and aligning blades, fences, bits, and other cutters¹.
  • Multi-mark tool: This tool can be used for squaring, leveling, and transferring measurements from one workpiece to another.
  • Folding plier multi-tools: These tools feature a pair of pliers as the main tool, along with other tools such as knives, screwdrivers, scissors, saws, files, and wire cutters.
  • Scissor-style multi-tools: These are tools that feature a pair of scissors as the main tool, along with other tools such as knives, screwdrivers, tweezers, bottle openers, and nail files.

Here are the best multi-tools for woodworkers, and the top awesome inventions for woodworking:

1. Cordless Drills

Cordless drills are hand drills that are powered by a battery. Because of the battery power, this multi-tool can be used anywhere a person needs it. This even includes a small, upside-down space that other tools may not be able to reach. Not only this, but cordless drills also come with a variety of different drill bits that can be used on anything. This is why this is a great multi-tool for woodworkers.

2. Wood Router
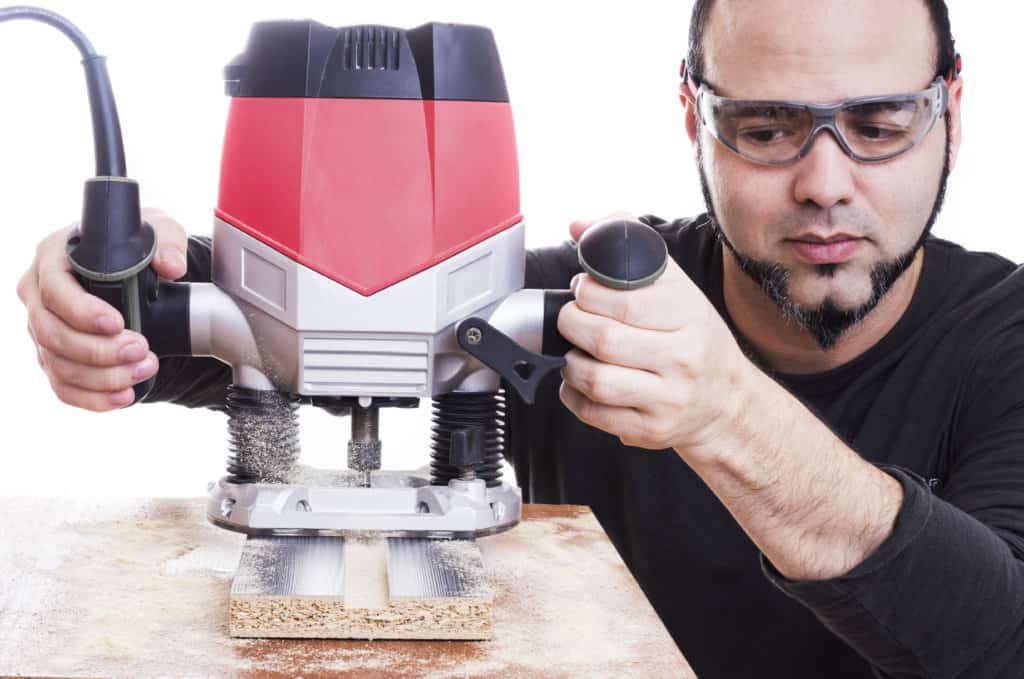
Wood Router

The possibilities of getting the job done with a wood router are endless for woodworkers. Check out Here for some of the best wood routers. Almost every woodworker knows they can get just about anything done with this awesome invention. This invention is light enough to be used in small and tight spaces. It also has an electrical version for ease of use. Not only this, but you can mount it on a table to get more accurate work done. The variety of bits for this tool comes in three different sizes.

They include the helical style which can be used for drilling, trimming, and shaping. The second style is the profile style which can be used for many different things including shaping the rounded edges to carving and you can also use it to round edges on corners or angles. Finally, the third style is called fluted bits and they can be used for cutting or shaping the edges or even trimming them. To select the best wood router to have to really decide whether you want to go corded or cordless. See how much work you can get done with this awesome invention?

3. Wood Lathe

The wood lathe is actually two centuries old and keeps improving over the years. The woodworker can use this multi-tool to spin the wood and shape and trim it any way they want to. Although this tool is over two hundred years old, it now comes in a variety of sizes. This tool is great because it can hold the largest piece of wood to the smallest piece of wood.

4. Chisels

Chisels are great woodworking tools that are used by the woodworker’s hand to shape and trim the wood to any size the person wants it. They come in tempered steel with a variety of shaped ends. They mainly have wooden handles on them and can be used to hold the wood by one area while hitting it with a hammer or a wooden mallet to shape or trim the wood. However, there is one common use for this tool and that is to finish joint holes. Although the woodworker uses the router for making the shape, they come back with a chisel to make the exact cut they need.

Chisels are also used for hand carving wood. When you want to carve wood into a different shape, chisels are the best tool to use.

5. Oscillating Tool

If you are a beginner woodworker, you won’t want to start out using this tool until you get used to all of the other tools. This is because it is more powerful than any of the other woodworking tools used today. If you are a woodworker, you will need to learn to use the oscillating tool before you try it. Asking someone who is more experienced with it is a good idea. However, the woodworker will not regret taking the time to use this tool because it has so many uses.

With the oscillating tool, it is so different that the blades move back and forth instead of around or up and down. With this tool, there are five different types of blades for the different uses it.
Oscillating Tool

One type of blade for the oscillating tool is that it can remove the wood molding that was put into place. Another type of blade can be cut through nails or wood without a problem. There are also a few different types of blades that cut through a variety of different wood and can also make a specific corner cut for the wood.

There are also blades for this tool that can make square cuts through the wood as well as blades to grind areas of wood down.

Final Thoughts

There are many different types of tools a woodworker can explore, try, and use when they are woodworking. Trying the different tools and exploring different things that can be done with these tools can be enjoyable and make the imagination run wild. Remember, this doesn’t just have to be a hobby. If you enjoy woodworking, why not make some money with it too? There are many different ways to make money with a woodworking job. One great way is to make different wooden furniture that can be sold to the public. The person enjoying this type of job can even open their own store to sell these items.

Although there are many different ways to use these tools for woodworking, it is always up to the woodworker to try the different tools and make the best use out of them. Letting their imagination run wild when playing and working with different wood can bring joy to the woodworker and money as well.

Read More:

  1. Home Hacks: Stuff You Can Clean In One Hour Or Less
  2. Hardwood Timber Flooring: Gives A Classic Look To Your Home
  3. What Species Of Wood Is Right For Your Wine Cellar Furniture?

Mashum Mollah is the feature writer of Search Engine Magazine and an SEO Analyst at Real Wealth Business. Over the last 3 years, He has successfully developed and implemented online marketing, SEO, and conversion campaigns for 50+ businesses of all sizes. He is the co-founder of Social Media Magazine.

View all posts

Leave a Reply

Your email address will not be published. Required fields are marked *

Related

Garden Edging

Garden Edging for Beginners

Edging offers a beautiful touch to your garden, but many people think of edging as expensive and time-consuming. It also protects the flowerbeds, lawns, and other plants by creating a boundary for them. Edging makes the perennials and annual flower beds look clearer and more polished. Also, you can paint the brick and concrete edging to create a color theme for your garden. However, you need to consider the plan and design of the garden before creating an edging, and it can be challenging for beginners. Let us know more about edging for beginners that they can use for their home garden. Consider the available space: The amount of available space plays a special role in designing garden edging. For instance, it would not be good to choose large slabs of boulders to create an edging in a small garden. Small brick edging, metal sheets, and plastic sheets are more suitable to use as edging in small gardens. However, if you have sufficient space or a large garden, you can go with any type or style. Make your garden look new by using the most creative edging solutions. Once you are able to decide on what will work best, you will be able to completely transform the garden space and wow everyone who sees it. Plan your budget: You need to plan the budget for your garden because it's a way to narrow down your options. Planning your budget also helps you to save time as you will exactly know what things you can buy within your budget. Now let us know various types of edgings that you can use in your garden. Edging trees might look simple enough, but a lot of things can go wrong if you are not familiar with the processes. If you are looking to make the most out of your budget, you can consider Tree Service Arlington for garden edging. They are professionals that will get the best work done so that you do not have to keep thinking and worrying about overgrown trees on your property. Using funds and spending them on experts will also help you save on expenditures over the long run. Steel, Aluminum, and Plastic: The simplest and most subtle edge of the landscape that effectively separates a lawn from a garden is made of steel, aluminum, or plastic strips 4 inches deep. The metal lawn edge easily bends into beautiful, smooth curves and prevents grassroots from spreading. However, painted aluminum and steel provide the most elegant and sophisticated look of garden edging as it almost disappears into the grass and garden bed. Plastic garden edge types have a prominent black bump on the top edge. They all work best on a reasonable basis; If you have a lot of drops and climbs, it's easy to install a paving edge. Plastic edging: The plastic aging may not look so glamorous, but it is relatively simple and highly convenient to install. As it's available in small sections, you can easily stall one part at a time that requires you to dig the ground with a trench to sink in the edge. The primary benefit of plastic edging is that it is inexpensive and long-lasting. Paver stones: Concrete pavers are another form of material that have a long life and are nearly indestructible. One disadvantage of paver stones is that they are heavy to handle and take time to install. So, you need to take off from work for a few days to perform heavy digging and installation of paving stones. Paving stones are durable and last longer than any other material available for edging. Natural rock: Mother durable material after paving stones that you can use to create an edging. They are available in a variety of shapes, sizes, and colors. They are very easy to install as all you need to do is the edges of each garden bed. However, as they have irregular shapes, you need to choose rocks of similar shape and size to create the most pleasing visual impact. You can visit a garden center for a nursery to buy natural rocks for your garden. Flagstone: Black stones are available in a variety of shades and thicknesses. You can directly place the flat species of flagstone along your garden edge or stack them to create a retro-style look for your landscape. Most local nurseries and garden centers offer some varieties of flagstones. They look pretty in your garden and last for years to come. Brick: Bricks are easily available in every area and are very convenient to install any landscape. All you need is to lay the bricks keeping their wide side down. The challenging part of the installation of bricks is to level them right. A simple way to level them is to use a string or line level or a rubber mallet. Bricks last longer and are relatively cheaper than other materials. Mazzega's landscaping offers premium-quality landscaping materials for residential and commercial use in Kelmscott. If you are located in or near Kelmscott, they can help you in choosing a suitable garden edging solution and offer landscaping materials. In addition to a physical store, they also have an online shop where you can order products on their website. Final Words: These were some garden edging tips for beginners. Creating garden edging is not difficult if you take help from a professional landscaping service. The difficulty level of installation depends on the type of material you choose for landscaping. Following these tips can help you to create a garden edging for landscape owners. Read Also: How to Maintain a Bright and Beautiful Garden During Winter How To Install Artificial Grass In Your Garden – Installation Guide Step By Step How to Choose the Right Containers for Your Container Garden How to Maintain Your Garden Railings?

READ MOREDetails
Home Look Luxurious

5 Interesting Ways To Make A Home Look Luxurious

If you want to make your home luxurious, the good news is, there are many ways to do that. When trying to make your home luxurious, you have to remodel the interior and exterior of your home. Let's consider five interesting ways you can make a home look luxurious. Ways To Make A Home Look Luxurious There are different ways homeowners can make their homes look luxurious. We are going to consider five of the ways you can do that. Paint The Walls To Make Your Home Luxurious First, you can start by painting both the interior and exterior of your home. Suppose the paint is old; add new layers of paint. Ensure you use neutral colours when painting your home interior. Neutral colour has a way of producing a calm effect. Apart from that, it also allows you to change the overall style of your home without repainting it. Neutral colours also have a way of highlighting furniture, wall decor, and other architectural designs. It is also the best type of colour that can attract potential home buyers. So to make your home look luxurious, paint the walls with neutral colours like white, ivory, or beige. Paint your living room, dining, hallway, kitchen, and bedroom. Upgrade Door And Window Another way you can make your home look luxurious is by upgrading your doors and windows. The door is part of the things a person will notice on entering your home. If the door of your house is old and squeaky, replace them. Change your front door as well as the ones inside. If you don't want to change the doors, you can repair them and spray them with paint to make them look new. You can as well replace your doorknob with a classy one. Upgrading your door will have a noticeable effect on your home. Apart from your doors, you also need to upgrade your window. Repair your window if it's old and damaged. Spray the window frame to make it look clean and new. Replace any crack or broken glass and check the curtains too. If the curtains are old, replace them with fabric. If possible, add blinds to your windows. Window blinds have a way of making the interior look modern and classy. Make Your House Luxurious With Plants Flowering plants have a way of beautifying the environment. If you want a cheap way to make your home look luxurious, try adding plants. Use plants to decorate both the inside and outside of your house. If you have a space in your home, place potted plants in the area. Homeowners can also use plants to create a focal point in their homes by hanging greenery in their dining or living room. Add potted flowers to your balcony or porch. Homeowners can also use flowers to decorate their landscapes. Replace Old Flooring Material You can also make your home look luxurious by upgrading your flooring. If your floor tiles have chipped or cracked, replace them with new ones. When replacing your indoor flooring, don't ignore your bathroom and kitchen. Replace your bathroom and kitchen tiles if it's old. Homeowners can also upgrade their outdoor flooring by creating a nice garden design with decking material. You can use a decking material like composite decking. Composite decking will add value to your home, making it look luxurious. Make It Luxurious With Lights Homeowners can make their home look luxurious by illuminating it with lights. The lights will not only illuminate your home but make it visually appealing. Use chandeliers or oversized pendant lights to create a focal point in your interior. You can also add lights around your landscape to make your home look luxurious. Ensure you add the lights moderately to avoid flooding your home with too many lights. Adding lights to your home is a way to improve its aesthetics. Conclusion There are different ways homeowners can make their homes luxurious. Homeowners should renovate their doors, windows, walls, and flooring. Read Also: Planting & Harvesting Mint The Most Common Causes of Truck Accidents How to Plant Grass Seed on Hard Dirt? – Latest Update 2021 Las Vegas Electricians Share Fun Lighting Ideas for Your Home

READ MOREDetails
Loft

Is Living in a Loft All It Is Cracked Up to Be?

There are one thing movies and TVs all agree on – lofts are cool. If there is a loft in a TV show or a movie, you can bet it will be chic and stylish, furnished in the latest fashion, exuding both the minimalism of the upper class and the industrial design of the hipster movement. Generally speaking, a loft can also be the small attic apartment directly under the roof of the building, but we will keep to the first definition of the loft. We asked real estate pros from Neuman & Neuman to tell us what advantages and disadvantages you may expect if you opt to live in a loft. 1. High Ceilings As mentioned before, we will focus on the apartments on the top floor which have a lot of free space in which you can adapt to your liking, usually including the attic. That means that the height of the ceilings will be considerably higher than in other apartments, even in that same building. Naturally, what you do with all that extra vertical space is up to you, some people enjoy having a completely open plan and admire the height of the ceiling, whereas other construct landings and floors within the apartment, creating smaller separate units with or without physical walls. 2. A Lot of Natural Light Being on the top floor of a building comes with some perks, and having access to a lot more natural light than others is one of them. In cases when a building or the loft itself is adapted from a different purpose into a living unit, ceiling windows may exist already, or you may install them to give yourself that coveted sunlight. In other cases, ceiling windows may not be an option, due to the building itself, but with the vertical dimension of your home a lot bigger than a regular apartment, you may have a lot more room for regular wall windows which a door interior designer will know how to incorporate in your home’s design. 3. An Amazing View Finally, living on the top floor of a building means that your view of the surroundings promises to be spectacular. If you are fortunate enough to have a terrace or a balcony – all the better. If not, I’m sure that the view from your many large windows is just as spectacular as ever. The view factor is particularly appealing in revitalized buildings in the city centers, like in San Diego’s Little Italy district, or Brooklyn in New York – which makes the prices of these loft properties go up in recent times, especially since they’re becoming more popular with the younger population. 4. Disadvantages of Lofts Even though lofts look amazing and have a lot of advantages, there are some drawbacks as well. One of the biggest potential problems is that lofts tend to be, at least partly, repurposed old buildings. That means that they were not built for living and that the insulation is not great. And having so many large windows isn't exactly helping, either. This can potentially increase your heating and air conditioning bills. However, if you spend some money on adaptation and adding insulation, you can increase your home’s energy efficiency considerably. Another problem may be the echo and the noise, especially if you opt for a completely open plan. The cavernous nature of lofts means that the sound will reverberate and there's not much you can do about it. Having drapes and cushioned furniture may reduce this problem, but this is one thing you will have to learn to live with if you go for buying or renting a loft. Read Also: How Long Does Vinyl Flooring Last? 5 Factors to Consider in Choosing the Right Floor Colors 7 Unexpected Ways to Use Glass and Wood for your Home 7 Expert Hacks for Downsizing to a Smaller Apartment 10 Points to Remember if you are Building a Residential House

READ MOREDetails