Published on: 19 August 2022
Last Updated on: 19 February 2025
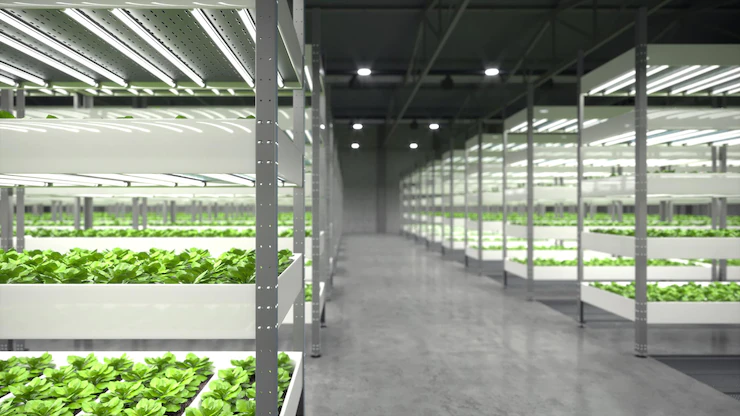
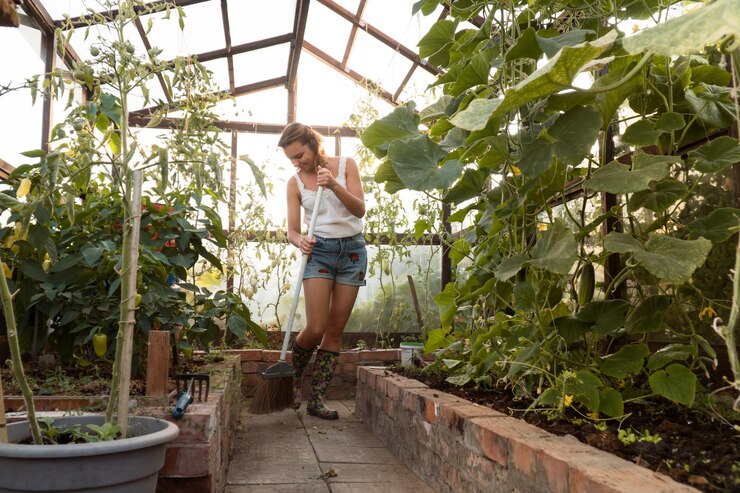
A greenhouse is a structure that is enclosed on all sides, has predetermined dimensions, and has a roof that is composed of clear glass or sheets of plastic that are translucent.
Because it contributes to the maintenance of the greenhouse’s internal climate, the type of commercial greenhouse flooring that you select for your greenhouse is an important consideration.
In most cases, it will rely on your preferred method of plant cultivation.
Why Is Commercial Greenhouse Flooring Important?
It is important to note that the commercial greenhouse flooring inside your greenhouse serves as the basic base of the structure, and it has the potential to make your time spent growing far more satisfying and gratifying.
Check out this link for more helpful tips for manufacturing an ideal flooring for commercial greenhouse
Before beginning the installation process, it is important to carefully analyze the many alternatives available for the greenhouse’s floor. In many ways, the floors of the greenhouse serve as the structure’s foundation.
They should be able to allow for proper drainage, protect the greenhouse from cold, prevent weeds and pests from entering, and keep you warm. You might be wondering what material to use for the floors of greenhouses.
To begin, there is a wide variety of substrates suitable for use as greenhouse flooring. Continue reading to discover how to construct a commercial greenhouse flooring, as well as the materials that may be used for greenhouse flooring and manufacturing the ideal flooring for a commercial greenhouse.
What Are Some Benefits Of Commercial Greenhouse Flooring?
Commercial greenhouse flooring is the surface that covers the ground inside a greenhouse. It can be made of various materials, such as soil, concrete, gravel, stone, wood, or tiles. Commercial greenhouse flooring can provide several benefits for the greenhouse owners and operators, such as:
Improving drainage: Commercial greenhouse flooring can prevent waterlogging and flooding by allowing excess water to drain away from the plants and the structure. This can reduce the risk of root rot, fungal diseases, and structural damage.
Preventing weed growth: Commercial greenhouse flooring can act as a weed barrier, preventing unwanted plants from sprouting and competing with the crops for nutrients, water, and space. This can save time and labor for weeding and improve crop quality and yield.
Controlling pests and diseases: Commercial greenhouse flooring can also prevent pests and pathogens from entering the greenhouse through the soil. This can reduce the need for pesticides and fungicides, and protect the plants from harmful insects, rodents, bacteria, and viruses.
Enhancing insulation: Commercial greenhouse flooring can help maintain the temperature and humidity of the greenhouse, especially if it has insulating properties. This can reduce the energy consumption and costs for heating and cooling, and create a more favorable environment for the plants.
Increasing aesthetics and functionality: Commercial greenhouse flooring can also improve the appearance and usability of the greenhouse. It can create a clean, neat, and attractive space for the workers and the customers. It can also make it easier to move around, transport materials, and install equipment.
What To Use For Flooring?
There are many different kinds of materials that may be used as greenhouse flooring.
A floor made of poured concrete, particularly one that is insulated, is the best feasible option according to a commercial flooring company TCF West. For commercial greenhouse flooring, there are multiple types of flooring options.
You have to know what types of flooring will be suitable for your use.
Is Concrete Good For Flooring?
A concrete floor is simple to maintain and comfortable to walk on, and if it is built properly, it should allow any excess water to drain away. In addition to this, concrete is excellent at retaining heat and reflecting light throughout the day.
However, concrete is not the only material that can be used for the floor of a greenhouse. There are other options. There are many additional options for greenhouse flooring that may be considered, with some producing better outcomes than others based on your financial considerations.
Before you begin putting the floor, you need to decide on the greenhouse flooring materials that are most essential to you. It is important to think about how many hours you will invest in the greenhouse as well as the durability of the various floor coverings.
A commercial greenhouse flooring is also made of concrete, for instance, and will survive for many years, but a floor made of mulch will deteriorate very quickly. Also, take into consideration your budget. Read more on this page.
Wood Flooring
It is possible to construct the base of a greenhouse out of wood, then fill it with crushed rock or gravel, and finish it off with weed cloth. This floor is one that drains well, is simple to maintain, is simple to install, and does not cost too much money.
The utilization of lava, as well as landscape rock as a greenhouse flooring material, is an appealing notion for manufacturing commercial greenhouse flooring.
The water that is absorbed by lava rock contributes to the overall level of humidity; nevertheless, neither lava rock nor landscape rock is simple to clean. Although it is simple to work with these materials, the cost of doing so may be rather high.
When it comes to greenhouse flooring materials, mulch flooring is the one with the fewest positive benefits. Although it is inexpensive, it cannot be cleaned and, in fact, serves as a breeding ground for germs and fungi.
Additionally, it rots quite quickly. The greenhouse has more humidity because of the bricks. It is recommended that a layer of sand be placed underneath them so that drainage and stability are improved.
In a similar fashion, a layer of sand should be placed beneath a foundation of rocks. Clay flooring is another choice that will stay for a long time and is comfortable to walk on.
Weed Mats
When it comes to excellent commercial greenhouse flooring options, weed mats are an excellent choice. They have good drainage, they prevent weeds and pests from growing, and they are simple to stretch and afterward staple into place.
Vinyl tiles designed specifically for use in greenhouses are gaining popularity due to the fact that they are simple to clean and provide great drainage.
They can be walked on or spread over a whole foundation to serve as a covering. There are a few different varieties of greenhouse flooring that are suitable for the job, provided that they are simple to clean and drain effectively.
Wrapping It Up:
If you decide against having commercial greenhouse flooring made of poured concrete, you need to place a weed mat barrier on top of the gravel or bare ground. Putting down rubber mats or an old carpet in locations where you will be working for extended periods of time is a good idea if you plan to have a concrete base.
Content Rally wrapped around an online publication where you can publish your own intellectuals. It is a publishing platform designed to make great stories by content creators. This is your era, your place to be online. So come forward share your views, thoughts and ideas via Content Rally.
Raising the value of your home can seem like an impossible task at first, particularly if you are working with a restrictive budget. However, it is not impossible. In this article, we will be looking into some of the simple ways that you can increase the value of your home with ease.
Replace The Doors And Windows
When looking to put your home on the market you want it to look its best. As a result, you may want to consider replacing the doors and windows, particularly if you are dealing with a draft of any kind. This will not only improve the curb appeal of your home, but it can also help to improve the energy usage of your home making it more appealing for those looking to purchase.
Makeover The Kitchen And Living Room
As the central hub of the home, the kitchen and the living room re the first two areas that you should consider modernizing. One of the easiest ways to do this is to paint the walls a neutral color. This will make the home more appealing to those hoping for a blank canvas, in addition to this, it is likely to brighten up the room as a whole. The living room can also be modernized and transformed by incorporating a custom-designed canvas using a next day canvas prints service for your home.
Improve The Look Of Your Garden
If you are lucky enough to have garden space, this needs to look the best that it can be at all times. By improving the front garden with flowers and taking care of the tress you are then making it seem more appealing to the buyer when they have a first impression. It is then time to consider the back garden. By mowing the lawn, tending to the flowerbeds, and removing any unwanted weeds in the patio, you can improve the curb appeal as well as the value of your home over time. Though this will take some man-hours, this will make it look more appealing to the listing.
Create A Driveway
The final way that you can boost the curb appeal for your home is to generate a driveway. If you have a vast amount of space outside the front of the house, sprucing up your driveway will make the home more appealing for those that have multiple cars or a family. Whether this is gated or just left open, this can help to limit on the road parking and raise the value of your home. IF you already have a driveway, it is recommended that you remove the weeds and clean the bricks or concrete to make it looks its best.
Whether you are in the process of selling, or you are considering it in the near future, some of these small little tips can help you to raise the property value of your home and sell it for the full amount that you would like.
Read Also:
Top Home Cleaning Tips
How To Pick The Perfect Flooring For Your New Home
If there is one thing that most people try to know after searching for the legalities of growing weed, it is about “how to harvest weed?”
If this is something that you are searching for, I have you covered!
You see, weed, or marijuana, is a controversial plant to talk about. You might want to grow it for medicinal and recreational purposes. But the “What if people...” thoughts might put you off! This is because harvesting or growing weed is not like harvesting potatoes. There are several other things associated with the same.
But don’t you worry, my friend! If you are trying to search for the best ways to harvest weed, both indoors and outdoors, you need to look no further! Keep on reading this blog till the end to learn more...
Is Growing Marijuana Legal?
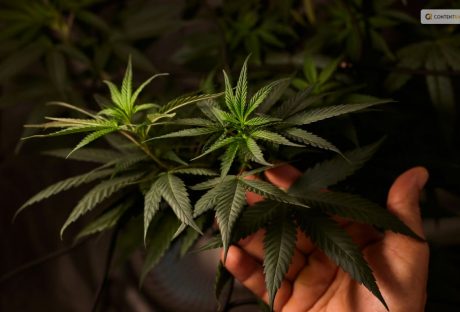
Marijuana, also known as cannabis, weed, pot, or ganja, is a plant that contains several psychoactive compounds. It can alter one's mood, cognition, and perception. Marijuana has been used for several reasons and purposes for thousands of years, ranging from medicinal to spiritual.
But its legal status has been a matter of debate and controversy in many countries. So, is growing marijuana legal?
The answer depends on where you live, how much you grow, and what you use it for. In some countries, such as Canada, Uruguay, and South Africa, growing marijuana for personal use is legal or decriminalized as long as you follow certain rules and regulations.
In other countries, such as the United States, Australia, and the Netherlands, growing marijuana is legal or tolerated in some states or regions but illegal or restricted in others. In many countries, such as China, India, and Saudi Arabia, growing marijuana is illegal and punishable by harsh penalties, regardless of the amount or purpose.
Various factors, such as the potential benefits and harms of marijuana use, the social and cultural attitudes towards marijuana, the economic and political interests of different groups, and the international treaties and agreements on drug control influence the legal status of marijuana.
The legal status of growing marijuana is also subject to change as new laws and policies are enacted or revised and further research and evidence are presented.
Growing marijuana is a complex and controversial issue that has no simple or universal answer. The best way to find out if growing marijuana is legal in your area is to consult the relevant authorities and sources, and to be aware of the risks and consequences of your actions. Remember, just because something is legal, does not mean it is safe, ethical, or advisable.
When Should You Plant Weed?
Spring is here, and you know what that means: it's time to get your marijuana seeds ready for planting outdoors.
This is the most important crop of the year because you can get the biggest harvest of all.
Some old-timers like to plant their seeds on the first full moon of March. They say this way, the seeds get some light at night and don't grow too tall too fast.
But sometimes, it's still too chilly in March, and not everywhere has the same weather. If you live in a colder place, your plants will grow slower and suffer from the cold and the wind. They will be weaker and more likely to get bugs and diseases
So, what should you do in this case?
Well, you can wait a month or two longer. A seed that sprouts in a nice climate from April onwards will grow bigger and better than one that sprouts in March in the same place
But growing plants for so long is not easy.
You must watch out for all kinds of things: bugs, diseases, nutrients, transplanting, pruning, training... It's a six-month-long job requiring constant attention
Things to Keep in Mind
If you want a good quality and quantity of weed there are several things that you need to keep in mind. Want to know what they might be? I have you covered! Here are some of the things that you'll need:
Fertilizers for growth and flowering: You can choose whatever fertilizers you like, organic or chemical. Organic ones, like humus, guano, and flower boosters, will give you a tasty and aromatic weed, but less of it. Chemical ones, like those from specific brands, will give you more buds, but less flavor.
Insecticides for insects like whiteflies, mites, or thrips: It's better to use them as a prevention, so you don't get any nasty surprises.
An anti-fungal product that works well against powdery mildew: Propolix or other chemical products are good, but you have to use them from the beginning.
Bacillus Thuringiensis: This is for caterpillars and other worms. Use it as soon as the flowers start to show, which is when these critters start to show up. Around May/June.
Stakes or wires to support the branches during the flowering stage.
Soil and Other Conditions to Grow Weed or Marijuana
It's obvious that this is the most common grow medium, probably because it's easy to find and has some nutrients already in it. Weed grown in soil is also more delicious and fragrant. And, no, it's not hard to grow in soil – just plant your (favorite) strain in the soil, and you're good to go.
That's it. Of course, there are different kinds of soil, and some are better than others. High-quality potting soil will make your life easier and faster. You might also want to add some extra nutrients to make your weed grow better.
Or you can make your own super soil. If you decide to buy soil, we suggest you go for the best brands, or at least those with a good soil mix. They should have things like earthworm castings, alfalfa meal, humic acid, etc.
Can You Grow Weed Without Soil?
Want to try something different? Go soilless. You'll see some quicker growth (and bigger harvests). And, conveniently, growing weed in soilless mediums is pretty similar to growing it in soil. The only difference is that you'll have to give the nutrients yourself because soilless mediums don't have any. Some examples of soilless mediums are coco coir, vermiculite, perlite, etc.
What About Hydroponic Grows? Is it Complicated?
No, hydroponic growth is not complicated. It's as easy as picking your setup (hydroponic system), getting your nutrients, and sprouting your seeds. And you'll get some amazing benefits: super-fast growth, huge yields, and super-strong weed.
Sounds good, right? Don't believe everything you hear because some information can mess up your growth. But with the right setup and care, you can be sure of a plentiful harvest.
What It Needs to Survive and Thrive: How to Grow Weed Plant?
If you want to grow the best weed possible, you need to know your plant well. Here are some of the main things that a weed plant needs to thrive, and how it works.
Light
Light is the fuel that drives photosynthesis and growth in a weed plant. The fan leaves are like solar panels that absorb light. The more light you give your plants, the more buds they will produce.
But be careful not to give them too much light. If you grow indoors, keep your lights at a safe distance from your plants, or you might burn them and ruin your nugs. And if your plants get too hot, they will dry out faster and need more water and attention.
Weed plants usually need at least six hours of sunlight a day when they grow outdoors. This is called “full sun”. When they grow indoors, they usually get between 12 and 18 hours of artificial light a day, depending on their stage of growth.
Weed is a photoperiod plant, which means that the amount of light it gets every day affects when it flowers and makes buds. Outdoors, this happens when the days get shorter in the fall. Indoors, you can make this happen by changing the light cycle from 18 to 12 hours a day.
Water
Water is essential for all plants, including weed. Water provides hydrogen for photosynthesis, and also carries nutrients from the soil to the plant through the roots, and throughout the whole plant.
Water also helps the plant stay firm and flexible, by creating pressure on the cell walls. This allows the plant to bend with the wind or reach for more light.
Plants also lose water through their leaves, like humans sweat, to cool down. This is called transpiration, and you can see it as droplets on the leaf tips.
This may sound obvious, but you only need to water the soil or the medium where your weed plant grows, not the leaves or the plant itself. We suggest that you water a lot, but not too often, rather than a little, but more frequently. This way, the roots can dry out a bit and get more oxygen from the soil.
Nutrients
A marijuana plant needs several nutrients to grow and flower. The main nutrients it needs are:
Nitrogen: Nitrogen helps a weed plant grow during the vegetative phase, when it makes more mass, stems, branches, and leaves. It is part of chlorophyll, the green pigment that helps the plant use light for photosynthesis.
Phosphorus: Phosphorus is important for storing and using energy, as well as for root growth and bud development. It helps the plant take up nutrients and build its structure.
Potassium: Potassium helps with many of the plant’s metabolic activities, such as respiration, transpiration, and enzyme activation. It also helps the plant fight off diseases and pests.
Calcium: Calcium is a minor nutrient, but it still plays a role in keeping the plant’s cell walls intact, and helping the plant absorb other nutrients.
Magnesium: Magnesium is part of chlorophyll, and helps the plant make glucose from photosynthesis. Without it, the plant can’t turn light into energy.
CO2
Plants breathe in CO2 through tiny holes in their leaves called stomata. During photosynthesis, plants turn CO2 into glucose, which they use to grow and flower.
Some indoor growers use a “CO2 burner”, which is a device that adds a little bit of CO2 to the air, to make the plants grow faster and bigger. But this is usually too much for home growers.
Wind/airflow
Wind or airflow is good for your plants, because it brings fresh air and CO2, which they need to grow.
Airflow also prevents mold and diseases, by removing moisture from the inside of the plant, so it doesn’t get too wet. You can also use a technique called scragging, which spreads out the branches and lets more air in.
Wind or airflow also makes your plant stronger and healthier, by making its stalks and branches thicker and sturdier. When a plant bends with the wind, it produces a hormone called auxin, which stimulates growth.
What to Keep in Mind While Harvesting Weed?
You probably know that different strains of weed need different amounts of time and sun to grow well. Sativas, which come from places near the equator, like a long and sunny summer to get fully ripe.
Indicas, which come from colder and harsher places, are usually faster to finish. But there are exceptions, of course. Some indicas are slow and some sativas are quick.
The best time of day to cut down your outdoor plants is in the morning, before the sun gets too strong. You don't want them to be wet from dew, but you also don't want them to be exposed to too much sunlight, which can ruin their flavor.
You can also harvest at night when it's cooler, but the morning is better because the plants are fresher and haven't been under the sun all day.
1. Watch the weather
As your buds get bigger and heavier and the season changes from summer to fall, the weather can change too. Depending on where you live, you might get some cold snaps or rainstorms.
These are not the end of the world, but you do need to pay attention to the weather and maybe decide on the spot when to harvest your plants, balancing their ripeness with the risk of losing them.
2. Harvesting in Lower Temperatures
According to sources, most weed plants can handle a light freeze—28-32°F for up to three hours—without any problem. But a hard freeze, anything lower or longer, can be a disaster.
Frost can make ice crystals form in the plant cells, hurting them. The leaves will look droopy and then turn dark and crunchy. The worse the frost, the more damage to the plant.
Remember that plants in pots are more sensitive to temperature changes than plants in the ground, so they are more likely to get frost damage.
3. Rainy Harvests
Rain is not a big deal by itself, but it depends on how long and how hard it rains. If it's going to stop soon and dry up fast, you can leave your almost ready plants outside. But if the rain is going to stay, mold is waiting—better to harvest sooner than later.
Covering your plants can help, but the air will still be humid. You can use some tall stakes and a tarp to cover them, but make sure to take them off when the rain or cold is over. In this way, the plants can warm up and breathe.
When to Harvest Weed Plant?
The type of plant growing determines when to harvest cannabis. Sativa, hybrid, and indica are the three primary kinds of cannabis seeds. Are you curious about the best time to harvest marijuana?
Let me break it down for you!
Sativa strain plants typically take longer to mature and give off a stronger cerebral height. However, Indica plants yield larger blooms and a more sedative, paralyzing high.
When an Indica and a Sativa are crossed, hybrids that enable flowers to have both traits are created. While Sativa cultivars blossom in 10 to 16 weeks (about three and a half months), Indica varieties flower in 8 to 10 weeks (about two and a half months) on average.
The cannabis plant can be found in hybrid form halfway between the two main species. It is important to understand that flowering times might vary based on environmental factors like temperature and duration of day.
Thus, the questions of when and how to harvest cannabis remain unanswered. Knowing what you want to achieve with your cannabis plants can help you decide when to harvest them.
Let's say you are growing cannabis for therapeutic purposes. Is there a unique method for harvesting cannabis in this case? If so, it is imperative to harvest the plant at the height of its cannabinoid content.
But if you are cultivating cannabis seeds for fun purposes, then it is best to harvest marijuana at its peak maturity.
How to Harvest Weed?
Once you've decided when to harvest your cannabis, it's critical to understand how to harvest cannabis plants correctly. It's simple to harvest cannabis; you just need to cut the stem off at the root. But it's best not to pull the branch out of the ground since this could damage it and reduce its yield.
It is crucial to properly dry the cannabis after harvesting it before stocking it. Hanging it upside down in a room with lots of ventilation and little light exposure is the best method to accomplish this, like a wardrobe. In order to efficiently dry cannabis, proper ventilation is necessary because it inhibits the growth of mold.
Before you proceed to store it, ensure that you let your cannabis rest for some time. This can range anywhere from three to seven days. This is a great way to ensure that the leaves are dried and ready for you to store.
Wrapping It Up!
In case you were searching for the best ways on how to harvest weed, I hope that this blog has been of help to you. If there are any other queries related to the same, please feel free to let me know. All that you need to do is scroll down till you reach the bottom of the page. Then leave your suggestions in the box below. And I will be there to answer them all for you!
More Resources:
Choosing a Medical Marijuana Dispensary
Marijuana Addiction Treatment: 5 Steps to Avoid Relapse
What Are Tarpenes? How Do They Work? – Cannabis Guide
Medical Marijuana Can Take New Dimensions in the Treatment of Pets
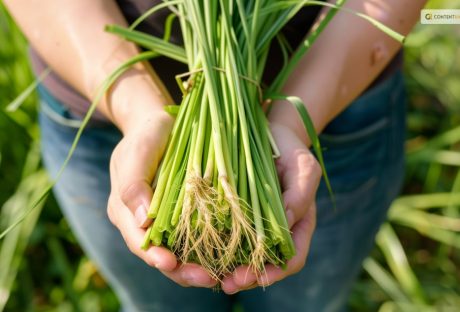
Lemongrass is a tropical herb that has a fresh and citrusy flavor and aroma. It is one of the most essential herb that is people widely use in Asian cuisines. They especially use it in Vietnamese, Thai, and Indonesian dishes. It is also a popular ingredient in teas, soups, curries, salads, and marinades. Lemongrass has many health benefits, such as improving digestion, boosting immunity, reducing inflammation, and relieving stress.
But did you know that you can grow and harvest your own lemongrass at home? Yes, you can! Lemongrass is easy to grow and maintain, and can thrive in pots, containers, or gardens. You can enjoy fresh and organic lemongrass all year round, and save money and time from buying it at the store.
In this article, I will show you how to harvest lemongrass, and share some tips and tricks for growing and using this versatile herb. By the end of this article, you will have a better understanding of how to harvest lemongrass, and how to make the most of this wonderful herb.
So, if that is something that you want to know, I have you covered! Keep on reading this blog till the end to learn more…
How to Grow Lemongrass?
Lemongrass is a wonderful herb that can add a refreshing and citrusy flavor to your dishes, drinks, and teas.
It is also a beautiful ornamental plant that can brighten up your garden with its tall, graceful stalks and fragrant leaves. Lemongrass is native to tropical regions, but you can grow it in cooler climates as well with some care and preparation.
Here are the steps and conditions for growing lemongrass successfully at home:
1. Choose a healthy lemongrass plant or stalk
You can buy a potted lemongrass plant from a nursery or garden center, or you can start your own from a fresh lemongrass stalk that you can find in most grocery stores or Asian markets. Look for a stalk that is firm, green, and has some roots at the base. Avoid any that are dry, brown, or moldy.
2. Prepare a sunny and warm spot for your lemongrass
Lemongrass loves full sun and heat, so choose a location that gets at least six hours of direct sunlight per day. If you live in a colder region, you can grow lemongrass in a container that you can move indoors during the winter.
Use a large pot with drainage holes and fill it with rich, loamy soil that is high in organic matter. You can also add some compost, manure, or leaf mold to improve the soil quality and fertility.
3. Plant your lemongrass in the soil
If you bought a potted plant, simply transplant it to the ground or a larger container, making sure to bury the roots well and leave some space between the stalks.
If you are starting from a stalk, peel off any dead or yellow leaves and trim the top part to about six inches.
Place the stalk in a glass of water and keep it in a sunny windowsill until roots start to grow, which can take a few weeks.
Then, plant the rooted stalk in the soil, leaving about two inches of the stem above the ground. Space the plants about two feet apart to allow them to spread
4. Water and fertilize your lemongrass regularly
Lemongrass needs moist soil to thrive, so water it frequently and deeply, especially during hot and dry periods.
A good rule of thumb is to water it once a week or whenever the top inch of the soil feels dry. You can also apply a layer of mulch around the plants to conserve moisture and prevent weeds.
Lemongrass also benefits from a monthly dose of liquid organic fertilizer during the growing season, such as fish emulsion or seaweed extract. This will help it grow faster and produce more leaves and stalks.
5. Harvest and enjoy your lemongrass
You can start harvesting your lemongrass when the stalks are about a foot tall and half an inch thick. Cut the stalks at the base with a sharp knife or scissors, leaving about two inches of the stem in the ground.
Additionally, you can use the whole stalk, or peel off the outer layers and use only the tender inner part. You can also harvest the leaves and use them fresh or dried for teas and infusions.
Lemongrass can be stored in the refrigerator for up to two weeks, or in the freezer for up to six months. You can also dry it and store it in an airtight container for later use.
How to Harvest Lemongrass?
Harvesting lemongrass is a simple and satisfying process that can be done in a few steps. Here are the basics of how to harvest lemongrass:
Choose the right time
The best time to harvest lemongrass is when the stalks are about 12 inches tall and 0.5 inches thick. This usually happens after 3 to 4 months of planting. You can harvest lemongrass throughout the year, as long as the temperature is above 40°F. You can also harvest lemongrass in batches, leaving some stalks to grow and regenerate.
Cut the stalks
To harvest lemongrass, you need a sharp knife or scissors, and a clean cutting board. Cut the stalks at the base, as close to the soil as possible. You can cut as many stalks as you need, or as many as you can use within a week. You can also trim off the leaves, as they are not edible and can be used for other purposes.
Wash and store the stalks
After cutting the stalks, wash them under running water, and pat them dry with a paper towel. You can store the stalks in the refrigerator, wrapped in a damp paper towel, and placed in a plastic bag. They can last for up to a week. You can also freeze the stalks, chopped or whole, in a freezer bag. They can last for up to 6 months.
Dividing Lemongrass: What is It and How to Do It?
Dividing lemongrass is a great way to propagate and maintain this aromatic and flavorful herb. Lemongrass is a perennial plant that grows in clumps of stalks and leaves.
Over time, these clumps can become crowded, woody, and less productive. By dividing lemongrass, you can rejuvenate the plant, increase its yield, and share it with others.
Here are the steps and reasons for dividing lemongrass:
1. When to divide lemongrass?
The best time to divide lemongrass is in the spring, after the last frost date when the plant is actively growing and has new shoots.
You can also divide lemongrass in the fall if you live in a warm winter climate or if you plan to overwinter the divisions indoors.
Avoid dividing lemongrass in the summer, when the heat and drought can stress the plant and reduce its survival rate.
2. How to divide lemongrass?
To divide lemongrass, you must dig up the entire plant and separate it into smaller sections. You can use a shovel, a sharp knife, or your hands to do this.
Each section should have at least one inch of root and several healthy stalks and leaves attached.
You can trim the leaves to about six inches to reduce water loss and make the divisions easier to handle. Discard any old, brown, or damaged parts of the plant.
3. Where to plant lemongrass divisions?
You can plant lemongrass divisions in the same spot where you dug up the parent plant or in a new location with full sun, moist and well-drained soil, and plenty of organic matter.
You can also plant lemongrass divisions in containers at least 10 inches deep with drainage holes. Space the divisions about two feet apart to allow room for growth.
Plant the divisions at the same depth as they were before, with the crown just below the soil surface.
4. How to care for lemongrass divisions?
Lemongrass divisions need regular water and fertilizer to establish and thrive. Water them deeply and frequently, especially during the first few weeks and during hot and dry periods.
You can also apply a layer of mulch around the plants to conserve moisture and prevent weeds. Fertilize the plants once a month with a liquid organic fertilizer, such as fish emulsion or seaweed extract, during the growing season.
Protect the plants from frost in the winter by moving them indoors or covering them with a frost cloth.
5. How to harvest and use lemongrass divisions?
You can start harvesting lemongrass divisions when they are about a foot tall and half an inch thick. Cut the stalks at the base with a sharp knife or scissors, leaving about two inches of the stem in the ground. You can use the whole stalk, peel off the outer layers, and use only the tender inner part.
Additionally, you can also harvest the leaves and use them fresh or dried for teas and infusions. Lemongrass can be stored in the refrigerator for up to two weeks or in the freezer for up to six months. You can also dry it and store it in an airtight container for later use.
How to Use Lemongrass in Food?
Lemongrass has a long, green stalk with a bulbous base and grassy leaves. It has a lemony taste with a hint of mint and ginger. Lemongrass can be used fresh, dried, or powdered, depending on the recipe and preference. Here are some ways related to how to use lemongrass in different ways:
Fresh lemongrass
Firstly, fresh lemongrass is the most aromatic and versatile form of lemongrass. You can find it in the produce section of most supermarkets, Asian markets, or online.
To prepare fresh lemongrass, you need to peel off the tough outer layers and trim off the root end and the top third of the stalk. You can use a sharp knife or scissors to do this. The part that you want to use is the pale and tender lower part of the stalk.
After that, you can slice it thinly, chop it finely, or bruise it with a pestle or the back of a knife. Slicing or chopping is good for salads, stir-fries, curries, and marinades, while bruising is good for soups, stews, and broths.
You can also make a paste by pounding or blending lemongrass with other ingredients, such as garlic, ginger, chilies, and cilantro.
A paste is great for adding flavor to meats, seafood, tofu, and rice. You can store fresh lemongrass in the refrigerator for up to two weeks or in the freezer for up to six months.
Dried lemongrass
Secondly, dried lemongrass is less potent than fresh lemongrass but still has a nice, lemony flavor. You can buy it in whole or sliced form or dry your lemongrass by hanging the stalks in a warm and airy place until they are brittle.
Dried lemongrass is good for making teas, infusions, and herbal blends. You can also use it to flavor soups, stews, and broths, but you must soak it in hot water for about 20 minutes before adding it to the pot.
Additionally, you can store dried lemongrass in an airtight container in a cool, dark place for up to a year.
Powdered lemongrass
Lastly, powdered lemongrass is the most convenient form of lemongrass, as it does not require any preparation. You can buy it in spice shops, Asian markets, or online.
Powdered lemongrass has a mild and sweet flavor and can be used in baking, desserts, sauces, and dressings. You can also sprinkle it over salads, soups, and stir-fries for a touch of freshness.
The shelf life of powdered lemongrass is also great. For up to six months, you can store powdered lemongrass in an airtight container in a cool and dark place.
How to Use Lemongrass in Other Things?
Apart from cooking, you can use lemongrass in many other ways. Some of the best and most popular uses of this herb are as follows:
Beautifying
You can use lemongrass to make your own beauty products, such as soap, lotion, or shampoo. You can infuse the stalks or the leaves with oil, such as coconut, olive, or almond oil.
Moreover, you can also add other ingredients, such as honey, aloe vera, or essential oils. You can use the products to cleanse, moisturize, or scent your skin and hair.
Healing
You can use lemongrass to treat various ailments, such as headaches, colds, or infections. You can inhale the steam from boiling the stalks or the leaves, or apply the oil to your temples, chest, or throat.
Additionally, you can also drink the tea, or gargle with the syrup. You can use the products to relieve pain, inflammation, or congestion.
Wrapping It Up!
If you want to know how to harvest lemongrass, I hope that this blog has been of help to you. If there are any other queries about the same, please feel free to let me know. All that you need to do is scroll down till you reach the bottom of the bottom of the page. Then leave your suggestions and comments in the box below. And I will be there to answer them all for you!
Learn More About:
Everything You Need To Know About Harvesting Basil
Asparagus 101: When, How, And How Often To Harvest?
How to Harvest Spinach the Right Way: A Step-by-Step Guide