Create Wall Mounted Glass Shelves with Custom Cut Glass

Published on: 03 July 2019 Last Updated on: 09 December 2021
Mounted Glass

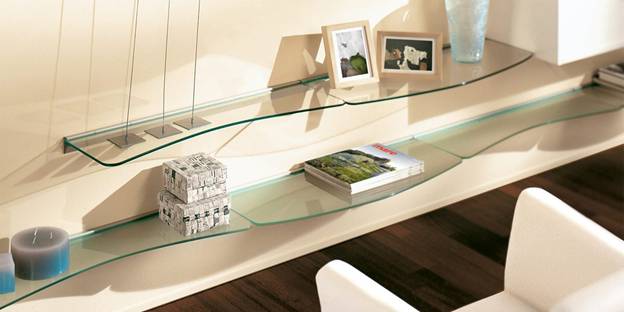
Mounted Glass shelves are very handy in improving the interior décor of your space in a classical manner. Glass shelves have been in use for many years now and technological advancement has led to the generation of advanced glass version with more desirable features and greater strength. This implies that glass materials today can support more weight and withstand higher pressure than earlier pure glass versions. One important feature of glass shelves is that they can fit the walls of rooms and there are many designs from which one can pick from. The main consideration when choosing the best wall mount glass shelf design is the purpose of the shelf as well as where and how the shelf will be mounted to the wall. This paper discusses the various designs of wall mount glass shelves that can be created using different custom cut glasses.

The shape of Glass Shelves

The glass shelves can be made with glass cut in different shapes. Rectangular and square glass shelves are the most common. Rectangular glass shelves can be installed in various places like the bathroom, in the living room, kitchen, office, and in the bedroom as well. Square shelves are mostly installed at the corners of rooms to provide sufficient anchoring for shelve. There are also specific shapes of glass shelves designed specifically for installation at corners. They include triangle, corner pentagon, and quarter circle glass shelves. It is important to consider the purpose of the shelf when choosing the glass material for the shelf to ensure the material chosen can support the required load without breaking.

Glass shelves can also be L-shaped and these are fit into or onto corners of rooms. There are many types of glasses to choose from for wall mounted glass shelves. Tempered glass is the commonly used type of custom cut glass for glass shelves. This type of glass is hardened to increase durability and resistance to high temperature and pressure. Tempered glass also breaks into blunt square pieces that are less likely to injure people as opposed to angled sharp pieces obtained when ordinary glass breaks. The other suitable glass type for wall-mounted glass shelves is the acrylic glass. Acrylic glass consists of a very transparent material that allows the glass to allow more light to pass through it than normal glass. The downside of acrylic glass is that it scratches easily but the scratches can be removed by buffing. Other types of custom cut glasses suitable for glass shelves are low-iron glass, textured or frosted glass, as well as colored glass.

Various Types of Mounted Glass Shelves Uses        

There are also various wall-mounted glass shelf designs dependent on the shape of the horizontal cross-section of the glass. Some glass shelves are bent like the eclipse and triumph shelves. Eclipse glass shelves are slightly curved forming an arc while the triumph glass shelves have a bookend on one end, and are designed for keeping books and magazines. Another glass shelf type is the Fiora glass shelf which has a straight surface like the rectangular glass shelf. Fiora glass shelves are available in clear and colored glass materials. The other type of glass shelves is the Roya glass shelf which is simply rectangular in shape. Bent glass shelves are very decorative and are mostly used in the bathroom for keeping light-weight objects.

Installation or Mounting to the Wall     

The glass shelves can either be mounted directly into the wall of the building or attached using brackets. Glass shelves with straight edges are the most suited for direct fixation into the wall of the building. When fixing glass shelves directly to the wall, a groove is first to cut into the wall using a chisel and hammer if the wall is masonry. The glass shelf is then fixed into the groove and a suitable adhesive applied to stick the glass to the wall. The other types of glass shelves are attached to the wall using brackets. The brackets are made of a strong durable material like stainless steel. Brackets are screwed or riveted to the wall and the glass shelves fixed to the brackets. Other types of glass shelves can be mounted to a frame which is then fixed to the wall. This type of glass shelves is manufactured as a set that is first connected together then fixed to the wall.

Mounted Glass shelves can also be hanging at the top. This type of glass shelves is referred to as the hanging glass shelves. The shelves are fixed to a frame that is suspended from the top of the building. Hanging glass shelves are manufactured as a set in the factory and are suitable for rooms where the wall is not strong enough for mounting the glass shelves directly to it. Also, when the walls are filled with other things, using the hanging glass shelves provides extra space for storing stuff.

Choose the Right Glass Thickness

As stated in the introduction, the intended purpose of the glass shelf and where it will be installed determines the type of glass material that will be used. The material chosen should be strong enough to support the anticipated load. The thickness of the glass also determines its ability to support a given weight with thicker glass shelves being able to support higher loads than thinner glass shelves. It is also crucial to consider the material that makes up the wall on which the shelf will be mounted as it has a direct relationship to the weight that the shelf can support. Brackets should be attached to hard materials like concrete, or masonry walls to ensure maximum strength.

Mounted Glass shelves have many designs from which people can choose from. In addition to providing more storage space, glass shelves including bent glass shelves, add aesthetic value to a room making it possible to display one’s collections with ease. The shelves allow light to pass through them helping to maintain the room well-lit which helps to brighten the mood of the place. One can also consider finishing the corners of the shelves in different shapes to make them more stylish and appealing. When installed properly, glass shelves match perfectly with any interior design theme.

Read Also:

Content Rally wrapped around an online publication where you can publish your own intellectuals. It is a publishing platform designed to make great stories by content creators. This is your era, your place to be online. So come forward share your views, thoughts and ideas via Content Rally.

View all posts

Leave a Reply

Your email address will not be published. Required fields are marked *

Related

Home Improvement Hacks

Budget Friendly Home Improvement Hacks To Save Your Pockets

Home improvement is a big deal now, with more people embracing their creativity and letting it show in the places they live. This has led to the rise of incredible trends and hacks that provide the perfect opportunity for people to work in their homes. However, with all this development, it also gets confusing and daunting for some people. This is mainly because they have no idea where to start or some of the hacks they can include in different areas. These hacks are meant to be easily doable tasks that will transform your space when implemented. We’ve categorized these hacks in terms of placement and application. Some of them include: Floors In the home, floors play a big role in how the home looks and the general style you’ll be working with. A few tweaks here and there can completely change the look of your floors and add style and character. Some of the most versatile hacks to include for your flooring include: Peel And Stick Tiles When it comes to finding the perfect flooring for that annoying red floor or just need a new look, peel and stick tiles will do the trick. These tiles are amazing given that you can easily install them yourself. They are designed to give off the illusion of regular tiles without having to deal with grout, glue, and other tedious processes. You can get them in different colors, styles, and patterns making them the perfect option. Replacing Your Tile Grout When dealing with tiles for your flooring, you may find that the grout may get stained and turn to a different color which becomes hard to clean. However, you have the option of replacing the grout with a new one in the same color or a different one. Adding A New Finish This is especially a great idea if you are dealing with wooden flooring. With this, it is easier to add a new finish when needed to give the floors a new and vibrant look. Lighting One of the most understated hacks is the ability to switch out your light fixtures and improve the overall look significantly. Most people don’t know what role lighting plays in your space. You need to improve your lighting situation, which will give your space more life. To make it more appealing, consider getting light fixtures that feature some detail and a unique design. Additionally, you could also include under-cabinet lighting for your kitchen featuring the use of custom led lights. You also have the option of choosing to go with statement chandeliers, floor lamps, wall lights, and pendant lights among others. When it comes to lighting, you are spoilt for choice and can easily improve your space. Walls Adding some style to your walls is another great way to improve the overall look of your home. For this, you have a few options to choose from that are easy to work with and get quality results. They include: Adding a Fresh Coat of Paint Paint is a great easy way to get a different look when working on your walls. With this, you have the option of working with a variety of colors depending on the vibe you are going for. Additionally, you could paint one wall a different color and have that as your accent wall. This will improve the look of your room significantly. Adding A Wallpaper Wallpapers provide a layout, especially if you don’t want to do a paint job on your walls. They come in different types, patterns, and designs to ensure that they cater to everyone’s needs. With this, you can choose to cover all your walls or use them on one wall that will serve as your accent wall. Hanging Art Art is another great way to bring your taste and style into your home. For this, you can create your art piece or purchase one made by another artist. Entryway When it comes to your entryway, the first thing you need to consider is your storage options. Once you get into the house, where do your shoes, bag, coat, and keys go? Having a station where all these items can be kept will keep the home tidy and add a great design aspect to your space. Additionally, you can also add other decor items to make your entryway arrangement more visually appealing. Patio When it comes to dealing with the outdoors, one of the most effective ways to change it is by adding a seating area. Be creative with this and go for something that portrays who you are. Don’t be too rigid and only stick to what’s normal. Find what works for you and add it to your space. Play around with colors and create a cozy space to relax with family and friends. Greenery Adding some green aspects to your home is an amazing way to improve the look and add some character. The best part about adding greenery to your space is that it will help improve air circulation. When working with greenery, you need to take the time to water them to ensure they are healthy at all times. You could also opt for fake plants, given that they will add the same look and style. Adding Budget-Friendly Feng-Shi To Home-Decor Are you looking to bring more balance and good vibes into your home without breaking the bank? Feng Shui is all about creating harmony in your living space, and you don’t need to spend a fortune to make it happen. With just a few budget-friendly changes, you can invite positive energy, or "Chi," into your home and make it a calming, welcoming space. Clear The Clutter The first and easiest Feng Shui tip: declutter! It’s amazing how much difference a tidy room can make. When you get rid of the excess, you’re not only creating physical space, but you're also allowing the energy to flow freely. Take a walk around your home and ask yourself: Do I really need this? Less clutter equals more clarity and positive energy. Maximize Natural Light Good lighting is key to great Feng Shui. Natural light boosts the energy in any room, so open up those curtains and let the sunlight pour in. If you’re working in a space that doesn’t get much natural light, don’t worry. You can place mirrors strategically to reflect and amplify what little sunlight you have. Mirrors are like energy boosters! Bring in Some Green Plants are a staple in Feng Shui. They not only clean the air but also represent life, growth, and vitality. Even a small potted plant can make a huge difference. If you’re not exactly a plant person (hello, brown thumbs!), opt for easy-to-care-for plants like succulents or snake plants. And don’t worry; artificial plants can also work if they look realistic. Use Soft, Calming Colors You don’t need to repaint your entire house to improve the flow of energy. Start by adding calming colors like soft greens, blues, or neutrals in small touches, think cushions, throws, or wall art. These tones promote peace and relaxation, which is exactly what you want in a balanced space. Arrange Furniture With Intention Did you know that where you place your furniture can affect the energy in a room? Try to arrange your furniture so that you can see the door from where you’re sitting or sleeping. It promotes a feeling of safety and control. Plus, don’t block pathways with furniture, as it interrupts the flow of energy. Ready to try it out? Let Feng Shui transform your space! Improve Your Living Space! Investing in your home and interior design is essential to ensure that you are content with your living space. This is something you can do by implementing a few hacks here and there. Take your time to go through them and add them to your space one at a time. Transformation is a gradual process which means you’ll need to keep at it until you get to your desired outcome. Read Also: How To Increase The Value Of Your Home Important Things to Know Before Starting a Home Improvement Project Home Sweet Home Improvement: How to Find the Best Home Improvement Loans

READ MOREDetails
First home renovation Ideas and tips

First home renovation Ideas and tips

Homes are the blessings which offer comfort, shelter, peace, and security. However, like every other thing in this world, homes do require proper maintenance and care. After some time, we have to renovate our home. We need to make changes according to the modern world and also make necessary repairs and developments. As part of this process, it’s important to plan for waste disposal. Knowing where to rent a dumpster in my area can make managing debris during renovations much easier, ensuring the project runs smoothly from start to finish. If it is the first time that you are renovating your home, then you seriously need some good advice for first home renovation. Most of the people consider hiring a home improvement contractor is the most crucial task and rest will be handled by them. However, the truth is you have to handle certain things by yourself. In this piece of writing, we are going to share some of the tips that will be helpful for your first home renovation. Take first home renovation decision : So the first tip involves the decision making phase. You have to decide whether or not the property you are going to renovate will be your permanent spot? If you are planning to live there for a long time, then it will be a good aides to go for renovation. Consider the details : I know that renovating a home is a very heartfelt experience for most of us. However, we have to see everything in deep detail. Do some little research about home and garden DIY projects to save money or you can also and find the costs involves, house pricing of the area, contractors fees, etc. without proper homework you would end up making a bad decision. Never ignore your budget : First Home renovation is more likely to cause an adrenaline rush through our body and we try to change the overall condition of our home. However, you have to conscious about eh budget aspect in the renovation project. The budget is the most significant part of any renovation project as you can do nothing without money. Calculate all the costs involved and then gather all the resources to fund those costs. Do not go for borrowing : I would highly recommend going to the saving option rather than borrowing. I would justify my recommendation on the fact that when we borrow money for the renovation we increase the financial burden on us. Moreover, borrowing makes a bit drift away from the budget and we unconsciously started investing more and more money. However, if you save the money for your home renovation and then it will retain you within budgetary limits. Moreover, there will be not burdened on you at the end. Participate in renovation : Another most amazing tip to save bucks on your home renovation is to do whatever you can do by yourself. If you know any of the skills involve and then use it to save money for other purposes. Contractor hiring : It is by far the most difficult stage of renovation. Hiring a competent and professional contractor need time and effort, find out more about home improvement contractors here, also, you have to search the market to find the most competitive rates and services. Putting a little effort will definitely pay you off at the end. Home renovation is an entirely exciting process but at the same, it also consumes your energy and money. If you are renovating your home for the first time and then we would be wise to seek advice from the experienced. Indulge yourself in the project : Although we strongly recommend hiring some professionals or experts if you are having your home renovated for the first time. However, that does not mean that you should leave everything on them and wait for the final product. Showing a keen interest in the whole project ensure the interesting development of the whole team. You have to keep a close watch on all the things going on. Moreover, try to visit the place and inspect the project on a regular basis. However, your indulgence should not cause a disturbance in the whole project. Ensure your home renovation is on point : You have to make sure that your home has been renovated according to your inspiration and desires. After all, who wants to go through all the dusty and muddy task? We all want our home to represent our personalities and emotions. All this could be achieved by hiring a professional construction company with a good reputation. Home renovation is an entirely exciting process but at the same, it also consumes your energy and money. However, if you just adore your home enough to let it go or if you do not have enough money to purchase a new home, home renovation is the best option. We have mentioned some of the most important points necessary to be kept in mind while renovating for the first time. If you are renovating your home for the first time and then I would be wise to seek advice from the experienced. Read More : Basic Idea Of Power Tools For Home Improvement Additional Ways To Keep Your Home Warm

READ MOREDetails
Painting Interior Doors

Tips for Painting Interior Doors

Freshly painted doors can enhance the makeover of any house. You can paint your doors on your own or hire a professional painter to do it for you. Many people prefer painting their doors themselves as they want to enjoy painting them on their own. However, if you don’t have any experience or want high-quality paintwork, you should always hire professionals for complete painting service. If you choose to paint or spray paint your interior doors, you need to know some tips and skills to do the job right. Let us explore some tips by professional painters that you can use to paint your doors. Remove or cover the door handles: Paint can stain the door handles and locks. So, it is better to remove them or cover them with painter’s tape to prevent them from getting stained. You will need a screwdriver with multiple heads to remove the handles and locks. Call a locksmith to remove the inbuilt lock systems as they are difficult to remove. Removing these things will make it easy to clean, sand and then paint the doors. Fill the cracks and holes: If there are any holes or cracks in your doors, you can fill them with a wood filler, gypsum plaster, or a filling compound. Put a small amount of wood filler or filling compound on a putty knife and put it into the hole or crack uniformly. Place it as uniformly as possible and leave it to dry for at least two hours. Check the filling the next day, and it requires more filling, add the required amount of filling compound to fill the space completely. Sand the surfaces: The old paint gets worn and imperfections develop with time on the door surfaces. That is the reason why homeowners want to repaint their doors. Sanding removes the worn paint and imperfections easily and prepares the surfaces for a clean and uniform finish. Start painting with a Roller: If you have already chosen the paint color, mix several cans in a bucket so that you can have the same shade on every door. Sometimes, the shade in different cars can vary a little, although not noticeable in the interiors in low light. Use a 4-inch roller to apply a thin layer of paint on the door starting from an edge. If you want to paint the trim first, you can use a 2-inch brush. To remove any lines, move the lightly loaded brush or roller from bottom to top. Using this technique will help you paint quickly and uniformly while leaving a wet edge. Painting a paneled door: Many homes have paneled doors and the technique to paint them is different from painting a flat door. Paint every panel beginning from the upper left side downwards in a sequence. Always use a brush of appropriate width to paint a paneled door. Don’t worry if you paint a bit outside the edges of a panel. Once the edges are painted, use a small roller to paint the space between the panels. If the rollers of appropriate size are not available, use a 2-to-4-inch brush to paint the center of the panels. Minimize the drying time: Paint in light and uniform coats to minimize the drying time. Thick coats of paint take a bit longer to dry and may look nonuniform after drying. If you are using a brush, you should dip its bristles halfway in the paint and tap the brush against the container edge slightly to remove the excess paint. If you plan to use a roller, place it in a pan and use the back-and-forth strokes to paint uniformly without soaking it. Let the paint dry before installing knobs and locks: Let the paint dry completely before installing the doorknobs and locks. Also, tell your kids and family members not to touch the doors until they dry completely. Once they dry up completely, you can install the accessories and start using the doors as you use them normally. Final Words: Painting the doors is not difficult, even if you are painting them for the first time. All you need to do is to follow the correct sequence of steps, use the right size of tools and prepare the surfaces before grabbing a brush or roller. Following these tips can help you to paint your interior doors easily and conveniently. Read Also: 10 Pro Tips To Minimize Commercial Door Repair & Maintenance Cost All About Commercial Fire Doors Why Should you Consider Security Doors for Your House?  

READ MOREDetails