Published on: 12 April 2016
Last Updated on: 29 May 2021
Investing in decent quality kitchen renovations goes far in keeping up your workspace. You require a ledge that is solid and in addition simple to clean.
Security: make beyond any doubt all your energy supply focuses are all around covered to keep up a sheltered space for children. The ledge edges ought to be fixed to maintain a strategic distance from any wounds to anybody.
Flooring: The deck additionally has the imperative impact; go in for an against a slip ground surface to maintain a strategic distance from mischances while exciting visitors if anything spills on it. Additionally, as the ground surface ought to be anything but difficult to clean of the considerable number of stains and waste which will guarantee your kitchen dependably looks like new.
Kitchen Renovations Must be Done at Regular Intervals:
Get the most innovative kitchen renovations done in your city
Dispose of single old hardware: Many individuals tend to clutch apparatuses or kitchenware to either cut expense or for nostalgic reasons. On the off chance, your apparatuses are old you have to contribute new machines to maintain a strategic distance from any likely mischances because of poor attachments or loose wiring.
Kitchen Renovations Melbourne will make your kitchen look amazing
Regular repairs in kitchens are necessary
Get advice from experts regarding renovating your kitchen
Less expensive cost and creative ideas must be considered
Collect the right information before repairing your kitchens
Put resources into a decent advisor: This is an essential angle you have to remember while remodeling your home. A decent advisor will offer you some assistance with understanding your space better way and aide you in the right bearing. A decent expert will likewise offer you some assistance with working inside of your financial plan and make your experience of revamping your home an anxiety-free one. There are also virtual kitchen design tools available such as this one that can help you to get ideas, and allow you can see how different treatments, surfaces, cabinets, and even colors, work together.
Is it true that you are considering kitchen rebuilding? Possibly the deck is old, recolored, breaking in a wide range of spots making it look unattractive. Maybe your ledges are starting to look like something from the ice age or much more terrible, your cupboards don’t match; the entryway pivots are drooping and the drawers simply need to drop out when you open them.
Ask a few questions and get the right advice for renovating your kitchens
You will be excited each time you stroll in and see the delightful new look of your kitchen. Also, how you’ll feel when your loved ones are in amazement of your most recent creation.
Kitchen design can be great with a totally revamped floor-plan or basic little upgrades to machines or equipment. Possibly you simply need to re-confront those old cupboards, or put in a new deck for the time being yet genuinely a complete re-try of your kitchen is going to give you the most fulfillment and have a greater effect on the worth included.
The most solid option is to go for the most astounding quality items for kitchen renovations, if conceivable in light of the fact that you need this redesign to keep going forever and additionally look fabulous.
Abdul Aziz Mondol is a professional blogger who is having a colossal interest in writing blogs and other jones of calligraphies. In terms of his professional commitments, he loves to share content related to business, finance, technology, and the gaming niche.
Many people think that having a small yard doesn’t require that much work to maintain. This could be true, but only if you have enough help and the right outdoor power tools. However, if you have various plants, flowers, and some trees, then it will surely require more work than you have anticipated. If you want your yard to look flawlessly beautiful, you should commit to maintaining it regularly.
What if you don’t have the time to spend making your yard beautiful at all times? The best answer is to hire a reliable gardener. It will cost you some but will eventually pay off. With a beautiful yard, you can relax, entertain guests, and bond with your family. However, hiring the right gardener is crucial. Before you avail of their services, make sure you have asked them these questions:
1. What Are The Qualifications of the Gardener?
If you’re planning to engage in some special project, then a professional gardener is the one you need. Does the gardener hold horticultural or landscaping certificates? Do they have a license, like a landscaping contractor’s license?
These documents will indicate the quality of work the gardener can provide you. Also, ask them about their experience and the clients they have served. This will give you a good idea of the competency of the gardener and whether or not they’re right for your project.
Once you are able to assess the experience and qualifications, you will be in a much better position to make a selection. However, if you go for thorough professionals as garden or tree experts like Tree Service Syracuse, you can rest assured that you are hiring the very best. Experts from Tree Service Systems are put through extensive tests and taught the best tips and tricks of the gardening trade.
2. Do They Have References?
If your yard requires extensive maintenance, then you’d want references that can share with you their experiences with the gardening company. Did the company meet its expectations? Are they professional when working with you?
You can also check the yard of your neighbors. If you see something you like, you can ask them if they hired a gardener to take care of their yard. If yes, then ask for the contact details and discuss to see if they can meet your needs and wants.
3. Can They Manage Your Yard Both Organically and Sustainably?
If you are particular about being organic and sustainable, then it’s essential that you talk to the gardener about it. This has a significant effect on how they deal with weeds, fertilization, and pests.
However, you must take note that going organic and sustainable costs more than the traditional approach. Also, depending on your location, there are gardeners that are not that knowledgeable about organic and sustainable methods.
4. Do They Grow Vegetables?
It’s not common for gardeners or landscapers to grow vegetables for you. However, it’s worth asking as it’s a great way to save your budget for groceries. Today, healthy produce is quite expensive, and growing your own allows you to pick the freshest fruit or vegetable while cutting a huge chunk of your expenses.
5. If You’re Goal Is a Garden Makeover, Do They Provide Permeable Landscaping?
Permeable landscaping is a reliable and environment-friendly way of landscaping design. It allows water and air to reach inaccessible soil allowing it to breathe properly. Moreover, it makes more space for cultivation and attracts butterflies and birds, which will make your yard even more beautiful.
Soil that is topped with a non-permeable material, such as asphalt and cement, will eventually die. You might want to consider replacing your traditional walkway, driveway, or patio with permeable pavers. These look like traditional paving, except that they allow water to go through the soil.
6. Can They Provide an Itemized List of Expenses?
In addition to labor, are you charged with the supplies as well? Do they seem reasonable? These questions are really important as they prevent you from being overcharged. With an itemized list, you will see where your money is spent and if the expenses are accurately calculated.
7. Can They Provide a Time Estimate?
A professional gardener with solid experience can complete the project faster. They might cost more but if you consider the amount of time it requires them to finish the job, they are actually cost-efficient. You can also foresee whether they are efficient for the job or not based on the resources they have.
If you have a huge yard, do they have enough manpower? Do they have the right tools to stay organized, such as motorized pole saws, lawnmowers, motorized, or cultivators? If the job requires cutting down huge trees and removal of huge stones and other components, then mini wheel dumpers are a huge plus. Having the right resources guarantees you that they can complete the project properly and faster.
8. How Much Will They Charge?
If you only require simple yard work, such as lawn mowing, then the charge should not cost much. However, local rates are different depending on where you are located. A great way to make sure that you’re being charged fairly is to ask neighbors, friends, family members, and even colleagues who are also hiring gardeners to care for their yard.
Meanwhile, for special projects, such as proper pruning of roses and trees, then the charge will cost more. For larger projects, such as garden makeovers, ask for an estimate and compare it to other gardening companies to get the most cost-effective value.
Read Also:
How To Arrive At The Perfect Choice Of A Potting Bench For Your Gardening
DIY Ways To Control Pests In Your Garden
Edmonton Landscape Maintenance Tips
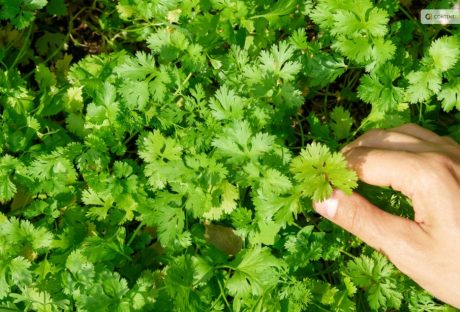
One of the most used herbs in the world, cilantro, is also referred to as Chinese parsley or Coriandrum sativum. Fresh and zesty, cilantro gives your recipes a flavor boost. Mexican, Middle Eastern, Indian, Mediterranean, Chinese, African, and even Scandinavian cuisines use it extensively. Even cilantro microgreens are grown from it!
Since cilantro itself doesn't keep well and loses aroma and flavor once dried, most people prefer to use it fresh. To have cilantro on hand, you should also have a few plants in the garden.
You can harvest the plant for its flavorful cilantro seeds, also known as coriander, even if you don't use the leaves in your recipes. The leaves of the cilantro plants come throughout the spring and summer. Allow them to go to seed at that time since they grow easily in the garden!
You must know how to harvest cilantro properly if you want to have a steady supply. Keep reading to find out all you need to know about harvesting cilantro.
Harvesting Cilantro: Overview
Most people either love or hate the flavor of cilantro leaves. However, you should still think about cultivating a few coriander plants in your garden and saving the seeds for a range of culinary uses.
Most people in the US grow this delicious herb for its leaves. But the tasty coriander seeds are also worth harvesting. They have a distinct flavor from cilantro leaves. This fragrant herb of the cool season, cilantro, quickly goes to seed in the long, sweltering summer months.
As the plant reaches higher in the sky, its rounded, lobed leaves become feathery. Pretty clusters of tiny white blossoms quickly emerge. Many pollinators are drawn to these nectar- and pollen-rich blossoms, particularly syrphid flies and honeybees. Little round coriander seeds with a kelly green color emerge as the blossoms start to fade.
What To Expect from Cilantro?
The distinctive flavor of coriander is citrusy and slightly nutty. It goes incredibly well with rice, beans, lentils, and roasted or grilled veggies. You can pick the seeds while they are still young and vibrant green. Or you can wait until they start to turn brown.
Since green coriander seed is only found in gardens, it is better to harvest them when they are still green because of their stronger, more distinct flavor. You will not find them in the farmers’ market or the grocery store.
If the seeds are kept in a glass container with a lid, then they can be refrigerated for several weeks and frozen effectively as well. Wait until most of the seed turns brown if you want to harvest the mature brown seed for winter grinding or planting next year.
Next, trim off a few inches of stalk and the seed heads, then hang them upside down in a brown paper bag. The seeds will drop out of the heads and land in the bag's bottom once they are completely dry. The dry seed should be kept in a dry, cool place in a glass jar with a lid.
For optimal flavor, grind it just before using. The flavor difference between freshly ground coriander seed and the pre-ground variety typically found in stores will astound you. Try adding green coriander seeds to dressings and marinades. Frequently adding an equal amount of ground coriander to recipes that call for cumin makes the flavors of the two go particularly well together.
How to Harvest Cilantro?
The most exciting aspect of growing plants is undoubtedly harvesting. Pick individual cilantro leaves if you plan to use a small amount. It is best to leave at least 1-2 inches of stem above the soil's surface when harvesting larger quantities of cilantro.
It is preferable to leave a few lower leaves on the plant to support the herbs until they grow back. To cut the stems cleanly, use harvesting snips, long reach harvesting snips, or sharp, sterilized garden shears. To guarantee that your herbs regrow, it is best to remove only a small portion of the plant at a time.
Furthermore, when the cilantro plant blooms and sets seed, the herb may start to taste bitter. So, when wondering how to harvest cilantro, it is preferable to harvest before the plant bolts because the leaves will be less appetizing at that point.
When is The Best Time to Harvest Cilantro?
When the morning dew has cleared and the sun hasn't set, it's the ideal time of day to harvest a variety of fruits, vegetables, and herbs, including cilantro. This way you can lessen the stress on your cilantro plant and give the fresh stock cuts enough time to dry before dusk, which lowers the risk of illness.
Before it bolts, harvest cilantro when it is 6 to 8 inches tall. The flavor of cilantro leaves significantly decreases after they have bolted. The lifespan of the cilantro plants can be increased by careful and routine harvesting. It is crucial, though, to wait for your plant to become established before beginning to harvest.
The plant develops numerous long, thin stems as it grows. They are ready to be harvested when the stems are long, and the leaves have a lacy appearance. The cilantro herbs are about ten to twelve inches tall at this point. Gather your cilantro in the spring and into the first part of the summer.
Your plants may bolt to seed if summertime full sun conditions prove to be too hot for them. The best time to harvest cilantro is early morning. You can either choose to harvest it once a week or source just individual leaves whenever you need them.
Most of the time, it takes about 2-3 weeks for regrowth, so you must harvest accordingly. You must remember that regular cut-and-come-again harvesting is the most ideal while the plant keeps producing foliage.
How To Store Fresh Cilantro?
Part of knowing how to harvest cilantro is also knowing how to store them. It's best to know how much you should take from the garden before you harvest. You will need to learn how to store cilantro if you do not intend to use the leaves right away to extend its shelf life. There are several approaches to try.
Storing Cilantro in Water
To keep the cilantro leaves dry, wait to wash them after harvesting. For storage purposes, store the stem ends in a glass or jar with 1 to 1.5 inches of water and refrigerate for a few days. At a minimum, change the water once a day. Use a plastic bag to cover the top loosely to preserve the humidity surrounding the herbs.
Storing Cilantro in The Freezer
Freezing cilantro is another low-maintenance way to store it. Shake off any extra moisture and rinse the leaves to get rid of any garden soil. Tear the leaves into small pieces and stuff them into ice cube trays, covering the herb with just enough water to barely cover.
You can pre-measure if you'd like to ensure that you know precisely how much is in each cube for recipes in the future. After the cubes are completely frozen, place them in a freezer bag. Add as needed to marinade, smoothies, soups, and sauces. You can freeze cilantro for up to six or eight months.
Read More: Everything You Need To Know About Harvesting Basil
How To Dry Cilantro?
There are two methods for drying cilantro. You can use the oven to dry cilantro. Since hot air can greatly affect the flavor of the finished and dried herb, you might want to avoid using heat if you want to enjoy flavorful dried cilantro.
Air drying or hanging drying is a better way to dry cilantro. Gather the stems of the herbs into a small bunch and secure them with a string. Place the bunch in a dark, well-ventilated area and hang it upside down. Alternatively, you can wrap the bunch in a brown paper bag to keep the cilantro from getting dusty.
After the bunch has been hanging for about a week, begin to check its level of dryness every day or two. It's ready to be crushed or powdered and stored for later use when it crumbles when touched.
Cure the cilantro ahead of time to reduce the possibility of mold growth. Put the dried cilantro in a glass mason jar to cure. Open the jar and give it a good shake every day to let fresh air into it and mix the contents. This will assist in achieving moisture content parity. If you'd like, you can also include a moisture-absorbing packet.
How To Harvest Cilantro Seeds?
You can harvest the coriander seeds even if you don't like cilantro leaves. The plant can grow to 20 inches when it flowers. This requires temperatures above 75 degrees. Pods will form once they have flowered, and the flowers will fade.
Before being harvested, these should be green to brown in color. These pods release the mature seed when it's ready. Tie the stems with the seed pods still attached into a bunch. Next, hang them upside down in a paper bag in a cool, dry place to harvest the seeds.
With time, the seeds will sprout and drop into the bag. Store your seeds in a dry, cool place in an airtight jar. Unground dried seeds can be kept for three to four years in storage. Before using dried seeds in your recipes, grind them for the best flavor.
How To Harvest Cilantro So It Keeps Growing?
If you sow cilantro seeds every two weeks from spring until late summer, you can be sure to always have fresh leaves available. We advise chopping them up and firmly packing them into an ice cube tray filled with water. Then, just place the tray in the freezer. These can then be added directly to hot pans when preparing soups or sauces. Or they can be dropped into hot or cold water for cooking or drinking.
What To Do If Cilantro Bolts?
It's time to collect and preserve your own coriander seeds once your plant produces seeds. Picture each of those tiny white blossoms turning into a flavorful spice for your cooking or seeds for the following year! In addition to being aesthetically pleasing and tasty, cilantro flowers are also excellent pollinators.
There is a short window of time when the growing seasons of cilantro and tomatoes coincide. This proves they go well together. It usually happens that my tomato and pepper plants are just starting to take off when my cilantro plants bolt, sending forth gorgeous white flowers.
To maximize the amount of fruit your plants produce for you, beneficial insects that are feeding on your cilantro flowers will collide with your fruiting plants, vibrate their leaves, and assist in pollination. Ladybugs, butterflies, and bees all love cilantro flowers. It truly is a win-win!
Choose Slow Bolt Seeds
Seek out seed packets labeled "long-standing" or "slow bolt cilantro," as these varieties have been cultivated to endure longer in the garden. You can find your go-to slow bolt seeds that are 100% certified organic from Seeds of Change.
Finding a local seed producer is another smart move. Buying local seeds means you'll be growing a climate-adapted variety of cilantro, which increases the likelihood that you'll keep it longer.
Harvest Cilantro Regularly
Regularly chop your cilantro leaves. This preserves the health of the plant and guarantees that the leaves of this herb are fresh when you use them. Your cilantro will continue to produce new leaves from the center of the plant if you regularly harvest it by chopping off the older outer leaves.
Additionally, your chances of cutting off those immature flower stalks increase with the amount of cilantro you harvest. This will aid in postponing any bolting.
Since cilantro is incredibly obstinate, you can delay as long as you can. Cut that thick center stalk as soon as possible. After that, the plant will start to send outside shoots, giving you a little extra cilantro before it eventually bolts completely. For sun protection, surround your cilantro with tall plants.
Plant Taller Plants Around Cilantro for Sun Protection
Encircle your cilantro with large warm-season plants (like tomato or pepper plants) so that the taller plants can shade your herbs slightly and help keep the soil cooler as the temperatures rise. After all, four to six hours of sun is sufficient for cilantro to grow. To increase the lifespan of your cilantro in the garden, interplant it with larger plants.
Wrapping Up
You will need to have patience if you want to collect the seeds for your cilantro. Before seeds can be harvested, cilantro needs to blossom. Before harvesting, the resulting seed heads need to be allowed to dry on the plant for a while.
Harvesting the seeds is then as simple as shaking them into a paper bag or chopping off the entire seedhead and placing it inside the bag. If you have thoughts to share or questions to ask about how to harvest cilantro, please leave a comment below. We would love to hear from you!
Read Also:
Asparagus 101: When, How, And How Often To Harvest?
Some Facts You Need to Know About Rainwater Harvesting
How to Harvest Lettuce: A Step-by-Step Guide for Fresh and Crispy Salads
Lemongrass is a tropical herb that has a fresh and citrusy flavor and aroma. It is one of the most essential herb that is people widely use in Asian cuisines. They especially use it in Vietnamese, Thai, and Indonesian dishes. It is also a popular ingredient in teas, soups, curries, salads, and marinades. Lemongrass has many health benefits, such as improving digestion, boosting immunity, reducing inflammation, and relieving stress.
But did you know that you can grow and harvest your own lemongrass at home? Yes, you can! Lemongrass is easy to grow and maintain, and can thrive in pots, containers, or gardens. You can enjoy fresh and organic lemongrass all year round, and save money and time from buying it at the store.
In this article, I will show you how to harvest lemongrass, and share some tips and tricks for growing and using this versatile herb. By the end of this article, you will have a better understanding of how to harvest lemongrass, and how to make the most of this wonderful herb.
So, if that is something that you want to know, I have you covered! Keep on reading this blog till the end to learn more…
How to Grow Lemongrass?
Lemongrass is a wonderful herb that can add a refreshing and citrusy flavor to your dishes, drinks, and teas.
It is also a beautiful ornamental plant that can brighten up your garden with its tall, graceful stalks and fragrant leaves. Lemongrass is native to tropical regions, but you can grow it in cooler climates as well with some care and preparation.
Here are the steps and conditions for growing lemongrass successfully at home:
1. Choose a healthy lemongrass plant or stalk
You can buy a potted lemongrass plant from a nursery or garden center, or you can start your own from a fresh lemongrass stalk that you can find in most grocery stores or Asian markets. Look for a stalk that is firm, green, and has some roots at the base. Avoid any that are dry, brown, or moldy.
2. Prepare a sunny and warm spot for your lemongrass
Lemongrass loves full sun and heat, so choose a location that gets at least six hours of direct sunlight per day. If you live in a colder region, you can grow lemongrass in a container that you can move indoors during the winter.
Use a large pot with drainage holes and fill it with rich, loamy soil that is high in organic matter. You can also add some compost, manure, or leaf mold to improve the soil quality and fertility.
3. Plant your lemongrass in the soil
If you bought a potted plant, simply transplant it to the ground or a larger container, making sure to bury the roots well and leave some space between the stalks.
If you are starting from a stalk, peel off any dead or yellow leaves and trim the top part to about six inches.
Place the stalk in a glass of water and keep it in a sunny windowsill until roots start to grow, which can take a few weeks.
Then, plant the rooted stalk in the soil, leaving about two inches of the stem above the ground. Space the plants about two feet apart to allow them to spread
4. Water and fertilize your lemongrass regularly
Lemongrass needs moist soil to thrive, so water it frequently and deeply, especially during hot and dry periods.
A good rule of thumb is to water it once a week or whenever the top inch of the soil feels dry. You can also apply a layer of mulch around the plants to conserve moisture and prevent weeds.
Lemongrass also benefits from a monthly dose of liquid organic fertilizer during the growing season, such as fish emulsion or seaweed extract. This will help it grow faster and produce more leaves and stalks.
5. Harvest and enjoy your lemongrass
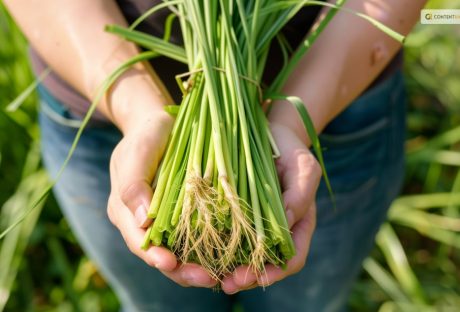
You can start harvesting your lemongrass when the stalks are about a foot tall and half an inch thick. Cut the stalks at the base with a sharp knife or scissors, leaving about two inches of the stem in the ground.
Additionally, you can use the whole stalk, or peel off the outer layers and use only the tender inner part. You can also harvest the leaves and use them fresh or dried for teas and infusions.
Lemongrass can be stored in the refrigerator for up to two weeks, or in the freezer for up to six months. You can also dry it and store it in an airtight container for later use.
How to Harvest Lemongrass?
Harvesting lemongrass is a simple and satisfying process that can be done in a few steps. Here are the basics of how to harvest lemongrass:
Choose the right time
The best time to harvest lemongrass is when the stalks are about 12 inches tall and 0.5 inches thick. This usually happens after 3 to 4 months of planting. You can harvest lemongrass throughout the year, as long as the temperature is above 40°F. You can also harvest lemongrass in batches, leaving some stalks to grow and regenerate.
Cut the stalks
To harvest lemongrass, you need a sharp knife or scissors, and a clean cutting board. Cut the stalks at the base, as close to the soil as possible. You can cut as many stalks as you need, or as many as you can use within a week. You can also trim off the leaves, as they are not edible and can be used for other purposes.
Wash and store the stalks
After cutting the stalks, wash them under running water, and pat them dry with a paper towel. You can store the stalks in the refrigerator, wrapped in a damp paper towel, and placed in a plastic bag. They can last for up to a week. You can also freeze the stalks, chopped or whole, in a freezer bag. They can last for up to 6 months.
Dividing Lemongrass: What is It and How to Do It?
Dividing lemongrass is a great way to propagate and maintain this aromatic and flavorful herb. Lemongrass is a perennial plant that grows in clumps of stalks and leaves.
Over time, these clumps can become crowded, woody, and less productive. By dividing lemongrass, you can rejuvenate the plant, increase its yield, and share it with others.
Here are the steps and reasons for dividing lemongrass:
1. When to divide lemongrass?
The best time to divide lemongrass is in the spring, after the last frost date when the plant is actively growing and has new shoots.
You can also divide lemongrass in the fall if you live in a warm winter climate or if you plan to overwinter the divisions indoors.
Avoid dividing lemongrass in the summer, when the heat and drought can stress the plant and reduce its survival rate.
2. How to divide lemongrass?
To divide lemongrass, you must dig up the entire plant and separate it into smaller sections. You can use a shovel, a sharp knife, or your hands to do this.
Each section should have at least one inch of root and several healthy stalks and leaves attached.
You can trim the leaves to about six inches to reduce water loss and make the divisions easier to handle. Discard any old, brown, or damaged parts of the plant.
3. Where to plant lemongrass divisions?
You can plant lemongrass divisions in the same spot where you dug up the parent plant or in a new location with full sun, moist and well-drained soil, and plenty of organic matter.
You can also plant lemongrass divisions in containers at least 10 inches deep with drainage holes. Space the divisions about two feet apart to allow room for growth.
Plant the divisions at the same depth as they were before, with the crown just below the soil surface.
4. How to care for lemongrass divisions?
Lemongrass divisions need regular water and fertilizer to establish and thrive. Water them deeply and frequently, especially during the first few weeks and during hot and dry periods.
You can also apply a layer of mulch around the plants to conserve moisture and prevent weeds. Fertilize the plants once a month with a liquid organic fertilizer, such as fish emulsion or seaweed extract, during the growing season.
Protect the plants from frost in the winter by moving them indoors or covering them with a frost cloth.
5. How to harvest and use lemongrass divisions?
You can start harvesting lemongrass divisions when they are about a foot tall and half an inch thick. Cut the stalks at the base with a sharp knife or scissors, leaving about two inches of the stem in the ground. You can use the whole stalk, peel off the outer layers, and use only the tender inner part.
Additionally, you can also harvest the leaves and use them fresh or dried for teas and infusions. Lemongrass can be stored in the refrigerator for up to two weeks or in the freezer for up to six months. You can also dry it and store it in an airtight container for later use.
How to Use Lemongrass in Food?
Lemongrass has a long, green stalk with a bulbous base and grassy leaves. It has a lemony taste with a hint of mint and ginger. Lemongrass can be used fresh, dried, or powdered, depending on the recipe and preference. Here are some ways related to how to use lemongrass in different ways:
Fresh lemongrass
Firstly, fresh lemongrass is the most aromatic and versatile form of lemongrass. You can find it in the produce section of most supermarkets, Asian markets, or online.
To prepare fresh lemongrass, you need to peel off the tough outer layers and trim off the root end and the top third of the stalk. You can use a sharp knife or scissors to do this. The part that you want to use is the pale and tender lower part of the stalk.
After that, you can slice it thinly, chop it finely, or bruise it with a pestle or the back of a knife. Slicing or chopping is good for salads, stir-fries, curries, and marinades, while bruising is good for soups, stews, and broths.
You can also make a paste by pounding or blending lemongrass with other ingredients, such as garlic, ginger, chilies, and cilantro.
A paste is great for adding flavor to meats, seafood, tofu, and rice. You can store fresh lemongrass in the refrigerator for up to two weeks or in the freezer for up to six months.
Dried lemongrass
Secondly, dried lemongrass is less potent than fresh lemongrass but still has a nice, lemony flavor. You can buy it in whole or sliced form or dry your lemongrass by hanging the stalks in a warm and airy place until they are brittle.
Dried lemongrass is good for making teas, infusions, and herbal blends. You can also use it to flavor soups, stews, and broths, but you must soak it in hot water for about 20 minutes before adding it to the pot.
Additionally, you can store dried lemongrass in an airtight container in a cool, dark place for up to a year.
Powdered lemongrass
Lastly, powdered lemongrass is the most convenient form of lemongrass, as it does not require any preparation. You can buy it in spice shops, Asian markets, or online.
Powdered lemongrass has a mild and sweet flavor and can be used in baking, desserts, sauces, and dressings. You can also sprinkle it over salads, soups, and stir-fries for a touch of freshness.
The shelf life of powdered lemongrass is also great. For up to six months, you can store powdered lemongrass in an airtight container in a cool and dark place.
How to Use Lemongrass in Other Things?
Apart from cooking, you can use lemongrass in many other ways. Some of the best and most popular uses of this herb are as follows:
Beautifying
You can use lemongrass to make your own beauty products, such as soap, lotion, or shampoo. You can infuse the stalks or the leaves with oil, such as coconut, olive, or almond oil.
Moreover, you can also add other ingredients, such as honey, aloe vera, or essential oils. You can use the products to cleanse, moisturize, or scent your skin and hair.
Healing
You can use lemongrass to treat various ailments, such as headaches, colds, or infections. You can inhale the steam from boiling the stalks or the leaves, or apply the oil to your temples, chest, or throat.
Additionally, you can also drink the tea, or gargle with the syrup. You can use the products to relieve pain, inflammation, or congestion.
Wrapping It Up!
If you want to know how to harvest lemongrass, I hope that this blog has been of help to you. If there are any other queries about the same, please feel free to let me know. All that you need to do is scroll down till you reach the bottom of the bottom of the page. Then leave your suggestions and comments in the box below. And I will be there to answer them all for you!
Learn More About:
Everything You Need To Know About Harvesting Basil
Asparagus 101: When, How, And How Often To Harvest?
How to Harvest Spinach the Right Way: A Step-by-Step Guide