How to Harvest Potatoes: A Complete Guide from Planting to Storage 

by

15 March 2024

Food

How to harvest potato

If there is something that I have learned in life, it is about gardening. Well, almost everything if not all. And if there is one thing that took me some time to master, it was knowing how to harvest potatoes at home! 

Potatoes are one of the most versatile and popular vegetables in the world. They can be cooked in many different ways, such as boiled, baked, fried, mashed, or roasted. Moreover, they are also rich in carbohydrates, fiber, vitamin C, potassium, and antioxidants.

But how do you grow and harvest your own potatoes at home? You see, potatoes are not like cilantro or other plants. These are tubers. 

In this article, I will show you everything you need to know about how to harvest potatoes, from planting to storage.

So, if that is something that you are interested in knowing, then I have you covered! Keep on reading this blog till the end to learn more… 

How to Plant Potato Seeds or Tubers? 

How to Plant Potato Seeds or Tubers_

The first step in how to harvest potatoes is to plant them. You can start with either potato seeds or tubers. Potato seeds are small, round, and black, and they are usually sold in packets.

Potato tubers are the actual potatoes that you eat, and they have eyes or buds that can sprout new plants.

You can buy certified seed potatoes from a nursery or garden center, or use organic potatoes from the grocery store. 

Here are some if the steps that you must take to plant them: 

Planting Potato Seeds 

  • To plant potato seeds, you need to sow them indoors in pots or trays filled with moist potting soil.
  • Place them in a sunny spot and keep the soil moist but not soggy.
  • The seeds will germinate in about two weeks and produce small green shoots.
  • When the shoots are about 3 inches tall, you can transplant them outdoors in your garden or in containers. 

Planting Potato Tubers 

  • To plant potato tubers, you need to cut them into pieces, each with at least one eye.
  • You can do this a few days before planting to let the cut surfaces heal and prevent rotting. Alternatively, you can plant whole small potatoes with several eyes.
  • To prepare the soil, you need to loosen it and add some organic matter, such as compost or manure. 
  •  You also need to make sure the soil is well-drained and slightly acidic, with a pH of 5.0 to 6.0.
  • You can use a soil test kit to check the pH level and adjust it with lime or sulfur if needed. 

Planting Potato Pieces 

  • To plant the potato pieces, you need to dig a trench about 4 inches deep and 12 inches wide.
  • Place the pieces about 12 inches apart, with the eyes facing up.
  • Cover them with 3 inches of soil and water well.
  • As the plants grow, you need to hill up the soil around them to cover the lower stems and prevent the tubers from being exposed to sunlight, which can turn them green and bitter.
  • You can also mulch the soil with straw, leaves, or grass clippings to retain moisture and suppress weeds. 

How to Care for Your Potato Plants? 

How to Care for Your Potato Plants_

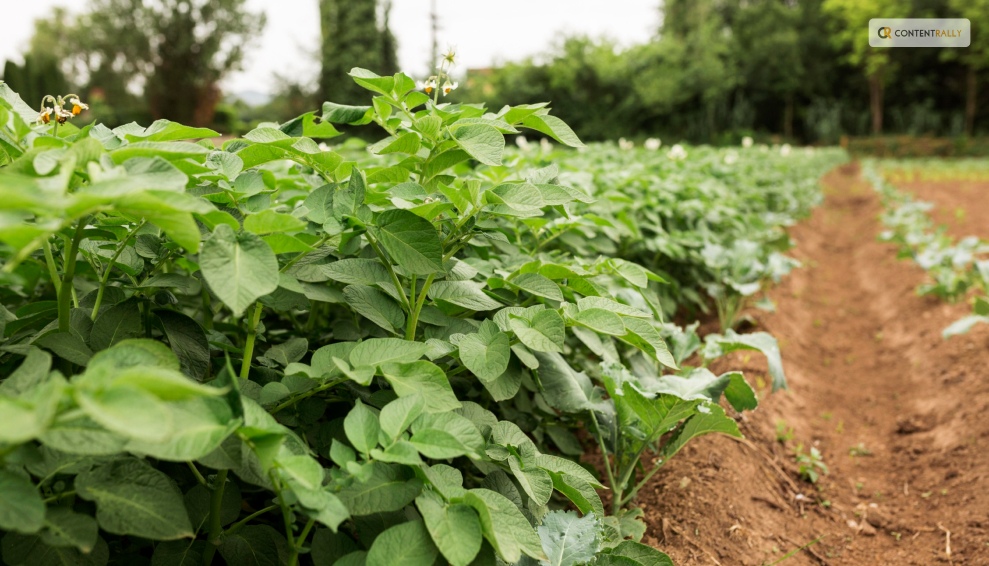
The second step in how to harvest potatoes is to care for your potato plants. You need to water them regularly, especially during dry spells, to keep the soil moist but not waterlogged. You also need to fertilize them every two weeks with a balanced organic fertilizer, such as fish emulsion or seaweed extract. Also, you can add some wood ash or bone meal to provide extra potassium and phosphorus, which are essential for tuber formation. 

You also need to protect your potato plants from pests and diseases, which can reduce your yield and quality. Some of the common potato pests are: 

  • Colorado potato beetles, which are yellow and black striped insects that feed on the leaves and can defoliate the plants. You can handpick them and drop them in a bucket of soapy water, or use an organic insecticide, such as neem oil or pyrethrin. 
  • Potato leafhoppers, which are small, green, winged insects that suck the sap from the leaves and cause them to curl and yellow. You can spray them with a strong jet of water, or use an organic insecticide, such as garlic or hot pepper spray. 
  • Wireworms, which are thin, brown, worm-like larvae that bore into the tubers and cause holes and tunnels. You can trap them with pieces of carrot or potato buried in the soil, or use beneficial nematodes, which are microscopic worms that parasitize and kill the wireworms. 

Common Potato Diseases 

One of the most common reasons why a potato cannot grow or survive is the diseases. If you were wondering what some of these can be and how to deal with them, I have you covered! 

Some of the common potato diseases are: 

  • Late Blight: It is a fungal disease that causes brown spots on the leaves and stems, and black or brown lesions on the tubers. It can spread rapidly and destroy the entire crop. You can prevent it by planting resistant varieties, avoiding overhead watering, and removing any infected plants and tubers. You can also use a fungicide, such as copper or sulfur, as a preventive measure. 
  • Scab: This is a bacterial disease that causes rough, corky patches on the tubers. It does not affect the taste or edibility of the potatoes, but it reduces their appearance and storage quality. You can prevent it by planting resistant varieties, maintaining a slightly acidic soil pH, and avoiding excessive nitrogen fertilization
  • Potato Virus Y: Lastly, this is a viral disease that causes mosaic patterns, mottling, or yellowing on the leaves, and misshapen or knobby tubers. It can reduce the yield and quality of the potatoes, and it can be transmitted by aphids or infected seed potatoes. You can prevent it by planting certified virus-free seed potatoes, controlling aphids, and removing any infected plants and tubers. 

How to Determine When Your Potatoes Are Ready to Harvest? 

How to Determine When Your Potatoes Are Ready to Harvest_

The third step in how to harvest potatoes is to determine when they are ready to harvest. This depends on the type and variety of potatoes you planted, and the size and maturity you want.

There are two main types of potatoes: early and late.

Early potatoes are ready to harvest in about 10 to 12 weeks (about 3 months) after planting, and they produce small to medium-sized tubers that are tender and thin-skinned. They are best for boiling, steaming, or roasting. 

Late potatoes are ready to harvest in about 15 to 20 weeks (about 4 and a half months) after planting, and they produce large, starchy tubers that are firm and thick-skinned. They are best for baking, mashing, or frying. 
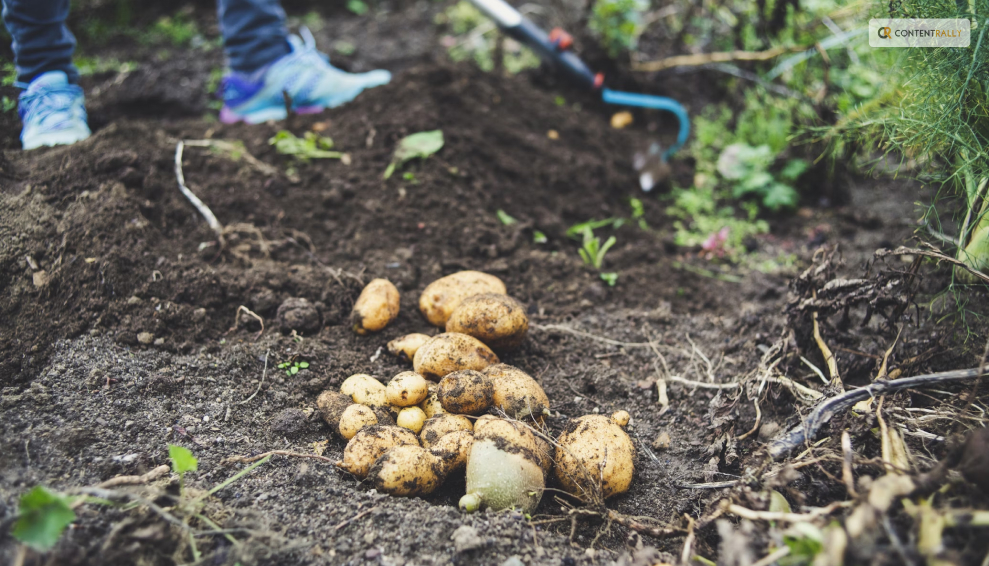
Early Harvesting 

  • To harvest early potatoes, you can start digging them up when the plants begin to flower, or when the lower leaves start to yellow.
  • You can use a garden fork or a spade to gently lift the plants and tubers from the soil, or you can use your hands to feel for the tubers under the soil.
  • You can harvest as many or as few potatoes as you need, and leave the rest in the ground until you are ready to use them.
  • You can also harvest some of the young, tender leaves and stems, which are edible and nutritious. 
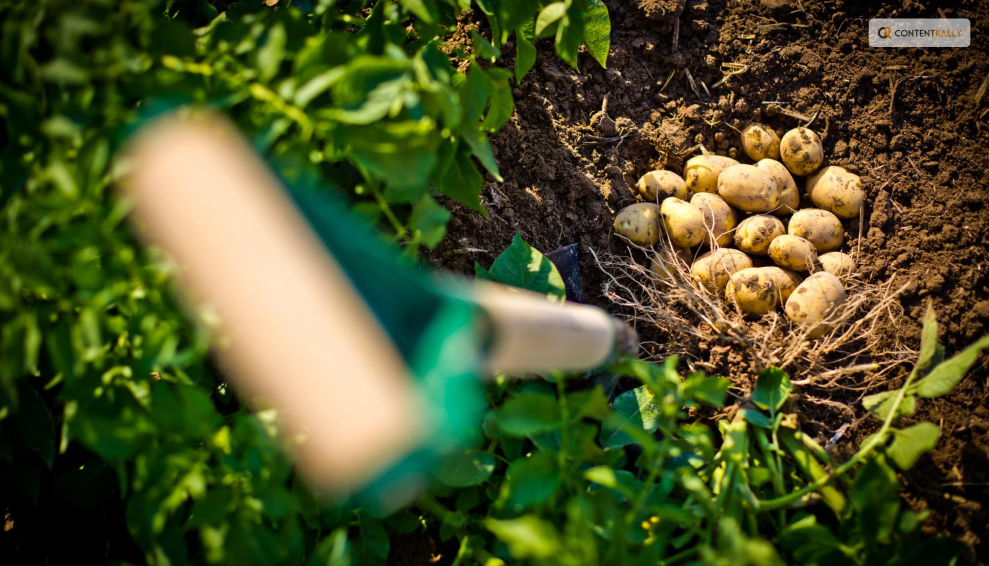
Late Harvesting 

  • To harvest late potatoes, you need to wait until the plants have died back completely, or until the first frost.
  • This allows the tubers to develop a thicker skin, which helps them store better.
  • You can use a garden fork or a spade to dig up the entire row of plants and tubers, or you can use a potato digger, which is a special tool that lifts and separates the tubers from the soil.
  • You need to be careful not to damage or bruise the tubers, as this can cause rotting or spoilage. 

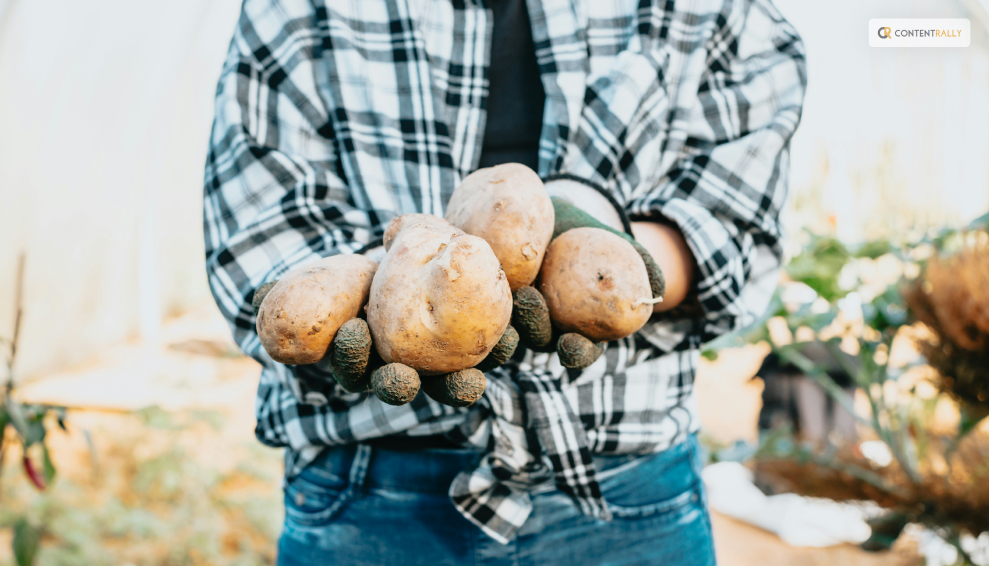
How to Dig Up, Cure, and Store Your Potatoes? 

How to Dig Up, Cure, and Store Your Potatoes_

The final step in how to harvest potatoes is to dig up, cure, and store your potatoes. This is important to preserve the quality and shelf life of your potatoes, and to prevent them from sprouting, rotting, or shrinking. Here are the steps to follow: 

Digging Up 

After digging up your potatoes, you need to brush off any excess soil and remove any damaged, diseased, or green tubers.

Do not wash your potatoes, as this can remove the protective skin and invite bacteria and fungi. You can wash them just before cooking or eating them. 

Curing 

You need to cure your potatoes for about two weeks in a cool, dark, and well-ventilated place, such as a basement, garage, or shed.

This allows the skin to harden and heal any minor cuts or bruises and enhances the flavor and texture of the potatoes.

The ideal temperature for curing is between 50°F and 60°F, and the ideal humidity is between 80% and 90%.

You can spread your potatoes in a single layer on a newspaper, cardboard, or wooden crate, and avoid exposing them to light, which can turn them green and bitter. 

Storing 

You need to store your potatoes in a cool, dark, and dry place, such as a cellar, pantry, or closet. The ideal temperature for storage is between 40°F and 50°F, and the ideal humidity is between 65% and 70%.

You can store your potatoes in paper bags, cardboard boxes, mesh bags, or wooden crates, and check them regularly for any signs of sprouting, rotting, or shriveling.

You can also store your potatoes in a root cellar, which is an underground or partially underground structure that maintains a constant temperature and humidity.

Additionally, you can also store your potatoes in a clamp, which is a mound of straw, hay, or leaves covered with soil, that insulates and protects the potatoes from frost and rodents. 

Wrapping It Up! 

If you want to know about how to harvest potatoes, I hope that this blog has been of help to you. However, if there are any other queries related to the same, please feel free to let me know.

All that you need to do is scroll down till you reach the bottom of the page. Then leave your comments and suggestions in the box below. And I will be there to answer them all for you!

Read Also:

Ankita Tripathy loves to write about food and the Hallyu Wave in particular. During her free time, she enjoys looking at the sky or reading books while sipping a cup of hot coffee. Her favourite niches are food, music, lifestyle, travel, and Korean Pop music and drama.

View all posts

Leave a Reply

Your email address will not be published. Required fields are marked *

Related

Alkaline Foods

7 Surprising Benefits Of Alkaline Foods

When it comes to the workings of these wondrous human bodies of ours, we truly reap what we sow. What we choose to put into our bodies has a profound effect on how it chooses to support us and perform for us. Our modern convenience food diets are riddled with acidic and overly processed foods that are harmful to our health. Things that we may have grown up with---meats, dairy, and coffee---are robbing us of our strength and vitality at every meal. Dangers of acidic foods: Our bodies strive to maintain a delicate PH balance throughout the day; this eliminates the acidic ash that can take its toll on bones, tissues, and organs that might otherwise function to support us. A body that is placed in a chronic, highly acidic state is more prone to disease, weight gain, and even a shorter life span. An alkaline diet rich in fresh, whole, organic foods becomes the very lifeforce of the body as it rebalances the PH and gives the body a chance to heal and regenerate itself. While it may seem at first that making the switch from acidic foods to alkaline foods is going to saddle you with culinary limitations and all sorts of unpleasantness, the feeling you will experience when you give your body a chance to "sigh" will be worth any comfort foods that you will be giving up for this new lifestyle. Whether you have been recently diagnosed with a chronic illness, or you simply want to improve your quality of life you owe it to yourself to give alkaline foods a chance. Here are some ways they can benefit you and your marvelous body: 1. Alkaline foods eliminate fatigue issues: An excess buildup of acid in the body depletes its natural store of oxygen; as a result, the body feels fatigue and so do you. Cells don't function as they should, and every system is working harder than ever to dump toxins and breathe once more. Switching to snacks that are alkaline in nature will reduce acidic buildup and release life-giving oxygen back into your system once more. 2. Alkaline foods strengthen the immune system: An imbalance in your PH levels weakens your body's ability to fight off disease and infection. Bacteria and viruses thrive in an anaerobic, or low-oxygen environment. Increasing your intake of alkaline foods brings more oxygen back into the body, battling disease and viruses and strengthening all systems. 3. Alkaline foods reduce inflammation: An acidic body is an inflamed body; when you have a buildup of acid in your body, you are prone to the development of chronically acidic and diseased states such as heart disease, arthritis, and even cancer. Bringing alkaline rich foods into your diet will reduce your risk for the development of these diseases and bring inflammation under control. 4. Alkaline foods strengthen bones and tissues: As we age, our bodies naturally pull calcium and other minerals from bone material to balance our body's PH. As a result, we grow gradually weaker and more prone to illness and injury. Consuming alkaline foods puts much-needed calcium back into our bodies and restores our strength and vitality in natural and healthy ways. 5. Alkaline foods can prevent the occurrence of cancer: Cancer cells thrive in an anaerobic environment, and by bringing alkaline foods into your diet, you increase the healing properties of vitamins, minerals, and vital oxygen that makes it difficult for cancer cells to multiply and grow. When you give your body the natural tools that it needs, the wonderful self-healing mechanisms present in your makeup go to work on their own, bringing your body into a state of balance once more. 6. Alkaline foods can help you lose weight...and keep it off: Giving your body the vital nutrients it needs through nutritious, whole foods is always preferable to the Standard American Diet, or S.A.D., for short. When you replace high-calorie acidic items like pizza, chips, cookies, and soda with high-quality fruits, vegetables, whole grains, and legumes, the equation is so simple. You'll experience permanent and lasting weight loss and you'll feel great! 7. Alkaline foods improve your quality of life: There are the whole brain, whole body benefits to eating alkaline foods--they heal and repair body tissues at a cellular level, they help to flush out harmful toxins that might slow you down, and they provide the energy necessary to lead a healthy and active life well into your later years. Alkaline foods can improve how you look, how you feel, and what you experience as your body gives back to you based on the wonderful, life-giving foods that you feed it with. Is An Alkaline Diet Right For Me? No matter what diet you choose to follow, it has to be manageable and sustainable in order for it to work. If you are going to derail yourself two weeks after starting an alkaline diet with a cheeseburger and fries, then perhaps going all in isn't for you right now. Making small, deliberate changes to your diet and assessing how you feel will help you create healthy habits for long term success. Many people become overwhelmed at the thought of having to replace everything in their diets; finding some tried and true alkaline diet snacks that you can use for a quick and healthy pick me up in between meals is one way to begin establishing new habits that will move you toward better health. Examples of healthy alkaline snacks include: fresh veggie sticks and hummus celery sticks with almond butter avocados with fresh salsa green juices smoothies nuts, seeds, and berries lara bars chia pudding with fresh berries Once you see how tasty and filling these new foods can be, it will become easier and easier to incorporate healthy, life-giving foods into your diet. Are you ready? Get ready! You are about to embark on an exciting journey to delicious food and better health. You'll experience vibrant energy, improved mood, and you'll feel better than you have in years. Don't look at all the things that you "can't" have on your new journey, focus instead on how much better you'll look and feel with a few simple changes and a whole new positive outlook on your health. Best of luck to you on your alkaline journey! Read Also: You Can’t Out-Diet Your Training 9 Magical Benefits Of A Vegetarian Diet Easy Diet Tips To Summer Six Pack Abs Eating Good Quality Foods For Diet Foods To Eat On A Low-Carb Ketogenic Diet Best Super Nutritious Foods To Include In Your Diet Choosing A Diet Based On Your Personality Type Why Have A Diet Chart For Weight Loss? 11 Foods You Must Incorporate Into Your Diet For Great Skin Featured Image: istockphoto.com

READ MOREDetails
Red Wine

The Best Red Wine that Suits Your Taste

For a casual wine drinker, wine is usually categorized as white wine, rose wine, blush wine and of course red wine. The supermarket sells many choices for each; we have Vin de table or the cheap but classic wine ranging to the most expensive amounting to thousands of dollars per bottle. Truth be told, most people read the labels but can’t understand it. We know that it is red wine or white wine but we have a little amount of knowledge about the types of wine grapes they use, and that is the most important thing. This is because the wine grape used in manufacturing, predicts and give off the taste, texture, and smell of the wine itself. Well yes, it can be generalized that white wine is mostly this, and red wine is mainly that, and the list goes on. But, if we try to understand and know the wine grape used in production then, it will be easier for us to choose the perfect wine from shelf to shelf. So read on and let’s have a glimpse of which type of wine will mostly tickle your taste buds. The Best Red Wine that Suits Your Taste: Cabernet Sauvignon: If you’re familiar with Currant and black cherries, then Cabernet Sauvignon radically tastes like this. Sometimes, upon drinking you can also taste that green olive and bell pepper feel that adds up to the wholeness of the wine. This is the trademark of Napa Valley and is also considered the primary component of Bordeaux. This wine is grown all over the globe, but only a few can achieve to produce the best Cabernet Sauvignon wine due to many factors like climate, soil component, and of course processing. Thus, each continent has its style of this wine, some tend to have that darker shade, and some have that strong aroma. Cabernet Franc: If you’re more into violets and blueberry, this is the type of red wine grape for you. This is considered the cousin of Cabernet Sauvignon and this is one of the significant classifications of the Bordeaux wine. Compared to its cousin, this gives off that earthy taste, and you can tell it from its aroma, emitting a scent of freshly roasted coffee. Of course, this wine grape is also grown all over the globe. It only varies in the number of tannin contents because of the different climate and topographical conditions during its growth. Also, since additives are combined with this red wine, it can result in a minty, and pungent taste. Pinot Noir: If the flavor of cola, root beer, plum, pale cherry, tomato leaf, and blackberry combined excites your palate, then this is what you are looking for. Pinot Noir is also the significant components of champagne and other sparkly wine during production. For connoisseurs, this red wine is a delicacy. And since it is a delicacy, Pinot Noir requires demanding supervision from winemakers since this type is fragile and prone to weedy flavors if not taken care of properly. It is usually grown in single-vineyard wine in Oregon and California. Merlot: If you like the taste of watermelons, strawberry or plum, then this is your best choice. Merlot is like the middleman of all these types as it doesn’t have that strong feature in its taste, and aroma. It is the purest red wine and the epitome of “Vin de table.” Merlot is best produced in Washington and most preferred red wine during the 1990s,  but due to oversupply, over pricing, production of poor and bland quality, it lost its reputation. Malbec: If you’re into sour and spicy impression, then Malbec is for you. This type of red wine isn’t that known in the globe, but it has been the pride and glory of Argentina. Malbec is usually aged in oak barrels that add to its flavor over time. Gamay: If you prefer a fruity, somewhat sweet taste, then look for this wine grape. It usually tastes like raspberry, fresh cherries, and strawberry. Gamay gives off that slight fizz and has the aroma of bananas. Gamay is best consumed when still young if you want to experience that bright, and tangy flavor. Sangiovese: If you are fond of the scent and taste of tobacco leaf, and pie cherry, the search is over since Sangiovese is for you. This type is the main grape in Tuscany and has also been the main component of other well-known wines. Sangiovese is quite acidic compared, but lighter in color when compared to other wine grapes. In Italy, Sangiovese is usually mixed with Cabernet Sauvignon to level off with the later, thus creating the “Super Tuscany.” Besides Italy, Sangiovese is best produced in Walla Walla Valley in Washington, but elsewhere this type is undistinguished and considered dull. Not all supermarkets and local stores are retailers of a vast variety of red wine, so not all stores can satisfy those parched palates. To achieve the greatest experience with red wine, there are online wine merchants who can offer you tons of choices. Sokolin Red Wine is there to help you browse through tons of options coming from all over the globe. When it comes to wine, you can never settle for whatever is in stock. Read Also: Things To Do To Enjoy Yourself In Melbourne How To Throw A Themed Winter B-Day Party To Remember The Advantages And Disadvantages Of Non-Alcoholic Spirits

READ MOREDetails
Concentrates into Vape Oil

How to Turn Concentrates into Vape Oil

Who doesn’t like the taste and flavors of vape oil, but what about the cost of vaping? Well, there’s a little secret, the cost of concentrates used to prepare vape oil is nothing as compared to vape oils available in the market, and the best part is that you can easily turn concentrates into vape oil yourself. What are Vape Concentrates? Vape concentrates are vegetable-based and that’s why vape oil is also safe for you to use. Nicotine is added to the vape oils which you buy from the market but it’s not a necessary ingredient. The added benefit of preparing vape oil yourself is that you can keep it totally Nicotine free. Avoiding Nicotine can keep you safe from developing addiction and from the side effects as well. What are the Different Types of Concentrates? Concentrates are of different types but all of those are not that good to be turned into vape oil. Some of the ideas concentrate for making it are: Shatter: Shatter is one of the most popular vape concentrates as it’s high in potency and is also flavor-rich. Moreover, it’s very easy to turn to shatter into vape oil. Crumble: Crumble is also another great option for high-potency vape concentrates. Wax: Wax is a comparatively low-potency concentrate recommended for beginners. Its price is also very low. Budder: Budder is also a low-potency concentrate. It’s an ideal concentrate for those who like to have low potency but still want a greater taste. How to Turn Concentrates into Vape Oil: Things you’ll Need to Turn Concentrates into Vape Oil Things you’ll need are: Your choice concentrate (Shatter, Wax, Budder, Crumble, or BHO) - 1 gram Wax liquidizer of your favorite flavor – 2 ml Microwaveable glass container for mixing the concentrate A syringe for measuring wax liquidizer and for filling the vape pen cartridge Method of Turning Concentrates into Vape Oil So let’s learn the secret formula for turning concentrates into vape oil: Vape oil can be prepared by using a variety of concentrates. The best ones for this purpose are Shatter, Wax, Budder, Crumble, and BHO. So, first of all, decide on the one you’d like to use by comparing their properties. Next, you should choose the flavor of wax liquidizer for preparing your favorite flavor of vape oil. You can get wax liquidizers in almost all the flavors of your choice. Bananas, pineapple, strawberries, and menthol are among a few all-time favorites. Take just one gram of your favorite concentrate and put it in the microwaveable glass container which comes with the wax liquidizer for mixing it with the concentrates. Check terpenes for sale. Now take a syringe to measure wax liquidizer and take only 2 ml of it for mixing in one gram of concentrate. You should now put it in the microwave oven for just 10 seconds and not more than that. After taking it out of the microwave, you need to stir the mixture well for preparing the perfect vape oil. Now it’s time to fill this tasty, self-prepared, and economical vape oil into your vape pen cartridge and enjoy. Is Vape Oil Safe to Use? Vape Oil is a healthy alternative to smoking. If you love the flavors of vape but don’t want to risk your health for this taste, all you need to do is stay away from Nicotine based vapes. You must read the ingredients of vape oil carefully before buying it. And if you’re preparing one yourself using concentrates and wax liquidizers, then it’s the best. In this way, you’ll know each and every ingredient which you’re adding to your vape oil. Even Wax Liquidizers are prepared very thoughtfully and carefully using safe and great-quality ingredients. So there’s no risk in using vape oil if you know what your vape oil is made of. So now if you’re thinking of trying this method to turn concentrates into vape oil yourself, you‘ll find it so much more cost-effective that you won’t believe it. Just with a small quantity of your choice concentrate and wax liquidizer you can fill many cartridges of vape oil that would have cost you 6 to 8 times more if you would have bought them from the market. Read Also: Use Floor Polishing for Keeping Your Flooring Looking New A Guide To Ear Wax Removal From Camden Opticians

READ MOREDetails