The Many Uses of Industrial Vacuum Ovens

Vacuum Ovens

Vacuum ovens play a critical role in several industries like agriculture, pharmaceutical, semiconductors, electronics, textiles, and food processing. Vacuum ovens are essential tools in laboratory tests, engineering, aerospace, and in many different industries. It’s also commonly used in drying cannabis, herbs, fruits, and vegetables.

The technical process in the operation of a high vacuum oven involves removing the moisture of the solid material inside the chamber. It’s ideal for drying hygroscopic materials, or those that quickly absorb moisture in the air.

Examples of hygroscopic substances are methanol, sodium hydroxide, honey, sulfuric acid, and glycerin.

How Does an Industrial Vacuum Ovens Work?

Industrial Vacuum Ovens

Vacuum ovens work by reducing the pressure just below the vapor pressure of water. As a result, the water will boil. Through the use of the vacuum pumps, the pressure around the oven is slowly lowered. The boiling point of water inside the material will drop down, and this will trigger evaporation.

What most people do not know is that water will boil at a lower temperature as long as you lower the pressure around it. If you boil water at very high altitudes where the temperature is low, it will still boil even at less than 100°C.

Inside the vacuum, the pressure is lowered to the point where the liquid will boil at room temperature.

A high vacuum oven can dry a substance faster compared to an air oven because of compact pressure and low humidity.

When is a Vacuum Oven Used?

You can use a vacuum oven in the following scenarios:

  • For particle accelerators and vacuum coating. The process will stretch the distance that the particle should cover before it collides with another particle.
  • To take out particles in the air that may trigger a chemical reaction on the substance to be dried. This process is used in vacuum melting.
  • To decontaminate surfaces by cutting the number of molecular impacts per second. It’s useful in laboratories that require atomic disinfection.
  • To trigger a chemical reaction by agitating the equilibrium in normal conditions.
  • To remove volatile substances or dissolved gases. This process is called degassing or freeze-drying.
  • To clean microwave tubes during the manufacturing process.
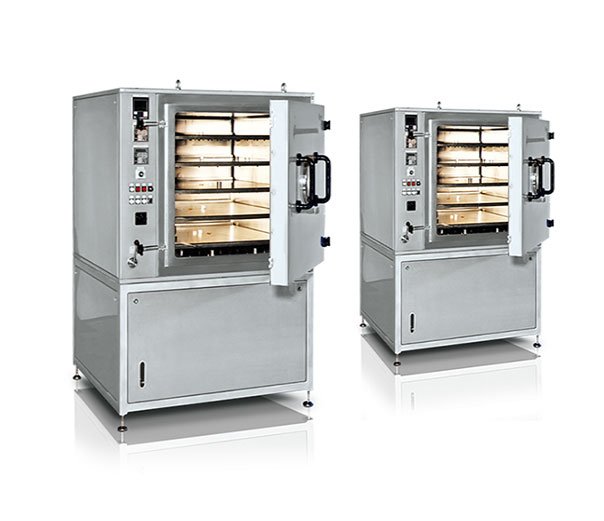
  • A high vacuum oven can be used in drying, curing, and baking. They can heat up to as high as 800°C. On average, the standard oven can accommodate up to 13,000 liters.
  • Prevent oxidation and decarburization. Decarburization refers to the process of reducing the amount of carbon in the metal.
  • Thermal ovens, meanwhile, are used mainly in pharmaceuticals, cosmetics, and the plastics industries. They are designed to dry heat-sensitive substances. Thermal ovens are also used in hospitals to disinfect and dry blankets, pillowcases, etc.
  • They can also be used to remove solvents from a particular solution. The solvent will separate quicker in a vacuum environment compared to room temperature.

Before, the material used on ovens is cast iron, which transfers heat very quickly. Nowadays, manufacturers use stainless steel, which is better at withstanding the pressure without sustaining cracks and deformity.

Read Also:

Content Rally wrapped around an online publication where you can publish your own intellectuals. It is a publishing platform designed to make great stories by content creators. This is your era, your place to be online. So come forward share your views, thoughts and ideas via Content Rally.

View all posts

Leave a Reply

Your email address will not be published. Required fields are marked *

Related

Flooring Installation Process

Flooring Installation Process Transforming Your Space With Elegance

When it comes to renovating or building a new space, one of the most crucial aspects is the flooring installation process. The type of flooring you choose can significantly impact the overall aesthetics, functionality, and durability of your space. In this comprehensive guide, we will walk you through the intricate process of flooring installation toronto, providing valuable insights and tips to ensure a successful transformation. Selecting The Right Flooring Material The first step in the flooring installation process is choosing the right material. Whether you opt for hardwood, laminate, vinyl, tile, or carpet, each material has its unique features and benefits. Consider factors such as your budget, the room's purpose, and your design preferences when making this decision. Measuring And Preparing The Space Before the installation begins, accurate measurements of the room are crucial. This step ensures that you purchase the right amount of flooring material. Additionally, you'll need to prepare the space by removing any existing flooring, baseboards, and furniture. A clean, level surface is essential for a smooth installation. Acclimating The Flooring Many flooring materials, especially hardwood, need to acclimate to the room's temperature and humidity levels before installation. This process prevents the flooring from warping or expanding after installation. Follow the manufacturer's recommendations for acclimation time. The Installation Process Subfloor Preparation A stable subfloor is the foundation of a successful flooring installation. Ensure that the subfloor is clean, dry, and free of any irregularities. Repair any damaged areas and add an underlayment if necessary. Layout And Design Planning the layout of your flooring is crucial for achieving a polished look. Decide whether you want a diagonal, herringbone, or straight pattern, depending on your design preferences. This step is especially important for tile and hardwood installations. Cutting And Fitting Precise cutting and fitting of the flooring material are essential for a seamless finish. Use the appropriate tools, such as a saw or cutter, to trim the material to fit the room's dimensions accurately. Pay special attention to corners and edges. Installation Method The installation method varies depending on the type of flooring you've chosen. For example, hardwood may be nailed or glued down, while laminate often features a click-and-lock system. Follow the manufacturer's guidelines and use the appropriate adhesives or fasteners. Finishing Touches After the main installation is complete, it's time for the finishing touches. Install baseboards and transitions to create a polished look. Seal gaps and joints to prevent moisture and dirt from seeping underneath the flooring. Maintenance And Care Cleaning And Maintenance Proper maintenance is crucial to ensure the longevity of your new flooring. Regularly sweep or vacuum to remove dirt and debris. Use manufacturer-recommended cleaning products to maintain the flooring's finish. Repairing Damage Accidents happen, and flooring can get damaged over time. Whether it's a scratch on hardwood or a chipped tile, knowing how to repair minor issues can extend the life of your flooring. Consult with professionals for major repairs. The flooring installation process is a transformative journey that adds beauty and functionality to your space. By carefully selecting the right material, preparing the space, and following the installation steps, you can achieve stunning results that will stand the test of time. Read Also: How To Pick The Perfect Flooring For Your New Home How to Protect Your Wood Flooring in a Busy Household List of Most Durable Kitchen Flooring

READ MOREDetails

7 Unique Kitchen Design Ideas That Your Family Will Enjoy

The kitchen is usually the hub of many homes. It's the room where you gather to prepare meals for your family. It's also a room where you can gather to talk about everyone's day and celebrate special events. Aside from being a functional kitchen, it should also be a room that is comfortable to look at and spend time in so that your family will enjoy this room of your home. These are only a few of the unique design ideas that you can try in your kitchen to give it an updated look that can be enjoyed throughout the year. Beach Waves: Whether you live on the coast or hours away from the beach, you can enjoy the beautiful scenery of the coast any time you enter your kitchen. The best place to start is with a white background with blue trim. From there, add hardware that is a dark color, such as dark blue or black. Light fixtures that hang from the ceiling can be blue as well to blend with the nautical theme. Hang pictures of lighthouses, the coastline, or other images that you would see at the beach to complete the design. Windows can be designed to look like portholes along with doorways that have an arched design if you want to take the nautical theme a step farther. Subtle Elegance: If your kitchen is small and only has one or two functional areas with cabinets and counters, then consider a design that features a subtle elegant appearance. Wooden cabinets can be transformed with a fresh coat of off-white paint and faux legs that will give a raised appearance. This will make it seem as though there is additional space under the cabinets even though there isn't. Open shelves are an option as well that is trending in many homes. These shelves give you the additional space needed to display the beautiful dishes and decorations that your family and guests might not always see when they are in your kitchen. A chandelier in the kitchen adds to the elegance that you're trying to achieve. Lounging While Eating: No one ever said that you have to sit at a table when you're eating a meal with your family. Create a modern design in your home that features a table surrounded by comfortable bench seating. You'll have a place to sit at the end of a long day while enjoying time with your family and a delicious meal. When you're designing the lighting in the kitchen, consider fixtures that are under the cabinets to add a soft glow to the counter spaces. Colorful Oasis: Give your kitchen a facelift with bright colors and appliances that match. Find a color that suits the entire family, using the shade when you paint the cabinets and the lower half of a kitchen island. Find chairs that are in the same color family or wooden chairs that you can paint in a dipped design to match the theme of the room. Colorful dishes on open shelves and appliances that are the same colors of the kitchen complete the look and add a touch of vibrancy to a room that can be somewhat boring. Companies like Brisbane Alfresco Kitchen Unique Design have various colorful decorations that can complete your kitchen in a way that showcases the personality of your family. Designing With Wallpaper: You probably thought that wallpaper went down the drain with the dishwater, but if you know how to apply it to the walls in your kitchen, it can be a nice feature to consider. Apply wallpaper to the walls that don't have a lot of details on them and that aren't home to appliances or counters. If you put wallpaper behind the stove or near the sink, consider covering it with glass or a clear film so that it doesn't get destroyed in a short time. A benefit of wallpaper in your kitchen is that it can easily be changed when you want a new look. Get Cozy: When you spend time with your family in the kitchen, it should be a warm experience. This is usually where you'll gather for holidays and special occasions as well. Lower the ceiling, and change the floor so that it looks like hardwood. An island with barstools provides an intimate setting where it's easier to talk to each other. Add a few details to the cabinets and the walls to bring a feeling of warmth to them, such as decorations that you might see in a cozy lodge. Mugs on the shelves or hanging on hooks on the walls are an option to consider to deliver the warm appearance that you desire. When you're trying to determine the best type of lighting, consider pendants that hang over the island or kitchen table. Two Tones: Instead of using one color throughout your kitchen, add a little balance by using one color for the top half of the room and one color for the lower half. White is a good color to start with on the upper half of your kitchen. This will allow you to focus more of your efforts on the cabinets and drawers in a color that you enjoy. It's also easier to play around with the hardware that's included on the cabinets and drawers when you have a solid color on the lower half of your kitchen. Counters that are a dark color tend to easily divide the two colors and make each shade stand out as soon as you enter the room. Read Also: 9 Feng Shui Tips For A Calmer Kitchen The Best Countertops To Help Revamp Your Kitchen Five Bedroom Rug Ideas – Area Rugs And Decorating Ideas A Guide To Finding The Perfect Sofa For Your Living Room

READ MOREDetails
Metal Studs

Why Metal Studs are More Suitable for Your Construction Works

When it comes to building structures, it is preferable to consider using metal studs in place of wooden studs for non-load bearing walls. Research shows that more than 50% of structures are built with metal studs made from cold-formed sheets. However, metal studs conduct cold, but builders prefer using metal studs in place of woods for the following reasons. 1. Metal studs are lighter than wooden studs and convenient to work: Metal studs are lighter in weight than wooden studs because of their hollow shape. This makes them less bulky than wooden studs in terms of transportation and storage. When cutting metal studs using aviation snips, there are no sawdusts, unlike cutting through wooden studs. But it is advisable to protect your hands from sharp ends using gloves, especially during galvanized steel frame building construction. 2. Metal studs are easier to handle: In terms of installation, metal studs weigh far less than wooden studs and are held in place with screws. Therefore, it easy to correct installation blunders with metal studs. 3. Metal studs are less prone to attacks from atmospheric elements: Metal studs are not inclined to stresses and uneven shrinkage. Unlike wooden studs, which are susceptible to such factors with time. Also, metal studs are more resistant to mold and rot, which are common wooden infections. Although metal studs rust with time, this is preventable by installing a vapor barrier on the concrete floor. This explains the durability and sturdiness commonly enjoyed with galvanized steel frame building. 4. Metal studs have a higher tensile strength than wooden studs: Metal studs have a higher tensile strength and flexibility than wooden studs. Therefore, they are preferred for construction in wind prone areas and seismic zones like the Gulf Coast states of the USA. 5. Metal studs are resistant to fire and insect attacks: Metal studs are not prone to insect attacks like carpenter ants and termites, which can cause grave damages to wooden studs. Also, in terms of fire outbreaks, metal studs are fire resistant and do not burn in the case of a fire outbreak, unlike wooden studs. 6. Metal studs have a higher cost advantage: Wooden studs cost 15% lesser than metal studs, but metal studs offer cost advantages in other areas. These advantages cut across warranty call-backs in the sales of metal studs are much reduced because metal studs are not susceptible to shrinkage, and additional stress-related factors. Buildings built with metal studs do not have cracks or nail pops to fix after completion. Therefore, scraps are significantly reduced. Up to 20% wastage is recorded when wooden studs are used in construction. Hence the cost of disposing of discarded materials is decreased considerably. 7. Higher insurance discounts: Owners of buildings built with metal studs enjoy a higher insurance discount due to lower risk factors. Unlike buildings built with wooden studs, which attracts a higher insurance premium because of their higher susceptibility to fire and other environmental factors. Conclusion: Metal studs are preferable for buildings because they are environmentally friendly compared with wooden studs. They can be recycled and are readily available in similar wooden dimensions. Read Also: How To Protect Your Wood Flooring In A Busy Household Hardwood Timber Flooring: Gives A Classic Look To Your Home

READ MOREDetails