Published on: 16 December 2019
Last Updated on: 18 December 2019
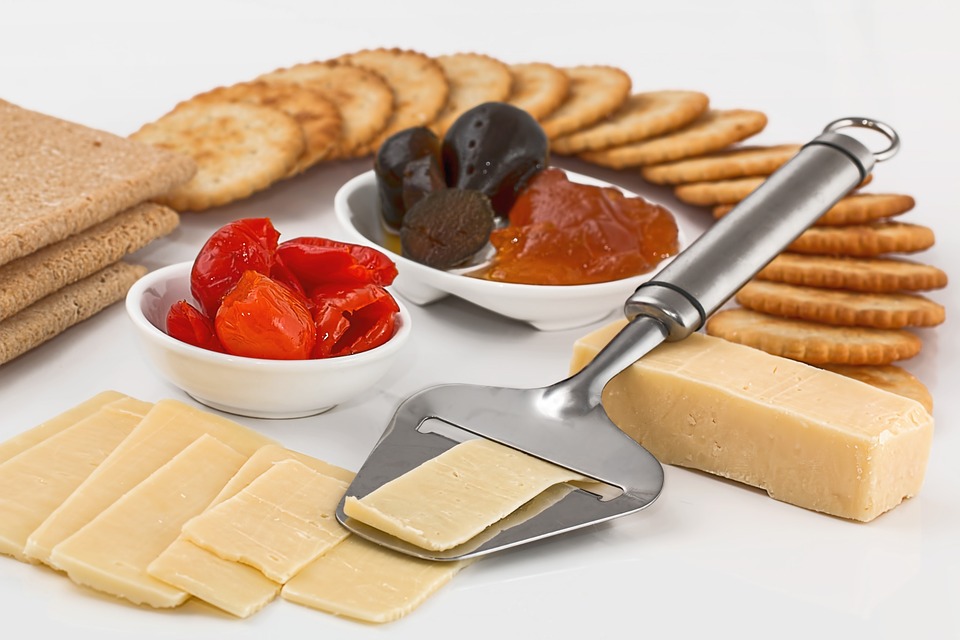
Particularly popular in the Mediterranean and Eastern Europe region, kashkaval is a semi-hard yellow cheese. It derives its name from the Italian cheese “Caciocavolla”. Kashkaval cheese is made from cow’s milk or ewe’s milk. The version made from cow’s milk is called Kashkaval Vitosha. The one made from ewe’s milk is called kashkaval Balkan. There is also a variety that uses a mixture of both of these types of milk. The cheese made from the mixture of these two kinds of milk is called kashkaval Preslav.
The different names of kashkaval:
Kashkaval is very popular in countries such as Romania, Bulgaria, and Macedonia. This variety of kashkaval cheese is also to be found widely in countries such as Turkey, Hungary, and Croatia. Each country has a different name for this variety of cheese though. While the Turkish refer to this cheese as “Kasra”, the Greeks call it “Kasseri”. The Romanians, on the other hand, call it “Cascaval”.
Kashkaval belongs to the pasta filata cheeses. This means that the curd is given a hot bath during the production process. This semi-hard yellow cheese or Kashkaval cheese is allowed to age for a good six months. This lends it a piquant and spicy flavor on the one hand and salty flavor on the other. In taste, it is very similar to the cheddar cheese that is widely popular in the United Kingdom. The Kashkaval cheese is also famously referred to as “the cheddar cheese of the Balkans”.
Popular kashkaval recipes:
The slightly hard texture of this yellow cheese makes it perfect for grilling and grating. It is thus generously used in salads, pizzas, appetizers, and lasagna. One of the famous Eastern European street food made with the kashkaval cheese is kashkaval pane. It is favored for its portability and thus preferred as an appetizer or served in clubs and bars.
It is essentially fried cheese made with simple and easy to find ingredients such as flour, breadcrumbs, and eggs apart from the kashkaval cheese itself. Served hot right off the pan it is known for its crunchy, melty goodness! Another popular Bulgarian recipe made with Kashkaval cheese made in Eastern European homes is the Bulgarian cheese banitza or banitsa that is also served as an appetizer. It is can also be served in the main course alongside other dishes.
It is similar to a Greek cheese pie or a Serbian burek. To make this you will need two cups of crumbled kashkaval, 2 eggs beaten, 16 sheets of filo dough, 6 tablespoons of plain yogurt, two sticks of unsalted butter and chopped green onions and sea salt for garnishing. To make this recipe, you will need to combine the cheese, yogurt, and eggs in a large bowl and beat them until they are smooth.
The next thing to do is fold one filo sheet in half and brush it with melted butter. Portion out the filling in the sheets making either a cigar-shaped roll or an S-shaped scroll. Remember to fold up the bottom edge first and then roll it up until you are looking at a tight cylindrical shape. Repeat the process with the remaining sheets. Sprinkle with chopped green onions and sea salt if desired and place on a parchment-lined pan.
The next thing to do is bake these goodies in a pre-heated oven for about 20 minutes until they are brown and crisp. Serve hot with your favorite wine and your recipe is bound to be a hit among your guests in gathering or with your family when you are gearing up for a fun evening with food and wine! The bottom line is kashkaval is a popular cheese and can be replaced with cheddar for a slightly exotic dish or simply whipped up in an omelet!
Content Rally wrapped around an online publication where you can publish your own intellectuals. It is a publishing platform designed to make great stories by content creators. This is your era, your place to be online. So come forward share your views, thoughts and ideas via Content Rally.
Is Indian food healthy? – Of course, they are. There are plenty of Indian dishes that are rich in nutrients, spices, and whole foods.
Although there are innumerable gastronomic options, there are many healthier options. In fact, some food recipes are based on Ayurveda, which is Ancient India’s system of medicine.
In this article, you will learn about the nutritional benefits of Indian food and the balanced dietary profile of Indian food. Also, you will learn about the health benefits of Indian food and healthy Indian cooking techniques.
Moreover, you will also learn about common myths about Indian food. Hence, to learn more, read on to the end of the article.
Is Indian Food Healthy?
Indian cuisine has a variety of food options consisting of both healthy and unhealthy options. Here, this article aims to consider only healthy Indian food.
Generally, in Indian food, you will find a blend of diverse flavors and healthy food traditions. In fact, apart from satisfying your taste buds, Indian food will improve your health.
One of the most notable aspects of Indian food is that you will find a rich array of ingredients. Traditionally, the Indian diet uses a variety of whole grains, fruits, legumes, and vegetables.
Interestingly, each of them contributes significantly to health benefits. Whole grains like whole wheat, brown rice, and millet play a significant part in Indian meals.
Apart from that, Indian food items are rich in antioxidants. This is because they have many spices that are full of antioxidants. For example, antioxidants in cloves and ginger contain anti-inflammatory properties. Apart from that, cardamom also contains antioxidants.
Basically, antioxidants are molecules that prevent oxidation damage in your body cells. Moreover, it also reduces when damage is done. Hence, Indians mostly follow a diet that is high in antioxidants. As a result, there are fewer risks of diseases like heart disease and cancer.
Balanced Dietary Profile Of Indian Food
Here is a balanced dietary profile of Indian food that you need to know about:
Food ItemsBalanced Dietary ProfileFruits and VegetablesGenerally, an everyday Indian diet includes 400 grams of vegetables and 100 grams of fruits.Cereals and PulsesEach day, a balanced diet consists of 250 grams of cereals.DiaryA balanced Indian diet consists of 200-250 ml of milk and milk products daily.ProteinIndian food contains 85 grams of protein in the form of eggs, animal protein, and pulses daily.Nuts and Seeds35 grams of nuts and seeds daily also fall under a balanced diet.
To ensure a balanced diet, you must cook your food well and make sure that the food is soft and less salty and spicy. Although Indian food has a lot of spices, the healthy options contain multiple healthy spices in the right amount.
Moreover, when consuming meat, milk, poultry, or any animal protein, make sure they are moderate in number. Furthermore, when you have a balanced diet, you must drink plenty of water and take fewer beverages.
Health Benefits Of Common Indian Ingredients
The following are the health benefits of common Indian food ingredients:
1. Spices
Since ancient times, India is known as the land of spices. Even today, India is the biggest exporter of spices in the world. Moreover, Indian food contains a variety of spices.
Here are some spices and their benefits:
Turmeric: It contains curcumin. This item has antioxidant and anti-inflammatory properties.
Cumin Seeds: They help in the digestion process and boost the immune system of your body.
Coriander Seeds: These help you to regulate your blood sugar levels.
Cardamom: It helps you to lower blood pressure levels.
Cinnamon: This spice can reduce heart risks.
2. Vegetables, Pulses, And Lentils
Indian foods contain vegetables in food items. These vegetables provide vitamins inside your body. Also, vegetables lower cholesterol and improve vision. Moreover, many pulses contain vitamins A, B, C, and E. Apart from that, they also contain minerals like iron, potassium, and zinc.
On the other hand, lentils and vegetables also promote heart health. This is because they have less saturated fat and high fiber.
3. Whole Grains And High Fiber Foods
Healthy Indian food items contain whole grains like wheat flour and brown rice. These items provide fiber, carbohydrates, and protein.
On the other hand, chickpeas, and other fruits and vegetables help you in the digestion process. Thereby, you can maintain a healthy weight and ensure there are no risks of chronic diseases.
Indian Cooking Techniques And Their Impact On Health
Generally, Indian cooking techniques preserve nutrients in the food items (vegetables, seafood, and meat). On the other hand, there are tempering methods and slow-cooking techniques, with the help of which you can ensure you get all the nutrients in your body.
Here are some of the major Indian healthy cooking techniques that you must know about:
1. Steaming
This is one of the healthiest cooking methods, where you ensure all nutrients in the food stay. Here, you cook the food with minimum water and little to no oil. In this case, you preserve all the vitamins and minerals in vegetables, fish, and meat.
2. Tadka
In this technique, you have to heat spices quickly in a little oil. Then, you have to add them to the main dish. Thereby, you add flavor without increasing the fat content in the food.
3. Dum Cooking
Dum is a slow-cooking method. Basically, you have to seal food in a pot-shaped cooker and add a small amount of liquid. Hence, you can allow flavors to develop inside the food. As a result, there is no need for excessive oil in the food.
4. Grilling
As you might already know, grilling is a simple way to cook vegetables and meat. Meanwhile, with this process, you can retain all the nutrients in the food. Also, you can add a nice-looking character to the food.
5. Pressure Cooking
In this way, you can cook food quickly with a low amount of water. As a result, you preserve most of the nutrients in the food item. Apart from that, this process also helps you to reduce your cooking time.
Why Is Indian Food One of the Healthiest Cuisines in the World?
Indian food is one of the healthiest cuisines in the world. This is because of good reasons. One of the major reasons is that it relies heavily on lentils, whole grains, vegetables, and diverse spices with low health benefits and saturated fats.
As a result, these food items are rich in nutrients and are dense with fibers when prepared with traditional techniques.
The following are some of the major reasons why Indian food items are healthy:
Stable ingredients in Indian food are high in fiber.
Due to India being a large and diverse country, a wide variety of vegetables are available. As a result, all the essential vitamins and minerals are available through food.
Moreover, a variety of spices available in India come with potential health benefits.
Traditional Indian food items use less amount of oil in cooking. Also, they focus mostly on healthy fats like ghee (moderate amount, of course).
Lentils are common in Indian cuisine and offer a complete profile of amino acids.
Many Indian foods feature fermented items like yogurt, which improve your gut health.
The Vegetarian Advantage of Indian Cuisine
India has an extensive variety of dishes full of flavors and delicacies. However, most consist primarily of lentils, vegetables, legumes, and whole grains.
This provides a nutritious, high-fiber, and well-rounded diet for vegetarians. Apart from that, these food items are full of diverse vitamins and many protein sources.
There is a vast array of vegetarian dishes in Indian cuisine. Moreover, due to the high range of species, it enhances the taste and offers potential benefits.
Common Myths About Indian Food Being Unhealthy
Here are some myths about Indian food that you will find common (however, they are just myths):
“Indian food is unhealthy and fatty”: This is a common misconception in the West because most Indian restaurants in Western Countries add a lot of oil and ghee to food items. However, this is not the case in Indian households.
“Indian foods are spicy”: When people think of spices, they align it with the word hot. Actually, India produces a lot of healthy spices. By adding those spices to food, you can make your food healthy.
“Indian desserts are too sweet”: Again, this is a myth as desserts differ with changing regions. Some regions in India create homemade desserts which are actually healthy.
Try Indian Food Now
Is Indian food healthy? – Now you know the answer to this question. You can see that there are multiple myths about Indian food, and they multiply with misinformation on social media.
India is the land of Yoga and Ayurveda. Hence, multiple healthy food options are available if you cook with the right ingredients.
Do you have more information about healthy Indian foods? Please share your opinions in the comments section below.
Read Also:
15 Healthy Mexican Food Items With Immense Health Benefits
Eat Your Heart Out A List Of Restaurants That Are Open On Christmas
Lift Your Home Cooking: Mysteries From HMD Bar And Grill’s Kitchen
Vaping is a popular hobby among many people, but keeping up with the latest trends and flavors can be tricky. Whether you're an experienced vaper or just starting, plenty of unique and delicious vape juice flavors can please any palate. Lately, people are also searching for “salt vape juice flavors sold here”.
In this article, we'll outline six trending vape juice flavors that you won't want to miss – so gather your family around for a taste test so they can see what all of the fuss is about!
Here Are The Trending Vape Juice Flavors That You Can Try With Your Family
1. Blue raspberry blast
If you're a fan of vaping and are looking for a refreshing flavor to try, you may want to check out the Blue Raspberry Blast. This popular flavor trend is gaining popularity amongst vapers, especially those who love fruity and sweet tastes.
The Blue Raspberry Blast is a flavor that is both tangy and sweet, making it a pleasant experience for your taste buds. It is perfect for enjoying with your family and friends, as it is a flavor most people will likely enjoy. Whether you're new to vaping or a seasoned pro, the Blue Raspberry Blast is worth trying out if you want something enticing and enjoyable. You can find great blue raspberry taste with Breeze Smoke Pro. Or you can suggest a similar sentence with the same anchor.
2. Vanilla bean dream
Vanilla Bean Dream is a top choice for those seeking a sweet, creamy vape juice flavor. This trending flavor combines the classic taste of vanilla with a dreamy creaminess to create a vaping experience that is both smooth and satisfying.
Vanilla Bean Dream is a great choice for those who don't want a strong or overpowering taste, and it is perfect for sharing with family and friends. With its buttery smoothness, this vape juice is a real crowd-pleaser. Whether new to vaping or a seasoned pro, Vanilla Bean Dream is a must-try flavor that will surely delight you.
3. Juicy watermelon burst
Looking for a new vape juice flavor that you and your family can enjoy? Look no further than Juicy Watermelon Burst! This trending flavor is bursting with sweet and juicy watermelon notes that are perfect for summertime.
Whether relaxing by the pool or enjoying a BBQ with loved ones, Juicy Watermelon Burst will surely be a hit. Its crisp and refreshing taste makes this flavor perfect for those looking for something delicious and easy to vape. Give it a try and see what all the fuss is about - you won't be disappointed!
4. Caramel swirl delight
If you're on the hunt for a vape juice flavor that is both sweet and irresistible, the Caramel Swirl Delight is worth a try. This trending flavor has been gaining popularity for its unique blend of rich caramel and smooth cream that explodes with flavor in every puff.
Whether you're new to vaping or a seasoned pro, this flavor is a must-try that will leave you wanting more. Plus, the Caramel Swirl Delight is a great option to share with your family and friends, as it is sure to impress even the pickiest of taste buds. So go ahead and indulge in this delicious vape juice flavor today!
5. Sweet and sour cherry bomb
If you're looking for a new e-juice flavor with your family, the Sweet and Sour Cherry Bomb is a trending option worth a taste test. This flavor features the perfect blend of sweetness and tartness, making it a deliciously unique experience that will tantalize your taste buds.
Every puff will deliver a burst of cherry flavor complemented by a tangy aftertaste, creating a complex and satisfying vaping experience. Whether you're a vape enthusiast looking to switch things up or just starting with vaping, the Sweet and Sour Cherry Bomb is a must-try flavor that's sure to impress.
6. Tangy lemon twist
If you're a fan of tangy flavors, then the Tangy Lemon Twist vape juice is worth a try! Perfect for those who aren't fans of overly sweet flavors, this juice offers a refreshing blend of tartness and sweetness that will tantalize your taste buds.
Additionally, this flavor isn't heavy or overpowering, making it an ideal choice for those who prefer a lighter vape experience. Whether you're looking to switch up your usual vape flavor routine or want to try something new with your family, the Tangy Lemon Twist vape juice is a great option to consider.
How To Choose The Perfect Vape Juice Flavor To Enjoy With Your Family?
Choosing the perfect vape juice flavor to enjoy with your family can be an exciting adventure.
First and foremost, it's essential to consider the preferences of each member of your household. Tasting different flavors together can also be a fun activity to help you find the perfect vape mood. When selecting vape juice flavors, consider a variety of flavor categories such as fruity, candy, dessert, and menthol.
Take your time to try different combinations and find a favorite that everyone in your family can enjoy. Importantly, ensure the vape juice flavors you pick are high quality and produced by a reputable company.
With a vast selection of vape juice flavors available, choosing the perfect one may take time and patience, but it'll ultimately be worthwhile.
Factors To Ensure While Trying Different Vape Juice Flavors With Your FamilyWhen trying different vape juice flavors with your family, there are a few critical factors to keep in mind for a satisfying and safe experience:
Consider the nicotine level and opt for lower concentrations if possible. This is particularly important if anyone in your family is new to vaping or sensitive to nicotine.
Be mindful of any flavor allergies or preferences and choose accordingly. Be open to trying different flavor profiles and experimenting with combinations, but always prioritize safety and comfort for everyone involved.
Always store your vape juice properly and keep it out of reach of children and pets.
Following these simple guidelines, you can enjoy trying different vape juice flavors with your family while ensuring a safe and enjoyable experience.
Bottom Line
Vaping has become a popular pastime for adults across all age groups. With increasingly diverse flavors, settling on the perfect mix can be hard. From Twisted Tobacco to Caramel Mint, there is something for everyone’s palate! In addition, this can be a great way for families to spend quality time together, whether inside or out. All you need is an e-cigarette starter kit, and you’re ready to go! Whatever flavor tickles your fancy, always remember to vape responsibly and take safety precautions when testing different flavors.
Read Also:
Top 5 Best Types of Vape Juice
How to Solve Some Problems of The Vapes
Benefits of Buying Your E Juice in NZ Online
Cooking on Christmas can occasionally seem like an unwelcome chore in between Christmas parties, gift-buying, and other yearly traditions. Hey, we are not judging—we understand!
After all the preparation that went into your Thanksgiving meal, you might not even be completely recovered! So how about you just decide to set the apron aside and read about what restaurants are open on Christmas Day?
Dine Out On Christmas
Picture this: You get to avoid all the stress of preparation and cooking while still enjoying a holiday meal with your loved ones. Looking for the best steakhouse in Nashville When searching for the top steakhouse in Nashville, discerning diners don't need to look far for exceptional cuts of meat and exquisite dining experience.
The best part is that you can pick up the food and spend time at home with your loved one because the majority of these restaurants offer takeout or heat-and-serve options. Visit your preferred coffee shop and indulge in a small pick-me-up following the hectic Christmas season spent wrapping gifts and spending time with family.
After that, order a steakhouse meal to enjoy while still cozy in your Christmas pajamas from Del Frisco's or Morton's! Having said that, there are lots of grocery stores open on Christmas this year if you need some last-minute snacks to complete the meal. Why not also check out the stores that are open on Christmas day while you're at it?
What Restaurants Are Open On Christmas Day?
Image Source: i.pinimg.com
It can feel pretty troublesome to get cooking after the collective pressure of Thanksgiving and Christmas setup. If you want to know about the restaurants that are in business on Christmas to have a meal without having to slog for it, here is a list. Check them out.
Dunkin' Donuts
If you are in the mood for Christmas brunch, you can grab a dozen donuts and some hot coffee on December 24 or 25 at certain Dunkin' Donuts locations. Check the hours of your neighborhood store by giving them a call before you get in the car.
Fogo de Chão
Image Source: fogodechao.com
Fogo de Chão, which is well-known for its tender steaks, is open for dining on December 24 and 25. Don't forget to book a table in advance. The Brazilian steakhouse also provides holiday to-go packages if you would prefer to eat your holiday meal at home.
Red Lobster
Image Source: prnewswire2-a.akamaihd.net
The well-known seafood chain will be open for lunch and dinner on Christmas Day at a few locations across the nation. The entire list of open eateries, arranged by state, is available here.
Carrabba's Italian Grill
Image Source: upload.wikimedia.org
If you're going to Carrabba's Italian Grill for dinner, then you should expect pasta, garlic bread, and a nice wine. The restaurant will be open at several locations on Christmas Eve. In addition, you can order Family Bundles in advance to enjoy them on Christmas Day. These bundles serve four people and include bread and salad.
Chart House
Image Source: images.getbento.com
Savor a decadent three-course meal at your nearby Chart House. Start with a seasonal main course like the Slow Roasted Lamb, then choose from classic Chart House favorites like New England Clam Chowder for your first course. Finally, finish with a choice of Mini Lava Cake, Cherry Cheesecake, or Chef's Dessert.
Del Frisco's Grille
Image Source: tilmanfertitta.com
On Christmas Day, have a late lunch and dinner at Del Frisco's Grille. The restaurant serves mouthwatering sandwiches, steaks, and irresistible apps. Remember to sample their gingerbread martini and holiday red, white, and sparkling wine while you are eating.
Macaroni Grill
Image Source: assets.entrepreneur.com
Since most Macaroni Grill locations are open from 12 p.m. to 8 p.m. in the past, you can probably get your pasta fix there this Christmas—perfect for both lunch and dinner. With their Honor Wine system, you can fill up your glass whenever you would like and help yourself to a glass of wine. It is advised to make reservations.
McDonald's
Image Source: s41230.pcdn.co
You may find yourself yearning for golden arches rather than golden rings! Normally, the fast-food restaurant is open on Christmas. You will need to inquire with your neighborhood Mickey D's to see if you can visit for some burgers and fries on Christmas Day because each franchise is independently owned.
Panda Express
Image Source: securitymagazine.com
Visit Panda Express if you are craving something fast. Now that BeyondTM, the Original Orange ChickenTM, is available in stores thanks to a partnership with Beyond Meat, vegetarians and vegans in your family can enjoy the meal as well.
Olive Garden
Image Source: costar.brightspotcdn.com
If you want to introduce your family to reasonably priced, shareable Italian food, Olive Garden is a fantastic choice. Some of the family-style meals they serve can accommodate up to 12 people. However, make sure to check the hours of your closest location by giving them a call before Christmas Eve.
Ruth's Chris Steak House
Image Source: nj.com
A large, hearty meal with friends and family is, for many, the perfect Christmas present. Ruth's Chris is open 365 days a year, and a representative from the restaurant confirmed to GoodHousekeeping.com that they will be open for business on this holiday.
Shake Shack
Image Source: nrn.com
You should definitely stop by Shake Shack for a quick bite if you find yourself in the JFK or Vegas airport this Christmas on your way back from vacation! (Or, you know, if there is a Shake Shack nearby because those milkshakes are the best; however, do check the hours by calling in advance).
Starbucks
Image Source: stories.starbucks.com
Warm up with a hot cup of coffee on Christmas morning (or give the kids a cake pop). You may need to find an alternative method of passing the mid-afternoon slump because most Starbucks locations were closed in the afternoon last year. Instead, they were open early.
The Palm Court
Image Source: media.timeout.com
It is not necessary to limit lunch at The Plaza to Eloise alone. Enjoy the Christmas Day Buffet at The Palm Court if you are already staying at the renowned hotel. Reservations for non-overnight patrons are not accepted at this restaurant.
Waffle House
Image Source: s.abcnews.com
Before you spend the entire day putting together every toy under the Christmas tree, indulge in a plate of your favorite breakfast item (been there, done that). Waffle House restaurants are renowned for being open around the clock all year long. Make sure the one closest to you is keeping these hours.
Wendy's
Image Source: imageio.forbes.com
When you visit Wendy's, make sure to grab a Baconator or a 10-piece nugget combo. The fast food restaurant chain's hours may vary depending on your local location, but it will be open on Christmas and Christmas Eve.
Wrapping Up
Do you want to know what radviseDomino's restaurants are open on Christmas Day? We hope this article helped. There are fewer options on Christmas Day since many eateries opt to remain closed.
However, Waffle House, IHOP, and are among the chains that are open on this holiday. We always calling the restaurant before you leave on significant holidays, just in case anything has changed.
If you have thoughts to share or questions to ask, please leave a comment below. We would love to hear from you!
Read More About:
The Best Star Wars Gifts This Christmas
A Complete Guide to Christmas Gift Giving
Unveiling Home Décor Ideas For Christmas
15 Inspiring Christmas Social Media Post Ideas
7 Restaurants You Must Must Experience In Melbourne