Which one of the Memory Foam Mattresses out there Worth Your Money

Published on: 30 November 2018 Last Updated on: 20 July 2021
Memory Foam Mattress

The decision of buying the right mattress can change things significantly. The mattress will have a serious impact on your lifestyle as the quality of your sleep depends on it. It can give you a good night’s sleep that will make you ready to work harder. Also picking the wrong mattress can leave you tired and sleep-deprived which is not good for your sanity. So, investing wisely in the first place is important. There are plenty of options out there and we are here to help you as well.

Which one of the Memory Foam Mattress out there Worth Your Money:
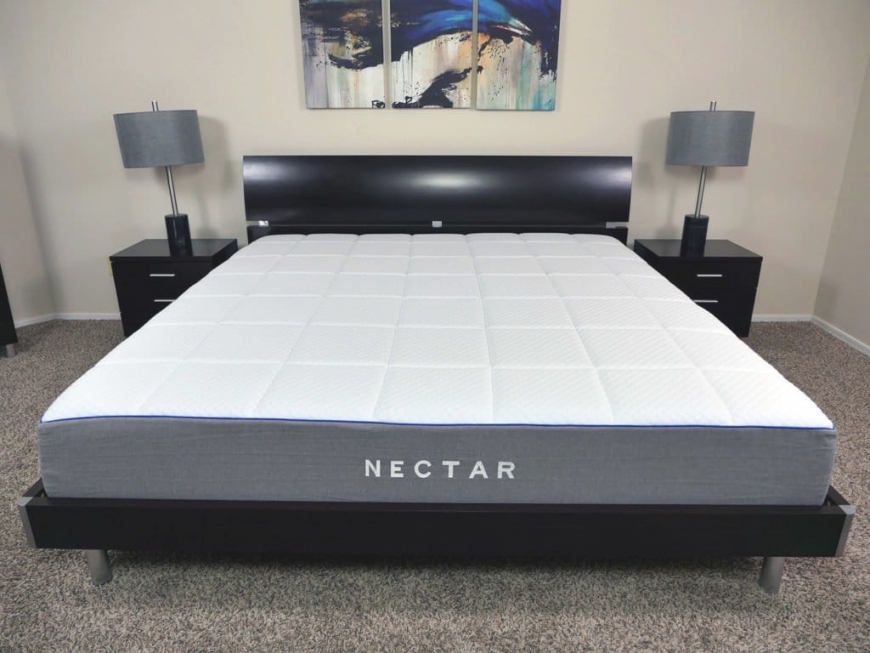
Nectar mattress:

The four foam layers technology that nectar uses best for good pressure relief. It gives you comfort by layers of gel and standard memory foam. The firmness options of the mattress make it the best memory foam mattress.

The mattress is medium-firm which is perfect for most kinds of sleeping positions. Two-layer polyfoam can protect you from having back and body pain. The mattress does not transfer motion. So, you do not have to wake up with your partner in the middle of the night.

Highlights of the mattress:

  1. Medium-firm
  2. Good pressure relief
  3. Does not transfer motion
  4. Lightweight and easy to move

Nest Bedding Alexander Signature:

If you side sleeper then this sleeping mattress is going to be your heaven. This mattress provides a comforting experience by medium firmness and pressure-relieving technology. The gel memory foam used in it is thicker. So it will not sink in easily. The motion is not going to be felt in the mattress.

The polyfoam base layers ensure a surface that is going to support your whole body. Sinking mattresses cannot keep the body aligned. But this does not happen with the nest bedding alexander signature.

Highlights of the mattress:

  1. Firmness option available 5.5 and 7.5
  2. Pressure-relieving
  3. Good for people with back pain
  4. The Polyfoam layer is of high density

Signature sleep:

Signature Sleep is a brand that is trusted for its quality. It has different layers is suitable for our lifestyle. The layers provide the utmost comfort while sleeping. You will get verities of size and depths to choose from. There are various options available according to your bed frame. The fabric is breathable and easy to clean. The best Side of the mattress is that it is safe for Mother Nature.

Highlights of the mattress:

  1. Two comfortable layers
  2. Easily washable
  3. Durable and quality products used
  4. Environment-friendly

Live and sleep:

The mattress is a little bit pricey but it’s totally worth your sleep. You are getting the best quality product that comes with a free memory foam pillow. If you are someone who changes their position frequently while sleeping then this mattress is going to save you. Its fabric is made of flex thread textile so the fabric is washable and durable at the same time. The breathable material makes sure you do not have a shower with your sweat. The foam used here is eco-friendly, hypoallergenic, and anti-bacterial.

Highlights of the mattress:

  1. Anti-bacterial
  2. Provides comfort by contouring the body
  3. Breathable material for the hot region
  4. Compressible for shifting easily

Zenus green tea:

The perfect mattress with memory foam comes in several thickness options. Pressure-relieving and body supporting features make it comfortable to sleep on. But the mattress does not sink in no matter how old it has become. The unique thing about this is it’s infused with green tea and castor seeds. This kills bacteria and odor.

Highlights of the mattress:

  1. Green tea and castor seeds infused
  2. 2 inches higher than others
  3. Affordable price

Final verdict:

These were hands-down best mattresses available in the market. Every one of them is known for their features and quality. Nectar mattress is mostly known for its good service but I would also go with Zenus green tea for its uniqueness and touch of nature.

Read Also:

Content Rally wrapped around an online publication where you can publish your own intellectuals. It is a publishing platform designed to make great stories by content creators. This is your era, your place to be online. So come forward share your views, thoughts and ideas via Content Rally.

View all posts

Leave a Reply

Your email address will not be published. Required fields are marked *

Related

Live Edge Wood

Tips To Care For Your Live Edge Wood Table

Live edge wood furniture is where the carpenter or the craftsman leaves the natural edges or incorporates them into the design. Live edge wood design is the new rave in town. This is because of its unique and stylish properties. Live edge wood can be used to make both furniture and decorations for your home. However, the thing about live edge wood furniture is that it can be hard to clean and maintain. Live edge wood is often left with visible knots and pits in addition to an uneven surface. These qualities are what make live wood furniture attractive. Below are some tips to help you keep those edges in shape. 1. Dry dusting: Use a microfiber cloth to dust off the edges of the live edge dining tables or any other furniture you have in your home. A microfiber cloth is best because it is soft and highly absorbent. You can be sure to get the dust off every corner or rut on the furniture with a microfiber cloth. You should always dry dust your live wood furniture regularly. 2. Do not use harsh cleaning products: Natural cleaning products are the best to use when cleaning your live edge dining tables. Most people are advised to use vinegar and warm water. Both elements should be mixed in equal parts and then use a microfiber cloth to clean the furniture. Just dampen the fabric with the mixture and then go ahead and start cleaning. Use your finger to reach the grooves of the wood. 3. Polish: Polishing wood always makes it look new. However, when it comes to living edge wood, it is typical for the wood polish to gather in the pits of the rugged edges of the timber. This can make your live wood look old and outdated. When using wood polish on live edge wood it is advisable to avoid the cracks and stick to the flat surfaces. Polishing your live edge wood furniture also helps to cover small stains and scratches. 4. Avoid moisture damage: When you have wood furniture in your house you will understand just how essential coasters are. Live wood furniture has a glass-like finish. It is common for homeowners to assume that the furniture can resist damage from water or moisture. This is not so, and you should use coasters or table mats on your live wood furniture to protect it from any moisture damage. A lot of live wood furniture pieces are got from waste wood. These are usually pieces of wood that were to be thrown away. Artisans have found creative ways to turn live edge wood into beautiful art pieces. Any live edge wood piece that you buy is enough to make a statement in your home or office. Furniture design companies today are also making custom live edge wood furniture for their customers. You can look at Dumond’s Furniture website to view their catalog and get ideas of tables, cabinets, made with live wood. They also have ready-made designs that you can order. Read Also: Why You Need A Solid Wood Office Desk Furniture In Utica: Benefits Of Buying Locally-Made Products What Species Of Wood Is Right For Your Wine Cellar Furniture?

READ MOREDetails
content rally

Floor Cutting Using Diamond Saw: What You Need To Know

Concrete comes as the topmost choice when you are in need of durable, weather-proof, heat-proof and long-lasting flooring material. But there comes a time when you need to repair, remove or replace concrete floors and you need to look around for quality concrete cutting tools. Diamond floor saws are the no.1 choice of professional concrete cutting contractors. Diamond floor sawing is extensively used to effectively cut through all types of materials including reinforced concrete, asphalt, slab and stone. The unique design of diamond sawing machines makes them more convenient for operators to carry out floor cutting as a one man job. Floor sawing service helps you efficiently cut through concrete slabs, driveways, decorative concrete floors and many other structures in horizontal alignment. Diamond saws also let you cut through concrete roads overlaid with asphalt. Different floors demand different diamond blade and a different cutting procedure to be followed. In this article, you will read some general tips and safety guidelines for cutting concrete floors using a diamond saw. Tips You Need To Consider While Floor Cutting With A Diamond Saw Never think of playing loose with heavy diamond cutting machines. When deciding to use the diamond saw for concrete cutting, give top priority to safety. You must ensure that you have selected the right diamond sawing blade which is perfect for the kind of material you need to cut through. Make sure the floor saw and diamond blades you use are in most up-to-date condition. Check if there is no loose connection in the machine. If you are using wet cutting method for floor cutting, make sure you have arranged a source with an ample volume of water at the worksite. Supplying water to diamond blades during the operation will help prevent blades from overheating. Use of water as a coolant and lubricant help floor sawing London contractors get quality cuts. It also helps extend the lifespan of the blade. You need to wear protective gears to safeguard your body parts from any kind of physical injury while operating the machine. Manage to have ear, eye and head protection. Never wear loose clothing. And make sure you wear safety boots and a respirator mask to avoid inhaling silica from the dust particles produced during floor cutting. When cutting the floor using a diamond saw, never increase the pressure on the saw to boost speed. And remember, the diamond floor sawing machine always make straight cuts, you can’t steer it to cut curves. When you hold cutting, make sure you lock the machine or turn the power off properly. You need to be extra cautious when sawing on a steep surface. If you want to cut green concrete using diamond floor saw, do it within 24 hours of being poured. The selection of the diamond blade in the floor saw may vary based on the thickness and aggregate of the concrete structure that needs to be cut. For deep floor cutting, you will need to make multiple passes to obtain the desired depth. The thought of performing floor cutting on own doesn’t make sense unless you have the required skills and knowledge to accomplish the job with the best of industry-standard and safety guidelines. But you can always depend on a professional diamond floor sawing contractor in the town! Read More:  How To Salvage Your Furniture After A Flood List Of Most Durable Kitchen Flooring Hardwood Timber Flooring: Gives A Classic Look To Your Home

READ MOREDetails
house painting

5 Interior House Painting Tips

Owning a house which you can modify according to your personal desire, is always something permanent and something incredibly profound. A home with well-painted walls and beams should tell the story of who you are and what you love. New paint with vibrant colors can change your mood, and make your home your favorite place to live in. Interior house painting can be a very intimidating and challenging task if you decide to take it upon yourself. You have two options, to either do it by yourself or hire a professional painting company to look over the project. If you opt with the first choice, these tips and techniques will help you to paint your own home, according to your likings, within a very friendly budget. When you want to paint your Boynton Beach home, be sure to give Gustafson Painting a call. The following steps are a guide on how to paint a house to meet your expectations: 1. Self Choosing Colors: The critical step, to begin with, is to choose a color which you like. Or at least you should have a good idea of what color combination suits your home, i.e. which colors you would like to paint to your rooms and which colors to paint washrooms, kitchen, etc. Select the color palettes and plan out which color combination gives your rooms the vibrant energy. Every color has its functions, e.g. Blue, green and purple are all relaxing colors. Moreover, other deep and shocking colors such as red, pink and yellow can be used in rooms which are mostly in use during the day, giving your rooms a lively, gaudy look. 2. Gathering Tools and Equipment: After this, you have to pick all the tools and equipment which are needed for painting the house; which includes sanding and scraping tools, wire brush, respirator, paint rollers, plastic sheets to cover the carpets and your valuable stuff, work gloves, drop cloth, ladder and scotch tape. This will ensure you are ready and won't have to leave your task in between, to search for something. 3. Repairing Damaged Parts: Once you have organized everything, the next step is to remove any dirt and dust buildups from the walls by using a pressure washer. After this, you can apply epoxy filler to cracks and fractures by using a putty knife. Allow it to let it dry. Once this is done, fill the gap around windows, doors, and ceilings to ensure a better coat of paint. When this is dried up, then feel the wall with your hand to ensure if there are any uneven spots left behind. Then, apply the primer to prepare the walls for paint when all damaged parts are repaired. 4. Brush the Walls: Before painting the walls with a roller, you should brush the walls. To brush the walls, mean to paint the corner of walls, ceilings, and trims. You can choose from paintbrushes which come in many shapes and sizes. The traditional method to paint the walls through brush is by the use of metal cans, which can be very difficult for you to carry along with the brush and can result in poor results. But nowadays, there are proper paint pails which will make the whole task a lot easier for you. 5. Ready to Paint Ahead! Finally, you are ready to paint with the rollers. But wait, before this you should mix a primer with paint to give a fresh and everlasting look. If you paint without using a primer, then the paint would peel off. For this, you have to scrap all the paint away, clean the surface before applying the first coat and after that, apply the second coat of your own choice. This is one way when you do not use a primer. But if you are using a primer with paint, then it will not cause any problem even if the first coat is not applied. And the most important order of painting as suggested by the experts of house painters in San Diego is that you should paint the trim first, then ceilings, and then walls. It will provide better adhesion throughout and will enhance the ability of the topcoat. Another pro tip is that don’t forget to open the windows and doors of your house during painting, as it provides better ventilation and the paint dries off quickly and efficiently. At the end of the painting, do the cleanup. Wash all the brushes and other stuff which you have used in the process. At last, give your house a final touch by placing all of the favorite furniture in place, to give your dream house a new look! With these interior house painting tips from the most experienced of the San Diego painting company, you will get pro results for your residence! Read Also: Find The Right Painters For Your Ann Arbor Home This Painting Season 5 Factors To Consider In Choosing The Right Floor Colors Roofing Painting Contractor Leads: Four Questions To Ask Before Hiring One

READ MOREDetails