Here’s What Makes Package Units Better than the Other ACs

Published on: 03 February 2020 Last Updated on: 04 February 2020
Package Units

Package ACs are generally used as an all-in-one HVAC system for spaces like homes, industrial sites, warehouses, and events that do not have enough space for a furnace or an air handler. They are available at fixed-rate capacities. Some package unit has a rating capacity of 3, 5, or 7 and highly rated ones like 10 or 15 tons. Though they are commonly used in homes and small spaces, package units are also suitable for restaurants, telephone exchanges, and bigger venues.

As the name suggests, all vital components found in a heating and cooling system are located in a single casing. All the crucial fixings, including the compressor, air handlers, cooling coil, and air filters, are housed in the unit, providing both heating and cooling capacities.

Here’s What Makes a Package Unit Different from Other ACs

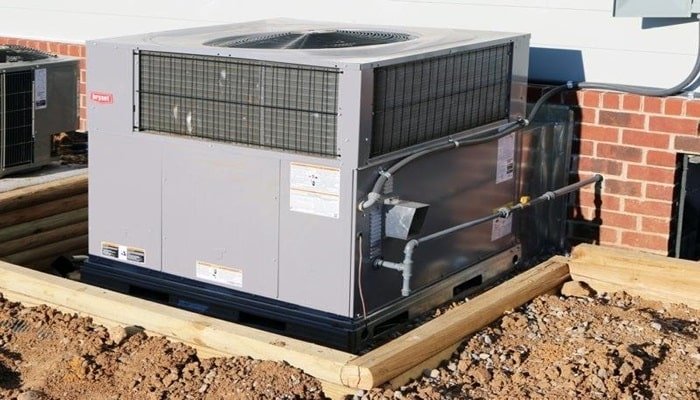
One of the distinguishing features of a packaged air conditioner unit is the casing which is found on the outside of a house or building. The cabinet is directly connected to the existing ventilation system which circulates the chemical refrigerant inside.

This setup is different from typical air conditioners of most homes in the country where the coils are located in a separate unit and connected through the refrigerant line. Split-type ACs have their evaporator coils indoors while the condenser coils are found outside of the structure.

And because the unit is located outside the premise of a building, package units primarily act as space savers. They also offer the versatility of installation, especially for homes and buildings with limited backyard spaces. Package ACs can also be set up on the roof in the absence of suitable yard space.

Why Should You Opt for a Packaged HVAC Unit?

There are specific considerations when opting for package units rather than other cooling and heating alternatives. For one, a packaged AC offers convenient maintenance because all components are found in a single place. A technician only visits a single spot and services everything from there.

Packaged air conditioners also emit a significantly lower indoor noise compared to a split-type AC and other alternatives. A well-maintained unit will not make enough noise to disturb your family; thus, providing your family the tranquility and comforts of ideal living space.

Additionally, packaged air conditioners do not only provide sufficient cooling for small spaces, but they are also outfitted with heating coils. The combination of both an air conditioner and a central heating system removes the need for an additional indoor furnace.

Different Types of Packaged Units

There are several package units available in the market, and each has its advantages and flaws. As such, selecting the ideal AC unit has to go along with the area you live to avoid any inconvenience.

Package AC

A package unit has the air conditioner and air handler housed in a single casing. They can also be outfitted with heating capacities, so adding heating strips would provide you both with a cooling and heating system.

Gas and Electric Package Systems

This type of HVAC system runs on gas and combines the functions of an air conditioner and a gas furnace. This option is ideal for homeowners who do not have an existing heater.

Dual-Fuel Systems

If you live in an area where temperatures drop below negative three degrees, a dual-fuel system is the best HVAC system to install. It can turn your gas furnace on when the temperature drops the ideal warmth, helping you save on your utility bill.

Talk with a professional to help you decide on the ideal AC unit to outfit your home or warehouse.  There are various types of package units with different capacities to outfit your space and give you the right warmth or cooling you need.

Featured image

Read Also:

Content Rally wrapped around an online publication where you can publish your own intellectuals. It is a publishing platform designed to make great stories by content creators. This is your era, your place to be online. So come forward share your views, thoughts and ideas via Content Rally.

View all posts

Leave a Reply

Your email address will not be published. Required fields are marked *

Related

Home DIY Decorating Tips

9 Home DIY Decorating Tips

For new homeowners, there is nothing more exciting than the prospect of owning your first home. This is a place that you can share with your family and make memories in. Of course, for your home to truly feel special you need to do the work to make it look as stunning as it possibly can, so not only do you get to impress your neighbors, but you will be able to give your family a feeling of warmth and belonging by manipulating the aesthetics to suit their tastes. If you don't want to spend money by hiring a professional interior designer at the moment, here are some quick ways for you to decorate your home! 1.  It All Starts At the Facade The facade is the first thing that your guests see when they enter your home. It is fair to say that the facade will create a more lasting first impression compared to the other parts of your home. One thing that you can do to make your home feel inviting is by giving your front door a nice playful hue, perhaps one of the primary colors of red, blue, or yellow. This gives your house a very impressive aesthetic, which many of your guests will surely appreciate. In fact, it is actually a very popular tradition to paint the front door red as a sign of welcome, which is something that started in the early days of the United States but is something that is still practiced today. 2.  Keep Everything Light and Subtle So this approach is a little different from your front door, but you should keep the colors of the interior of your home very light and very subtle. Remember, you want to tickle the senses with the color of your front door, but you want to calm them down with the color of your walls and furniture. The reason why is simple: the colors of the interior surround you and your guests, from all sides. That is why having a very profound color indoors has the potential of absolutely overwhelming your guests. Light-colored walls of white or gray particularly go well with natural light. 3.  You Can’t Get Enough Natural Light Speaking of natural light, you should make sure that you maximize it within your home by removing any obstructions from the outside or from within that could obstruct it. Natural light is beautiful and it can easily improve the aesthetic of your home. 4.  Mirrors, A Must Have For Every Room Of course, if your home is not situated in an area that permits too much natural light, there is a little secret that you can so that you can recreate the effect of having tons of natural light in your home. That is, of course, with the careful and creative use of mirrors. You should have a mirror hung in every room because it can bounce light around to give your home better brightness and artificially create the feeling of having tons of light from coming from the outside. 5.  Make Good Use Of Art The oldest trick in the book when it comes to making your home look fancier and more luxurious is to buy art and carefully choose the right areas of your home to feature them in. You have to remember that art is very subjective, so you shouldn’t feel the need to buy pieces that are too expensive to enhance the aura of your living room. It is purely visual, there are tons of paintings out there that you can buy for under $50 that would look great on your wall. To the untrained eye, which accounts for most eyes, the difference between those pieces of art and the most expensive ones will be completely negligible. If it looks good and fits the color scheme of your home, buys it! 6.  Add An Electric Fireplace Earlier we talked about the home being the perfect place to make your loved ones feel nice, loved, and warm. There is no better way to recreate this warmth in your home than to feature an electric fireplace with mantle. Not only are electric fireplaces very practical for people who live in colder states, but they are very symbolic and traditional as well; an ideal setting for having deep conversations and telling fun stories in the presence of the people you care about. Not only are electric fireplaces very practical for people who live in colder states, but they are very symbolic and traditional as well; an ideal setting for having deep conversations and telling fun stories in the presence of the people you care about. You can also consider in using bio ethanol burners, powered by clean and renewable bioethanol fuel, offer an eco-friendly and versatile solution for adding warmth and ambiance to any space without the need for a chimney or vent. 7.  Lighting that Matches the Room This tip is a little bit more technical but it can be very powerful if you use it correctly. You should have different types of lighting in your home and you should match with the room it is in. There is ambient lighting that exists purely for the purpose of illumination, which would work great in the living room. There is also such a thing as accent lighting, which provides very decorative and very pleasing highlights. These types of lights are perfect for places where you entertain like the dining room. 8.  Don’t Forget to Declutter This is probably something that you hear time and time again from people that are interested in home decorating, less is definitely more. Having that said, you have to constantly look at the parts of your home that you feel may look a little overwhelming and find ways to declutter. Maybe your bookshelf has too many books, or maybe your furniture is too closely packed together. 9. Low Ceiling? No Problem One of the first things that realtors talk about when they are trying to sell an expensive home is high ceilings, they are just magnificent to behold and they can give the home a very grandiose appearance. Of course, if these types of homes are not exactly within your budget, there are some visual tricks that you can try to artificially reproduce this look. Using custom drapes, using large mirrors, and using design elements that feature vertical stripes will all make your ceiling look higher. Styling a Stunning Home So those are some of the simple ways you can make your home look great in a way that does not break the bank. Always remember, however, that design may give you a beautiful looking house, but it is the people in it that truly turn it into a home. Read Also: How to Improve Your Living Conditions in a Small Living Space 5 Tech Items You Can Display as Decor Home Improvement Hacks to Add to Your Space

READ MOREDetails
Clothes Dryer Maintenance

9 Clothes Dryer Maintenance Tips

Taking care of your appliances is the key to saving money, time, and effort. The clothes dryer maintenance is among essential major assistants in your household. While it works, you don’t notice it. When it breaks down, you face a disaster. The life expectancy of an average dryer is about 13 years. However, the majority of these appliances last much less. The reason is the lack of proper operation and maintenance. It’s not enough to plug the unit in and forget about it. If the only thing you do for your dryer is clean the lint filter, your appliance is likely to demand repair in just a few years. In this article, we’ll share top clothes dryer maintenance tips to keep your dryer working for as long as possible. Here are the 9 Clothes Dryer Maintenance Tips: 1. Run Full Loads Only The more you run your dryer the faster it will give out. It’s as easy as that. Since you are unlikely to limit the number of times you do laundry, you can at least add some efficiency to the process. By ensuring you only run full loads, you don’t just extend the lifespan of your clothes dryer, you save energy as well. Don’t rush to do laundry when you have free time. Wait until a full load is available. On the other hand, don’t overload the dryer. In the rush to finish laundry quicker, many homeowners overload washers and dryers. As a result, the motor strains, dryer becomes misbalanced and eventually stops functioning. 2. Opt for Professional Installation With numerous DIY videos overwhelming the Internet, homeowners often opt for DIY appliance installation to save money. Even though installing a dryer may appear straightforward, it’s not as easy as it sounds. You may not notice the mistakes you make during the process. They’ll become obvious after several uses. By that time, your dryer could already be damaged. Proper venting is highly important for a clothes dryer. You would need to select the right material and size for the venting tube and install it properly. Meanwhile, you should make sure the appliance is perfectly balanced. It’s especially important if you are placing it on top of the washer. 3. Clean the Dryer Vent The dryer vent is the most important part of your appliance. It needs regular maintenance. Ideally, you should hire professional technicians to check and clean the vent at least once a year. However, some owners do it on their own. Cleaning the vent involves disconnecting it from the dryer. After that, you would need to use a long-handled attachment to ensure penetrability. Special dryer vent cleaning brushes exist to remove clogs. Be careful about reinstalling the duct properly after the cleaning is done. If you fail to do it, the dryer won’t function. Consider hiring professional dryer vent cleaners to avoid mistakes. According to experts from Jacksonville appliance repair services, if ducts aren’t cleaned regularly, the dryer’s motor can burn out leading to costly repairs. 4. Limit the Number of Dryer Sheets While dryer sheets are an excellent way to keep your clothes static-free and soft, they aren’t harmless. These products have a wax layer that melts when the dryer heats up. If you use too many of them, the wax settles on the appliance’s interior walls and clogs the venting system and the lint trap. Removing this layer may be tough. No matter how many dryer sheets you use, it’s important to clean your dryer once a week even if you don’t see any dirt inside. Failure to clean the dryer regularly is the top cause of dryer-related fires in households. 5. Clear the Lint Trap Lint trap is one of the most important parts of your clothes dryer maintenance tips. Cleaning it regularly is the key to the appliance’s longevity. Wipe the lint filter clean after EACH load. Even if you are planning to do two loads in a row, clean the trap between them. At least once a week, remove the lint screen and vacuum the trap. You can use a brush to loosen the residue. Every one or two months, remove the lint filter and soak it in warm soapy water for about an hour or so. This can help remove wax, which appears after using dryer sheets and residue that settles after using a fabric softener. 6. Inspect the Appliance Weekly A visual inspection of the dryer can help prevent damages. Make sure no moisture is trapped around the door seal. If there is any, wipe it off gently. In fact, you can wipe the door after each load is done to prevent mold formation and bacteria growth. When checking the appliance, pay special attention to the doors seals. If they are cracked, ripped or damaged, the dryer is struggling to maintain the right temperatures. It may be straining the motor and overusing electricity. Replacing door seals is much easier and cheaper than repairing the motor. 7. Listen to it Work One of the first signs of dryer problems is the change in its operating noise. If you hear that something seems off, turn the appliance off immediately and check what’s happening inside. The reason for the change of sound could be overstuffing dryer with clothing or a sleeve caught up in an improperly installed lint trap. If everything seems to be in order, but the dryer continues to make strange noises, call professional technicians. 8. Check Exterior Vents Every month or so inspect the exterior vent of your dryer. While the appliance is working, go outside and check if the air is flowing freely through the vent. If something seems wrong, the pipe may be clogged. If you have a plastic vent, consider replacing it with a metal one. A plastic vent is a fire hazard. 9. Find a Professional Repair Service Some clothes dryer maintenance tasks require an expert’s assistance. Spend some time looking for a reliable repair service before anything breaks down. Knowing whom to call in case of an emergency could prevent further damage to your dryer. Start following the above clothes dryer maintenance tips today, and your dryer will serve you for at least a decade. Read Also: How to cut down your home decor costs? Read here Knowing Your Vehicle: 5 Maintenance Tips for Porsche Owners Tips on How to Avoid Hoarding and Get Rid of Clutter

READ MOREDetails
Iron Clothes

How to Use Iron Clothes With Steam

Believe it or not, the amount of people that don’t know how to iron clothes is amazing. There’s no shame on it since most of us were thrown into society without really practicing skills that would definitely help us fight back as we become independent. These skills include things like cooking a proper meal before going to work, knowing what groceries to buy without spending all our money on unnecessary things, being able to pay bills accordingly without becoming a mess, cleaning the house every now and then, and of course, knowing how to use steam irons and what to do to properly iron our clothes to not look like folded toilet paper. Don’t worry though! In this guide, I’m going to teach you the essentials of how to iron, and how to deal with different types of fabric. To be honest, ironing is not something as complicated as many think. It’s all about knowing what to do, which is what most people lack. The process may require a little preparation and patience, though, so be prepared to practice with different pieces of clothing to get the main idea. One thing is sure, though. You have to be careful when using an iron because they can be harmful if dealt with without precautions! How to Prepare for It The first thing you’ll need is a flat surface where you can prepare your clothes to be ironed. Try to have everything neatly organized to avoid possible accidents, and if you can, try to do it on an ironing board. Some clothing is too delicate for the heat produced by the heated metal of the device, so have a piece of fabric to protect these. Read more: A Complete Guide on Using IRON on Transfer Paper Connect the Iron Irons can take some time before they are ready to be used. They usually show a sign that they are ready, so be sure to be attentive about them while you take care of the next step. Never try to do it before its ready, since it’ll lead to a slower and far less efficient process. Know the Differences Between Materials, and Sort Them Beforehand Depending on the type of fabric you are dealing with, you might want to change your approach while ironing. You can’t deal with a silk piece the same way you would deal with a cotton one, for example. Some pieces of clothing will require you to use the lowest setting of heat possible, while others may require even more heat. Separate silk, wool, rayon, and acetate to be dealt with the lowest settings. Wool clothes may require the protection of another piece of fabric that was previously dampened, so take that in mind! For polyester, go with the medium heat setting, and for cotton, you can go either medium and high heat setting. Both of them should be dampened to be protected from the heat. Before the iron is ready to go, you should have them sorted out. How to Iron Clothes When you deal with shirts with a collar, you should start with it. You can start with a pattern that follows the inside part of the collar, starting from the center of it, until you reach the edges. Then, fall back to the center, and keep moving between both sides. Once you’ve finished with it, you can work the outside. Lay down the shirt in a way that you can flatten it with the iron with simple movements. After that, you have to work your way down, slowly moving the shirt. Then, work the sleeves then the cuffs. Pants are much easier than shirts with a collar. You just have yo lay them down in a way that you can work both legs at the same time. Start with the waist, gently work with the pockets, and go your way down. Repeat the process until you are satisfied with the results, but make sure to be gentle and careful with the heat and the ironing. Considering that there are way too many types of clothing to teach all of the proper methods and techniques to iron them accordingly, you should check this guide on how to do it without fail. Safety Recommendations Ironing can be a pretty dangerous process if you are not attentive while you do it. If you don’t take safety measures, you might harm yourself or others, so make sure to pay attention to this part of the guide. The very first thing you should always make sure is that the iron is unreachable for children. Children can be curious and do things without knowing, so you will be the one to blame if you allow them to get closer while they are heated up. This is important even after you’ve finished ironing. These devices tend to remain heated up even after disconnecting them, so you should still be attentive to any possible situation. I recommend you to wait at least 10 minutes before taking your guard off. Remember to check just in case. While it rests, don’t leave it face down. You might burn something or damage the iron if you do. If an accident happens and you burn yourself or someone else gets burned, treat the burn with cool water for as much time as you can. 20 minutes should be more than enough. Don’t use things like butter or oil, since it might infect the injury. if the burn is too big, you should check yourself with a doctor. Read Also: How To Choose A Washing Machine? How to Pack Clothing Properly for Shipping Choose The Latest Collection Of Women Clothing For a Stylish Look 6 Benefits Of Buying Clothes Online – Why People trust online shopping

READ MOREDetails