Published on: 09 March 2022
Last Updated on: 14 February 2025
The number of people who enjoy delicious seafood is consistently expanding all around the world. Its adaptability and nutritional value have made it a household favorite.
While cooking and serving chicken, turkey, lamb, and other meats are easier, seafood requires a lot of technique, even if it takes less time to prepare.
Most fish and seafood meals don’t require any special equipment or cookware, but even simple pan-fried salmon filets taste better when cooked in a pan or skillet with low edges that allow you to easily turn the fish.
Additionally, having kitchen tools dedicated to fish and seafood is more hygienic—a spatula used frequently for fish can acquire a strong odor that you don’t want on your French toast. As a result, purchasing specific utensils and cookware for fish and seafood is a good idea.
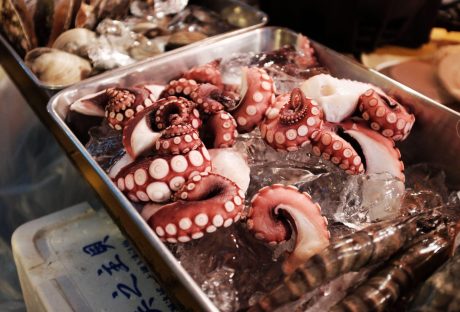
Each sea creature has its unique set of culinary challenges. While shrimp can readily be peeled from their shells, crabs and lobsters must be cooked in their shells before being cracked apart.
Fish must be scaled and peeled (certain fish) byfishbone tweezers at Fish Me. As you can see, seafood preparation necessitates the use of specialist equipment.
1. A-parts Multipurpose Seafood Scissors Are the Best Shrimp Deveiner
Although you can buy peeled and deveined shrimp these days, it’s always a good idea to have a tool on hand. Since it’s designed for multiple activities, this tool won’t get forgotten in the back of a drawer waiting to be used.
When peeling shrimp, it works in the same way as other deveiners, by slipping the tip beneath the shell and then opening the scissors to remove the shell quickly.
The scissors movement isn’t merely for leverage like it is with other deveiners. These are really cute, so they may be used to easily serve lobster shells or crab legs. The blades are composed of robust, food-safe stainless steel, and the handles are comfortable to hold.
2. Fishbone tweezers
Fish contain a large number of microscopic pin bones that can be easily removed with a set of fishbone pliers or tweezers. These are extremely useful for removing pin bones from filets of fish.
What else to look for in Seafood and Fishing Tools
1. Cookware
Seafood recipes are frequently prepared on the stovetop and finished in the oven or broiler. Look for the oven- and broiler-safe cookware, which eliminates the need to transfer the dish to another pan, which might break apart delicate shellfish and leave you with more dishes to clean. A microwave-safe seafood pan is also available.
2. Dishes to Serve
Consider what you’ll most likely use it for and whether the dish is large enough to accommodate it, such as when serving a whole fish.
The food looks misplaced and cools fast on big serving platters. If you’re unsure, go with a smaller serving dish—you can always refill it.
3. Tool Use
If you shuck oysters at least once a week, a tool with a particular purpose, such as an oyster knife, makes the most sense. Other tools are more versatile and can be used for a variety of shellfish as well as other items like almonds.
Final words
Purchase some beautiful caviar spoons if you’re serving caviar. A rolling pin, tongs, kitchen scissors, knives, and a chopping board are also required for making octopus.
Simpler kitchen tools can be used to replace some of the items. So, if you believe you have a better idea, go ahead and try it. Alternatively, to make things easier, you can buy a kit. Furthermore, if you know someone who enjoys seafood, consider giving them a set of these items as a gift.
Content Rally wrapped around an online publication where you can publish your own intellectuals. It is a publishing platform designed to make great stories by content creators. This is your era, your place to be online. So come forward share your views, thoughts and ideas via Content Rally.
Christmas is just a couple of weeks away, and it gets busy at this time of the year.
Moreover, with all the festive celebrations, you will definitely want some fast food. But, what fast food is open on Christmas? The answer is many fast-food restaurants, and food stalls are open on 25 December to fulfill your cravings.
In this article, you will learn about what fast food chain is open on Christmas. Apart from that, this article will also give you details about the types of fast-food chains open on Christmas. Moreover, you will also get tips on finding open fast-food locations. Hence, to learn more, read on to the end of the article.
The Popularity Of Fast Food On Christmas
Recently, more fast-food chains have been choosing to operate on Christmas Day. This is great news for people who do not celebrate by going out or who just want to take a break on Christmas. This is also helpful for people who are just looking for a convenient option for lunch and dinner.
Generally, in the United States, unlike many other countries across the world, fast-food chains are quite popular.
This is because of the following reasons:
It is easy to get quick and easy fast food. Also, you will find it cheaper than preparing a meal at home.
If you live in a city, the fast-paced city life and professional commitments make fast food an easy-to-get option.
Generally, fast food is more affordable than healthy meals, organic food, and fresh food alternatives.
Convenience is the biggest reason for the popularity of fast-food chains. Moreover, since Americans value time and money a lot, it makes fast food easy on the pocket as well as on time-savings.
In fact, you can order cheeseburgers, sodas, and supersize items, each within a dollar. Basically, when it comes to Christmas, people want to take a break from making food and spend more time with their families. Hence, fast food has become the go-to alternative.
On the other hand, many fast food chains use marketing campaigns to promote their food during holidays. Apart from that, fast food items also contain some ingredients that make people feel good, like saturated fats, sugar, trans fats, high calories, etc.
Types Of Fast-Food Chains Open On Christmas
The following are the major types of fast-food chains that are open on Christmas:
Snacks
Generally, these fast-food chains include a snack bar, beverage establishments, and simple meals like sandwiches, burgers, and hotdogs. Here, the serving person will serve you at the counter or on the table.
Burger Shops
This is a popular option in some places. In those shops, you will find upscale burgers and a variety of cheeseburgers. Moreover, you will find different types of concept burgers that emphasize variety and freshness. Generally, these are takeaway counters.
Food Court
These places are full of different small takeaway counters. Here, each customer pays independently and eats in a common room. In these places, each owner of the food island contributes to the dining room rental.
Healthy Fast Food
Healthy fast food options are also common in some places. For example, you will get nutritious wraps, vegetarian food, and a variety of vegan options. Basically, if you want a balanced diet, this is a great option. Also, it helps you a lot, even when you are on the move. Hence, if you are health-conscious, this can be a great alternative.
Niche Fast Food
Many new themed and niche fast food restaurants are opening up. Here, you can personalize your fast food. Here, the restaurant fuses fast food with many other food options to create something new.
What Fast Food Chain Is Open On Christmas?
The following are some of the fast food chains that are open on Christmas:
1. McDonalds
The Golden Arches are the most popular fast-food options during Christmas. Yes, McDonald’s is open on Christmas and throughout the festive season.
No matter which state you are from, you will find many locations open on Christmas Day and even on Christmas Eve. However, the hours may change depending on the location you are from.
2. Starbucks
Sipping a Cafe Mocha on the evening of Christmas with a book in hand. This is heaven for people who like to celebrate Christmas alone. However, even if you have your family and friends with you on Christmas day, Starbucks is always a go-to option.
Generally, you will find most Starbucks locations open on Christmas. However, individual store hours may differ depending on the place you stay. Basically, it depends on the cultural and climatic conditions of the place. Hence, before you visit the nearest Starbucks, make sure to call.
3. Burger King
A juicy burger on a Christmas day is like heaven to many. Head to the nearest Burger King to get your burger. However, you might find some locations closed on Christmas Day. Hence, it is better to call beforehand. This is because the holiday hours are different in every location.
4. Dunkin’ Donuts
If you have a sweet tooth, Dunkin’ Donuts is there to satisfy your needs. In fact, most of the Dunkin’ Donuts locations stay open on Christmas Day. Hence, if you are looking for a quick breakfast or an afternoon treat, order something from Dunkin’ Donuts. However, make sure to confirm the timings of your local store by calling them beforehand.
Tips For Finding Open Fast-Food Locations
The following are the steps you must follow if you want to find an open fast-food location near you:
Open your smartphone.
Tap on the Google Maps app to open it. Make sure your GPS is on.
Tap the name of the shop and add “near me” after that.
You will find all the locations of that shop near you.
Check the opening and closing times of the shop. Also, note down the phone number of the shop.
Call that shop and ask whether they are open within the time frame within which you will visit.
If the storekeeper confirms that they are open, head on to that fast-food shop quickly.
This way, you can visit a fast-food store near you and try out your favorite meal.
Alternatives To Fast Food On Christmas
A good home-cooked meal is always the better option if you want to compare it with fast food. Whether you are alone or with your family, spending some time cooking something you like is a great way to spend your Christmas in an amazing manner.
Depending on how much time you have, you can also try out a new recipe. All you need to do is open YouTube and check out a cooking recipe.
If possible, you can even involve your family members in the preparation. Basically, if there are many hands, the workload will be less. Moreover, this will strengthen the family bonding.
Summing Up
What fast food chain is open on Christmas? You can see that the popular fast food chains that are open on Christmas are McDonald’s, Burger King, Starbucks, and Dunkin’ Donuts. Apart from that, if you have any other local fast-food shop open, you can visit there.
Do you have more suggestions on how to find a fast-food shop nearby? Please share your ideas and opinions in the comments section below.
Read Also:
Is Walmart Open On Christmas? Get To Know What Is Open And What Is Not
Best Bulking Foods That You Need For Fast Muscle Gains
All you need to know about kashkaval cheese
Unveiling home décor ideas for Christmas
If you want a guide to healthy eating habits, the USDA Food Pyramid 2024 is one of the best sources you must refer to. To stay healthy, you need different types of nutrients in your body.
Hence, you must consume a variety of foods from each of the major food groups. Basically, the food pyramid makes healthy eating easier.
In this article, you will learn about the food pyramid and how it works. Here, the article will contain a brief explanation of each shelf in the pyramid. Moreover, you will learn about the major changes in Food Pyramid 2024.
Finally, you will get essential tips to follow the pyramid for a healthy lifestyle. Hence, to learn more, read on to the end of the article.
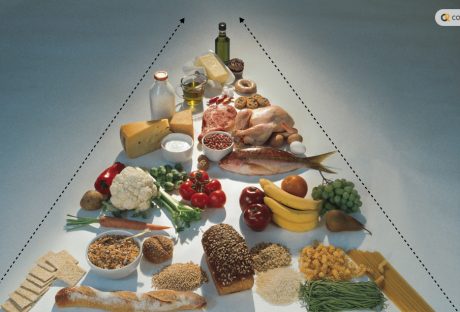
Food Pyramid 2024: What Is It?
With the help of a food pyramid, healthy eating will be easier for you. Basically, it shows different groups of food and how much food in these food groups you need to have a healthy diet. For instance, if you eat the right amount from each food group, you will have a balanced diet.
It is important to eat well. This has both short-term and long-term benefits. By eating well, you can feel good, look your best, and maintain a healthy weight.
Moreover, in the long term, with the help of a healthy and balanced diet, you can reduce heart risks. Apart from that, eating healthy will also help you deal with diabetes, osteoporosis, and some types of cancers.
The recent food pyramid has equal parts of healthy fats, fruits, vegetables, and whole grains at the base. However, almost three decades ago, the base had carbohydrates.
Currently, the food pyramid is an improved version and caters to the actual needs and demands of an actual person.
Basically, when you are looking at the food pyramid, use it as a guideline for your diet. Do not use it to follow a strict diet.
Hence, if you want a diet chart as your starting point to lead a healthy lifestyle, the pyramid is a good option. However, you must modify it as per your diet, lifestyle, and eating habits.
Explaining Each Shelf of the Food Pyramid 2024
The food pyramid consists of five main shelves. Basically, there is a shelf for every food group. Here, the most important shelf is at the bottom of the pyramid, while the least important is at the top of the pyramid.
The following are some basic details of each of the shelves on the food pyramid:
Level 1
This level consists of vegetables, fruit, and salad. Basically, you can eat plenty of these food items every day.
Level 2
Here, you have starchy foods. These consist of whole-meal cereals like bread, pasta, potatoes, rice, etc., which you can have with every meal. In fact, having a wholegrain diet is one of the best options to consider for a healthy diet.
Level 3
The next level of diet belongs to dairy. Here, you must focus on consuming milk, yogurt, and cheese. Moreover, to choose the level of fat, you can go with reduced fat or low fat.
Level 4
This level consists of meat, chicken, poultry, eggs, fish, and nuts. Here, you must ensure that you choose lean meat options. Also, make sure to have fish at least twice a week, especially if it is oil. This will help you consume essential fatty acids and protein.
Level 5
The fifth level consists of fats, spreads, and oils. Basically, these are not fully essential, and you must consume them in small amounts. Moreover, choose unsaturated or reduced-fat oils only.
Level 6
These are non-essential foods and have high amounts of salt, sugar, and fat. Hence, this shelf is of the least importance. You must have these foods at least once or twice a week.
Major Changes in the Food Pyramid 2024 from Earlier Ones
The following are some of the major changes you can find in the Food Pyramid 2024 from earlier food pyramids:
1. Plant-Based Proteins
Modern science and nutrition understand the importance of plant protein such as legumes, tofu, and tempeh. These protein sources are not only beneficial for your health, but they also have a lower environmental impact.
2. More Refined Sugars
Sweets, sugary beverages, processed snacks, and desserts are on the top shelf of the pyramid. Hence, it is better to avoid them. However, if you have a sweet tooth, look for natural options like fruits.
3. Less Dairy Products
A few years ago, people considered a glass of milk as a healthy option. However, the Food Pyramid 2024 suggests you cut full-fat dairy products. Rather, it suggests you stick to low-fat dairy products or plant-based dairy alternatives.
4. More Whole Grains
The old days of refined grains are over. Now, the food pyramid suggests you include whole grains as the base of your diet.
For instance, you can include quinoa, buckwheat, brown rice, and whole wheat bread. Basically, these items are rich in fiber and nutrients. Hence, these should be an important part of your diet.
5. A Higher Number of Fruits and Vegetables
The importance of green vegetables and fruits is increasing with time. Hence, you must include veggies that are rich in nutrients. Apart from that, you must also include fruits in your daily diet for better health.
6. More Healthy Oils
Earlier, oil was present on the top shelf of the food pyramid. However, experts now encourage the use of healthy oils. For instance, to include healthy oils in your diet, you must consider virgin oils, nuts, seeds, olive oil, etc. However, you must not overuse them.
7. Inclusion of Supplements
The world of health and nutrition is understanding the importance of food supplements like multivitamins and multi-minerals.
In fact, these supplements help fill up the shortage of nutrients in your body. Moreover, you also need Vitamin D in your body, which you can only get from certain food options.
8. The Importance of Exercise
No matter how much healthy you eat, you must exercise your body. Actually, exercise and diet go hand in hand. Hence, always exercise when you are following the Food Pyramid 2024.
Related: Great Health Benefits You Get From A Protein Coconut Bar
Tips To Follow Food Pyramid 2024
One of the first things you must understand regarding the USDA Food Pyramid 2024 is that you do not need to strictly follow it. Here, all you need to do is integrate it with what your diet already is.
The following are some simple tips you must consider in this case if you want to have a healthier lifestyle:
1. Cook Meals At Home
Of course, you might not have enough time to cook your meals at home. However, to start with, you can cook one meal per day. Moreover, if you cook at home, you can use fresh products and will also have control over portion sizes.
2. Plan Your Meals Beforehand
By planning your meals, you can save a lot of time and money. However, if you consider planning for the week too much, you can start by planning what you need to buy from the grocery store. Here, you can refer to the pyramid. Also, by sticking to the pyramid, you can save yourself from impulsive purchases.
3. Try New Recipes
By trying new recipes, you can include food that you have not tried before. As a result, you can expand your food pyramid. Also, this will give you a chance to include healthy options in your meals. Moreover, you might end up discovering a recipe that you really enjoy.
4. Hydration
Apart from a healthy diet, you also need to drink enough water. Make sure to drink plenty during the day. This will help your body stay hydrated. Moreover, it will support your overall health as well.
Start Following Food Pyramid 2024 Now
The Food Pyramid 2024 offers a nutritious, balanced, and environment-friendly diet. Hence, if you incorporate each level of food into your diet, you can benefit a lot in the long run.
However, you do not need to strictly follow the diet. All you need is to align your current diet with the Food Pyramid and change slowly.
Do you have more suggestions on how to follow the Food Pyramid 2024? Please share your ideas and opinions in the comments section below.
Read Also:
7 Benefits Of Eating Protein Rich Snacks
15 Healthy Mexican Food Items With Immense Health Benefits
What Are the 5 Components of Fitness? – Let’s Find Out
Our body necessarily needs protein. However, older adults need fewer amounts of protein without totally eliminating it from their diet. Without protein, our bodies will not function well. Besides meat, there are plant-based food alternatives. Protein is essential for our health and useful for people who do workouts and even those who are in recovery.
This kind of diet is helpful for vegans, health enthusiasts, and seniors alike who are avoiding meats in their diets. Here is a list of some food that could be your alternative for meat. Say hello to healthy living.
Seitan
https://stocksnap.io
Seitan or commonly known as wheat gluten, which is composed of 75% protein. With a 100g serving, your daily protein requirement is completed already.
This healthy food is very low in fat and packed with nutrients like being low in sodium and carbohydrates. It can be a good source of calcium and also high in iron.
Seitan is indeed a wonder for diet programs to increase the protein intake without cholesterol and added fat. The only downside of this food is it is not gluten-free as it made from gluten.
Seitan can be cooked like meat - grilled, braised and broiled. You can substitute seitan for chicken or turkey.
Lentils
https://www.pexels.com
The next one on our list is lentils. It contains tons of fibers that give you 26 grams of protein each day. It also contains iron, potassium, and magnesium.
Lentils also are high in folate, contains antioxidants, low in sodium and fat and are cholesterol-free. Eating lentils on a regular basis could add up some proteins and can be beneficial to your diet.
There are two varieties of lentils which are green and red. They are part of the legume family and are versatile that can be used in different meals. You can add lentils in your stews, veggie burgers or even a substitute for chicken breast. Just don’t overuse the serving of lentils as they can cause severe gout in seniors who have trouble in processing protein.
Quinoa
https://stocksnap.io
Quinoa, a tiny seed that is full of protein, provides nine essential amino acids that our body can't produce itself, including lysine that is necessary for tissue repair and growth. It contains fiber, irons, magnesium, and manganese. With just a cup of quinoa, your body is served with 8g of protein.
Cook it like how rice is cooked. It can also be a great substitute for pasta and rice.
Eggs
https://stocksnap.io
Eggs are an excellent substitute for meat if you are not vegan. A large egg contains at least 6g of protein. Eggs are one of the staple food in every house's pantry, which make it the perfect substitute. It contains tons of vitamins and minerals plus amino acids that your body needs.
Boiled, fried or scrambled, eggs are versatile. It's up to you how you'll eat at least two eggs a day.
Tofu
https://www.pexels.com
Tofu is a popular choice for meat alternative and as used in numerous vegetarian cuisine. Though tofu can't compare with seitan or quinoa regarding filling in for the protein loss, relatively, tofu can be a good substitute as it is healthy and beneficial as well.
It can be substituted for fish, chicken or pork, can be grilled, fried, steamed, sauteed, etc.
Takeaway
Eating healthy food can be difficult and giving staple food can make it harder. Knowing and learning alternative food that you can eat without compromising the nutrients that our body needs make it better. The list is a guide to the food that could be a great option to substitute with meat, and that would give the same amount of nutrients or even more.
Read More :
Meals That Matter: The Best Foods And The Ways They Make You Fit
Top 5 Foods For Healthier And Thicker Hair
The Mouthwatering Foodie Tour To Mumbai
Christina Ellis is a writer and a blogger who loves writing about topics that revolve around health and medicine. She is an aspiring nurse which is why Christina loves assisting elderly patients and writing about properly taking care of them. When not writing or volunteering at their local clinic, Christina plays volleyball and goes to the gym.