The Versatility Of The Ottoman Makes It A Must-Have

Published on: 11 August 2018 Last Updated on: 08 August 2019
the ottoman

The ottoman is one of the most versatile pieces of furniture available. You can use them in just about any room – living room, dining room, kitchen, den. An ottoman is comfortable, flexible seating for kids and adults, a handy footrest, a makeshift coffee table, and may also double as storage.

Ottomans were first introduced into Europe in the 18th century from Turkey. At the time, Turkey was the heart of the Ottoman Empire, hence the strange name of this piece of furniture. Its comfort and flexibility meant that it soon took off in European parlors, especially in Britain. How many ways are there to use an ottoman? These are just a few ideas to get you started.

1. Coffee Table :

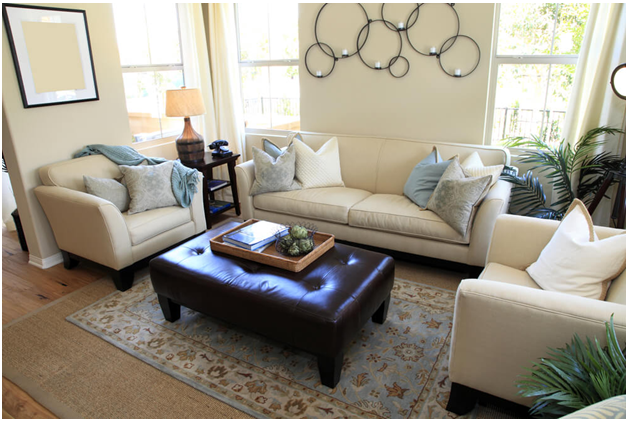
Whether your ottoman is leather, upholstered, or wicker, you can quickly transform it into a coffee table. Use a classic wood or metal tray to set down food and drinks and you can enjoy coffee or breakfast with a book on the sofa. This is a great idea for smaller spaces where both an ottoman and a coffee table would take up too much room.

2. Kitchen Table Seating :

Want to add some unique flair to your kitchen table? Use a pair of ottomans as kitchen table seating, especially paired with two traditional chairs on the other side to add some dynamic asymmetry and character to your kitchen table. Leatherworks well here as it’s easy to clean.

3. Movable Living Room Seating :

One of the great things about an ottoman is that many are lightweight and easy to move around. This makes them a great solution for adjustable living room seating. If you have kids or regularly invite over guests, they bring the flexibility you wish you had in a living room when you sit down to watch a movie or the game or gather around a table to play a board game. You won’t have guests sitting on the floor. The flexibility of the ottoman makes it a must-have in any living room. If you have a living room with limited space, you can also tuck ottomans away for everyday use and bring them out when you need extra chairs.

4. End of the Bed :

Need seating in your bedroom that’s not just the bed? An ottoman tucked at the end of the bed gives you a place to sit while you change or get ready in the morning. It can also become a convenient place to put all those outfits you pulled out of the closet and decided against at the last minute. Many ottomans also open and turn into storage space. A hinged top ottoman provides extra storage space in the bedroom when your dresser just isn’t big enough.

6. Footrests :

You don’t need to get creative with ottomans to enjoy them. Use your ottoman as a classic footrest and kick up your feet after a long day at work or with the kids. In fact, using a footrest when you relax might even help with back pain.

Bring an ottoman into your home and enjoy flexible furniture.

Read Also :

Content Rally wrapped around an online publication where you can publish your own intellectuals. It is a publishing platform designed to make great stories by content creators. This is your era, your place to be online. So come forward share your views, thoughts and ideas via Content Rally.

View all posts

Leave a Reply

Your email address will not be published. Required fields are marked *

Related

Fixer-Upper Improvement Ideas

Top Fixer-Upper Improvement Ideas That Make A Huge Impact

Real estate investors understand that fixer-upper properties carry huge potential. Yes, they may look bad initially, but their property value will steadily increase with the right improvements and renovations. Buyers know this and take advantage by acquiring such properties for less and investing enough in the renovations to increase the value.  Renovating a fixer-upper is a huge financial endeavor. It’s labor-intensive, and it might take some time before things look good as envisioned. Homeowners who want to improve their fixer-uppers must work with a reputable and experienced contractor to address issues that may crop up during the project. They must also look for a good skip-hire company to help eliminate the waste produced by the project. If you’re looking for such a company, you can check out betaskips.co.uk to determine how they can assist you. They can provide adequate-sized skips at reasonable rates, so you wouldn’t have to worry about waste disposal.  Checkout Top Six Fixer-Upper Improvement Ideas That Make A Huge Impact Here are some home improvement ideas that can make a huge impact. 1. Replace the front door If your front door isn't stable and the door frame isn't secure enough, it's time to replace them. A good front door will help you save energy costs and improve security and kerb appeal. You can also repaint the door with a suitable colored paint that will reflect your personality.  2. Paint the exterior Chipped, peeling, or faded exterior paint doesn’t look good and will greatly affect the property value. Potential buyers look into such details and will be discerning when it comes to that. It will be best to paint the exterior walls with good weather-proof paint to ensure durability and better kerb appeal. It will take a bit of change to finish the job, but it will be worth it.  3. Light up the property One of the best ways to improve a fixer-upper is to ensure that it has adequate lighting fixtures inside and outside the house. For example, you can use strings of LED lights or strips for the front and back yard. You can also use solar-powered lamps to illuminate pathways. Inside the house, make sure that you have enough lighting fixtures in every room to guarantee safety. 4. Repaint the cabinets If your budget doesn't accommodate new cabinetry, you can repaint the existing ones with a color scheme that would make them pop. It will help improve the design cohesion and will also define the area. Bright-colored paint will brighten up the space and energize people.  5. Install a backsplash  Backsplashes may be a minor installation, but they can help make the kitchen area look better. When cooking, these backsplashes will also protect the walls from messy and greasy splashes. Install ones that complement the countertops or tiles for design unity.  6. Install better windows Another way to improve property valuation is to install more secure windows. Typically windows in fixer-uppers have rotted frames and aren't properly secured from theft, so it would be better if you had a professional window installer replace them with newer ones. Endnotes If you buy a fixer-upper house, you will spend some money getting them into shape. You might spend a lot, but the results will be worth it in the long run.  Read Also: Ideas for Modern Flooring Designs for Home Improvement Plans Important Things to Know Before Starting a Home Improvement Project Home Sweet Home Improvement: How to Find the Best Home Improvement Loans

READ MOREDetails
Bathroom

How To Keep A Bathroom Timelessly Elegant

When it comes to bathroom design, new trends emerge year after year. If these are always followed, however, this can become quite expensive in the long run. Those who don't want to invest a lot of money in redesigning their bathroom after just a short time are therefore much better off with a timeless style in the bathroom. But what interior design tips should actually be considered for this and what options are basically available? The following article shows. Timeless bathroom design - the basics With regard to a timeless bathroom design, some principles can be identified. These include the fact that the focus should be on basic colors. In addition, the functionality of the interior should be given the highest possible priority. Another valuable tip is to follow the well-known motto "less is more" when designing the bathroom. Despite a high level of functionality, however, aesthetics should not be neglected - after all, you should be able to feel good all around in the bathroom. Use basic colors In timeless bathrooms, people hardly ever go for shades like a bright turquoise or a gaudy red. Such splashes of color are only suitable for accessories and bathroom accessories, such as towels - after all, if necessary, these can be replaced in no time at all. Much more suitable are basic colors, such as black, gray, cream, sand, or white. Such muted colors will still be considered modern and contemporary in 20 years. In addition, brown tones also provide a high feel-good factor and a cozy ambiance, whether in the area of furniture or tiles. You can discover marble look tiles on this website. The tiles, by the way, play an extremely important role when it comes to the timeless design of the bathroom. Accordingly, basic colors should be used here as well. In addition, modern tiles have meanwhile been showing themselves as large-format for several years. Less is more A timeless bathroom is hardly characterized by the fact that the design always immediately catches the eye as soon as the room is entered. Current trends can be completely out again in just a few months. To prevent the design of the bathroom from soon being judged as a tasteful misstep, it is therefore much more advisable to prefer more inconspicuous and restrained designs. If the essentials are placed in the focus of the interior, the chances are good to be satisfied with the bathroom design for many years. Choose tried and tested classics There can be a very fine line between modern and antiquated - this is true not only in the world of fashion but also in bathroom design. When it comes to putting together new bathroom furnishings, it is therefore essential to proceed with caution. Many furnishings can be identified that have already proven themselves over many years. The chosen products should still give pleasure when entering the bathroom in ten years. Functionality in focus A timeless interior means, above all, that it will be enjoyed for a long time. However, if the functionality in the bathroom is neglected, this is quickly tarnished - a beautiful appearance is hardly enough in this room. Thus, awkward-to-use faucets, a too-small sink, or slippery floor tiles are taboo. A bathroom can only be truly timeless if its usability is guaranteed for many years. It also makes sense to address the issue of accessibility in the bathroom at an early stage. Additional: Bathroom Remodeling Tips and Ideas How to Keep Your Bathroom Clean All the Time Considerations When Choosing the Ceramic Bathroom Tile 5 Hotel Housekeeping Tricks You Need To Clean Your Bathroom

READ MOREDetails
Clean Blocked Drains

7 Ways to Clean Blocked Drains in Your Home

The drains in your home really do take a lot of abuse. Not only are things sometimes accidentally flushed down toilets and drains, but they also naturally collect all of the dust, hair, and whatever else is in the air. Over time, your pipes are bound to get clogged at some point.Clean Blocked Drains cxan make things work for you in all the aspects. Of course, a plumber can clear out a clog in a snap. But, here are seven things that you can try on your own first without using harsh chemicals which could harm your pipes. 7 Ways to Clean Blocked Drains in Your Home: 1. Find the clog: It might not be that deep. In a toilet, it's generally somewhere in the base. And, in sinks, it's often in the trap underneath it where hair and other debris will settle. There are a few different tools that you can use to attack the clog from the outside of the drain. Trap cleaner: You can find one at your local hardware store. It's usually made of plastic and is about the length of your arm. It has ridges along the sides and is designed to fit inside of your drain. You can use it to fish out anything that might be clogging the trap. Drain snake: It's the same idea as the trap cleaner, only it's longer and has a hose that rolls up, so it can get to clogs that may be deeper inside of the drains. Wire coat hanger: In a pinch? Just grab a wire coat hanger, unwind it, fashion it into a long hook, and use it to clear the trap. 2. Use a plunger: It's a basic home necessity for toilets. And, it can also be used for sinks. All you need is a solid suction and you may get the same results on a sink drain that you would with a toilet. In a sink, it might help to have a little standing water while you are plunging. 3. Dish Detergent: You can use it in toilets and sink drains. Pour it straight down the drain or into the toilet, about a quarter of a cup. The detergent will settle on the clog, and start to break it down. Let it sit for a few hours, run some hot water, and try plunging. The soap is sometimes strong enough to break up the clog. 4. Boiling Water: This would be more effective for a sink drain. Pouring boiling water directly down the drain could break up the clog. You could add boiling water, wait a few minutes, try plunging, and repeat the process a couple of times, if necessary. Just make sure the water isn't still boiling while you are plunging to protect yourself from any scalding. 5. Use a wet/dry vac: Wet/dry vacs are great for many purposes, including clearing clogs in your drain. If the clog isn't too deep, you can use it to either pull the clog out or push it down the drain. It's a good idea to try to pull it out first to remove the clog from your plumbing system. But, sometimes pushing it will also clear the clog and allow it to drain. 6. Clean the trap: If you are dealing with a clogged sink, you can usually access the trap underneath the drain. Most likely, that's where the clog will be. If you're handy with home repairs, here's a quick how-to. You'll need a plumber's wrench. Have a bucket underneath to catch the water. Unscrew the fittings on the top and bottom of the trap. Remove the trap and clean it out. An old toothbrush is perfect. Clean out the surrounding pipes. Put it back together. A plumbing company such as Red Dog knows all about unblocking drains so if you are not confident taking apart the pipes in the drain, it may be worth hiring a professional. 7. DIY Clog-removing Recipes: You may actually have a few things in your pantry that can be used to clear up clogged drains. Here a few different ideas that you can try before calling a plumber. Mix salt and baking soda: Combine equal parts of salt and baking soda, maybe a half-cup of each. Pour it directly into the clogged drain, and let it sit for a few minutes. The salt and baking soda will settle on the clog and start to eat away at parts of it. Then, pour boiling water down the drain. If there is standing water in the sink, you can also include plunging the drain in the process to get things moving around. Combine baking soda and vinegar: Mix together equal parts of white vinegar and baking soda, maybe a half-cup of each. Stand over the sink when you mix them. The reaction of the two substances will result in an almost immediate fizz. Pour everything down the drain. This one is best to let sit for a few hours or overnight. Afterward, try rinsing the drain with hot water. Sodium Hydroxide: More commonly known as caustic soda, you can find it at your local hardware store if you don't already have it on hand. You will mix 3 cups of soda with about a gallon of water. The mixture will get warmer and begin to fizz. Pour all of it directly into the drain. Wait for a half-hour or so, and pour boiling water down the drain. If it seems a little better, but still draining slowly, you can repeat the process. Unfortunately, some clogs are either too deep or too intense for any of these home remedies. If you've tried everything, and you just can't seem to get that clog cleared on your own, give Brisbane Drain Cleaning by Conrad Martens a call today. Our team of dedicated service professionals will quickly assess your individual circumstances and easily get your drains cleared. Let us show you have we've built our reputation of providing dependable service focused on quality of workmanship to the entire Brisbane area since 1982. Read Also: 8 Plumbing Myths Busted 3 Reasons Why Business Organizations Need To Get The Drains Cleaned Regularly

READ MOREDetails