The Best Way Of Keeping Stink Bugs Outside Your Home

Published on: 19 April 2021 Last Updated on: 31 December 2024
Stink Bugs

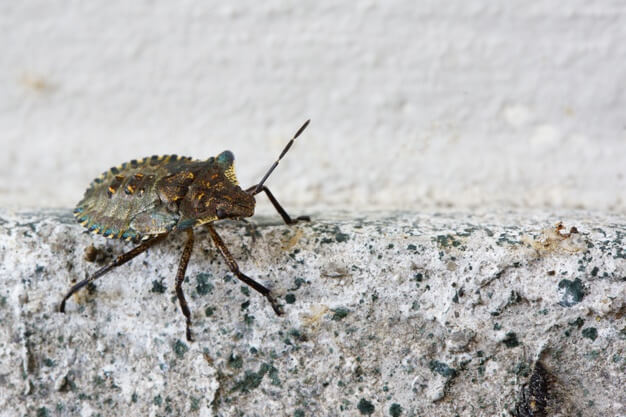
Stink bugs earned their name because they emit a foul smell when they are threatened. The aim is to make them less appealing to predators. However, if you are simply trying to remove the bug and they release the odor, you’re going to need to put up with it for a while. It is not pleasant!

That’s why, if you think you have a problem with stink bugs, it’s a good idea to get professional help from a local pest control company.

When They Are Likely To Visit

Stink bugs enjoy warmer weather. As such they will look for somewhere to stay over winter. The moment the temperature starts to drop the stink bugs will look for a warm winter spot. This is when they are most likely to head into your home as it is warm and there will be plenty of places for a stink bug to hide and hibernate.

Surprisingly, this is not when you will have the biggest issue with these bugs. While you may accidentally disturb them over the winter, the biggest issue is in the spring. This is when the stink bugs come out of their winter slumber and head back outside. Unfortunately, like most insects, they can’t see the glass in their way. That means they often sit on the window where you will spot them and attempt to get rid of them.

This is when they will feel most threatened and will release their obnoxious odor.

Annual Inspection

One of the most effective ways of keeping stink bugs out of your home is to click here and book an annual inspection in the winter. The experts can locate any stink bugs in your home and eradicate them before they wake up and leave you a smelly present.

This is also a good opportunity to check for other pests that can cause issues in your home.

Damp Towels

Surprisingly, a damp towel is an effective way of keeping the stink bugs out of your home. Simply drape the damp towel across a chair in your yard and the stink bugs will be attracted to it. In the morning you may find it covered with stink bugs but they won’t be inside your house.

You can then kill the stink bugs outside if you wish. The easiest technique is to drop them into a bucket of soapy water.

Squash Some Stink Bugs

Use an old shoe or a piece of wood that doesn’t matter if it has stink bug odor on it. All you have to do is squash several stink bugs outside your home. They will emit their foul odor and this warns other stink bugs of danger. They will avoid the area, effectively protecting your home.

Screening

Screening stops stink bugs from coming into your windows and doors. But, it doesn’t stop them from landing on the screens. However, if you rub the screens with dryer sheets you’ll find the stink bugs are repelled and will avoid your home. That’s easy and effective!

Read Also: 

Subham Saha started his career as a professional web content writer. He has more than 3 years of experience in digital marketing. He also has a great knowledge in SEO, SMO, Website development, etc. He completed his graduation in Electrical Engineering. He is very passionate about building his career in the Digital marketing industry. Subham has a great interest in reading books about Business, Economics, Psychology, Technology, and History.

View all posts

Leave a Reply

Your email address will not be published. Required fields are marked *

Related

Interior Design

6 Interior Design Tips to Make Your House a Home

Decorations don’t necessarily make your house a home. However, certain interior design tips can help make your space cozier. When your home feels lived-in, it feels more like you belong there! Here are just a few tips for making your house feel more like home. 1. Lighting is Everything Comfortable lighting is one of the most important elements of interior design, and it’s one of the quickest ways to make your new home feel like home. Try indirect lighting for a gentle glow. If you’re going to be doing more than watching movies in your living room, consider task lighting. Make sure you can see to read or craft if you plan to spend a lot of time doing those things in your living space. Where there isn’t natural light, provide warm light with different types of lamps, different lampshades, and more. Mix it up with recessed lighting, chandeliers, and other different fixtures to bring out the coziness of your home. 2. Dress it Up with Art Bare walls can make your home feel empty and soulless. Even beautifully painted walls need to be decorated, and art is a great way to make your home feel closer and more lived-in. Choose art that you already know and love, but choose a frame that works best with your current design ideas. Make sure to hang the art correctly and display it where it fits best. Using art can be a great way to tie a room together! If you can’t find art that you like enough for a certain room, trying substituting a classy mirror instead! 3. Family Photos are Key All of those family photos need a place, so why not put them where you can see them? Nothing makes you feel more at home than your family and friends. You can display your photos in frames on the wall or your surfaces. You can also get canvas prints made of your favorite family photos and hang them up for all to see! Your house starts to feel like home once it’s full. Even if you don’t live with your family, being able to see their faces and recall great memories with them can help you feel more at ease. 4. Personal Space If you don’t live alone, chances are you share all of your spaces with at least one other person. However, choosing to set aside a room or corner of a room just for you is important. Make sure that you have your personal space with your favorite things, including books, personal decorations, gifts from friends, and your favorite blanket. Make a cozy space just for you! It can help your home feel more welcoming. 5. Your Style Rules One of the greatest things about your home is that you can decorate it however you want. The urge to make your room look like a showroom or a picture from a magazine is tempting, but adding your style can be incredibly worthwhile. Use the colorful pillows that you like, you can easily buy this product online and hang those custom pieces you’ve found throughout your life where you can see them, and choose wall colors that compliment your uniqueness. The only way to make your home feel completely yours is to put yourself into it wherever you can. Use your style to create a space you’ll enjoy living in. 6. Plants Add Life Finally, plants can make all the difference. Use small succulents or other plants on your shelves and surfaces to add color and life. Large plants go great in corners while hanging plants can be placed near windows to liven up your living room. Wherever you choose to place them, make sure you care for your plants properly to keep them alive as long as possible. If you don’t want to care for living plants, there are also synthetic options that add a great look without needing any care at all! Conclusion Even a well-decorated house can feel comfortable. Make sure that you dress up your existing style with things that make you feel as if space is uniquely yours. If you don’t love spending time there, it just isn’t worth it! If you need to make your house a home in the Atlanta area, call on the expertise of interior designers in Atlanta, GA. Read Also: Modern Home design ideas for crowded families How to Make Your Home Look Like You Hired An Interior Designer Outstanding Design Advice If Your Home Is Really Small How to Make your Home Look Beautiful in the Upcoming Holidays Top 5 Interior Designers from Singapore

READ MOREDetails
LED Strip Lights

Here Are A few Of The Benefits Of The LED Strip Lights

LED Strip Lights provide a lot of benefits over the more traditional luminaries, like halogen, incandescent, and fluorescent. A few of such lights are intrinsic to the LED-technology in general, as the extended life expectancy, while the others are unique to the LED Strips, like flexibility. This post will outline a few of the benefits provided by these new generation strip lights available at https://www.lepro.com/. Color: The LED lights are capable of recreating a much broader range of colors than the customary types of lighting, making them particularly suitable for the effects of light installations. As well as the standard cool white and warm white, which are utilized for ambiance, the LED lights can also make a broad spectrum of the customary colors. Less Electricity: Like all the LED-technology, these LED Strip lightings make use of considerably less electricity in operation. The typical meter strip of the LED lights will make use of approximately 7.2 watts in power, which can really work out to about ninety percent more efficient than the other lighting types. It can really make these lights incredibly reasonably priced to run and permits the users to experiment with the much larger installations without the fright of running up excessive electricity bills. Flexible: The customary luminaries really tend to be housed inside the glass enclosures, which are inflexible and fragile. On the contrary, the LED lights on the strip lights are mounted to the flexible ribbon of the circuit board, which can really be bent around ninety-degree corners and be created to really fit the surfaces with the changing gradient. Life Expectancy: The LED lights have a life expectancy that can far exceed that of the customary luminaries. A typical Strip Light will last you up to seventy thousand hours. Less Heat:   Incandescent and halogen light bulbs are infamous for becoming extremely hot during utilization. The LED Strips (https://www.lepro.com/led-strip-lights) while conversely generate comparatively less heat, making them much safer to make use of and less of a fire hazard. Discrete: Such lights are usually contemplated as a linear lighting source because of their extremely long and thin design. It really permits them to be fitted in the locations that the majority of other types of lighting cannot. Under the alcoves, kitchen cabinets, bookcases, shelves, you name it, these LED strip lights can really do it! Cutting: The LED Strip Lights are one of those types of lighting available that can easily be cut. They feature cutting points all along the length, which can be utilized for shortening or separating strips. The non-solder connections can be utilized for simple re-connection, or you can also ask the retailer to do the job for you. Simple Installation: The mounting strip lights are astonishingly simple and need extremely little know-how. The majority of strips have a three M of self-adhesive backing, which permits them to be stuck down onto the surface without the requirement for brackets or mounts. Even if they do not have such backing, installing them is still quite simple and far less annoying than the installation of the fluorescent tube, for instance. Diverse manufacturers can provide even more variables and also the custom options in these lightings, so discuss the needs with the signage or LED lighting specialist for deciding exactly which product will really suit the best. Read Also: The Benefits of Solar Lighting in a Nutshell A Rundown of the Basic Led Lighting

READ MOREDetails
Drywall

Elevate Your Home With Unique Ceiling Textures

Drywalls are those construction materials that are used to create walls and ceilings in your home. Not all that, but drywalls also come in handy if you want to create design features like eaves, arches, or any mind-blowing architectural requirements!!! Do you know the best part about drywalls? These are super easy to install, highly durable, and only require simple repairs when damaged. So, drywall is a flat component composed of calcium sulfate dihydrate, typically between thick sheets of backer paper, and facer, used to construct interior ceilings. Let’s talk about the ceiling textures and the drywall options you can choose for your home!!! The Ceiling Textures And Your Drywall Options Decorating your home can be a real challenge for many !!! Therefore, choosing the right drywall finish or texture can prove to be a hard nut to crack. And it’s very natural to get in a state of indecision if you are handpicking it for your new home or renovation project. There are so many options that it feels like you are “searching for a pearl in an ocean.” Making up your mind about whether or not to go texturing your ceiling can be a tough job. And even if you choose to texture your ceilings, there are chances you’ll be confused about which one to go for!!!! And remember, getting the drywall right is the first step of tiling projects?”. But No Need to Worry!! This article will guide you in choosing the perfect texture and drywall option for your ceilings to look more elegant than ever!! 1. Sheetrock Texture: Old Is Gold Sheetrock ceiling texture is a drywall ceiling texture that has been famous since 1917. The reason this drywall texture is so awesomely renowned is because of the artistic look that it gives to your ceiling And the best part is you don’t need to use any sort of spray paint in this case. You can achieve this texture by using your artistic hand technique and without using any special brushes. This texture is perfect for any room. There are no restrictions on the use of this ceiling texture. 2. Stipple Brush Texture: A Test Of Your Skill This texture is not as easy as it seems. You need skills to create this texture. To create this texture, you need a roller and slap brush. The fascinating fact about this texture is it can cover the bumps and holes on your ceiling. And if you have the skills, then this texture can surely make your ceiling look gorgeous than ever!! 3. Swirl Texture: Creativity Taken To A New Level To achieve this texture, you need either a roller or sprayer. You can also do this by using a technique called “the basic swirl” method. But one thing that you need to keep in mind is while creating this texture, you’ll need a lot of patience to get the best result. And the difficult part is you need to create the pattern before the mud dries. So, make sure to have a helping hand by your side. Overall, the texture can really give that awesome look on your ceilings if you do it in the right way!!! 4. Orange Peel Texture: A Color Of Choice The name suggests all the colors of orange skin, but sometimes it’s also called “an eggshell” ceiling texture. If you really love this color, then this can be on the top of your favorite lists. To create this texture, you need to apply thin mud to the ceiling using a spray gun set at very high pressure. The more artistic mind you have, the more artistic look it has got!!!! 5. Smooth Textures: Choice Of Many If you are someone who wants the best at a cheap cost, then this texture is just the right choice for you. Moreover, you don’t need to have many skills to create this texture design. The look of this texture is just mind-blowing, and if you are someone who likes things to be consistently gorgeous, then this is the texture you can have for your ceiling. This texture is effortless to remove and is also perfectly suited for any room. 6. Tree Bark Texture: Beauty Of Nature If you are someone who loves nature and wants to bring the reflection of nature inside your home, then this textured style is just the option you can have. This ceiling has the look of a tree. You can create this texture just by using a heavy roller. The texture might look simply, but it’s very artistic and can surely catch the eyes of many. If you have a farmhouse, then this texture will double the beauty!!!!! 7. Slap Brush Texture: Slap The Beauty Out Artistic, gorgeous, beautiful, and elegant are the nicknames you can give to this texture. A complete package of beauty!!!! To get this texture, you’ll need a brush with very stiff bristles and thin mud. Firstly, you have to cover your ceiling with mud using a roller, then take the brush and slap the ceiling from the edge. This can be a hard nut to crack because if you don’t get it right on the first shot, the whole ceiling might end up looking messy. 8. Popcorn Texture: Cottage Cheese This texture, also known as the “cottage cheese” or “acoustic” ceiling texture, is probably one of the most famous ceiling textures ever!!! If you look closely, you’ll see it’s kind of a look-alike of “popcorn.” That’s why it’s called “popcorn texture.” To achieve the correct texture, you need to use a sprayer to apply to your ceiling. This contains Styrofoam with mud which gives that puffy effect. But it will require you to have a lot of skill to achieve this effect. That’s because the “popcorn texture” is both challenging to apply and remove. I hope this article will help you to know about the needs of ceiling textures and drywall options. And now I believe you’ll be able to get yourself the perfect texture for your ceilings. How Can I Remove Old Ceiling Textures Safely? Removing old ceiling textures can be a big job, but it doesn’t have to be intimidating! If you want to update your ceiling and get rid of that outdated texture, I’m here to help. No matter if you have popcorn, stipple, or another type of texture, this process takes a little bit of care, but don’t worry! Here’s a step-by-step guide on how to remove an old ceiling texture without breaking your back or the bank. Step 1: Test For Asbestos Before you get out any tools…safety first!  Remember, many older ceilings (especially those with popcorn texture installed prior to 1980) contain asbestos. Before doing anything else, have your ceiling tested for asbestos. You can hire a pro to test the ceiling or buy a self-test kit. If asbestos is present, halt all work and consult pros immediately. Asbestos removal is not a do-it-yourself job because it poses serious health risks if mishandled. Step 2: Clear The Room If there’s no asbestos present, it’s time to get the room ready. Cover all the furniture. You’d be amazed at how far a fine mist of water, compound, and paint can travel! Also, plastic should be removed from the floors, and tape should be around any ceiling fans or lights that are not being removed. I can personally tell you we didn’t do this. We found dried white dust on our bedspread when we were stripping the wallpaper in our bedroom, and we had to clean up all the residual dust a little too late. It was wild! Step 3: Soften The Texture For Better Finish Here’s where the fun starts! To make that texture easier to remove, you’ll need to soften it. Fill a spray bottle with warm water and mist the ceiling. You don’t want to drench it. If you put too much water on the ceiling, it could end up damaging the drywall underneath. Allow the water to sit for about 15–20 minutes or so, giving it time to penetrate and loosen up that texture material. Don’t rush this step. It’ll only cause more work for you in the long run. Step 4: Clean Your Work Grab a wide putty knife or scraper and start scraping off the texture. Do small sections at a time, and scrape at a shallow angle so that you don’t gouge the drywall underneath. If it’s not coming off well, spray some more with the water bottle and let it sit for a little longer. This step can be kind of messy and time-consuming, but have patience because, in the end, you will have a nice smooth ceiling. Step 5: Patch & Sand Once the texture is gone, you may notice a few dings or dents in the ceiling. Don’t worry! Just fill them with some joint compound, sand it smooth, wipe away any dust and you’re ready for a new ceiling. And that’s it! A fresh, smooth ceiling in no time! Read Also: Here’s How to Turn Your Garage into a Bedroom on a Budget! Turn your attic into a living space

READ MOREDetails