What Are Black Triangles Between Your Teeth?

Published on: 15 October 2022 Last Updated on: 18 October 2022
What Causes Black Triangle Teeth

Celebrities with bright smiles are now more popular than ever, which may lead people to start noticing their teeth’s cosmetic problems. Black triangle teeth are one of the most common dental problems people don’t address or pay attention to.

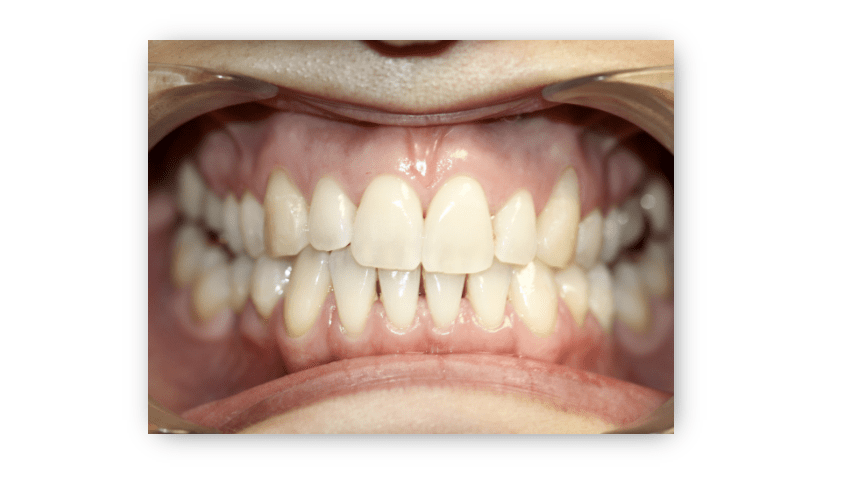
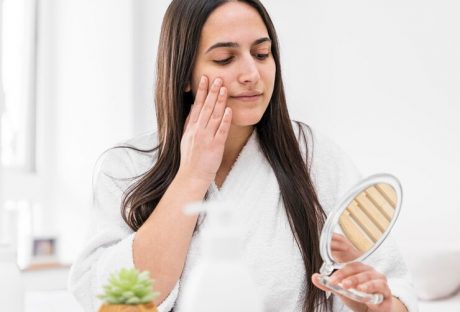
You can check for yourself if you have black triangles between your teeth. Smile with your teeth exposed in front of a mirror. If you can see any black areas between your gums and teeth, you have black triangle teeth or gingival embrasures.

They are initially harmless, but they can be dangerous if not treated immediately. It’s important to understand how they develop and what you can do to treat them.

What Are Black Triangle Teeth?

These black, triangle-shaped gaps between your gums and teeth are known as open gingival embrasures. They are usually associated with dental habits, age, and bone injury. They are also called black triangle teeth, which occur when your teeth and gums don’t fill the gaps between them.

Black triangles between teeth are a common problem; nearly 76% of adults over 20 have black spaces between their teeth, according to a study. 

Food debris and plaque can accumulate in these gaps, making teeth susceptible to cavities and gum infections. The risk increases the more a person doesn’t practice good oral hygiene. Most want to fix them for cosmetic reasons and to keep their teeth and gums healthy.

What Causes Black Triangle Teeth?
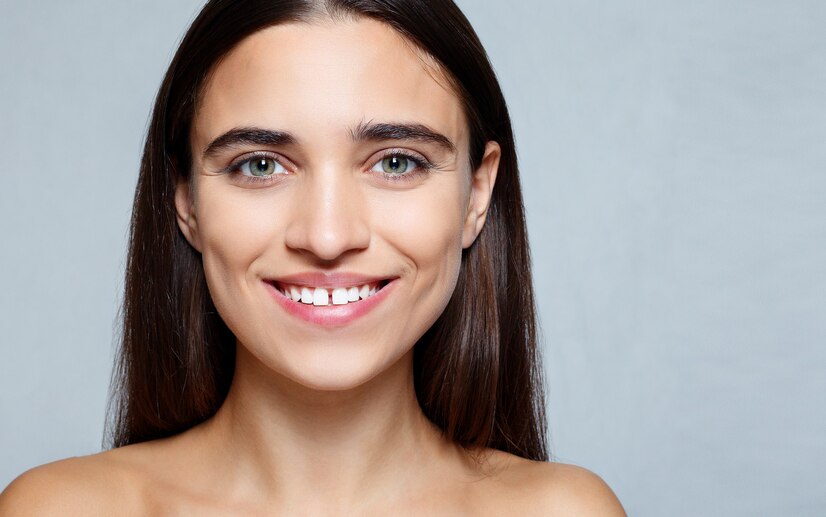
Black Triangles

It is important to see your dentist immediately to discuss how to treat this condition. They will use your dental history and the cause of your black triangle teeth as their guide in recommending treatments that best address it.

According to sunrise-dentistry.com, some of the reasons black triangle teeth occur are:

1. Receding Gums

Gum disease, infections, age, and smoking can lead to gum recession and thinness. Bacteria exposure and tooth decay can lead to cavities and other infections. Getting help immediately from a dentist is important if you find gaps between your teeth, regardless of their size.

2. Aggressive Dental Hygiene Techniques

Brushing or flossing too hard can damage the tissues between your teeth. Using a toothbrush with the right head size is also important; a toothbrush with a large head can make the gaps between your teeth larger.

3. Fragile Gum Tissue

Every person’s gum tissue thickness and stability are different. Experts believe that thinner gum tissues are less resistant to dental procedures. If you have fragile gum tissue, getting fullness back after dental implants will not be easy.

4. Teeth Shape

Apart from the gum thickness, each person’s tooth shape also differs. A person with triangular-shaped teeth is more likely to develop black gaps. Their teeth have wider biting surfaces than their bottom part near the gum line.

5. Mistakes During an Orthodontic Procedure

Black triangle teeth and other dental conditions can develop when an orthodontic procedure goes wrong. Small gaps can also form when teeth shift into new positions. You may need to repeat your dental treatment or visit a more reliable dentist.

How To Get Rid Of Black Spaces Between Your Teeth?

Now that it’s clear that the black gaps between your teeth are not just cosmetic issues, it’s best to learn how to eliminate them.

Consult your dentist before making any changes in your lifestyle or treatment for your dental health. They can help you understand the nature of your dental condition and determine the best approach to manage them.

According to the British Dental Journal’s study, patients have several treatment options for the black triangles between their teeth.

  • Safe surgical techniques like pinhole surgery repair and tissue transplantation to preserve gums
  • Tissue engineering, where dentists use regenerative cells to restore gum tissue
  • Hyaluronic acid treatment to reduce black gaps between teeth and volumize gum tissues
  • Using prosthetics made of composite or porcelain with a pink shade to bond teeth and conceal the appearance of black triangles between teeth
  • Installing a removable gingival cover to close the triangle spaces between the teeth
  • Repositioning or reshaping teeth to reduce or eliminate the black spaces between them

Proper Dental Hygiene and Black Triangle Teeth

Brushing and flossing your teeth every day will help prevent gum disease, blackening of your teeth, and other serious conditions. Routine dental checks help you know how your lifestyle choices impact your dental health and help your dentist check for early signs of dental problems.

The American Dental Association has developed guidelines for how to brush your teeth and perform interdental cleaning. They also recommend using a toothbrush with soft bristles.

Key Takeaway

The black triangles between your teeth are more than just a cosmetic problem. They are caused by oral health problems like receding gums, aggressive oral hygiene techniques, and fragile gum tissue. Mistakes during an orthodontic procedure and the shape of your teeth may also cause black triangles between your teeth.

You should consult your dentist about them; they are the best people suited to help you determine the best course of action to take. They can also address the dental problems causing the black triangles between your teeth.

Additionals:

Content Rally wrapped around an online publication where you can publish your own intellectuals. It is a publishing platform designed to make great stories by content creators. This is your era, your place to be online. So come forward share your views, thoughts and ideas via Content Rally.

View all posts

Leave a Reply

Your email address will not be published. Required fields are marked *

Related

beautiful eyes

Tips to get beautiful eyes at your home

You must be familiar with the saying that “Your eyes say a lot about you”. Eyes are one of the most important facial features that people notice when they meet you for the first time. Who doesn’t want to nail their first impression in people’ mind and the best way to do so is by having magnificent eyes? But fret not, you can easily get beautiful looking eyes in no time by simply following these beauty tips. These tips are a collection of simple home remedies which you can easily perform; Fresh looking eyes: Your eyes say a lot about you more than you can think, if you have tired eyes it will make you appear exhausted and down. In order to get fresh eyes to use this simple yet effective hack. Place two spoons overnight in the freezer. In the morning place these frozen spoons over your eyes in such a way that the spoons’ curved surface covers your eyes. As the spoons will be very cold you can try placing them in intervals and by doing so the blood circulation to your eyes is enhanced and your eyes appear fresh. Another tip to get fresh looking eyes is by using icy cold water. Soak cotton pads in icy water and place them on your eyes for at least ten mins every day this will not only make your eyes to look fresh but it will make them feel fresh too as by placing cold cotton pads on your eyes their tiredness is gone. Icy pads improve the blood circulation of your eyes making them feel lighter and fresh. Getting rid of Dark circles: Dark circles are the most annoying things under your eyes that can destroy your complete appearance in seconds. Dark circles make your face look old and tired and we all know that no one wants to look old. Here are some amazing and easy tips through which you can get rid of those awful looking dark circles in no time; Green tea bags: Green tea bags contain caffeine which helps in tightening the skin of your eyes. Simply soak two teabags of green tea in cold water and place them on your eyes. Leave it for 15 to 20 minutes. The tannins and flavonoids present in the green-tea have an anti-inflammatory effect and it will help in reducing the redness and puffiness of the eyes. The caffeine in the teabags will reduce the appearance of your dark circles immediately. Potato: Potatoes are rich in enzymes, vitamin C and starch.  These constituents make potatoes an ideal ingredient for curing dark circles. You can use potato juice and apply it on your eyes by soaking cotton swabs in it or you can simply cut slices of potato and put it on your eyes. The cooling effect of potato helps in reducing swelling and inflammation of vessels underneath the eyes which cure and reduce that dark and tired appearance of dark circles. For sunken eyes: To reduce the effect of sunken eyes you can these easy remedies; The best way is to sleep. Try maintain a fixed sleeping schedule this will definitely help in reducing your sunken eyes. Applying a teaspoonful of honey mixed in half teaspoon of almond oil gently on your eyes before sleeping will help in recovering your normal eye shape. We hope that these remedies will help in improving your looks by making your eyes more attractive and appealing. But, always remember to use some type of privacy app while using social media to protect your data and for best apps, you should try Covenant Eyes app review. Source: Alovegarden.com Read Alos: Contacts Vs Glasses: Which Of These Two Eyesight Improving Methods Are Best For You? Understanding New Age Spirituality

READ MOREDetails
Flapper Makeup

Easy And Cheap Flapper Makeup Hacks: A Complete Beginners Guide

Stage makeup might be the new norm. However, the 1920s flapper makeup is nothing short of a sensation. Artists see it as a timeless token of expressive beauty, style, and sensational glamour. Let’s check out the main touch points of the artisanal and aesthetic flapper makeup. No doubt the 1920s looks were iconic. So, it’s worthwhile to understand the styles that inspired flapper makeup. We can also try to explore the twenties’ spirit that was depicted through the bold makeup looks. After all, expressing the inner self is the prime function of beauty. Before we know in detail, can you tell what flapper makeup was precisely? Well, long eyelashes, neatly defined brows, and scarlet lips are the tokens defining flapper makeup. That’s not all. The advent of rosy cheeks for that doll-like look can also be credited to the 1920s. What Defined Flapper 1920s Makeup? Eager to get into the crux of flapper makeup? Modern makeup enthusiasts are obsessed with the right nude look or depicting a sensational minimalist look. But the 1920s saw makeup and beauty differently. Remember the characters from The Great Gatsby? The youthful quest of character and dollish overtones dominated the thoughts of the 1920s artists. Today, you won’t celebrate such layered makeup. Instead, models proposed in angled foundations with neatly chiseled jawlines are today's front runners. Moreover, the heavy blushed, and brighter skin toning of flapper makeup has found a replacement in the contoured makeup of today. So, the basics of the flapper makeup look is getting dolled up with makeup. Since the makeup was ceremonial, events like dancing and night parties were so. Many of you may think- What about nails? Trust me, your favorite ombre nail designs 2024 versions would not have made any mark in that look. The face was still the epitome of beauty. Types Of Flapper Girl 1920s Makeup There were many flapper styles during the 1920s. In our imagination, the bold 1920 makeup girl would have liked some of these flapper styles: 1. The Classic Decor Dark and smoky eyes dominated this look. Remember the goth scenes with grim female characters? Yes, you’re thinking right. Sharp eyebrows, blood-red lips, and pale white complexions complemented the classic flapper makeup look. 2. The Bob Rain or shine, girls would go gaga over a playful twist. The definition of the bold flapper makeup completed with the faux bob. Short hair was the norm of the day. No commitment. Just do a contemporary transition and have fun! 3. The Cost-Effective Version Flapper makeup had a cost-effective version, too. If you don’t want your flapper makeup experiment to cause a hole in your pocket, here’s your solution. Firstly, grab any light foundation. Go for the wet n wild photo focus matte/gloss liquid foundation. It costs $5.47 and is available in classic, beige, and other shades. You can also go with the e.l.f. Flawless Finish Foundation. The latter would be better for the glossy, bold look. It covers uneven skin tones like MAC, The Whoo, or any in that category. Remember, the foundation is the basis of the cost-effective flapper makeup. Secondly, your primary role is to create smoky eyes using your regular eyeshadow palette. Lastly, go for a cheap radiant red lipstick for those popping red lips. BAAM! Your pocket friendly flapper makeup looks completed in 30 minutes or so. 4. The Zombie Flapper Makeup Look Today, I suggest a mattifying primer with a matte foundation, contour for cheeks, and dark shades for eye sockets. Of course, a makeup setter spray to top it up. But do you want to know how a 1920s makeup flapper would look like? Complement your flapper style with an authentic macabre look. Create a makeup base to begin with. After that, create defining under-eye circles, draw cracks, and apply fake blood in patches and splashes on your skin. Could you spot the difference? The 1920s flapper is so much more high definition than today’s looks. That’s the beauty of the bold makeup sensation we’ve left behind. How To Use 1920s Flapper Makeup: Tutorial The prime element in your 1920s flapper look would be how you groom your eyes. The eyes are an actual package here. Similarly, I’m talking about eyebrows, lashes, lids, and under-eye. Secondly, you must draw bold lips. No extraordinary treatment. But well-defined bright lipstick.   Lipstick However, I find that MAC’s Locked Kiss Transfer Resistant Creamy Matte would be an iconic lipstick I’d choose for realistic flapper makeup. After all, you must make your lips feel soft, thick, and plushy yet neatly chiseled. Mascara, eyeliners, eye shadows, etc After that, we will focus on the eye section. First, apply your eye shadow. You will find film stars staging dark eye shadows at that time. I also feel that the darker eye shadows preserved the real essence of the flapper makeup. It’s not the twenty’s spirit if it’s not bold and defining! For parties, most women flaunted their dark, smoky eyes. I was so hooked on that look. Indeed, my suggestion for eye shadows would be the same. Secondly, we will focus on the eyeliner. Start by drawing a thin line with your eyeliner. Let the top lash line be smudged; use a thin eye shadow brush. However, something still seems incomplete. Complete your eyeliner effect with an added eye shadow shade on the eyeliner. Caution: The to-eye shadow layer should only go down the point once the smudged eyeliner liner is marked. Otherwise, you won’t be able to conceal the extra eye shadow. I prefer the NYX eye pencils for the above. However, you can go with the brand of your choice. Thirdly, I would suggest a lash mascara brush. Brush your mascara more towards the center of your traditional long eyelashes. Don’t focus much on the sides. Brow Pencils Finally comes the eyebrows. The typical choice would be long and thin eyebrows. Meanwhile, don’t forget to use brow pencils to perfect your brows. Certainly, thin, chappy, or sparse eyebrows won’t make sense if we’re speaking flapper makeup here. However, there’s something more important here. Don’t draw a clean eyebrow arch. Rather, slop downwards. Most experts would not go any further. However, I am skeptical about the look and more about the finish. So, I would like yur blush to be perfect as well. Don’t taper the blush. Instead, try to give it a rounded appearance. After all, the blush is the crux behind the more youthful look. Other than the face, hands and feet also mattered in the 1920s. Back then people knew what is pedicure. The introduction of hemlines popularized nail care and pedicure trends. But nail makeup was not highly defined. So, they did not know what is builder gel. Related: Get Part Ready In No Time with These Hair And Makeup Hacks! The Flapper Era: A Cultural Revolution The flapper makeup is no less than a revolutionary look. It was the prime movement that resulted in the rise of a subculture. When a group of young people wished to defy social norms and sexual definition, they chose the flapper over minimalist makeup. Moreover, flapper makeup was a strong connotation of the fact that 1920s women were trying to break free. They needed to make accurate, bold statements that came in the first look. Flapper makeup looks aligned with style, approach, and cultural tastes. For example, flappers liked jazz. They also had bold lifestyles. Key Elements Of Flapper Makeup That’s easy. Flapper makeup uses all high-definition components. So, there was minimal layering in the makeup. Firstly, the flapper's makeup is incomplete without dark and smoky eyes. Secondly, a pale white skin tone is a definition look for a flapper. Don’t go by the racial connotation of the makeup essentials. After all, these elementary things defined a revolutionary generation. After dark eyes, flappers could not feel complete without firm lips and blush. Iconic Flapper Makeup Products Here are the main kits you would find in the makeup box of any flapper: 1. A heavy-duty mascara 2. Sets of long eyelashes 3. White toners, foundations, contours, etc. for base makeup 4. Eyelash curler 5. Eye pencil 6. Lipstick 7. Powders for touch up Flapper Makeup Techniques I have defined the flapper makeup essentially briskly already. So, I will talk about five master flapper makeup techniques only- 1. Have thin and long eyebrows and use a kohl liner for the best effect 2. Don’t forget false lashes. 3. Create a smoky eye effect as it would suit you 4. Plumm red, burgundy or any rich shade of red would do good 5. Carry Face powder Flapper Makeup In Modern Culture Days have changed. People don’t prefer the bold look that may seem prosthetic to the modern generation. However, bold makeup was an expression of revelation from shackles for women back then. So, it’s natural that the essence of flapper makeup still exists today. If you’re curious too, here are two unmistakable things that have become timeless. Firstly, the smoky eyes look. Women still use the smudgy and messy eye-shadowed look for that bold statement. Secondly, we see the cupid’s bow lips quite often. That is another gift of the flapper makeup era. If you want to know more about flapper makeup or want to offer tips, comment your doubts or queries in the following section. I will check the comments in no time! Additional Resources: Polish Your Creativity: A Colorful Journey into Self-Care With Nail Polish Smashbox Primer: Use It To Make Your Makeup Last Longer Essential Eye Care Tips That Can Improve Eyelash Hygiene

READ MOREDetails
Acne

The 5 Best Herbal Remedies to Treat Acne

One of the most prevalent skin conditions affecting both men and women, acne affects a whopping 80% of people at some point or the other in life. It starts when the naturally occurring pores in the skin get blocked with oil and worn-out skin cells. Deposition of extra sebum in the pores causes growth and build-up of bacteria, eventually leading to inflammation and subsequent redness and irritation. Conventional treatments for acne are sometimes harsh and sometimes ineffective. Hence, relying on natural remedies is your best bet. Acne is one of those things that can appear anywhere, from your face to your legs. Even having acne on your tushy is not an uncommon problem, especially if you are a very active person. Sweating triggers a lot of skin imperfections, that's why being able to fight these blemishes has triggered many companies to sprout solutions for us with creams and face washes. Here, we take a look at the top 5 herbal remedies for acne  1. Apply Tea Tree Oil A powerful essential oil derived from the leaves of a small tree originating in Australia, tea tree oil is famous for its ability to combat bacteria and tone down skin inflammation. Furthermore, several studies have shown that applying approximately 5% tea tree oil on the skin reduces acne effectively. As compared to the same concentration of benzoyl peroxide, 5% tea tree oil does not act as quickly. However, it is still just as effective and can improve acne significantly within three months of repeated usage. Since tea tree oil is super potent, it's advisable to dilute it before application; else you may suffer from side-effects like irritation, dryness, and burning. You can search for the best tea tree oil in the market here. Steps to Use Tea Tree Oil Combine nine parts of water with 1 part of tea tree oil in a bowl. Then dip a cotton ball into the mixture and dab it properly all over the area of acne breakouts. Apply some moisturizer to ease any irritation. Repeat the procedure once or twice a day, or whenever you get the pimples 2. Apply Green Tea Green tea is enriched with high levels of antioxidants, flavonoids, and tannins. These compounds can help combat bacteria, reduce inflammation and promote good health in general. Consequently, it nourishes your skin and makes it less susceptible to developing acne. The primary antioxidant of green tea is epigallocatechin-3-gallate, which has proven efficacy in controlling sebum production, fighting inflammation and eventually inhibiting the growth of acne. Steps to Use Green Tea  Steep a packet of green tea in hot/ boiling water for 3-5 minutes. Allow the tea to cool down. Dip a cotton swab into the tea and apply it all over your skin. Alternatively, you can pour the tea into a spray bottle and spray it on your skin. Let it dry and then rinse off the water. Pat your face dry. If possible, add the leftover tea leaves to honey for making a moisturizing face mask. Remember, in addition to applying green tea on your skin; you can also drink it daily to achieve beneficial results, especially in terms of acne removal. Drinking green tea helps in the lowering of insulin level and blood sugar, both of which can lead to the formation of acne. 3. Apple Cider Vinegar Prepared by fermenting apple cider, apple cider vinegar is a powerful elixir with proven efficacy in fighting several different types of bacteria and viruses. It contains numerous organic acids that have been known to kill acne. For example, succinic acid has been proven in its role of suppressing inflammation. Similarly, high levels of lactic acid in apple cider vinegar have also been shown to reduce the severity of acne breakouts. And what's best is that apple cider vinegar can even help to dry up excess oil, leading to a reduction in acne formation in the long run. Steps to Use Apple Cider Vinegar Combine one part of apple cider vinegar with three parts of water. Consider using more apply for extra-sensitive skin. After cleansing thoroughly, apply the mixture on your skin gently with a cotton swab. Let it stay put for a few seconds and then rinse off with water. Pat dry gently. Repeat the process daily, or as needed. Remember, you should always dilute apple cider vinegar before applying it on your skin as it's very harsh and could lead to irritation and burns when applied in the concentrated form. 4. Cinnamon & Honey Mask Cinnamon and honey are both powerful sources of antioxidants. According to several studies, increasing antioxidant supply to the skin is important for reducing acne, and apparently, shows better results than applying retinoid and benzoyl peroxide. Just so you know, the latter two are common, anti-bacterial medications for acne-prone skin. Due to the presence of an overwhelming amount of vitamin B3, linoleic fatty acid, sodium ascorbyl phosphate and vitamin C extracts, both honey and cinnamon can reduce inflammation and fight bacteria, thereby nullifying the two leading causes of acne. Steps to Prepare a Honey & Cinnamon Mask Mix a teaspoon of cinnamon and two tablespoons of honey to form a smooth paste. Clean your face with a mild face wash and apply the mask on your face. Let it stay put for 10-15 minutes. Rinse off the mask completely and pat your skin dry with a soft towel. Repeat the process every week to observe good results 5. Apply Witch Hazel Derived from witch hazel shrub, this popular North American plant contains tannins that are known to have potent antibacterial and anti-inflammatory action on the skin. It is used to treat a wide range of skin ailments, including eczema, dandruff, bruises, insect bites, burns, and acne. Several studies have proven that applying witch hazel on the skin can combat bacteria, lower inflammation, and promote the well-being of the skin. Steps to Use Witch Hazel  Mix a cup of water and a tablespoon of witch hazel bark in a saucepan. Immerse the witch hazel bark for half-an-hour and allow the mixture to boil for some time. Then reduce the flame and cook it covered for 10 minutes. Let the mixture cool down for another 10 minutes. Strain and keep the liquid in an airtight container. Apply on clean skin with a cotton swab once or twice a day Ending Note In conclusion, we would like to stress on the importance of natural and herbal remedies for treating acne from scratch. This is one of the most common skin conditions with a wide range of underlying causes, some of which are unidentified to date. Conventional treatments tend to cause dryness, irritation, and redness. However, natural remedies beg to differ. The herbal remedies listed above may not work for one and all, but they are surely worth giving a try! Read More: The Relationship Between Oral Health And General Health Top 5 Foods For Healthier And Thicker Hair 5 Protein Enriched Food To Improve Mental Health E-Cigarettes: How They Effect On Your Oral Health

READ MOREDetails