The 5 Best Herbal Remedies to Treat Acne

Published on: 13 October 2017 Last Updated on: 16 August 2019
Acne

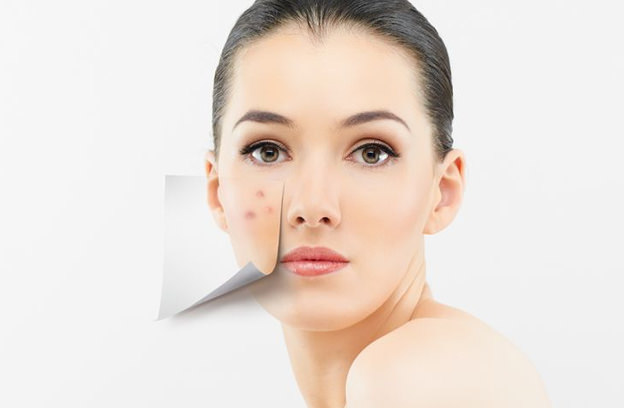
One of the most prevalent skin conditions affecting both men and women, acne affects a whopping 80% of people at some point or the other in life.

It starts when the naturally occurring pores in the skin get blocked with oil and worn-out skin cells. Deposition of extra sebum in the pores causes growth and build-up of bacteria, eventually leading to inflammation and subsequent redness and irritation. Conventional treatments for acne are sometimes harsh and sometimes ineffective. Hence, relying on natural remedies is your best bet. Acne is one of those things that can appear anywhere, from your face to your legs. Even having acne on your tushy is not an uncommon problem, especially if you are a very active person. Sweating triggers a lot of skin imperfections, that’s why being able to fight these blemishes has triggered many companies to sprout solutions for us with creams and face washes.

Here, we take a look at the top 5 herbal remedies for acne

 1. Apply Tea Tree Oil

A powerful essential oil derived from the leaves of a small tree originating in Australia, tea tree oil is famous for its ability to combat bacteria and tone down skin inflammation. Furthermore, several studies have shown that applying approximately 5% tea tree oil on the skin reduces acne effectively.

As compared to the same concentration of benzoyl peroxide, 5% tea tree oil does not act as quickly.

However, it is still just as effective and can improve acne significantly within three months of repeated usage. Since tea tree oil is super potent, it’s advisable to dilute it before application; else you may suffer from side-effects like irritation, dryness, and burning. You can search for the best tea tree oil in the market here.

Tea Tree Oil

Steps to Use Tea Tree Oil

    • Combine nine parts of water with 1 part of tea tree oil in a bowl.
    • Then dip a cotton ball into the mixture and dab it properly all over the area of acne breakouts.
    • Apply some moisturizer to ease any irritation.
    • Repeat the procedure once or twice a day, or whenever you get the pimples

2. Apply Green Tea

Green tea is enriched with high levels of antioxidants, flavonoids, and tannins. These compounds can help combat bacteria, reduce inflammation and promote good health in general.

Consequently, it nourishes your skin and makes it less susceptible to developing acne. The primary antioxidant of green tea is epigallocatechin-3-gallate, which has proven efficacy in controlling sebum production, fighting inflammation and eventually inhibiting the growth of acne.

Steps to Use Green Tea 

  • Steep a packet of green tea in hot/ boiling water for 3-5 minutes.
  • Allow the tea to cool down.
  • Dip a cotton swab into the tea and apply it all over your skin. Alternatively, you can pour the tea into a spray bottle and spray it on your skin.
  • Let it dry and then rinse off the water. Pat your face dry.
  • If possible, add the leftover tea leaves to honey for making a moisturizing face mask.

Remember, in addition to applying green tea on your skin; you can also drink it daily to achieve beneficial results, especially in terms of acne removal. Drinking green tea helps in the lowering of insulin level and blood sugar, both of which can lead to the formation of acne.

3. Apple Cider Vinegar

Prepared by fermenting apple cider, apple cider vinegar is a powerful elixir with proven efficacy in fighting several different types of bacteria and viruses.

It contains numerous organic acids that have been known to kill acne. For example, succinic acid has been proven in its role of suppressing inflammation.

Similarly, high levels of lactic acid in apple cider vinegar have also been shown to reduce the severity of acne breakouts. And what’s best is that apple cider vinegar can even help to dry up excess oil, leading to a reduction in acne formation in the long run.

Vinegar oil

Steps to Use Apple Cider Vinegar

  • Combine one part of apple cider vinegar with three parts of water. Consider using more apply for extra-sensitive skin.
  • After cleansing thoroughly, apply the mixture on your skin gently with a cotton swab.
  • Let it stay put for a few seconds and then rinse off with water. Pat dry gently.
  • Repeat the process daily, or as needed.

Remember, you should always dilute apple cider vinegar before applying it on your skin as it’s very harsh and could lead to irritation and burns when applied in the concentrated form.

4. Cinnamon & Honey Mask

Cinnamon and honey are both powerful sources of antioxidants. According to several studies, increasing antioxidant supply to the skin is important for reducing acne, and apparently, shows better results than applying retinoid and benzoyl peroxide.

Just so you know, the latter two are common, anti-bacterial medications for acne-prone skin. Due to the presence of an overwhelming amount of vitamin B3, linoleic fatty acid, sodium ascorbyl phosphate and vitamin C extracts, both honey and cinnamon can reduce inflammation and fight bacteria, thereby nullifying the two leading causes of acne.

Steps to Prepare a Honey & Cinnamon Mask

  • Mix a teaspoon of cinnamon and two tablespoons of honey to form a smooth paste.
  • Clean your face with a mild face wash and apply the mask on your face. Let it stay put for 10-15 minutes.
  • Rinse off the mask completely and pat your skin dry with a soft towel.

Repeat the process every week to observe good results

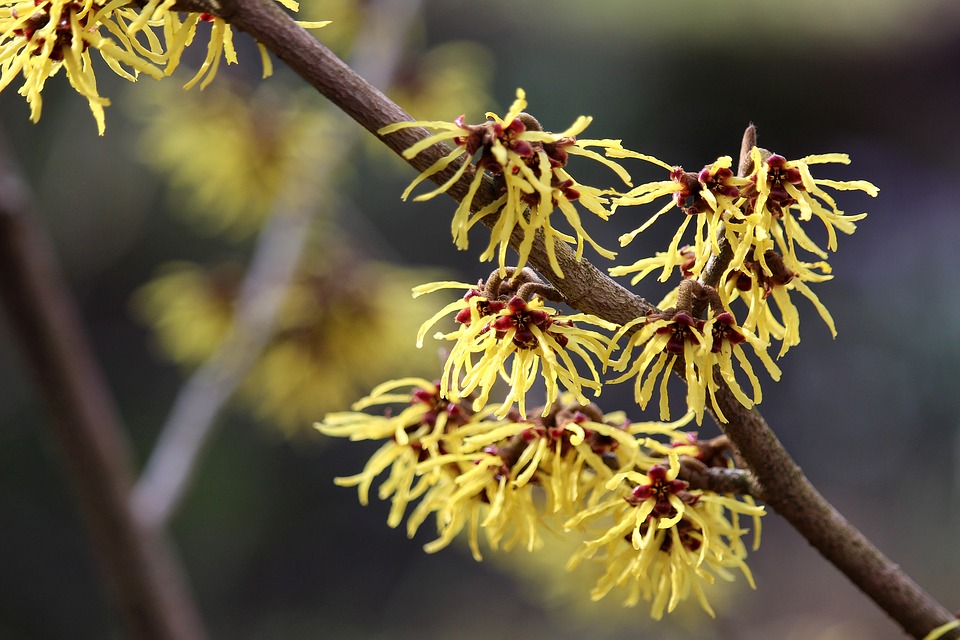
5. Apply Witch Hazel

Derived from witch hazel shrub, this popular North American plant contains tannins that are known to have potent antibacterial and anti-inflammatory action on the skin.

It is used to treat a wide range of skin ailments, including eczema, dandruff, bruises, insect bites, burns, and acne. Several studies have proven that applying witch hazel on the skin can combat bacteria, lower inflammation, and promote the well-being of the skin.

Witch Hazel

Steps to Use Witch Hazel

 Mix a cup of water and a tablespoon of witch hazel bark in a saucepan.

  • Immerse the witch hazel bark for half-an-hour and allow the mixture to boil for some time.
  • Then reduce the flame and cook it covered for 10 minutes.
  • Let the mixture cool down for another 10 minutes.
  • Strain and keep the liquid in an airtight container.
  • Apply on clean skin with a cotton swab once or twice a day

Ending Note

In conclusion, we would like to stress on the importance of natural and herbal remedies for treating acne from scratch. This is one of the most common skin conditions with a wide range of underlying causes, some of which are unidentified to date. Conventional treatments tend to cause dryness, irritation, and redness. However, natural remedies beg to differ. The herbal remedies listed above may not work for one and all, but they are surely worth giving a try!

Read More:

  1. The Relationship Between Oral Health And General Health
  2. Top 5 Foods For Healthier And Thicker Hair
  3. 5 Protein Enriched Food To Improve Mental Health
  4. E-Cigarettes: How They Effect On Your Oral Health

Content Rally wrapped around an online publication where you can publish your own intellectuals. It is a publishing platform designed to make great stories by content creators. This is your era, your place to be online. So come forward share your views, thoughts and ideas via Content Rally.

View all posts

Leave a Reply

Your email address will not be published. Required fields are marked *

Related

Epilators

Epilators: The Best Solution To Smooth Skin

Epilators are an electronic device that can be used to effectively remove hair at the follicle level. They work in a manner similar to tweezers but cover a larger area at the same time. This works with the help of springs and rotating discs that pull the hairs out from the root level allowing you to have smoother skin for longer durations of time. Compared to other waxing methods the epilator is also effective in terms of short regrowth time. Usually, you need to space two hair removal sessions apart with adequate time to let the hair grow long enough to pull them out. In the case of the epilator, it can pull hairs up to 0.02 inches tall as well. This allows you to use this device without much gap to enjoy consistent smooth skin. How to choose an epilator: While choosing an epilator it is essential to look at the specifications in order to assure it is the best option for you. Looking at the number of tweezers is a good way to assess an epilator. On an average, epilators have 40-60 tweezers. The more the number of tweezers is, the easier and faster the process will be. It will also result in lesser pain as more number of hairs can be covered with a single roll of the epilator. Another factor to consider while choosing an epilator is its battery power. The noise, speed settings, and area of usage are also integral points that can help you shortlist. Cost of an epilator: An epilator is a device that can be used for a few years and hence it is worth the money invested. It is economical and viable. You can choose an affordable epilator that is effective as well based on a good research. Some of these devices offer additional features such as multiple fittings that can be made of to use the epilator in different parts of the body including the sensitive areas. How to use an epilator: Epilators have to be used with caution regarding areas of usage. There are a lot of precautions to take before you use your epilator that will let you undergo the process with less pain. These include moisturizing your skin beforehand and many other shortcuts that will let you be more comfortable with the whole process. It is also necessary to know if you are using a dry epilator or a wet one and condition your body to have the required state. It is integral to apply a numbing cream before you use the epilator on sensitive areas to reduce the pain. For a Brazilian, there are specific fittings for an epilator and specific epilators available. Similarly while epilating the face it is essential to use a face epilator and not the same one that you may use on your arms and legs. An epilator is a convenient tool that is easily portable and highly effective for smooth hairless skin. This device is functionally effective as well as cost effective. You can choose from options available to find one that suits you best. Read Also: 7 Tips For People With Hypersensitive Skin 7 Anti-Aging Tricks And Tips To Get Youthful Skin Like A Teen

READ MOREDetails
Classy Makeup

Simple But Classy Look Make-up

If you're looking for a simple but classy makeup look, there are a few steps to follow that will help you achieve just that. Whether you want to adopt a basic and elegant look for a special occasion, such as an engagement, wedding, reunion, or another occasion, there are certain guidelines that will help you achieve a sophisticated look for almost any event. Here are some basics to get you started. In the following section, we speak to leading experts at the Paris Lash Academy and ask them about the best simple and classy make-up looks that you can opt for. Paris Lash Academy offers various eyelash extensions that can complement your looks. Simple But Classy Makeup Look: Makeup Brushes: Before you get started on your simple but classy makeup routine, be sure and gather a set of quality makeup brushes to speed up the process. You'll likely need foundation, blush, eyelid, powder, and contouring brushes. You might also want to think about including a few beauty blenders, particularly for foundation, blush, and contour application. You want a smooth application and the right brushes and blenders can provide that. Prepping Skin: In order for makeup to blend as it should, cleanse your skin to create a slight exfoliating effect before any makeup is applied. Once cleansed, moisturize the face and apply a face and eyelid primer. Primer applications should smooth and preserve any makeup that is applied to those areas. Evening out Skin Tone: If the skin is blotchy or uneven, the application of a sheer tinted moisturizer will help to smooth and even out skin tone. Tinted moisturizers can also add warmth to the complexion. You don't have to go for an exact skin match with a sheer tint as you can still bring an added intensity or glow to the skin. If your skin is extremely oily, you'll probably want to skip the tinted moisturizer step to avoid oil buildup. Concealing Under-Eye Circles and Blemishes: Evening out skin tone also means including and using a good concealer that is rich in pigment and staying power. You want to cover dark under-eye circles and other blemishes. Using too much will accentuate problems, so simply use a short swiping motion under the eye. When dispensing the concealer, place it in a triangular shape under the eye. Blend the area with your finger or a beauty blender. For blemishes, dab the actual spot and blend. Continue to do the same action if added coverage is necessary. You want the concealer to be at least one to two shades lighter than your skin tone. Other spots to highlight include going up the bridge of the nose and on up to the forehead. Foundation: The right foundation is the piece de resistance of any makeup routine. You want to find a shade that is closest to your actual skin tone and decide whether a liquid or cream is suitable for your skin type. For a more flawless look, use a beauty blender to apply the foundation. It will definitely deliver a smoother and more complete coverage. Blend the foundation on the face and continue down onto the neck area. If necessary, use your concealer again to cover any blemishes or dark areas, or to add further accents. Contouring/Highlighting: Once the foundation phase is complete, use a contour brush to apply contour powder or cream under the apple areas of the cheeks. Also, apply that same contour to the forehead area and both sides of the jaw. In order to add more warmth, apply a bronzer to those same areas. Blush Color and Highlighter: For added color, choose a blush color for a simple but classy makeup look. You want to think about using cream blushes in warm peaches and pinks so that skin is given a natural and subtle look. Forego cool pinks as they add too much drama. Natural cheek colors can convey a blushing bride kind of appearance that can enhance just about any luvbridal wedding ensemble as well as any other special occasion or event. Use a blender or brush to apply blush to the apples of the cheeks. For more cheek and face enhancement, add a non-sparkly highlighter to the tip of the nose and cheek areas and anywhere else where the sun would normally hit. Again, use a beauty blender to smooth out both the blush and highlighter to create a more subtle and simple effect. Eye Shadow, Liner, Mascara, and Eye Pencils: Soft browns are the best eyeshadow colors to use to enhance the eye area and its shape. Select a shade that is a bit darker than your skin. Brush and blend the shadow into the creases of the eye as well as on the lower lashes. Keep it soft with no hard lines. Add a neutral creamy color shadow at the inner corners of the eyes as well as at the center of the lids, and on the brow bones. At the outer corners of the eyes, use a darker shade to bring a further dimension to the eyes. Liner - Apply a dark brown or black liner to the eyelids. Liquid and gel liners give a longer, starker and lasting effect while pencils usually bring a softer and smoother look. Mascara - provides a finishing touch to the eye area. Apply several coats to the top lashes. For lighter lashes uses brown mascara and if you have darker lashes, use brown or black. Avoid mascara products that produce spidery lengths to lashes, as they can detract from a more natural look. Mascara can also be used on your bottom lashes by applying a bit of mascara from the wand and placing it right at the roots of the bottom lashes using a small eye brush to dot in the mascara. Eyebrow pencil/gel - color choices should be one or two shades on the darker side for blonde or light brown hair, while one or two shades lighter for dark or black hair. You want your brows to be natural but you also want them to be defined. Use an eyebrow template if you are not sure of how to color in your brows or simply need a guideline for correct color placement. Think soft and subtle, yet defined. Lips: You want to enhance your lips with a pretty lasting tint rather than an outlandish and garish color. Choose a shade that actually matches your true lip color and pat or press the color into the lips. Go to the center of the lips first and blend the color in an outward motion. Darker berry colors and reds are flattering in a matte tint as they do bring emphasis to the lips without exaggerating them. Powder: Maybe you don't require powder to finish your look but if your skin has a tendency to get oily and produces shiny spots, you might want to think about an oil-absorbing powder. Powders that are pressed, silk, airbrushed, translucent, and hydrating are great for completing any look, whether your skin is oily or otherwise. These powders are easy to use as you can just sweep a powder brush across them and buff the skin to create a perfect look, which includes powdering the under-eye area as well. Pores and blemishes are also reduced with the use of this kind of powder, and touch-ups are easy as the buildup is almost nonexistent. Setting or Fixing Spray: Once your makeup is completely done, use a setting or fixing spray to hold your work of art in place. Whether you choose it in spray, powder, or mist form, it is designed to maintain your makeup for a number of hours to all day. It helps you avoid those frequent powder room touch-ups that are annoying and a hassle. There are specific types to use for both oily and dry skin. Creating a simple but classy makeup look can be fun and enhancing and if you have a few steps to follow, the process isn't then difficult. Take a look at the steps here and give yourself a simple but classy makeup makeover. Just remember not to overdo it. A Simple Professional Makeup Routine for Everyday   Sometimes all we need is simple classy makeup to put yourself together before your office.  Creating a polished look for the office doesn’t have to be time-consuming. With a few straightforward steps, you can achieve a clean and classy makeup look that’s ideal for work.  Start with a Clean Slate  Your face is the canvas, and a clean slate is the beginning step of a well-set makeup.  Therefore, begin by thoroughly cleansing your face to remove any impurities.   Apply a lightweight moisturizer to hydrate your skin, followed by a primer to ensure your makeup lasts throughout the day.  Achieve an Even Complexion  The second step is getting an even complexion. This will be the base of your minimal makeup. Half of the time, getting an even tone can already make you feel put together.  Select a light foundation or BB cream (if you do not want something heavy like foundation) that closely matches your skin tone.   Blend it evenly across your face using a beauty blender or brush, focusing on areas that need extra coverage. For blemishes or dark circles, gently apply concealer and blend it in seamlessly.  Enhance Your Natural Glow  Too much bold makeup can make you stand out in all the wrong ways when you are in the office.  So, if you are in love with the heavy sun-kissed look, it is time to keep that overwhelming rouge down.  Rather, choose a soft pink or peach blush to add a subtle pop of color to your cheeks.   Lightly contour under your cheekbones and along your hairline with a matte bronzer. Finish by applying a touch of highlighter to the high points of your face, such as the tops of your cheeks and the bridge of your nose.  Subtly Define Your Eyes  Again, do not go for a bold eye look. Reserve them for the evenings. But here is how you can define them with the help of counting.  Go for neutral eyeshadow shades like soft browns or taupe. Apply a lighter shade across your lids and blend a slightly darker shade into the crease for depth. Use brown or black eyeliner to line your upper lash line and finish with a coat of mascara.  Perfect Your Brows  Sometimes, all you need is a well-set brow, and your makeup and your face have an automatic symmetry.  Fill in any sparse areas of your brows with a brow pencil or powder, maintaining a natural look. Follow the natural shape of your brows without making them too bold.  Finish with a Soft Lip Shade  Finally, it is time to seal the makeup with lips.  For a natural and professional look, you can opt for a simple lip gloss or balm. Try not to go overboard with the clear gloss, as it can cheapen your look at times.  Select a lip color that enhances your natural lip tone, such as a nude, pink, or soft berry shade.   Apply it evenly, and if you like, add a layer of gloss for a polished finish.  Read Also: 7 Tips For People With Hypersensitive Skin Expert Doctor’s Treatments For Cystic Acne 7 Anti-Aging Tricks And Tips To Get Youthful Skin Like A Teen Get Part Ready In No Time With These Hair And Makeup Hacks!

READ MOREDetails
Spot Patches

Overnight Spot Patches: What They Can And Can’t Do For Acne

Literally, thousands of people get relief from the healing and supportive qualities offered by overnight spot patches. Containing a gentle compound known as hydrocolloid, these little circles of protection not only stop you from picking your pimples but also draw out the toxins inside. However, before you buy any cosmetics-related products, it’s first important to know what they do and what they don’t. This is something that absolutely applies to spot patches, as many people expressing disappointment in the achieved results are not using them properly, as they tend not to know what they do precisely. What CAN Overnight Spot Patches Do? A little like their larger cousin - the blister bandage - acne patches comprise of small stickers with a gummy back that sits right over the zit in question. By providing a protective barrier, the spot is kept clean, while also drawing out pus, dirt, bacteria, and anything else nasty lurking in your pores. Picking is one of the worst things you can do to a zit and patches like these stop it in its tracks - which is very beneficial, as it’s easily done without knowing and it’s something that can undo all your hard work. Used on pimples and other spots that have essentially risen and broken the skin’s surface, they’re usually applied at bedtime (hence the name), meaning you wake up to the somewhat pleasing task of taking them off and seeing what they’ve drawn out. Prior to application, it’s essential that your skin’s surface is totally dry, as you might otherwise find it hard to affix your overnight spot patches to your skin. Should you be trying to treat a freshly-picked spot that’s oozing liquid, you should cleanse it before any patch is applied. Used in this way, acne patches CAN provide vital protection for your spots and help you overcome them. What CAN’T Overnight Acne Patches Do? Well, firstly they can’t make your acne worse, as they’re designed to bring down inflammation. The only negative experience you might have is one of disappointment that you didn’t the intended results, but this is invariable because, again, they’ve been used incorrectly i.e. before the spot has properly erupted. This is the crux of what spot patches can’t do, as they’re created to deal with open or nearly open zits, rather than papules and cysts that are well below the skin’s surface. Truthfully, if they’re applied over deep lesions or active bumps, they’re not going to do a great deal. They’re not going to completely clear your pores either, as benzoyl peroxide and salicylic acid products are the tools of choice when it comes to that particular task. Related Resource: What You Need to Know About Caring for Your Skin as You Get Older: Your Guide Use Overnight Spot Patches For Their Correct Purpose Why wouldn’t you wear wellington boots to play soccer? That’s right because that’s not what they’re designed for! So, when using zit patches, the same thing applies - they’re for a very specific purpose for a very specific kind of spot. You can’t expect they’re going to do anything else or you will be left disappointed in what they do. Use the product for its intended purpose in the way described and you can’t help but calm down your zit, but if you’re expecting anything else other than a calmer spot with less gunk inside afterward, you’re not going to be happy. Read Also: Are CBD Lotions Good For Your Skin?Is the 10 Step Korean Skincare Routine Worth the Hype?5 Most Exciting Facial Treatments For Smooth & Gorgeous Skin

READ MOREDetails