5 Tips How to Live Clutter-Free In a Small Space with Kids

Small Space

Despite kid’s petite size, they occupy a considerable amount of space including their toys and games, specifically if you live in a small space apartment. This can be a never-ending puzzle with each additional child if you don’t find your way to place all of the stuff where it is meant to be!

Are you wondering how to take the maximum usage of the spare areas in your apartment?

Then, take a look at the 5 most useful and practical tips to use all empty areas in your small space:

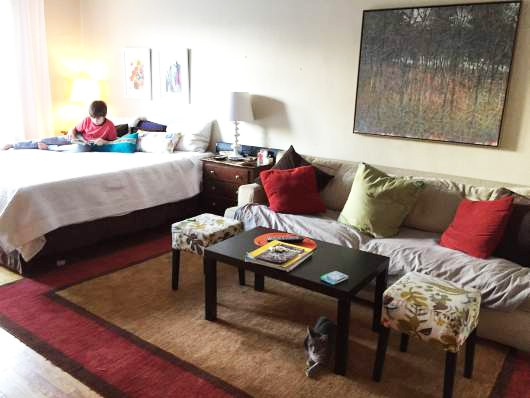
Make Your Living Small Space Kid-Friendly:

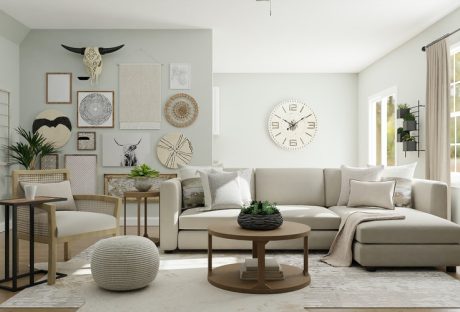
Making your apartment jam-packed with a lot of loose showpieces and vases is a big no-no. It looks not only messy but also not suitable for kids in terms of safety. Look at some interesting tips to make your small space looks more open and expanded:

  • Do not put plenty of stuff together in every corner of your apartment. Instead, put small pieces of stuff maintaining the theme as well.
  • You can even use colorful baskets in your living area to keep the trash away instantly; it will help you in keeping the area clutter-free always.
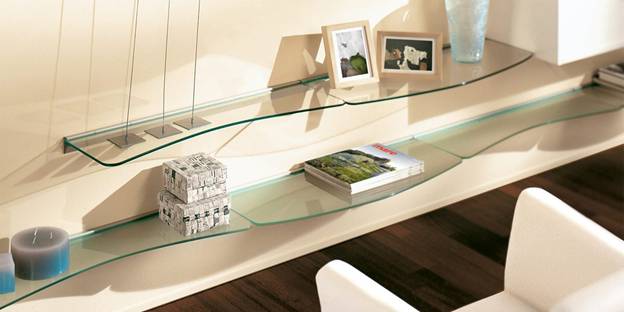
  • Instead of using glass pieces and vases, use a wooden one! It will safeguard your kid from an accident while he is crawling or playing all around in the apartment.

Use Smart Storage Ideas:

If you still struggle with keeping rarely-used things within your home, then self-storage units are at your rescue. You can also choose an ideal size for your stuff with different sizes available. People at the facility understand any concerns you might have and make the process easier than you would think.

Regardless of the weather, they make sure that your valuable storage remains safe and secured. These units are not only meant for keeping your stuff near you but also they are helpful in terms of relocating.

Take Advantage of the Usage of Vertical Spaces:

Making the maximum use of vertical spaces, whether it is in your bedroom, kid’s room or kitchen is one of the best ideas! It will make your small space more presentable and well-organized.

You can buy shelves and cupboards, or you can consider creating customized units with accurate dimensions, placing them in the most suited areas. It will not only make your apartment look wider and open, but also gives you plenty of space to throw on random stuff inside.

Keep It Minimal and Classy:

As we have already discussed above, that is, try to keep as minimal stuff as possible. For instance, instead of keeping big indoor plants on floors, put tiny ones on your shelves keeping in mind your kid’s safety. Likewise, instead of putting huge and heavy furniture, use small customized furniture that you can lift without many efforts.

To give your kids the maximum area to play in the living room is to show some creative side in wall designing and paintings rather than focusing only on floors.

Play With Colors but Do Not Overdo It:

You probably got numerous interior designing ideas on the internet, but do not splurge your money without even considering whether or not it suits your apartment. Keep it simple instead! Now, it doesn’t mean that you use only one color, but try to use subtle colors.

Let’s say, white color is something that looks more spread-out and gives an illusion of a bigger space.  When it comes to kids, bright colors will be more likely to make them joyful, so, why not give it a try into your kid’s room!

Read Also:

I enjoy writing and I write quality guest posts on topics of my interest and passion. I have been doing this since my college days. My special interests are in health, fitness, food and following the latest trends in these areas. I am an editor at Content Rally.

View all posts

Leave a Reply

Your email address will not be published. Required fields are marked *

Related

roof for your home

Choosing the right roof for your home – Types to select from

When thinking about how to select the best roofing for your home, you need to take into account several issues and have to research various different elements. A roof which is well designed and perfectly made with materials of good quality increases the value of your house giving it a new dimension. While thinking about choosing the best roofing possible for the house, you will come to know about various processes and various materials which were not known to you before. It is one of the most difficult areas to construct in a building and needs the guidance of a leading roofing contractor. It is easy to replace your existing roof if any with the same process and with the same materials. But this will make you lose the chance of upgrading your roofing. Given below are various points which will help you to choose the best roofing for your house: Fighting the weather : Your roof is generally a barrier which guards your home against various climatic warriors like sun, rain, and snow. Thus it should be taken care of that you use materials which are strong enough to protect your roof from these climate changes and do not wear out easily. So researching and consulting the roofing contractors about which materials are to be chosen is very important for the longevity of the roof as well as the house. Usually, the metal roofing or tiles roofing lasts longer than the roof made with shingles. Design : For different houses, roofing of different styles and designs are needed. For example, for an original Tuscan home, authentic clay roof tile is best suited. The Dutch houses are known for their steep-sloped roof sides and shingles is a better option of rooting for this kind of houses. Type of roofing : You need to think and confirm what kind of roofing you will need.  There are various types of roofing from where you can choose the best one according to your needs. There are clay tile and concrete flooring, metal flooring, asphalt shingles flooring, etc. These roofing types vary in costing, weights, durability, longevity. The metal roofing is far more beneficial than the asphalt shingles one.  The asphalt one is easy to install and is lighter and is less complicated. The metal roofing process is a more complicated one which cost more but also provides better performance and stays for a longer period without wearing out very early. They are stronger and are able to fight the climatic changes better than others. Asphalt shingles : Choosing asphalt shingles is very beneficial with respect to price as it is less costly than others and probably will give the best value to your roof while fitting the budget. The best type of shingles is laminated and architectural shingles. They are thicker and more textured and will serve about 20 years and will keep you tension free. Weights : You need to take care of the fact that the weight of the materials you use in the roofing process must not exceed the limit or else they can put pressure on your ceiling. Lightweight materials are also easy to install and materials like shingles and composites can be laid and installed directly over the top of the existing roof. The metal roofing is heavier than shingles and also than the tile roofing. Comparison : Comparing the price, quality, and weights of the materials are also very important as it makes you sure about which company you should buy the materials. If you note the prices and weights of the materials from various dealers and compare the prices from the quotations, it will be beneficial and will cost you less for doing the job. Colors : There is always a debate about whether to choose roofing of dark color or a light color. This will influence the heating of the roof as well as the rooms down under. Studies conclude that when ply sheets were placed under black or dark-colored shingles, they kept the temperature about ten degrees warmer than the same kind of shingles but white in color. Thus it is a difficult but important choice to make whether to focus more on the color or more on the heat retention. The advice is to go for a color that you like and prefer as you will have to keep it for a long span and you will have to live with it. Hence, we can see that while choosing the type of flooring for your home, you should take into account many aspects and do proper research about it. The various types of flooring offer various kinds of features and you may choose from them accordingly. The price may vary, the longevity may vary and their strength to tolerate the weather may also vary. Thus finding the best roofing which will protect the roof from leakage, mosses, molds and other substances will be beneficial. Click here roofing prices and choose the right roofing for your home. Read Also : Professional Roofing Services And Different Decorating Styles Pressure Washing- Why It Is Necessarily Important For Your Home? Professional Roofing Services And Different Decorating Styles

READ MOREDetails
ceiling light

How You Can Choose the Ideal Ceiling Light for Your Living Area

Your house can certainly benefit from the right lighting – lighting is, after all, essential for any living space. With the proper lighting, you can have warmth and homeliness in your abode, but you can also have an entirely functional element that can help you perform certain tasks and see everything clearly. But lighting can have an impact on other elements as well, and it can affect your space's wall color to the color of your flooring or carpet. It is therefore essential to have an ideal plan for your lighting, especially when it comes to your living area. The correct light can go a long way in giving your home the ambiance and serenity it needs, and it can lend a great atmosphere to your living space as well. The ceiling light you choose, in particular, can make a huge impact. Here, then, is how you can select the ideal ceiling light for your living area. How You Can Choose the Ideal Ceiling Light for Your Living Area: The height of the ceiling and the available space: Firstly, you should try to figure out how you use the room and the time of day you often spend there. It is also important to note the available space – how big or small it is – as well as the height of the ceiling. If, for instance, the ceiling in your living area is low, a large fixture such as a chandelier may not be such an ideal choice, as it may make your living room appear cluttered and smaller. On the other hand, if you have a high ceiling, a small ceiling fixture may look awkward and may even 'disappear' in a room with a high ceiling. If your living area has a low ceiling, you could go for semi-flush mount or flush mount lighting fixtures, as these kinds of fixtures have a small drop and don't extend too far from the ceiling, which adds to the illusion of a higher ceiling or space. For high ceilings, big, bold chandeliers or lighting fixtures are an excellent option. The type of lighting: You should know that different ceiling lights will have a variety of functions, which leads us to the different types of lighting. You should ask yourself this important question as well: what is the purpose of your ceiling light, especially when taking into consideration the kind of ambiance you would like your living area to have? Essentially speaking, there are three major types of lighting: task lighting, accent lighting, and ambient lighting. In general, a ceiling light in the living area provides ambient lighting because it gives a wide illumination, and you can also control it with the use of a dimmer. You can complement ambient lighting with the use of layers in the lighting scheme and design of your living area. You can add layers with lighting fixtures such as lamps (both floor and table lamps), sconces, drop lights, downlights, and recessed lighting. Lamps serve well as both accent and task lighting too. The bulb: The bulb you choose also makes a difference, as any expert will tell you – and many of us make the error of overlooking the bulb, even though it can impact the overall elegance of our lighting design. Modern lighting often involves the use of LED bulbs, as they are bright and energy-efficient, and they can last for a long time. Living areas can definitely benefit from the use of LED bulbs, because living room lighting is used almost every day, most especially at night, and LED bulbs are ideal for this type of use. There are decorative LED bulbs which you can also make use of, and they are often great for any living space – this is especially true for filament bulbs, which are trendy yet have a unique vintage appeal. Read Also: 3 Trendy Lighting Ideas For Your Kitchen Island The Benefits Of Solar Lighting In A Nutshell Las Vegas Electricians Share Fun Lighting Ideas For Your Home

READ MOREDetails
how to install faucets

How To Install Faucets And Sinks

Installing a new sink is an uncomplicated and quick task. The process is relatively easy, and you can do the installation part by yourself with a bit of experience. Then how to install faucets? Though some complicated kitchen faucets require professional installation, many of the kitchen fixtures can be installed easily.  Here is a guide on how to install faucets and sinks.  Materials Needed   In order to install the kitchen faucet and sink set, you will need the following list of things: a sink, a faucet or tap, a basin wrench, a strainer set, pump pliers, a screwdriver, a crescent wrench, a spatula, plumber's putty, silicone sealant, a bucket, a flashlight, and a set of towels.  How to install faucets, and this reason is nearby if you wish to enlarge the opening within the countertop. It is also necessary to know how to clean bathroom sinks to maintain hygiene.  Step By Step Guide To Install Faucets And Sinks If you are looking for durable, sturdy, and premium quality faucets, it is best to choose Oltsw taps.  Here, we have mentioned the steps to know how to install faucets and sinks.  Step 1: Measure and mark the layout of the kitchen’s sink Place the counter's back edge in the center of the sink within its cabinet. If the sink contains a template, align it along the mark on the counter. This is the first step of how to install faucets. Place the back edge one and a half inches parallel to the counter. Trace around it; proceed to the subsequent degree. If there is no template, use 2-inch tape to stipulate the sink location. Mark the middle of the sink on its back edge. Lay the sink inverted on the counter. Align the mark on the sink and the one on the counter together.  Step 2: Mark the cut lines on the counter The cut line marking is the second phase of how to install faucets. The employing a straightedge to attach the marks, you will find yourself with an oblong outline on the counter of the sink's hole. To approximate the radius of the corner of the sink, round off the corners by hand. Take a slightly wider bit than the jigsaw blade (½-inch bit is typically enough). Then, at each junction of the cut-out lines, make sure to drill a hole inside the radius.  Step 3: Use a jigsaw to cut the sink opening Place a jigsaw blade into a front hole and cut along the marked line to the back hole. Repeat on the opposite side. Lay a scrap of wood some inches longer than the cut-out across the sink area. Screw through the piece and into the cut-out waste to stop it from binding the saw blade or falling. Cut along the cut lines marked at the front and back and remove the cut-out piece. Make sure that the fit of the sink in the countertop is set. If it is necessary, trim the opening with the jigsaw.  Step 4: Install the kitchen faucet Set the sink the wrong way up on a padded sawhorse or counter. Then, feed the tap's supply tubing and tailpiece through the gasket, which helps seal the faucet to the sink. Screw the washers and mount them on the lower side sink deck. This is the pre-final step of how to install faucets. Just make sure that the tap can swing for a whole area across the sink deck before tightening mounting nuts.  Step 5: Attach The Strainer Over Applied Putty Put the sink up, apply a thick roll of the plumber putty under the strainer edge, and push it up through the sink's drain hole. Slip the housing (if your strainer has one), gasket, and washer onto the filter and against the lower side of the sink. Dab the pipe-joint compound and expose the opening threads.  Thread the locknut onto the strainer by hand, then tighten it with pliers while holding the filter in situ. Fit the gasket onto the tailpiece of the sink drain and attach it to the strainer through its slip nut. Tighten the nut using a hand while holding the filter.  Step 6: Set the sink and connect the water supply Remove the tape, and pull it toward the center of the hole. With the sink still, the wrong way up, press a bead of silicone tapping around the lower side of the sink's brim. Turn the sink upright and set it on the hole of the countertop.  Make sure that the front of the sink is parallel with the front fringe of the countertop. Adjust it, if necessary. Next, use the corn-head supply tubes or the braided stainless-steel hoses to connect the tap and shut off the valves. Now, attach the required sprayer hose to the faucet's threaded tailpiece.  Step 7: Connect The Drain Pipes Assemble the trap adapter on top of the sink-drain tailpiece. Cut and dry-fit the length of the PVC pipe and attach the trap adapter to the trap and the drain elbow to the waste line. Then slide the web on the tailpiece to finely tune the length and alignment of the pipe.  Take the drain pieces apart. Clean the cut ends with a utility knife. Use a PVC primer to coat it and its mating pieces. Let it dry and hold for 30 seconds. Now you are finishing the process of how to install faucets. Conclusion The essential features of kitchens and bathrooms are the sink and faucets. The sink and faucets need to be installed properly to avoid any damage and issues later on. Taking this into account, we have mentioned how to install faucets with significant steps to be followed while installing sinks and kitchen faucets. Additional reading: Small Kitchen Storage Ideas Know About The Type Of Kitchens According To Different Size Different Types of Conversions to Make the Most of Spare space  

READ MOREDetails