Your Buying Guide to Get Your Dream Luxury Home

by

06 September 2019

Home & Garden

Luxury Homes

Luxury houses have jaw-dropping architecture, grandiose landscaping, robust and high-quality house finishes, and high-technology appliances, and of course, lavish amenities, and spacious rooms for several guests. Indeed, buying a luxury house can provide you with comfortable living facilities.

It is crucial to put all the necessary cautiousness when buying a luxury house. There are many elements you can consider before giving out your money to a home developer. That is why this article is written to give you some tips on how to get your dream Los Angeles luxury homes for sale without regrets.

Your Buying Guide to Get Your Dream Luxury Homes:

1. Look for a Certified Real Estate Agent That Focuses on Luxury Houses:

Real Estate Agent

Generally speaking, luxury houses can be hard to find because of its exclusivity. Sometimes, they don’t appear on several listing services. This is because many homeowners guarded their utmost privacy and stayed as private as possible.

A certified luxury home agent has appropriate knowledge when it comes to a luxury market. They have multiple connections and work exclusively with elite sellers and buyers. An agent should have access to different luxury properties in several cities or states. Moreover, some luxury agents focus on specific niches such as islands, villas, or beach houses.

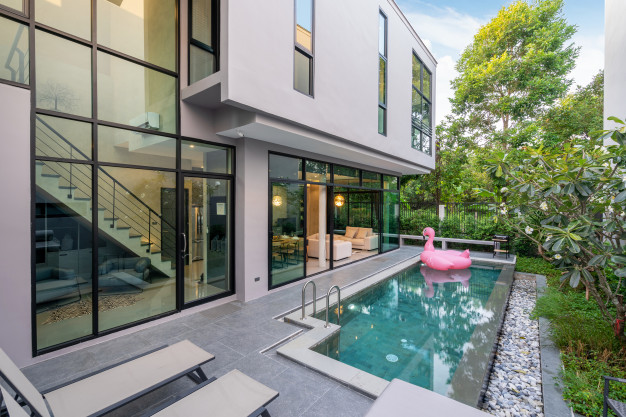
2. Don’t Get Fooled by Property Photos:

You name it, brochures, pictures, advertisements, videos walk-throughs, and reviews can’t replace the feeling of excitement when you see and feel the floor of a luxury home.

Regardless, if you need to travel hundreds of miles away or across the sea, overseas, etc. visiting the actual house is a must. This is essential because purchasing this property is one of the most significant decisions in your life.

Check the house for yourself, try the amenities, and see all the facilities and rooms if you can. It’s also advisable to visit the house not once but more often at different seasons and times.

3. Create a House Checklist:

House Checklist

Before visiting the actual house, you must first identify your needs and your expectations. Doing this can help you handle your emotions to avoid an impulsive and uneducated decision. For example, if the house has a large home theater and wine cellar, but you won’t be using them, then what’s the point of paying?

4. Manage Your Documents Appropriately:

Purchasing Los Angeles luxury homes for sale are not the same as buying a starter home or condo unit. High-end home markets carefully examine the capacity of the buyer’s ability to pay.

Therefore, managing your financial documentation before looking for a house is a must. It is essential to prove your capacity to pay a million-dollar charming home. Sellers will also determine if you can pay in cash or loan. But if you are going to purchase luxury homes, it is highly recommended to pay them in cash or check.

When buying a luxury home, ensure that you check if it will have a higher resale value, in case you decide to sell it in the future.

Read Also:

I enjoy writing and I write quality guest posts on topics of my interest and passion. I have been doing this since my college days. My special interests are in health, fitness, food and following the latest trends in these areas. I am an editor at Content Rally.

View all posts

Leave a Reply

Your email address will not be published. Required fields are marked *

Related

kitchen-2619008_960_720

Installing A Kitchen Tile Splashback – The Basics

Adding wall tiles to a backsplash can be a really simple and effective way to spruce up your kitchen sink area, as well as protecting the surface as well. Here we look at the basics. Home improvements needn't be expensive, all it takes is a little research and time and you can make a significant difference to the house you live in. Choosing tiles for a kitchen splashback can be a really simple and effective way to spruce up your kitchen sink area, as well as protecting the surface as well. For a project like this, you are likely to need little more than a couple of days to complete it, and a minimal amount of money to achieve a great result, depending on the equipment you already have. Before You Start Prepare The Wall Before you start, clear everything out of the way that may obstruct the job and/ or get broken or damaged while you work. You should also check that the wall is good for tiling as well – chances are you will choose porcelain tiles, which are heavier than more traditional ceramic tiles so the walls need to be up to support their weight. If there is any level of condensation you must wait for the wall to completely naturally dry out before you begin tiling. If the drywall you're working with isn't sound, you must repair it before you do any tiling. Plan The Design You'll need to plan your design before you can purchase your equipment or begin the project. Measure how high you want the backsplash to be from the countertop and consider the type of tiles you would like to use. If you are unsure, take a look at sites like Pinterest for inspiration. Get Your Equipment When buying your equipment, especially your wall tiles, try to start with more than you need. With porcelain floor tiles or wall tiles, it is always good to have extras in case some get damaged during the job or even years after and you need a replacement tile that matches. In order to determine how much tile requires you need to measure the length and width of the area, you are putting a backsplash on. Simply multiply the length by the width to get your desired wall tile amount. If you don't know what type of equipment you need for the job, speak to an advisor at the shop or warehouse and they will be able to advise you on the best tools for the job. Read also: Close Look At Top 5 Roofing Materials – Pros And Cons Install Once you have done all the correct preparation, it's time for you to install your backsplash. Safety First The first thing you need to do is make the area you are working in safe. All electrical appliances nearby should be either turned off if they are permanent fixtures, or moved away if they are temporary. Read also: Making Your Office Safer For Workers Clean The Area Using a clean cloth, gently wipe the area with warm water and let it dry naturally. Apply The Adhesive Using the manufacturer's instructions, apply your tile adhesive using a tile trowel. Make sure the adhesive is spread thinly and only apply enough adhesive for the area you are tiling, or it will dry before you have applied all the tiles. Lay The Tiles Place the first tile at the bottom of the backsplash in the middle. Firmly push the tile on to encourage it to settle into the adhesive and use a level to make sure it isn't wonky. Use a spacer or piece of cardboard on each corner of the tile and push them into the adhesive well. Continue to lay the tile's row by row, taking care to remove any adhesive that pushes up through the tile gaps. Ensure you are leaving enough room for grout and checking constantly that the tiles are level. Cut Tiles Away In A Separate Area Depending on the equipment you are using, you need to ensure you follow all safety procedures to ensure you are working safely. Ensure you only score tiles where the scored section won't be showing, and only score tiles when you need to, as the measurements needed may change as the job progresses. Wipe Once all the tiles have been laid you can wipe away any adhesive that has seeped out using a clean, damp cloth. Leave The Tiles To Dry You must leave the tiles to dry according to the time stated by the adhesive manufacturer. Trying to skip this process will result in an uneven backsplash and tiles that will not remain stable. Grout When mixing grout you should be wearing appropriate safety equipment such as gloves, goggles and a mouth mark. Grout the tiles precisely and carefully, taking care to wipe away any excess once it becomes firm. Once the grout has dried, you can then wipe the tiles off completely. Well Done! You should now have a fancy new backsplash to enjoy in your kitchen! Remember, if you take the time to do the job right, you should end up with a well-done backsplash that will look fantastic and last for years to come.

READ MOREDetails
how to clean evaporator coil without removing

How To Clean Evaporator Coil Without Removing?

If you want your air conditioner to perform well at all times, you will need to ensure that you maintain and clean the parts of the air conditioner on a regular basis. If you schedule your maintenance as per the requirement of the AC, then it is great. However, in some cases, people like to clean their AC themselves. If you are one of them, you might be interested to know how to clean evaporator coil without removing it when you have a dirty evaporator coil. In this article, we will basically talk about why you need to clean your AC's evaporator coil and how to clean evaporator coil without removing the coil from the AC. Before that, you will also know about what happens to the air conditioner when the evaporator gets dirty. What Happens When Your AC Coil Gets Dirty? Image Source If the evaporator coil of your AC is unclean, it puts your AC at risk. It compromises the safety and working efficiency of the AC in general. In the first, an unclean evaporator coil slows down the speed at which the air blows through the AC, as it blocks the flow of the air. If the evaporator coil contains other materials and particles like pollen and dust, it limits the efficiency of the flow of air. The following things happen when there is an unclean evaporator coil inside the air conditioner: 1. If the evaporator coil is dirty or clogged with particles, then it reduces the flow of air into your home. If there is a reduced flow of air inside your home, it will lead to a lowering of the efficiency of the cooling system of the AC. Your room takes a lot of time to cool than it normally takes, probably your evaporator coil needs cleaning. 2. There might be some cases where your room is not achieving a good level of cooling, despite running the AC for hours at a stretch. In such cases, the problem is probably more than a delay in the cooling performance of the AC. Basically, it is a negative effect on the AC's cooling capacity. 3. Another great issue that happens when the evaporator coil of your AC gets dirty is that the operating pressure increases. This increases the temperature level of the AC, as the unit is working at hotter levels. This is not good for the AC as it damages the components of the AC. 4. An unclean evaporator coil creates wear on the AC system. If one important part of the AC fails to work properly, the other parts follow suit. This is because there is more pressure on the other components of the AC. Hence, the other parts are more likely to get damaged due to the failure of one part. Therefore, you will end up with a damaged AC altogether, and repairing it will be quite expensive for you. 5. If your AC’s evaporator coil gets compromised and does not work properly, then it affects the performance of the other parts of the AC. Hence, your AC unit will have a shorter life. If you want your AC unit to perform well and serve your home for a long time, you will need to ensure that every part of your AC is clean, especially the evaporator coil. Why Do You Need Your Air Conditioner Coil Clean? Image Source You will not need to spend a lot on the repairs of the AC. Regular maintenance will keep out the issues from the AC that need repair. Before any problem turns into a bigger one, you can fix it with regular maintenance. Apart from that, if you keep your evaporator coil clean always, it will not accumulate dust and hence will perform better as a result. How To Clean AC Coils? – Things You Need? Image Source The first thing you will obviously need for your AC cleaning is an air conditioner coil cleaner. Apart from that, you will need a cotton cloth for cleaning the coil. For your own protection, wear protective goggles, and wear gloves on your hand for better protection. Furthermore, ensure that you are following the instructions properly while you are cleaning your AC’s evaporator coil. How To Clean Evaporator Coil Without Removing? Image Source The evaporator coil basically captures all the heat present in your home to condition the air inside. Apart from the evaporator coil, there is a condenser coil in the AC, which removes the air from the AC to the outside of the house. This is the way in which the AC works in colling the house. Since an evaporator is an important part of your air conditioner, hence keeping it clean will enable you to keep your air conditioner always efficient. However, if your question is, “How to clean AC evaporator coils inside house?” then you need to read the next subsection of this article. Read More: Here’s What Makes Package Units Better than the Other ACs AC Coil Cleaners - How To Clean Evaporator Coil Without Removing? Image Source The following are the ways in which you can clean the evaporator coil of your AC without removing it from the AC: Step 1: Turn down the power of the AC, and unplug the machine from the electric port. You will not need an electricity risk for yourself while cleaning. Step 2: Remove the access panel from the AC to see the evaporator coil clearly. Go over the manual of the AC, if required. The manual has instructions on where you can find the access panel. Step 3: Take the access panel off, and remove the screws from the AC. Keep the screws in a safe place. Step 4: To blow the unclean particles off, try using a compressed air canister. This will help you to easily loosen the dirt on the evaporator coil. Step 5: Put back the screws, as well as the access panel. Your evaporator coil is clean. Summing Up Hope the article helped you in knowing how to clean evaporator coil without removing it from the AC. Cleaning your AC is a part of the maintenance operation of the AC. If you maintain your AC on a regular basis, it will offer you a lot of benefits. There will be less hassle and issues on your AC as a result of regular maintenance and cleaning. If you clean the parts of your AC, your AC will look and perform as if it is fully new. Read Also: Best Paying Jobs In Electric Utilities Central How to Brew the Best Beer with an Electric Brew System 13 Ways to Maintain the Coolness of Your Air Condition Unit

READ MOREDetails
Portable Generators

Portable Generators: 5 Ways To Keep Them Clean and Running

Before purchasing your portable generator, there are two essential things you should always consider; it’s versatility and handiness. This will significantly help in cases of breakdown. How? Once you’re sure of your portable generator power and versatility, then it becomes more comfortable for you to identify it’s spare parts availability. If you want your portable generator to last longer, then you’ll have to follow the number one rule of owning a portable generator strictly. Bonus: Maintenance. Proper maintenance will ensure your portable generator works efficiently. Outlined below are five tips for maintaining your portable generator for efficiency. 1. Fresh Oil Helps Changing the oil of your machine regularly replacing it with a fresh one will maintain your engine for efficacy. If your generator is new, then it needs to be synchronised exactly after 30 hours of use. This sounds demanding and tiresome but, you’re never going to regret it. Don’t worry because as time goes by, changing the oil of your small engine will only be done after every 100 hours of use, or even after every season. It is always important to have a stock of oil or gas set aside in case you run out of power. The fact is that you’ll never know when you’re going to have extended power outages. This is to prevent your engine from corrosion. 2. Plugs & Filters Ensure that your generator has a way of igniting gas into the engine cylinders otherwise, your generator will have no use. However, maintaining your generator will have you change your plug and air filter occasionally. You can do this after using it for 200 hours or maybe once at the start of each season. Having done that successfully, your generator will have a proper fuel-air mixture that will help your generator work efficiently thus, an extension of lifespan. 3. Store Your Generator on an Empty Tank This implies that if you ’re planning to store your generator for longer, maybe a month or so. But, before you do that, ensure that you drain the fuel from the tank. However, there are necessary steps you’ll need to follow before emptying your generator’s fuel tank. First, you’ll have to add a quality gas stabilizer to the fuel tank and allow it to run for about 15 minutes. Once you’ve done that, allow your engine to cool down, then start your engine and run it until it runs out of gas and automatically shuts down. On the other hand, you may use a siphon that’s non-conductive to remove excess gas in the tank. Remember, the siphon should be non-conductive to prevent the fuel tank from static electricity. 4. Charge the Battery You can charge your generator only if it has a battery because not all of the generators use a battery. Some of the generators are electric starts feature so; they will need to charge before storing them. You can as well plug your generator’s battery in a trickle charger for freshness and availability. 5. Train in the Off-Season As you continue to store your generator, you are advised to always start it after every month allowing it to run for some few minutes. This will help keep your generator’s features lubricated because oil will be circulating through the engine. Wrap Up Had problems before maintaining your portable generator? Worry not because the above tips have provided solutions to your questions. Read More: 7 Specifications You Should Look for When Buying a Home Generator Generator Secrets that manufacturer won’t tell you Advantages of Using a Portable Solar Generator

READ MOREDetails