NY Kitchen Remodeling Transforming Your Space With Style

Published on: 17 October 2023 Last Updated on: 28 November 2023
Kitchen Remodeling

In the heart of every home, the kitchen stands as a hub of activity. It’s where culinary masterpieces are born, where families gather, and where memories are created. But what if your kitchen is no longer inspiring or functional? That’s where the magic of “ny kitchen remodeling” comes into play.

In this article, we’ll explore the exciting world of kitchen remodeling in New York, guiding you through the process, trends, and tips to transform your kitchen into a stylish and functional space.

Understanding the Need for Kitchen Remodeling

Kitchen remodeling is the need of the hour, and you must understand it for convenience. Here, we discuss some points that will provide you with an idea of kitchen remodeling. 

Assessing the Current State of Your Kitchen

Before diving into the renovation process, it’s essential to assess your existing kitchen’s layout, design, and functionality. Identify what works and what doesn’t. Take note of any outdated appliances, worn-out cabinets, or inefficient use of space.

Setting Clear Goals for Your Remodel

Once you’ve identified the shortcomings, set clear objectives for your kitchen remodeling project. Do you want to enhance storage space, improve the flow, or create a more modern aesthetic? Having a clear vision will guide your decisions throughout the process.

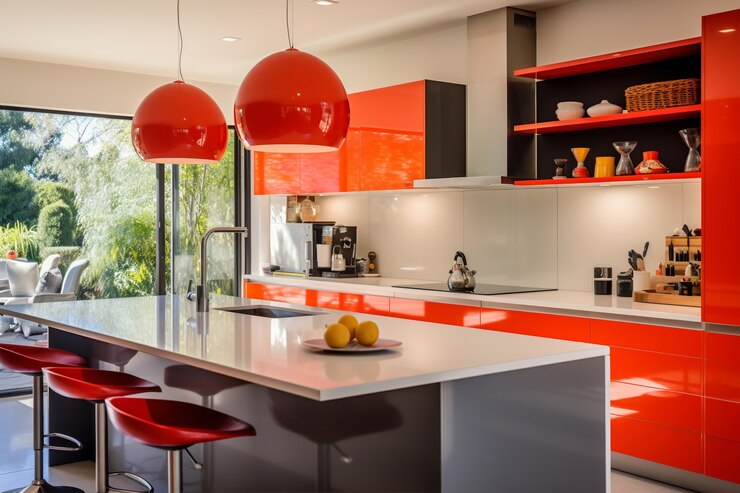
Exploring Design Trends

When you look for kitchen design, the first thing you look into is aesthetics. This section discusses some of the trends in the new kitchen’s design. The design of the modern kitchen must sync with the present requirements. So let us understand them all here.

Modern Minimalism

Minimalistic designs with clean lines, neutral colors, and streamlined appliances are gaining popularity in New York kitchens. This trend emphasizes functionality and simplicity, making the kitchen a serene space for cooking and socializing.

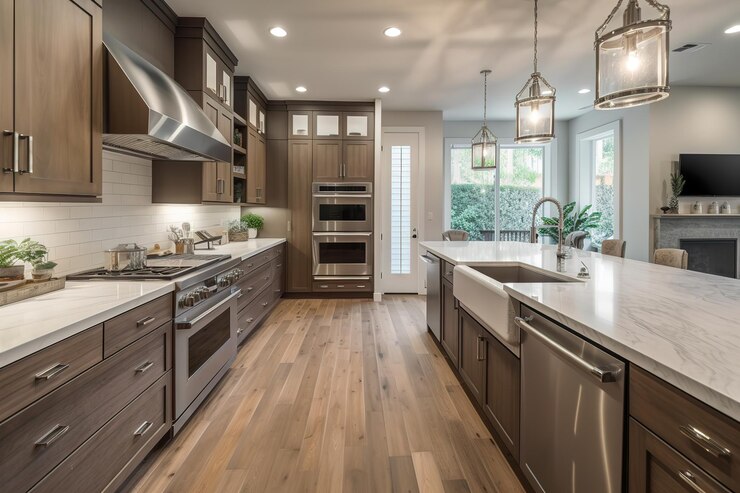
Open Concept Layouts

Breaking down walls to create an open-concept kitchen and living area is another prevalent trend. This approach fosters a sense of togetherness, making it easier to interact with family and friends while preparing meals. The open layout can easily fit today’s requirements, and at the same time, they elevate the aesthetics and the utility of modern kitchens. 

Sustainable Kitchen Remodeling

Eco-friendly designs and materials are on the rise. Incorporating energy-efficient appliances, recycled materials, and sustainable practices not only reduces your carbon footprint but also adds value to your home. Sustainability is the need of the hour. Here, we discuss some of the approaches to earn it. Let us get started with the discussion here. 

The Kitchen Remodeling Process

Here we bring forth some areas of kitchen remodelling.

Budgeting

Setting a realistic budget is a crucial step. Determine how much you’re willing to invest in your project, and allocate funds for each aspect, from cabinetry and countertops to lighting and flooring.

Hiring Professionals

Engaging experienced contractors, designers, and craftsmen is vital. They can help you bring your vision to life and ensure that the remodeling process goes smoothly.

Choosing Materials

Selecting the right materials is key to achieving the desired look and durability. Explore options for countertops, cabinets, backsplashes, and flooring that match your style and budget.

Adding Personal Touches

Personalize your kitchen by incorporating elements that reflect your personality and preferences. Whether it’s unique lighting fixtures, custom cabinetry, or a bold color scheme, these touches will make your kitchen truly yours.

Benefits of Kitchen Remodeling

There are some of the benefits of kitchen remodeling. Some people might relate it to aesthetics. But if you discuss it in the long run, it indeed has its benefits for not one but multiple reasons. Let us look at them here. 

Enhanced Functionality

A well-planned kitchen remodel can significantly improve the functionality of your space, making cooking and daily tasks more efficient.

Storage

In the UK, space is depleting; therefore, everyone within their capacity is trying their level best to enhance the storage facility. A kitchen removal focuses on using the space and creating new space. 

It indeed has its own advantages. Therefore you can say that storage indeed becomes one of the factors. With a good storage facility, you can remodel your kitchen and make it smart. 

Increased Home Value

Investing in a kitchen remodel can increase your home’s resale value, making it a wise financial decision.

Improved Aesthetics

Aesthetic upgrades can transform your kitchen into a visually stunning space, providing joy and inspiration daily.
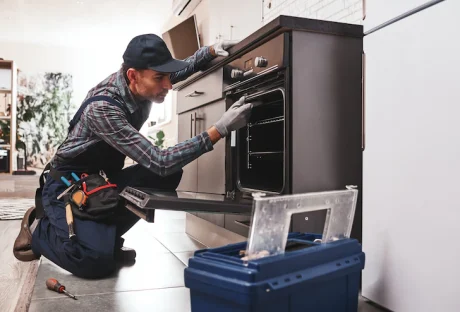
Safety 

The majority of kitchen accidents occur due to safety reasons. If your oven is outdated, If the screws of your cupboard fittings are not ready, it can indeed put you at risk. A kitchen remodel provides you with an opportunity to replace whatever is old. Thus, it reduces the risks. This is the reason people try to move whatever is old for safety reasons. 

Adding personal Touches

There is nothing better than personalization. Personalizing your kitchen is all about the efforts that you made in decking and improving the features it has. There are myriads of areas in your kitchen where you have room for personalization. You can try different ways to personalize your kitchen. 

First, you can create a noticeboard corner in your kitchen. You can leave comments or directions there for the other family members. You can also use the potted plants on the window sill. Thereafter, you can create a pegboard so tha you can access the utensils you use most frequently. 

Conclusion

To conclude, one can say that kitchen remodeling must be one of the projects that a household must prioritize. 

In the bustling city of New York, kitchen remodeling is more than just a renovation project; it’s a way to enhance your daily life. By embracing the latest design trends, carefully planning the process, and personalizing your space, you can create a kitchen that reflects your style and meets your needs.

Read Also:

Arnab is a professional blogger, having an enormous interest in writing blogs and other jones of calligraphies. In terms of his professional commitments, He carries out sharing sentient blogs.

View all posts

Leave a Reply

Your email address will not be published. Required fields are marked *

Related

led_flood_lighting

A Rundown of the Basic Led Lighting

“This blog shares some basic options available for LED lighting a house.” What is LED? The term LED refers to “Light-emitting diodes”. When these lights first made their appearance in the market, people were skeptical about their use as they emitted a bluish-white light, a bit unconventional for homes. But things have changed now. Advancement in technology and continuous researchers have made this high-efficiency LED lights to produce, the warm yellow hue that homeowners prefer in their interior. Read also: Secrets to the Perfect Bedroom Light People, worldwide have now shifted from the traditional incandescent bulbs to LED lighting in spite of their high initial cost, because of their efficiency. This high efficiency LED home lighting, ensures lower power bills, better quality of lighting and last much longer than a normal lamp. The other feature of these lamps is their versatility, which has made people switch from traditional bulbs to LED lighting. These lamps offer a varied range in lighting- from soft, cool lights to warm and crisp ones. They come in a wide range of designs and lets you play with the interior lighting scheme. Some of the variety in which LED lights are available for home décor are:  Tape, Ropes, Smart Bulbs, Pucks, Panels, and more. Here is a quick rundown of the basic options that you get with High-Efficiency LED Home Lightings inside your home:  LED Tape Lighting A flexible lighting option that can be used in two shades to create a light and shadow ambiance in a room, preferably bathrooms and kitchens. Use the usual “white” LED tape above the kitchen cabinets for a bright glow and stick “soft and warm” LED tape under the cabinets for warm illumination. LED tape light is a flexible tape of circuit boards with LED chips come with a self- adhesive back for easy installation anywhere. The tape can be cut according to preferred size. The chips are the lights that come in a range of brightness options. Read More: The Right Light Set-Up For Your Band LED Panel Lights The LED Panels are multiple of LED light chips, enclosed within a metal channel covered by a transparent acrylic case. They are brighter than the LED tapes as more LED chips are included in one space. The Panels come in a wide range of color options and can be dimmed and brightened as preferred. The LED Panels are of great use in bathrooms, for illuminating a bathroom vanity. Attached along the entire length of the mirror below and above, they give a soft, dramatic look. These panels are ideal for bathroom use as they are protected additionally by the acrylic case. LED Smart Bulbs The latest technology has brought LED Smart Bulbs in the market. The “smartness” factor in these bulbs comes from their management through smartphones, and other similar gadgets or the Wi-Fi network of a home. They allow the use of a wide spectrum of colors in lighting and also the control of the light warmth.  Use LED Smart Bulbs with Industrial Steampunk Pipe Light fixtures and change the look of your home. Ideal for a kitchen with a modern, minimalist look. Create a dramatic atmosphere by using these Industrial Steampunk Pipe Light Fixtures above the kitchen island to brighten up space and highlight it as well. You can also use this light fixture to lighten up the kitchen working space. Other than a kitchen, Industrial Steampunk Pipe Light Fixtures with LED Smart bulbs can also be used in studies as well as the poolside with appropriate interior planning. LED Puck Lighting LED lights create a pool of light in an area and let off less heat than Xenon puck lights. They are ideal for illuminating inside the cabinets and small corner spaces. The discs are ideal for creating a drama with light and shadow as the areas that fall outside the light focus, are left in the dark. You can get LED Puck lights in individual units or in kits as well. LED Ropes Ideal for outdoor lighting of a home, for patios, poolside, walkways LED Ropes to offer a soft bluish light. These are actually LED chips encased in a round plastic tube. The durability of the plastic and its waterproof nature makes LED Rope a better option of outdoor lighting. Read More:  Create A Stunning Outdoor Space With These Residential Landscape Lighting Tips Secrets To The Perfect Bedroom Light

READ MOREDetails
how to harvest lettuce

How to Harvest Lettuce: A Step-by-Step Guide for Fresh and Crispy Salads

Since lettuce plants grow best in cool growing seasons, most lettuce varieties are classified as spring or fall greens. However, if the longer days are keeping your lettuce plant producing leaves well into the summer and it hasn't bolted yet, here are some excellent tips to follow to maximize your harvest. Taking individual leaves off the plant is one way to increase its yield. Alternatively, you could sow in succession every two weeks in the early spring or fall to continue the harvest. To offer lettuces shade and protection from the hot summer sun and high temperatures, a third method is to interplant with a taller crop. Lastly, cultivators should seek out cultivars known for their slow bolting, like the looseleaf varieties "Slobolt" and "Sierra." Here is how to harvest lettuce so you can eat some leaves right away and encourage the plant to continue growing more. How To Harvest Lettuce? If you want to harvest lettuce and do not know how to go about it, here are all the details. Follow the steps closely to get the healthiest and crispiest lettuce for your salads and sandwiches. Plant Looseleaf Varieties Your lettuce variety should be ready to harvest in 35 days, according to the seed packet, which means you should have large enough leaves to pick a little more than a month after planting. By regularly picking the outer leaves, you may be able to extend the harvest until late June if you sow seeds in March or April. Begin Harvesting Early in The Season Young lettuce plants will be harmed by light frost, but mature plants can withstand it. If you live in an area where there is no winter frost, you can plant early and begin harvesting the outer leaves when they get to be 4 or 6 inches long. Your harvest can last up to 30 days longer if you plant and harvest early. Pick Lettuce in The Morning It is ideal to harvest lettuce early in the day to avoid the leaves wilting due to the intense heat. The leaves are crispest and flavorful in the morning because they contain the most water. Look For Plants with Large Outer Leaves The center of the crown is where the new growth starts on the lettuce. You must remove the largest, oldest leaves that are about 4-6 inches long. You will find these leaves on the outside of the plant. Cut or Pinch The Outer Leaves At 1/4 to 1/2 inch from the base, pinch off each outer leaf. To break the leaf off the crown, apply just enough pressure with your thumb and forefinger. Another option is to use a sterile, sharp scissor or snipping tool, though there is disagreement about whether doing so accelerates the browning of cut edges. Harvest Until it Flowers When older, mature leaves are consistently removed, the lettuce plant is encouraged to grow new leaves in their place. Harvesting individual leaves is possible until the plant produces a flower stalk, which indicates that it is ready to bolt and set seed. Lettuce turns bitter once it bolts. When to Harvest Lettuce? As soon as the lettuce is large enough to pick, it can be harvested. A seed packet will typically tell you how many days it will take to harvest. For the "cut and come again" method of harvesting loose leaves, standard-size varieties are the most effective. When outer leaves are 4 to 6 inches tall, that's the best time to begin harvesting. There are many varieties of lettuce seeds available, including blends and mesclun mixes. The best varieties to plant for a continuous harvest are called bi-colored, spotted, or loose-leaf lettuces in green and red or burgundy tones. The following are some varieties you might want to try: Black Seeded Simpson Green Salad Bowl Freckles Lolla Rossa Gourmet Mesclun Blend Deer Tongue Garden Leaf Blend Loose leaf lettuce varieties yield the best results from the cut-and-come-again method. Red, green, and oak leaf lettuce are a few examples. Additionally, you can wait to pick until a full head has matured or harvest early leaves from loose-heading varieties like butterhead and romaine. When and How to Gather Lettuce Heads The growth habit of head lettuce is akin to that of cabbage. In order to form a dense, rounded, or clumped shape, younger leaves emerge from the center, and older leaves form layers. There are two types of head lettuce: loosehead (similar to romaine) and crisphead (like iceberg). Let the crisphead varieties mature for a single harvest and keep an eye on them in accordance with the days to harvest specified on the seed packet. When the heads are dense and the appropriate size, they are ready to be picked. If you remove the outer leaves once or twice, loosehead lettuces will still head. However, the size of the fully mature head may decrease as a result. These lettuces can produce a head of looser layering or wrapping leaves (butterhead) or a clump of tall, straight leaves (romaine). Remove crispheads by chopping off the stem just below the center. Loose heads can be trimmed similarly or removed, with roots and subterranean stems cut back to the leaf base, depending on size. What Happens If a Flower Stalk Bolts A lettuce plant will eventually shoot up a flower stalk in the center, a sign that it has reached the end of its life and is ready to bolt, or bloom, and set seed. Though they might still be edible, the lettuce leaves are starting to get tough and bitter. There is no stopping flowering once this process has begun. Throw away the plant and plant again if the weather permits. Types of Lettuce There are four types of lettuce you can choose from when choosing which to grow: leaf, butterhead (loosehead), romaine, and head lettuce. When it comes to cultivation and harvesting, the main distinction is that leaf lettuce crops yield several harvests, whereas head lettuce varieties, such as iceberg, romaine, and butterhead, only yield one harvest. Leaf lettuces are, therefore, a favorite among home gardeners since you can grow them in raised beds, on the ground, or in patio containers. Keep in mind that lettuce is a cool-season crop, so you should schedule your harvest for the spring when the temperature is still cool. Such temperatures are usually around 70 degrees. Find out when the first frost occurs in your area each fall and plant appropriately. Starting fall crops from seed indoors and moving them outside as the weather cools down may be the best option. Seek out head lettuce cultivars such as Crisphead and Iceberg that you can grow from seed. In roughly six weeks, the lettuce will reach maturity and be ready for harvest after the seeds have germinated in 10 to 21 days. One loose butterhead variety that you can grow from seed or seed tape is called Buttercrunch. It takes 65 days to be ready for harvest. Vivian is one of the romaine varieties that yields soft, flavorful leaves. Directly sow seeds in the garden in the spring. Start seeds indoors in the fall and transplant them to your garden. Varieties of loose-leaf lettuce grow quickly and are enjoyable to experiment with in salads, sandwiches, and other culinary creations. Look for mesclun mixes and heirloom cultivars such as "Black Seeded Simpson." Many come in simple-to-grow seed tapes that can be harvested in roughly seven weeks. How to Harvest Leaf Lettuce? When the weather gets chilly, you can harvest salad from a leaf lettuce crop in your home garden whenever you're ready to eat. You can harvest an entire crop of lettuce at once by waiting for it to mature. However, cutting fresh lettuce leaves off as they grow is the easiest way to prepare them for consumption at any time. Depending on the variety, lettuce leaves should be harvested when they reach a length of 3 to 6 inches. Gather leaves continuously until the lettuce plant "bolts." This indicates that the plant has focused its energy on developing seeds and flowers, and as a result, the leaves typically develop tough stems and a bitter taste. How to Harvest a Full Head of Lettuce? A lettuce plant can continue to grow until it produces a full head of leaves. Use the "one and done" approach when harvesting head lettuce. Just make a clean, above-soil knife cut across the entire head of lettuce at the base of the plant. For this, a harvest knife comes in handy. Remember the seed packet and note the maturity or harvesting days. As your plants get bigger, keep an eye out for indicators of maturity, which are typically firm, full heads. Harvest in the spring before it gets too hot, usually when the daytime highs hit 70 degrees Fahrenheit. The bitter taste of the leaves and the mushy head of lettuce can result from warm weather. How to Store Lettuce? When the lettuce is inside, you can use a colander to wash the leaves and thick cotton towels to dry them so you can use them in salads and sandwiches. In case you cultivate a lot of lettuce, investing in a salad spinner would be wise. It helps dry and wash Lettuce quickly. Lettuce leaves without water should be refrigerated. For most greens, store the leaves in a loose plastic bag for approximately a week. When the salad greens are ready to be eaten, give them a good rinse in several runs of cold water and then pat dry. How to Harvest Lettuce Microgreens? Microgreens are incredibly simple to harvest! When the first true leaves appear, after ten to fifteen days of planting the seeds, they will be ready. When the microgreens are two to three inches long, harvest them if you are measuring them by height. Investigating the flavor profiles of the microgreens at various heights is enjoyable. Cut the entire plant ½ inch above the soil line with a pair of scissors or grass shears. If you need more inspiration, check out our many other interesting gardening tips for growing microgreens, like growing lettuce microgreens! How to Harvest Romaine Lettuce? The leaves of romaine lettuce (also known as cos) have the perfect amount of crunch or crispness. The lettuce plant's outer leaves can be harvested as it grows. The leaves can be chopped off one to two inches above the ground. Gathering these tender green leaves now will give the lettuce more time to ripen before full plants can be harvested. Before Romaine lettuce reaches maturity, it can take 55–70 days to grow from seed. To determine when the lettuce is ripe, examine it directly. When the romaine lettuce leaves are 6 to 8 inches tall, the ribs are firm and juicy, and the leaves have formed a tightly compacted head, the lettuce is ready for harvesting. To test if the lettuce head is firm, squeeze it. Overripe head lettuce will be tough, while young head lettuce will be soft. Harvest by making a cut an inch above the ground, saving the crown for a subsequent harvest. You can harvest the lettuce head by digging up the entire plant if it is nearing the end of its garden lifespan. Read More: Everything You Need To Know About Harvesting Basil! Loose Leaf lettuce The harvest window for leaf lettuce varieties is quite broad. After planting, the young, baby lettuce leaves can be harvested 25 days later, and the plant will mature fully in 50–60 days. Make sure your crop is harvested prior to it bolting. Since you can harvest loose-leaf lettuce more than once during the growing season, it's ideal for repeated harvesting. You can chop the entire lettuce plant 1-2" above the soil line once the leaves reach 4".  In 10 to 15 days, fresh leaves that have sprouted from the base will be ready for harvesting again if the crown is left intact.  Try spreading out your seed sowings and doing multiple sowings to ensure a consistent harvest all season long. If you want to preserve the crisp flavor of the young baby greens, you should sow them again. Another method of harvesting involves leaving the inner leaves to grow while pruning the young leaves on the outside of the head for greens. When the plants are 4 inches tall, you can begin harvesting lettuce by cutting them just above the soil line. Crisphead Lettuce When grown locally, crisphead or iceberg lettuce makes for incredibly tasty salad greens.  You might not get a whole head of lettuce, but this can be a cut-and-come-again harvest.  A single harvest is more appropriate for this green lettuce. After planting, there is a 50 to 75-day window for harvest. Iceberg lettuce can be harvested as soon as the head appears before the outer leaves turn brown and as soon as the center feels firm, and the leaves are compacted tightly. Before the crisp lettuce starts to open and the seed stalk starts to form, harvest it. More importantly, if you see the lettuce beginning to bolt—a common issue in hot weather—or the seed stalk, harvest it right away. Harvesting iceberg lettuce is best done by digging up the entire plant and then cutting off the stalk. Because of its thick stem, this lettuce plant can be challenging to harvest while it is still in the ground.  If you decide to harvest the lettuce while it's still in the ground, please take care not to harm it.  You can cut the stem just below the leaves by lifting the lettuce upwards. Wrapping Up Nothing compares to the sheer satisfaction of harvesting and regrowing fresh, new lettuce from the same plant. You are far superior to other lettuce owners if you can figure out how to harvest lettuce correctly so that it keeps growing. Thus, if you want to become a rich lettuce farmer, make sure you constantly and meticulously follow all the above steps! If you have thoughts to share or questions to ask about how to harvest lettuce, then please leave a comment below. We would love to hear from you. Read Also: Some Facts You Need to Know About Rainwater Harvesting Asparagus 101: When, How, And How Often To Harvest? Exploring Ideas For A Biophilic Home Design

READ MOREDetails
Biophilic Home Design

Exploring Ideas For A Biophilic Home Design

Biophilic design has become a popular global interior design trend. Pinterest Business reported a 100% increase in searches for "biophilic design bedroom" between 2019 and 2021.  This design approach is rooted in biophilia, humans' innate affinity with the natural world.  Moreover, it has practical applications in design. Research indicates that it can positively affect productivity and well-being.  For instance, a study showed that people spent 11% more time in biophilic-inspired hotel lobbies.  Similarly, schools in Washington State saw a 5% increase in student test scores and a 15% reduction in absenteeism with a biophilic design approach. Let us explore what interior designers suggest for a biophilic home and ideas that you must explore! Understanding Biophilic Home Designs The modern world of technology has taken a new direction towards nature. Robotics, AI, and the Internet of Things (IOT) have caused urban architects to incorporate biophilic designs.  These designs involve greenery and natural elements. It helps to improve air quality, airflow, circadian rhythm, heart rate, and human health.  Biophilic designs stimulate visual connection and enhance the multi-sensory experience using indoor plants and natural patterns.  Stephen Kellert and Edward O. Wilson, who founded biophilic designs, have made nature feel more accessible at home. He incorporates plants, sunlight, natural materials, and fresh air. How To Make Your Home Biophilic? Given below are the different aspects that you can add to your home for a biophilic design— Add Plenty Of Greens Integrating plants into your interior design can create a natural and inviting ambiance. Adding greens helps enhance the aesthetic aspects of a biophilic home, ensuring a calming environment. Moreover, indoor plants help purify the air inside your home. However, this does not necessarily mean you must go overboard and transform your home into a tropical paradise.  You can opt for potted plants, hanging baskets, or even a simple vase with fresh-cut flowers. Match your live elements with the color scheme of your decor. Most home designing experts advise you to get more succulents for your home. These plants require less watering but look amazing in every setting. Alternatively, nature-inspired artwork, botanical prints, or murals can bring the outdoors in.  The idea is to create a synergy between the artificial environment and the natural world. This home design can positively impact your mood, health, and well-being.  Therefore, incorporating natural elements into your interior design can create a more harmonious and balanced living. This biophilic element can be functional and beautiful at the same time. Enable Natural Lighting Incorporating natural light into interior spaces has numerous benefits.  Biophilic design emphasizes the connection between humans and nature. Therefore, it prioritizes light and space to create a healthier, harmonizing, and more comfortable environment.  Biophilic home designs use different components of warmth and sunlight. Natural light can blend the boundaries between the interior and exterior of a space.  For instance, large windows and skylights can allow sunlight to stream in, making a space more open and inviting. Additionally, glass roofs and walls allow you to save electricity with natural lighting during the daytime.  If you can reduce your exposure to artificial lighting, you say goodbye to stress and fatigue. It helps invigorate the body and mind.  Therefore, we can design spaces incorporating biophilic principles to improve our well-being and strengthen our connection to nature. It creates spaces that promote well-being and encourage a greater appreciation for the natural world. Use Organic Decor Items Biophilic design is a concept that aims to connect people with nature by incorporating natural elements into the built environment.  To create a peaceful atmosphere and promote a sense of well-being in your home, incorporate natural materials like leather, wood, and stone for your decor items. This brings a natural touch to the textures, colors, and forms around your home.  Furthermore, using subdued and organic color schemes can also help to enhance the calming and stress-reducing properties of biophilic design. Handcraft your decor with jute ropes,  Therefore, you can create an affordable and easy-to-maintain space with these decor items. That is aesthetically pleasing and enhances your physical and mental health. Maintain The Patio Biophilia is an evolutionary concept that suggests humans have an innate affinity for nature. This idea is gaining traction in outdoor architecture and design as well. Biophilic design is a concept that aims to create a connection with nature and its resources. To achieve this in your outdoor space, you can incorporate some major additions like the following: Eco-friendly composite decking. Vertical gardens. Green screens in small spaces.  Native plants can help support wildlife and blur the boundaries between the territory and nature. Therefore, it is essential to consider factors such as sunlight exposure and irrigation when selecting plant species for your patio.  Furthermore, incorporating water elements like fountains or cascades can help create a tranquil atmosphere.  It is also important to choose outdoor furniture inspired by nature instead of plastic. Install fire pits made of natural materials like stone or metal. This can help create a comfortable and inviting outdoor biophilic space.  Let The Air Flow Achieving a biophilic home design involves paying attention to the air circulation within each room.  You can start by determining the direction of the wind around your home. Next, open your windows accordingly to facilitate the flow of fresh air.  Additionally, you can enhance the airflow in your home by ensuring that your rooms are spacious and free of clutter.  Consider using furniture that provides ample storage space to keep your rooms organized and uncluttered. This allows the air to circulate freely throughout your home.  By creating a well-ventilated and spacious environment, you can enhance the biophilic design of your home. Therefore, bring nature indoors and improve your overall well-being. Add Water Features Adding water features like cascades, fountains, or reflecting pools to your outdoor space can incorporate a biophilic design. It helps create a serene atmosphere.  The sound and sight of water can instantly transport you to nature and induce a feeling of tranquility and relaxation. You can go for a small pond or stream in your backyard if you have a generous budget. This addition can create a more natural and immersive experience.  However, a small water fountain in your garden, patio, or deck can do the trick if you prefer a simpler option.  It's a quick and easy way to add elegance and calmness to your outdoor space! Wrap It Up With A Fire Pit Adding a fire pit to your outdoor space can significantly impact its ambiance and appeal.  By creating a warm and inviting atmosphere, fire pits can make your outdoor area a more comfortable and enjoyable place to spend time.  Furthermore, fire is a natural element that can uniquely evoke feelings of tranquility and connection with nature.  Therefore, incorporating a fire pit into your outdoor design can help create a biophilic environment that promotes relaxation and well-being. Read Also: Enhancing Spaces With Greenery: The Art Of Plant Styling In Interior Design 6 Interior Design Tips to Make Your House a Home Top 5 Interior Designers from Singapore

READ MOREDetails