How to Expand Tree Grates

Tree Grates

Trees are an essential component of any great urban landscape. They not only add a touch of beauty to a property but also help urban dwellers by providing cleaner air, cool down buildings and their surroundings, and providing a natural carbon sink. Trees can affect both the micro and the microclimates of an urban area, making them an integral part of any city’s transformational plan. If you want to transform your urban property into an enduring beauty, it’s time to start planting the best trees.

However, while trees will work great for your landscape, they have to endure a harsh environment that can cause lasting damage. Trees have to withstand car accidents and vandalism, increasing microclimate temperatures, paved surroundings, exposure to de-icing salt, wind, and the reflecting glare from buildings. This is where tree grates come in handy.

If you have an urban area or property you would like to landscape, this article explores the role of tree grating, types of grates, and how to expand these installations.

Introducing Tree Grating in Urban Landscaping

Tree Grating

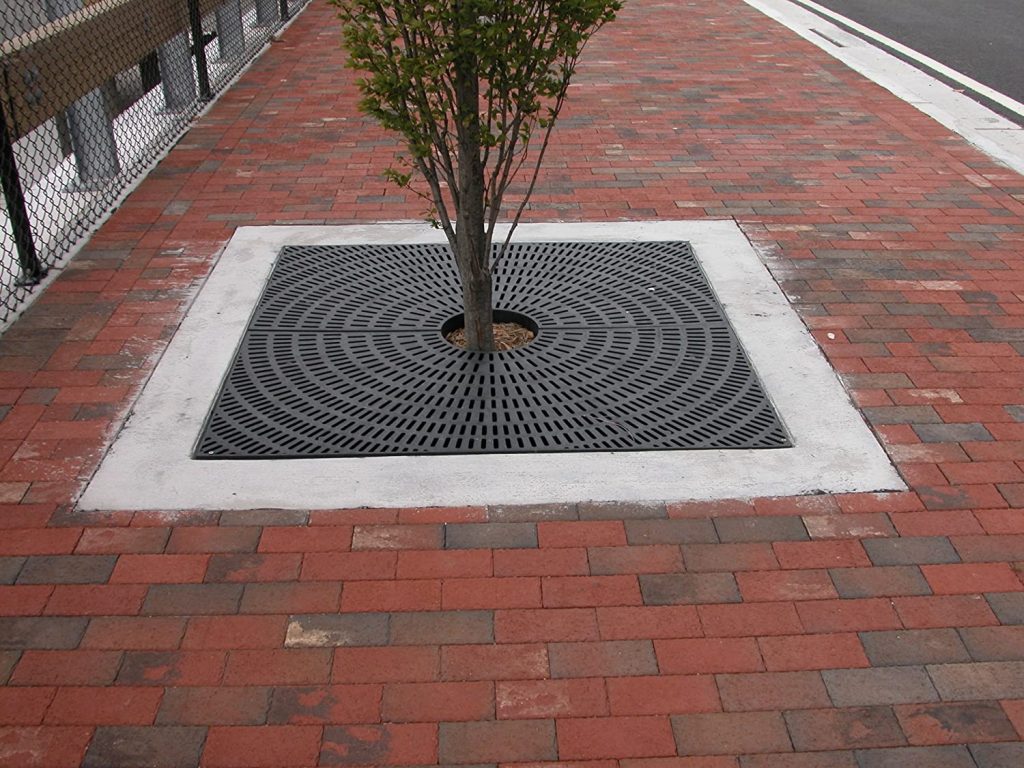
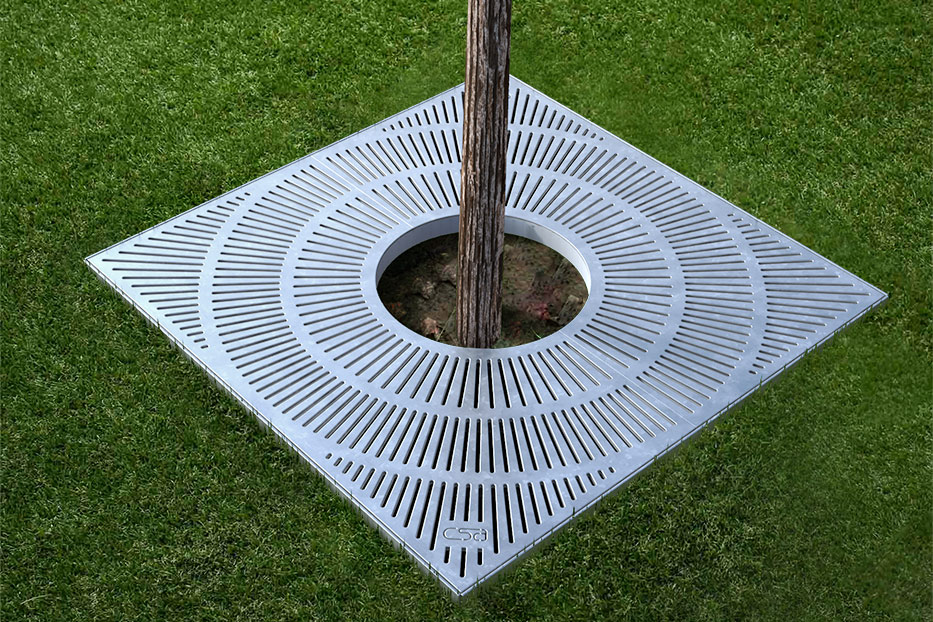
A tree grate is a ubiquitous feature in most cities but most people don’t give these landscaping features a lot of thought. This is despite the fact these installations play a critical role in protecting trees from abrasion caused by bustling urban life.

The landscaping installation protects roots that would otherwise become exposed and vulnerable to damage. The grating provides an ideal pit where roots can thrive without any dangers from pedestrians, exposure to glare, de-icing salt, and other harmful materials.

Tree grilles create a greater surface area for natural or supplemental irrigation. These root coverings also facilitate better air circulation within the covered space. Tree grating protects the soil, the rooting system, and sometimes the trunk.

If trees are left to grow without this physical protection, they might not withstand the harsh urban environment. While most people enjoy the beautiful landscaping, they don’t make any efforts to protect these trees.

Other reasons to install tree gratings include:

  1. Enhanced aesthetics: You can choose a tree grate that increases the visual appeal of your landscape. Most of the products on the market are visually appealing and are designed to improve curb appeal. These installations are easy to customize to suit your landscaping needs.
  2. Improving safety: Grates also protect pedestrians against injuries that would be caused by exposed roots.
  3. Landscaping maintenance: Maintaining a green landscape is not easy due to litter build-up from trees. However, grates help by preventing weed build-up around the tree and also make it easier to maintain the area around the trees.
  4. Diverse styling options: You can choose grates in multiple sizes, shapes, materials, and designs. This makes it easier to find that perfect grating system that suits your landscape.
  5. Flexibility: The best grates for your trees should accommodate the tree’s growth. Expanding the tree grates is an important step in maintaining your green landscape. This gives room to your trees to thrive at their different stages of growth.

You can choose grates for your trees from different materials including cast iron tree grates, natural stone, steel, recycled plastic, concrete tree grates, and other materials.

  • When choosing any tree grilles, consider:
  • The durability of the material
  • Theft and vandal-resistance
  • ADA (Americans with disabilities act) compliance
  • Ease of customization
  • Eco-friendly materials
  • Ease of installation and expansion
  • The versatility of the tree grills for different tree species.

Steps to Expand a Tree Grate

When designing and installing a tree grate, it’s important to appreciate that the tree will continue growing. This necessitates changes to the tree grille to accommodate such growth.

If a tree grate is not expandable, it might cause more harm than good to the tree. For this reason, always assess how expandable any tree grille is before you buy it.

The best tree grills are easy to expand by removing the inner center rings. This means you can continue expanding the grates as the tree continues to grow. When shopping for a grate, look for one designed for expansion.

Here are the steps for expanding a tree grate:

  1. Check the rate of the tree’s growth and identify the grate rings you should cut.
  2.  Depending on the material, use a portable hard wheel grinder with an abrasive wheel (aluminum oxide) to cut off the marked rings.
  3.  Cut through with the wheel on thin areas of the grate casting
  4. For thicker areas of the grating, (including casting edges or areas with heavy support ribs) cut halfway through the casting with the grinder.
  5. Use a heavy hammer to remove the marked areas and they should break at the core line. Before applying the sharp blow, ensure there’s sufficient support behind the casting.
  6.  Continue the process for all the grates and leave enough room for the tree trunk to grow.

Final Thoughts

Using trees for landscaping has both functional and aesthetical purposes. Tree grates are crucial for green landscaping as they protect your trees against physical damage. These installations fuse aesthetics with function to add visual appeal to an area while also protecting tree roots, managing floodwater and maintaining beautiful, neat and safe sidewalks. With time, you should expand these grates to allow more room for tree trunks’ growth.

Read Also:

Content Rally wrapped around an online publication where you can publish your own intellectuals. It is a publishing platform designed to make great stories by content creators. This is your era, your place to be online. So come forward share your views, thoughts and ideas via Content Rally.

View all posts

Leave a Reply

Your email address will not be published. Required fields are marked *

Related

Home Maintenance

Home Maintenance Tips To Keep Your Home In Good Condition

Owning a home includes a good deal of responsibility. Homeowners have dozens of minor tasks they need to keep up with if they want to avoid paying for costly repairs. With adequate preparation, though, the many maintenance tasks required of homeowners can be performed easily without taking up too much time. Read on to find brief checklists for monthly and seasonal tasks that will make it easier to stay on top of everything. Spring Maintenance Checklist Winter can wreak havoc on a home, and everyone looks forward to using spring as a time to get outside and away from the house, but homeowners should take care of a few things first. For example, spring is the best time to handle major projects like scheduling roofing services and repairs to address any damage done during the winter. Most homeowners also find that a small amount of work early in the season can help them prevent some extra hassles when summer approaches. Be sure to tackle the following. Spring cleaning, both inside the home and in the yard. Tree inspections to find signs of damage from winter storms. Reseeding and fertilizing the lawn. Properly servicing and storing seasonal equipment from winter, such as snow blowers. Conducting a full inspection of the home's exterior, including its roof, gutters, and paint. Giving the house a quick scrub. Cleaning the deck or patio. Opening the pool for summer. Summer Maintenance Checklist Getting the bulk of the major landscaping and exterior maintenance or repairs done in the spring gives homeowners more time to enjoy the summer. That said, they'll still need to take care of a few things regularly, including the following items.  Turning on the sprinklers for the season once the rain ends. Mowing the lawn and weeding the garden every week. Keeping the pool clean by scrubbing it twice a month and checking chemical levels weekly. Completing weekend home improvement projects while the weather is nice. Fall Maintenance Checklist Just like spring brings a lot of work with it because it represents the changing of the seasons, fall home maintenance requires a lot of advanced planning for the winter months ahead. Important tasks to remember include the following. Planting perennial flowers, trees, and shrubs. Harvesting annual plants. Raking leaves. Cleaning gutters. Turning off the sprinkler system. Stacking firewood for winter. Cleaning, closing, and covering the pool. Winter Maintenance Checklist Most modern families hunker down for the winter and don't worry too much about home improvement projects. However, there are some maintenance issues that must be handled in the early winter. They include these items. Preparing the snowblower for the season. Stocking up on ice melt and other supplies. Coming up with a plan for dealing with ice dams. Checking the emergency generator to make sure it's in good working order. Monthly Maintenance Checklist Not all home maintenance tasks are seasonal. Some must be performed every month of the year. They include the following elements. Changing HVAC filters. Inspecting major home systems. Checking the plumbing system for damage. Restocking cleaning supplies. Checking and cleaning gutters. Performing a full walk-through of the property. Know When to Hire a Pro Basic home maintenance tasks are easy enough to perform for someone with a DIY mindset. However, major repairs and renovations are best left to professionals. This is particularly true of projects like roof maintenance, plumbing repairs, and major landscape changes. Read Also: Cleaning Your Home with Pets – The Most Common Problems Home Maintenance Plans And Cleaning Tips During Covid-19 Some Facts You Need to Know About Rainwater Harvesting

READ MOREDetails
Your House

How To Keep Your House Clean – A Beginner’s Guide

Starting the process of tidying up and arranging your home might feel overwhelming, but it's incredibly rewarding. A clean, organized space not only brings a sense of calmness but also sets the stage for enjoyable moments with loved ones.  This beginner's manual on cleaning and organizing equips you with the essentials to kickstart your journey towards a serene living environment. So, let's get started with it. Step - 1: Begin Your Journey with Something Small Beginning with a small area can help alleviate the overwhelming feeling of cleaning and organizing your home. For example, starting in just one room or a tiny section within a room can reduce the stress associated with the task.  Once you've tidied up and organized that small space, it tends to inspire further progress.  It's like a chain reaction— as soon as you initiate the process, you'll often find the motivation to continue. The sense of accomplishment from cleaning that initial space acts as a catalyst, propelling you to tackle more cleaning and organizing tasks. Step - 2: Declutter Your Rooms. All of Them! Before diving into organizing, it's crucial to declutter thoroughly.  Start with a smaller space like your fridge. Empty its content, discarding expired or inedible items. Clean all of the surfaces using a damp cloth and your preferred all-purpose cleaner.  When clearing out various areas in your home, prioritize keeping only the things you truly need or cherish. If it's challenging to part with certain items, remember they might serve someone else while giving you more room at home.  Consider donating or selling belongings you no longer adore. Discard broken, incomplete, or heavily worn-out items. Items that are no longer in use—like old toys, baby gear, clothes, or furniture—can find new homes through donation or sale.  This decluttering not only creates space for other purposes but also makes it easier to access and appreciate the things you genuinely value and use. Step 3: Get a Cleaning Caddy for Yourself Before starting your home cleaning routine, it's helpful to prepare a portable cleaning kit that you can easily carry around.  You don't need a multitude of cleaners or tools—just include what you'll actually use. Your cleaning kit can be as simple as a bucket, plastic bin, canvas bag with handles, or any larger container that suits your convenience.  Whether store-bought or homemade, the key is to have a portable solution that suits your needs as you move from room to room. Step 4: Keep the Surfaces Clean After completing the decluttering process, it's crucial to tidy up the space before organizing. Quickly cleaning the area will impart a fresh feel, enhancing the likelihood of maintaining its cleanliness for an extended period. Here are some cleaning tips that you might need… Create a cleaning caddy for easy access to supplies.  Then clean from higher surfaces downward to catch falling debris as you progress.  Utilize a vacuum attachment to clear drawers, shelves, cabinets, or closets of any remaining debris.  Use a damp microfiber cloth to wipe surfaces, ensuring thorough cleaning. Remove any items that don't belong in the cleaned area. Step - 5: Organize Everything The crucial element in home organization is to gather similar items together.  Whether it's your refrigerator, pantry, kitchen cabinets, bathroom, living room, kids' rooms, closets, or garage, arranging items of the same kind is essential for easy access and visibility. Scattered items make it difficult to locate what you need and can lead to clutter.  By grouping similar items, you create a clear system that helps in both finding items and guiding your family when it comes to tidying up. I: How to Organize Your Kitchen? It's beneficial to begin organizing your kitchen by focusing on a small area first, as this can inspire you to tackle other spaces. The kitchen often serves as the hub of a home and sees frequent use, making it a great starting point.  Once you've sorted out your kitchen, the task of taking care of the rest of your house becomes more manageable. A smart step in this process is to begin with your refrigerator. Streamlining your fridge organization can serve as a catalyst for organizing other areas. II: Organizing Your Fridge Arranging your refrigerator involves categorizing similar food items–together for better organization. With adjustable shelves and doors, along with additional bins, you can optimize the space quite easily. Clear plastic bins are particularly helpful as they allow easy visibility of their contents. They're convenient for accessing snacks, packing lunches, and planning meals.  Here are examples of foods that should be grouped together either in bins, on shelves, or in drawers for a more organized fridge... Bagged fruits and vegetables  Cheeses and lunch meals  Fresh vegetables and fruits Sauces and condiments  Salad dressings III: Organizing the Other Parts of Your House After you've sorted one area, take the same approach to the rest of your house.  Use the refrigerator organization tips as a template for each room: clear out unnecessary items, tidy up, and then arrange everything neatly.  Remember, the key is to tackle each room gradually to avoid feeling swamped, following the same method each time. If there are any similar types of items available in your house, group them together. Clean the area once you are done with the former step. Get rid of anything and everything that you don't want to use. Step 6: Disinfect the Surface Areas and Countertops Clean the hard surfaces around your home thoroughly, including countertops, appliances, cabinets, doorknobs, light switches, TV remotes, and phones.  Disinfect surfaces that are commonly touched to reduce the spread of germs.  Create a natural disinfectant by combining one-fourth to half a cup of white or apple cider vinegar with one cup of water. They'll work like magic for you. Make It a Group Activity Collaborating as a team is a top-notch method for swiftly tidying up a house. Plan ahead with your family for a designated time and distribute specific chores among everyone.  Joining forces not only injects some enjoyment into the cleaning process but also ensures a sparkling home in no time. You can also opt for a reputable cleaning service that can help you with the process. It can seem a little more expensive than usual, but it's much more sustainable per see. Read Also: Vancouver House Cleaning Services with Local Home Cleaners Near You What You Need to Look for When Hiring House Cleaning Service 5 Hotel Housekeeping Tricks You Need To Clean Your Bathroom

READ MOREDetails
modern dining room

5 Tips for Creating a Modern Dining Room

The dining room is more than just a space where meals are taken. It is the heart of the home and the one place that brings people together. As a space where families get to spend time and enjoy delicious meals, it is only right that homeowners would want it to be stylish and luxurious. The modern dining room comes in two types; the formal dining room is a separate area from the kitchen. On the other hand, open-plan dining where the kitchen connects to the living space. For the past years, the open plan dining has gained traction among homeowners, and the formal dining room is becoming more uncommon. Why? Because the large open plan is more practical and allows them to save space. Thus, the modern dining room concept has typically become the kitchen area that transitions into the living area. So how do you proceed with creating a modern dining room? Whether you are doing an extreme dining makeover or making a few tweaks to make your dining room, there are so many options to explore to give your space a modern tone. These tips will help you give your dining space a refreshing modern vibe. 1.Add a centerpiece When creating a modern dining room, it is essential also to decorate the dining table. A contemporary table centerpiece could spice up your dining room, giving it that modern look you are going for. Depending on your style, centerpieces go from a simple vase of flowers and candles to a decorative bowl with fruits. You can even customize one by DIYing decorations. Greenery centerpieces like succulents or snake plants would also do an excellent job bringing life into space. A bonus is they are low maintenance, and you won't have to deal with withered plants frequently. Mixing different statement-making materials with bold and neutral colors to decorate the room will give it a sophisticated look. Apart from elevating the dining room's overall appearance, a fantastic centerpiece will transform your dining into a classy space. 2.Integrate wooden furniture Wooden furniture has a lot to offer in the dining room. It's simple, and its natural attribute can bring style to the room. However, before you go in over your head with displaying cabinets and sideboards, start with the basics; dining table and chairs. However, you should consider adding a wooden dining table handcrafted to meet your preferred style and needs. There is a vast choice of wooden dining tables you can add to update your dining area. A large dining design would do a great job adding comfort. Team your dining table with classic chairs to give your dining space a whole new look. Anne Quin furniture offers to handcraft modern style dining tables at affordable rates. If you crave a luxurious dining set, you can learn more about Anne Quin furniture on their site. 3.Light it up One way to make a statement in your dining space is by adding a modern lighting fixture. Pendant lightings are on-trend, and most importantly, they work perfectly in the dining room. Always remember to choose a soothing light because you want people to be comfortable. The pro tip is the bigger you go, the better it is for the room's appeal. You can choose a single large hanging pendant or install a group to make a bolder statement in the room. There are many shops filled with affordable lighting fixtures, so you have free reign, one that marries well with the existing décor and finishes in the area. A beautiful lighting fixture will bring the room together and boost its visual appeal. 4.Add a banquette A modern dining space is about mixing different aspects: classic, elegant, and contemporary. Create a relaxed vibe in the room by adding a banquette near the dining table. A banquette is an ultimate steal when modernizing your dining space; homeowners get to enjoy a modern vibe while adding more storage space. It also offers a flexible seating option which is a bonus. You can top the banquette with colorful plush pillows to cheer up the area and add comfort. 5.A gallery wall Modern dining styles are about breaking the norm, and many homeowners are embracing going bold in their dining areas. To give the room a purposeful look, you can choose to add modern art or a couple of picture frames.   Since most modern furniture tends to be sleek and cold, a wall of art would create a warm look and maintain a contemporary tone at the same time.   A beautiful piece of contemporary art will bring in some color to finish the dining room. Family photos or botanical-inspired prints could add personality to your dining space. However, ensure you use matching frames to give the room a cohesive look.   Trust us; displaying them in your dining room would look twice as good as it would on your social media. How to Create a Cozy Dining for A Rented Apartment  Moved from your hometown for work?  Want to know how to create a cozy environment? Especially in the dining space? Here is how you can.  Moving to a new city for work is exciting. But first, you need an apartment.   Then, you’ll want to make that space feel like home — especially the dining area where you’ll gather for meals and memories. Here’s how to create great dining in a rented space.  Purchase a Compact Dining Set  In a rented apartment, the space is often limited! Yes, it is a nuisance, but we have to do the most   A small round-dining table with two comfortable chairs can make the space feel intimate, and it doesn’t take up that much space. You can choose it to your liking if you prefer modern, rustic or in between.  Think About your Lighting Options  Lighting is so important to help create a warm and inviting space. A great floor lamp or a simple set of string lights can add a nice glow to your dining area.   If you’re able to, I would love the idea of installing a pendant light above the table as well.  Use Rug To Define Space  Add some seasonal greenery or flowers. A geometric rug in neutral tones will ground a black dining room and contrast the heavy pattern of your living room.  Try to keep the rug color the same as your kitchen floor for a seamless blending. This also creates a focal point, which is where all the cooking and cleaning will go on.  Sometimes, less is more when it comes to a beautiful black dining room.  Add Personal Touches  Stop searching for the perfect inspiration from the latest AD. Just do what feels right to keep it cozy!  Make the space your own with personal decorations. A small gallery wall with your favorite photos, a vase of fresh flowers, or a few candles can add a homey feel to your dining area. These touches make the space uniquely yours, even in a rental.  Keep it Functional  Lastly, make sure your dining space works for you. When space is tight, use furniture that can serve double duty. For example, a bench with built-in storage or a table that you can fold & move out of the way when not needed.  There you have it – an inviting and cozy eating space in your apartment.   A place where you can enjoy meals, put your feet up, and recharge as you immerse yourself in your home sweet home.  Final Notes!  Even though the kitchen wins many people’s hearts, the dining area will always be a special place in the home. As seen above, the simplicity and minimalism that a modern dining design calls for taking.   Different forms. These are a slew of tips you can incorporate to give your dining area a modern feel.  Remember to go for designs that complement one another to give your room a seamless pattern. If you remember these things and find the right design combo, you should be good to go.   Have fun and happy redesigning!   Read Also: Ideas to Give Luxury Feel to Your Condo How to Make your Home Look Beautiful in the Upcoming Holidays 5 Tips For Designing a Tiny House How You Can Choose the Ideal Ceiling Light for Your Living Area

READ MOREDetails