Top Easy Way To Fix Avast UI Failed To Load Error In 2024

Published on: 19 August 2021 Last Updated on: 23 December 2024
Avast UI failed to load

Avast Antivirus is the most famous Antivirus in the world. It is so popular among PC users because it offers both a Free Version and a Premium Version, which can be used in computers such as desktops and laptops. There is an Android version of this application as well. If you are not so tech-savvy, let me first tell you in short what Antivirus is.

An antivirus is software that protects your system from viruses, malware, and Spyware. Ever since the Windows 10 update, people have been reporting that they are getting an error message saying Avast UI failed to load.

Windows is infamous for providing buggy updates. The same thing was reported in Windows 7 as well as Windows 8. It’s quite sad to see that Windows, even after becoming the most used Operating System on the planet, has failed to achieve proper security, and adding to that, most of their updates are quite buggy. 

However, they fix the bugs in later updates. But the avast UI failed to load has been bothering people for quite some time now. In this article, we will suggest a few troubleshooting methods, following which you can sort out the issue. 

What Causes Avast UI Failed To Load?

Here are some of the root reasons listed below for this error.

  • There is a good chance that this error pops up because of some error in the configuration of Windows. 
  • Another reason for showing Avast UI Failed to Load pop up is that you might be using more than one antivirus simultaneously on the same device.
  • The last reason we could think of is if there is any problem with your system’s Remote Desktop Services.

How Can You Fix Avast UI Failed To Load Issue?
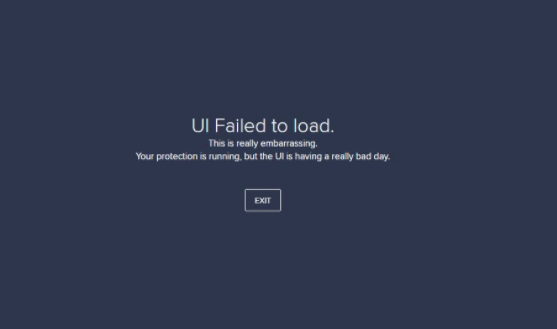
UI failed to load

In order to fix the “Avast UI Failed to Load” issue, you need to check a few things first. Make sure that you have exited the Antivirus. Restart Avast Antivirus. But still, if the issue is not fixed, you can follow these procedures to say bye-bye to this issue. 

Procedure 1: Turn On The Remote Desktop Services
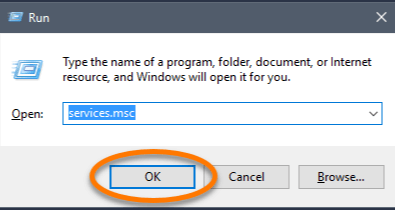
Remote Desktop Services

What you need to do is press the Windows key and R simultaneously. This will open up the RUN box. 

After having that box on your screen, you have to type ‘services.msc’ in that box and press the enter key.

Now check for the Service Page. After finding the Service Page, you have to search for Remote Desktop Services. After you have found the remote desktop services, what you need to do is right-click on it and then select the option of ‘Properties.’
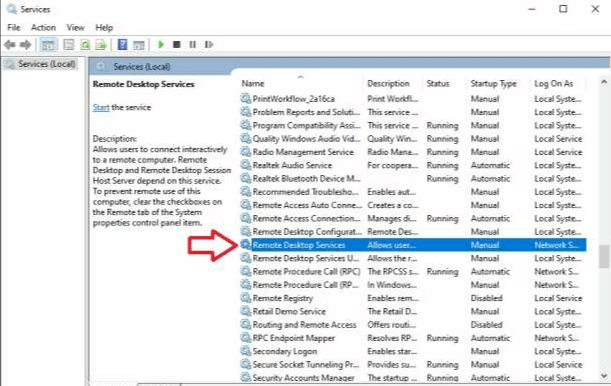
remote desktop

After clicking on properties, you have to double-click on the button that says start and set the startup type to automatic. After you have done that, click on ‘OK” to confirm the changes you have made. Now, you have to close the services page and manually restart your PC, laptop, or whatever you are using. It will complete the process. If you are still facing Avast’s problem, UI failed to load, then kindly follow the next procedure closely.
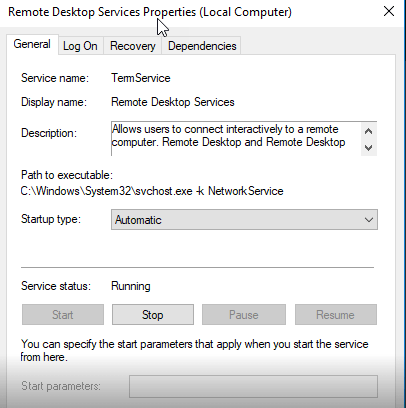
  

parameters

Procedure 2: Try Repairing The Avast Antivirus Software

Kindly follow this procedure closely to repair. You have to go to the Control Panel Section. You can find the Control Panel in the settings section of your computer. If you do not know how to open the control panel.

Click on the start button and type the control panel. After opening the Control Panel, search for the Program & Features option, find it, click on it, and look for Avast Antivirus software. Now, you need to right-click on Avast; you will get the option to uninstall/change. 

Be very careful while doing this, as a single mistake can uninstall Avast from your PC. Select the option to repair after having clicked on change. Now, you need to wait for Avast to repair itself, and after Avast completes its repair, reboot your PC. If the error of avast UI failed to load persists, kindly follow the next procedure.

Procedure 3: Uninstall And Reinstall Avast Antivirus Software 
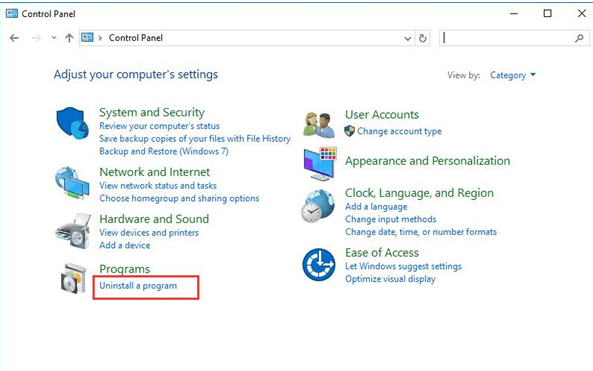
uninstall and reinstall

If any of the above methods did not work for you, then you try to uninstall Avast Antivirus. To uninstall Avast Antivirus Software, you need to open the Control Panel. You can open Control Panel by merely typing Control Panel in the Run dialog box; another way to open Control Panel is by searching the control panel after clicking on the Start button. 

After opening the Control Panel, go to the programs and features section and find the Avast Antivirus software. Right-click on it and select uninstall this time instead of selecting change as you did in the previous procedure. 

Please wait for some minutes for Avast Antivirus Software to completely uninstall itself from your computer. Reboot your computer as the final step of the process. Switch back on your computer, download Avast from the official website, and install it again as a whole new software.

Make sure you do not do anything else on your computer while Avast Antivirus is being installed, as it puts extra pressure on the computer’s RAM. After the installation process, open Avast and check if the Avast UI failed to load the error persists. If it does, kindly follow the next procedure. 

Procedure 4: Get The Recognition Issue Fixed

If the error of Avast UI failed to load persists, you could follow the last and final procedure.You need to look up from the Avast icon on your desktop and Open the shield’s control. In shields control, right-click on the Disable to disable the shields. You will get the option to disable it for 10 minutes to an hour. Disable it for 10 minutes, wait for 10 minutes, and check if the ‘avast ui failed to load’ issue persists. If the error is still showing, then try out some other methods.

  • Press the Windows Button and R buttons simultaneously. It will open up the Run dialog box. Type cmd in that box so that it opens the Windows Command Prompt Box. Type ‘winmgmt/verifyrepository’ on the search field and hit the enter button. 
  • If it shows the status as inconsistency, you need to type ‘winmgmt/salvagerepository’ in the search field and press the enter key to finish the process.
  • If the result shows that the Windows management instrument was consistent, you need to type ‘winmgmt /resetrepository.’ 
  • After doing that, Windows will send you a message showing that the WMI repository has been rebuilt successfully.

Finally, you need to reboot the system and start Avast antivirus, and hopefully, it will not show the error of Avast UI failing to load. We are sure that after trying all these steps, your Avast Antivirus will run just fine. But still, if the error exists, we suggest you contact Avast Customer Care as soon as possible.

Procedure 5: Update Your Avast Software

Most of the time, what can fix such an error message is a simple update. Fortunately, you can update the app without the hassle of having to re-download the app. Redownloading can be a viable option if you cannot access the interface at all. Here is how you can update Avast Antivirus as well as other Avast applications that offer easy updates to its users.

  1. Press the Windows+X keys at the same time, then select the app and features from the context menu.
  2. Find the Avast Antivirus or any other app that is causing you to see the UI failure arrow. Click on it, and from teh options that unfold, choose Uninstall.
  3. Click the Update button and wait for the software to locate any new updates that might be ready to download. It will automatically install the latest version, which will take quite a bit of time, depending on the configuration of your system.
  4. When the repair process is complete, launch the Avast app that you were having trouble with. This should get your app up and running.

It is possible that updating the Avast app the way mentioned above will fix the internal corruptions or missing files, thereby restoring the UI. But if you are still facing the same issue, try speaking to Avast Customer Support.

Conclusion

Avast is one of the best antiviruses in the market. The story of avast goes way back to 1995. Initially, it did not offer the best of services, but they have been improving their services year by year. It’s one of the few antiviruses that offer a premium version and a free version as well. 

Do not think that the free version has limitations like other antivirus software because it’s not so. The free version provides a few premium features, which include a WIFI inspector and ad blocker, etc.

However the recent trend of Avast showing that the Avast UI failed to load is not what users are expecting. Whether it’s the fault of Avast or Windows 10 is yet to be found out. Rest assured, you can try the above procedures to get rid of the issue.

You May Also Like:

Content Rally wrapped around an online publication where you can publish your own intellectuals. It is a publishing platform designed to make great stories by content creators. This is your era, your place to be online. So come forward share your views, thoughts and ideas via Content Rally.

View all posts

Leave a Reply

Your email address will not be published. Required fields are marked *

Related

Scan

How To Scan From Printer To Computer?

Even been assigned the task to edit a file and scan it back? You might have wondered how exactly you would do that. The question of how to scan from a printer to PC can be tricky and you might need a little assistance in this aspect. Scanning a file from a printer to your PC can be an easy task for you if you follow the instructions given below. The following are the steps you need to follow to easily scan a document from your printer to your PC or laptop. Multifunction Color Laser Printers are the best when it comes to printing colorful images. Connect your computer to the scanner: First of all, you need to make sure that your PC or laptop is connected to the scanner. If it is not connected, then connect the scanner to your computer. Both the machines should be connected to a cord, as well as both of them, should be connected to your WiFi. Place the file on the scanner: Now you have to place the document, which you wish to scan, face-down on the scanner. Once you have properly placed the intended document, close the lid of the scanner. Open ‘Fax and Scan’ on your computer: Now, using your PC or laptop, select ‘Start’. You can find the ‘Select’ option on the lower-left corner of your screen. Now navigate to desktop apps and open ‘Fax and Scan.’ You can also open ‘Fax and Scan’ by typing this name on the search bar. Checking if the printer is correct or not: Once you have opened the ‘Fax and Scan,’ navigate to the ‘New Scan’ tab and click it. You can find the ‘New Scan’ tab on the upper left corner of the screen of your PC or laptop. A new window will be opened when you will click on the ‘New Scan’ tab. Now you need to make sure that the printer is correct. Navigate to the upper left corner of the newly opened window and check whether the printer is correct or not. If the printer is not correct, click on the ‘Change’ option, and choose the correct printer you want to use. Picking the right settings: Now, you need to pick up the right settings before scanning your file. Firstly, select the right type of file. You can choose the file type in the ‘Profile’ section. Now choose whether you want to print a ‘black and white’ document or a ‘colored’ one. Now choose the type of file you want your file to be saved as such as the PDF or JPEG format. Now, you can adjust other settings such as brightness, resolution, and contrast etcetera, if you want to. Scan the document: After you have picked the right settings, make sure that you preview the file before scanning it. If something does not look right, you can adjust it now. If you want to make any changes right now, you need to repeat the process to ensure that the document is completely right before you scan it. Finally, click on the ‘Scan’ option and your document will be scanned. If you want to find the scanned document, open file explorer, and navigate to the Documents folder. You will find the Scanned Documents folder in the Documents folder. Read also: Paper Authority: Basic Tips in Purchasing a Printer 7 Ways To Stop Spending So Much On Printing In Your Business Advance Copier: Printing Quality Business Cards On Your Own Computer

READ MOREDetails
Prepaid SIM Cards

3 Best Prepaid SIM Cards For Tourists Visiting The USA

If you're planning on traveling to the USA, you might be wondering how you're going to stay connected to your friends and family back home while exploring this incredible country. A lot of people assume that they'll have no choice but to use their phone carrier's international roaming plan while they're in America - and if you're someone who only occasionally makes calls or sends text messages, then this will probably work out fine for you. The US prepaid SIM card industry has grown over the last few years, meaning there are more options than ever before when it comes to choosing the best prepaid sim card USA for tourists to use during their trip to the USA. Whether you’re looking for an affordable choice with unlimited data, or you need something that’s easy to set up and includes international calling features, these three prepaid USA SIM cards have been chosen as the best options based on their benefits and features. Read on below to find out more about each one! 3 Prepaid SIM Cards for Tourists Visiting the USA 1. ATT The AT&T GoPhone sim is a good choice for visitors to the United States, particularly those who plan on spending most of their time in large cities or near top tourist destinations. With unlimited data and texts, you'll be able to stay in touch with friends and family back home. You can also add additional data if you find yourself needing more, which is a feature that isn't offered by many other prepaid options. And while there's no free roaming outside of North America, AT&T offers discounted rates that are reasonably priced. The biggest drawback to AT&T is its coverage -- especially if you're visiting small cities or rural areas. Data may not work as well as it does in more populated areas. 2. Verizon The Verizon Wireless prepaid plan, $60 a month, is worth considering if you like larger data buckets and unlimited talk and text. The plan comes with 4GB of data and unlimited calling to Mexico and Canada. Then it’s throttle-down on mobile speeds once you cross over into your data allotment—but at least it won’t cost you any more money after that. You can share your pool of high-speed data across up to 10 devices (smartphones, tablets, etc.), so long as they have been on your account for 30 days. Alternatively, they can access slow 2G service while connected through Wi-Fi instead. 3. T-Mobile If you’re looking to make international calls while in the US, T-Mobile is a great choice. Not only does it have some of America’s fastest LTE networks, but it also offers unlimited text and data roaming to over 100 countries. Plus, you get up to 10GB of 4G LTE mobile hotspot use with an eligible smartphone plan. Your data speeds might slow down after that (due to congestion on their network), but your service will still work. If you need more than 10GB, though, I recommend going with Verizon instead. They offer 15GB of LTE mobile hotspot usage per month, along with faster overall speeds when using your phone as a hotspot. Their TravelPass feature also allows you to use their service as if you were at home. You just pay extra for every gigabyte used (or purchase additional data passes). Also, note that Verizon is better if you want an unlocked phone – they are one of two major carriers (along with AT&T) that don't sell phones locked into a specific carrier or contract. Finally, be aware that there are no T-Mobile stores in Las Vegas airport – they do have them throughout most major cities, however. Additionals: Best Bulk Sd Cards Of 2020 – Review And Buying GuideGuide For Choosing a Smartphone: Top TipsBest Performing Routers In 2021

READ MOREDetails
hard drive

Different Ways to backup your hard drive explained

If you have not been backing up your data, you are not playing safe. It is a practice that you should make a habit of. Why? There is a high risk for you to lose your data when your hard disk drive fails when your computer is stolen when a disaster strikes, or when malware infects your computer. It is imperative for you to safeguard yourself from these incidents, and the only effective way to achieve this is by backing up your hard drive. Besides, backup methods save you time and money, and they could give you a competitive advantage. Additionally, some data is irreplaceable and losing it would be a disaster. That’s why this article will explain some of the ways to back up your hard drive. Local drive : One of the best and most efficient ways to back up your data is by transferring all your data to a local drive – one that is separate from your computer. Backing up on another hard drive is an easy and quick process, especially if you have several drives attached to the system. You could back up your databases and files to an external drive, a USB flash drive, or even a secondary drive. Moreover, you could save your hard drive data to a different drive on a computer that is connected to your network. Keep in mind that the backup process when using a local drive varies. You have to ensure to carry out the backup steps appropriately. It could save you a lot of trouble when your data gets lost. Cloud storage : Another effective way to back up your hard drive is by relying on cloud storage services. In recent times, this backup method has become one of the most revered. Its popularity has risen because it can be done automatically, and you get a particular amount of storage space for free. Moreover, you could access your files and data from any location so long as you have a good internet connection. There are some cloud storage services, and you should choose the one that works best with the size of your data and files. You can test these services for yourself by logging on to ottomatik.io, which is one of the best cloud storage services. Other reputable cloud storage services include OneDrive, Google Drive, Box, and Dropbox. Some of these storage options are free, some require you to pay, while others are free but with paid extras. Drive cloning : Well, if you have considered other backup options and you are still not content, you might want to consider drive cloning. It is another effective backup option; albeit not as popular as the methods above. So, what exactly does it entail? It works through a clone hard drive, which is a second drive that has an exact mirror image of your original hard drive. Unlike in the earlier days when drive cloning was an expensive strategy, storage management companies have come up with excellent software, making the process more seamless. Using the software available, you can create an exact image of your hard drive fast add efficiently. 3-2-1 strategy : The whole idea behind backing up data and files is to ensure that all vital information is fully protected. That is why you should consider a 3-2-1 backup strategy. It is a strategy that requires you to rely on multiple backup options. When you choose this strategy, you should ensure to create three copies of your hard drive data to avoid losing it. You should also ensure that you store one copy of the data you’ve backed up off-site. This ensures that your data is safe from natural disasters and theft. Also, you need to utilize two data formats. With this strategy in place, you will hardly lose any data. Conclusion : There are numerous backup options, and all are meant to protect your hard drive from total data loss when a natural disaster strikes or your computer crashes. Backing up your data helps you save a lot of time, effort, and money that you would spend trying to recover lost data. You might want to consider one or all of the methods mentioned in this article. They could save you a lot of trouble.  Read Also :  5 Indispensable Things To Keep In Mind While Picking A Hard Drive How To Securely Wipe Your Confidential Data From A Hard Drive 5 Actionable Mobile Marketing Tips That Drive Sales

READ MOREDetails