Published on: 11 May 2021
Last Updated on: 02 January 2025
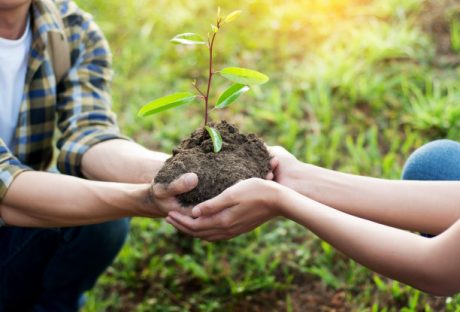
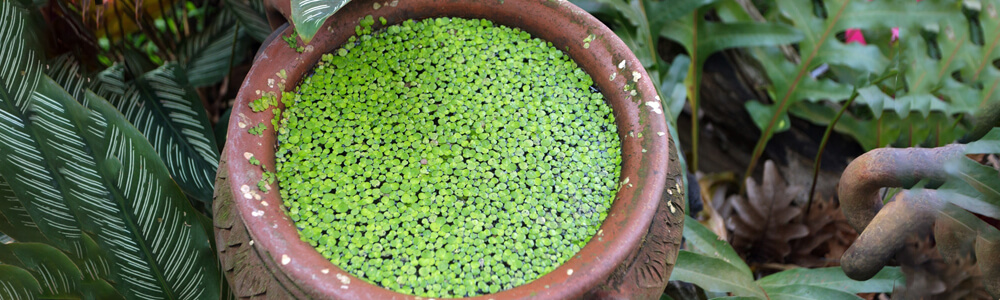
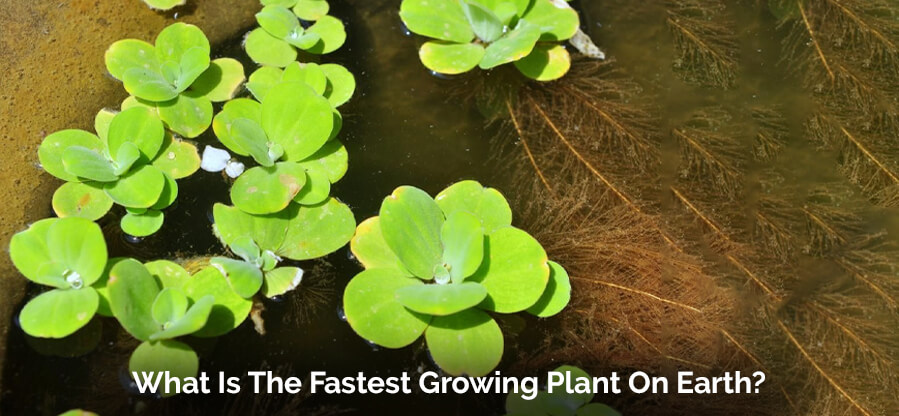
What is the fastest growing plant on earth? The answer to this question is Duckweed which is known as the fastest-growing plant in the world in 2021.The Duckweed family consists of 37 species and can be found pretty all over the globe. Besides, this plant is also known as Wolffia, a plant that is easy to harvest and float on water. It grows very fast that you have never imagined of.Wolffia is found everywhere in freshwater and has become a subject of fascination for scientists. This plant acts much like a weed, although it is eaten by humans, animals, and ducks.
What Is The Fastest Growing Plant On Earth?
As already discussed above, the fastest growing plant on earth is Duckweed, also known as Wolffia. This plant is a tiny type of duckweed that grows faster.On the other hand, you are probably familiar with this plant (duckweed) that is found on ponds where several green beads seem to form a lid on water sources. The genetics underlying this strange little plant’s success has long been a mystery to scientists.The Genome Research of February 2021 will help scientists to know how plants grow up so fast and what are the functions that allow them.
What Makes Wolffia (Duckweed) The Fastest Growing Plant In the World?
There are various reasons why Wolffia is known as the fastest-growing plant in the world. Many individuals are taking the benefit of this unusual crop as it is extremely high in protein and is a part of some Southeast Asian cuisines. This plant reproduces very quickly. According to many types of research, Wolffia is regarded as the fastest growing plant in the globe. About forty percent of the plant’s genes are influenced by this time of day factor. Wolffia, clocks in with only 13 percent of its genes restricted by time.
Can You Speed Up Growing Rate Of Plants?
Smaller plants and trees grow faster than bigger versions of the same tree and plant because of the root ratio. These variants grow fast as they highlight a great balance of roots to top growth. On the other hand, the plant and trees can place all their strength into top growth enables it to grow taller. And fast-growing plants only grow as fast as their roots support. Besides, if you are growing plants, they must be planted right. In order to encourage deep root growth, you can also give continuous watering to the same.
The Final Thoughts
Duckweed is the fastest growing plant on earth and this is the correct answer to your question. The characteristics of the same are described above and if you have any queries about the same, you can specify them below in the comment section.
Content Rally wrapped around an online publication where you can publish your own intellectuals. It is a publishing platform designed to make great stories by content creators. This is your era, your place to be online. So come forward share your views, thoughts and ideas via Content Rally.
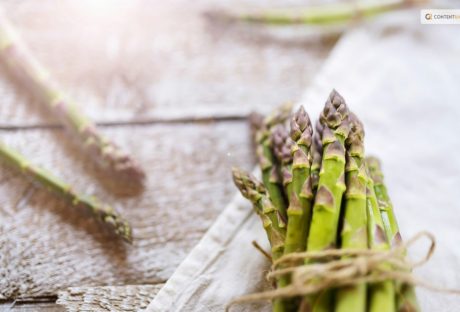
If you are a gardener like me, you must have thought about harvesting greens that you eat at restaurants at your house. One of these days, I was with my friends from my university, and we were discussing the importance of eating veggies for staying healthy. And they could not figure out the best ways to effectively do so. Reading my previous blog about cilantro, Laila asked me, “how to grow and harvest asparagus?”
Well, surely asparagus is one of the most delicious and nutritious vegetables you can grow in your garden. But what a lot of people do not know is that it's also one of the easiest once you know how to harvest asparagus properly.
In this article, I will cover everything you need to know about harvesting asparagus, from when to start, how to cut, and how often to do it. Additionally, I will also share some tips on how to store and freeze asparagus, as well as the benefits of eating this green wonder.
So, keep on reading till the end to learn more...
How Does Asparagus Grow?
Before I dive into the seemingly difficult process of how to harvest asparagus, let me help you grow it.
Asparagus is a perennial plant that grows from a crown of roots that can live for up to 20 years. The crown produces spears, which are the edible part of the plant, every spring.
The spears grow rapidly, sometimes up to an inch per day, and can reach a height of 6 to 10 inches. The spears are harvested before they open into fern-like leaves, which are edible and tough.
Asparagus grows best in well-drained, sandy soil with a pH of 6.5 to 7.5. It prefers full sun and moderate temperatures and needs regular watering and fertilizing.
Asparagus can be grown from seeds or crowns, but crowns are easier and faster to establish. Crowns are planted in trenches about 12 to 18 inches apart and covered with 2 to 3 inches of soil. As the spears emerge, more soil is added until the trench is filled
Benefits of Asparagus
https://giphy.com/gifs/food-asparagus-taylor-lee-nicholson-pejh5q5BBXxi2m4PgF
Asparagus is not only tasty, but also healthy. It's low in calories and high in fiber, vitamins, minerals, and antioxidants just like spinach. It can help lower blood pressure, regulate blood sugar, support digestion, and prevent urinary tract infections.
Asparagus also contains a compound called asparagine, which is a natural diuretic that helps flush out excess fluids and salts from the body. Asparagus is also a good source of folate, which is essential for pregnant women and fetal development
When to Harvest Asparagus?
The first year after planting, you should not harvest any asparagus spears, as they need to grow and strengthen the root system.
The second year, you can harvest a few spears for a short period, about two to three weeks.
The third year and beyond, you can harvest asparagus for a longer period, up to eight weeks, depending on the climate and the health of the plants.
The best time to harvest asparagus is in the early morning when the spears are crisp and tender. You should harvest asparagus when the spears are about 6 to 10 inches tall, and before the tips start to open up. If you wait too long, the spears will become woody and bitter.
How to Plant and Care for Asparagus?
Asparagus is a long-term investment that can reward you with years of delicious harvests. However, it requires some planning and preparation before planting.
Here are some steps to follow to plant and care for asparagus:
Choose the Day
Choose a sunny and well-drained spot in your garden, preferably with sandy or loamy soil. Avoid areas where water tends to pool or where weeds are hard to control. Asparagus also needs plenty of space, so make sure you have at least 4 to 5 feet between rows and 12 to 18 inches between plants.
Prepare the Soil
Prepare the soil by adding organic matter, such as compost or manure, and adjusting the pH to 6.5 to 7.5. You can use a soil test kit to check the pH and nutrient levels of your soil. You may also need to add some fertilizer, such as 10-10-10 or 10-20-10, to boost the phosphorus and potassium content.
Dig it Deep
Dig a trench about 8 to 12 inches deep and 12 to 18 inches wide. You can make the trench longer or shorter depending on how many asparagus crowns you have. Asparagus crowns are the dormant roots of the plant that you can buy from nurseries or online. They usually have one-year-old or two-year-old crowns, which are more reliable and productive than seeds.
Fertilize
Spread some fertilizer along the bottom of the trench, about 2 pounds per 100 square feet. Then, cover the fertilizer with 2 to 3 inches of soil, forming a ridge in the center of the trench.
Placing the Plant
Place the asparagus crowns on top of the ridge, about 12 to 18 inches apart, with the buds facing up. The crowns should be slightly below the soil surface, about 1 to 2 inches deep. Do not bury them too deep, as this will delay the emergence of the spears.
Focus on the Crown
Cover the crowns with another 2 to 3 inches of soil, and water well. As the spears grow, gradually fill in the trench with more soil, until it is level with the ground. This will help protect the crowns from frost and weeds.
Add Mulch
Mulch the bed with straw, leaves, or wood chips, to conserve moisture and prevent weeds. You can also add some organic fertilizer, such as fish emulsion or seaweed extract, every few weeks during the growing season, to encourage healthy growth.
Keep in Mind
Do not harvest any asparagus spears in the first year, as they need to establish a strong root system. In the second year, you can harvest a few spears for a short period, about two to three weeks. In the third year and beyond, you can harvest asparagus for a longer period, up to eight weeks, depending on the climate and the health of the plants.
How to Harvest Asparagus?
Now, coming to the most important part that you wanted to know about. Let us talk about the ways to harvest asparagus!
To harvest asparagus, you need a sharp knife or a pair of scissors. You should cut the spears at the base, about an inch below the soil surface.
Be careful not to damage the crown or the emerging spears. You should also avoid cutting too many spears from one plant, as this will weaken the plant and reduce the yield. A good rule of thumb is to leave at least one-third of the spears on each plant.
You should harvest asparagus every day or every other day, depending on how fast the spears grow. You should stop harvesting asparagus when the spears become thinner than a pencil, as this indicates that the plant is running out of energy.
You should then let the spears grow into ferns, which will replenish the crown and prepare it for the next season.
How to Store and Freeze Asparagus?
Unlike lettuce, which you can store for more than a week, asparagus is best eaten fresh, as it loses its flavor and texture quickly. If you can't eat it right away, you should store it in the refrigerator for up to a week.
To keep it fresh, you should trim the ends of the spears and stand them upright in a glass of water or wrap them in a damp paper towel and put them in a plastic bag.
If you want to preserve asparagus for longer, you can freeze it. To freeze asparagus, you should first wash and trim the spears, and then blanch them in boiling water for two to three minutes, depending on the thickness.
Blanching is a process of briefly cooking and cooling the vegetables to stop the enzyme activity that causes them to spoil.
After blanching, you should drain and cool the spears, and then pack them in freezer bags or containers, leaving some space for expansion. You can freeze asparagus for up to a year, and use it in soups, casseroles, or stir-fries.
How to Prevent and Treat Asparagus Pests and Diseases?
Asparagus is generally a hardy and resilient plant, but it can still suffer from some pests and diseases that can affect its growth and quality.
Here are some of the most common problems that affect asparagus plants, and how to prevent or treat them:
Asparagus beetles
These are small, black or red beetles that feed on the spears and the ferns, causing them to wilt and turn brown. They can also lay eggs on the spears, which hatch into larvae that chew on the stems and leaves.
To prevent asparagus beetles, you should keep the area around the plants clean and weed-free, and remove any old or damaged spears. To treat asparagus beetles, you can hand-pick them and their eggs, or spray them with insecticidal soap or neem oil.
Fusarium wilt
This is a fungal disease that infects the roots and the crowns of the plants, causing them to rot and die. It can also cause the spears to become yellow, twisted, and stunted. Fusarium wilt is more likely to occur in poorly drained, acidic, or infested soil.
To prevent fusarium wilt, you should plant disease-resistant varieties, rotate crops, and avoid overwatering or injuring the plants. To treat fusarium wilt, you should remove and destroy any infected plants, and apply fungicides to the soil.
Rust
This is another fungal disease that affects the ferns, causing them to develop orange or brown spots and pustules. Rust can reduce the vigor and yield of the plants, and make them more susceptible to other diseases. Rust is more likely to occur in humid, wet, or shady conditions.
To prevent rust, you should plant resistant varieties, space the plants well, and prune any excess or infected ferns. To treat rust, you should apply fungicides to the ferns, and avoid watering them from above.
Crown rot
This is a bacterial disease that causes the crowns and the bases of the spears to become soft, mushy, and foul-smelling. Crown rot can spread quickly and kill the plants. Crown rot is more likely to occur in wet, compacted, or poorly drained soil.
To prevent crown rot, you should plant healthy crowns, improve the drainage and aeration of the soil, and avoid overwatering or injuring the plants. To treat crown rot, you should remove and destroy any infected plants, and disinfect the tools and the soil.
Bonus: How to Cook and Enjoy Asparagus?
There are many ways to cook and enjoy asparagus, from steaming, boiling, roasting, grilling, to sautéing. The key is not to overcook it, as it will become mushy and lose its flavor.
You should cook asparagus until it is bright green and crisp-tender, which usually takes about 5 to 10 minutes, depending on the method and the thickness of the spears.
You can season asparagus with salt, pepper, butter, lemon juice, garlic, herbs, cheese, or any other condiments you like. You can also pair asparagus with eggs, bacon, ham, chicken, fish, pasta, rice, or salad. Asparagus is a versatile and delicious vegetable that can complement any meal.
Wrapping It Up!
Asparagus is a wonderful vegetable that you can grow and harvest in your own garden. It's easy to care for, once you know how to harvest asparagus properly.
You should harvest asparagus when the spears are about 6 to 10 inches tall and before the tips start to open up. You should cut the spears at the base and leave some on the plant to grow into ferns. It would be best to store asparagus in the refrigerator for later use.
And yes, you should also enjoy the many benefits and flavors of asparagus, by cooking it in various ways and pairing it with different dishes. Asparagus is a springtime delight that you don't want to miss.
Learn More About:
Planting & Harvesting Mint
7 Health Benefits of Black Seed Oil
Spirulina: The Complete Plant Based Protein Source | Health Benefits
Garden fences are an essential part of any outdoor space, providing privacy, security, and aesthetic appeal. One way to enhance the look of your garden fence is to plant greenery on it.
Not only does it add visual interest, but it can also provide shade and habitat for birds and other wildlife. However, planting and maintaining greenery on decorative garden fences can be challenging.
How To Maintain Greenery On Garden Fences?
Maintaining greenery on decorative garden fences addition is a beautiful and natural touch to your outdoor space. When it comes to maintaining greenery on garden fences, consider the versatility of custom window boxes. These personalized window boxes can enhance your garden's aesthetic and provide a perfect space for your favorite plants.
Without proper care theses, the beautiful natural touch can look like a small wild bush. More than installing the fence panels, regular maintenance is required to ensure the long life of the fences. Check out cedarmountainfence.com for fencing repair and maintenance ideas.
Let’s see the easy caring tips that do not require expert help. You can apply these tips on your own by using small and readily available tools.
1. Choosing The Right Plants For Your Garden Fence
The first step in planting greenery on your garden fence is to choose the right plants. When selecting plants, consider the amount of sunlight your fence receives and the soil quality.
Some plants, such as ivy and jasmine, are ideal for shady areas, while others, like clematis and morning glories, prefer sunny spots. You should also choose plants well-suited to your soil type and moisture levels.
It's also important to choose garden fences and plants that will complement your existing landscaping and the style of your garden fence. Consider planting wildflowers or climbing roses if you have a rustic wooden fence. You might opt for succulents or grasses if you have a more modern fence.
2. Planting Your Greenery
Once you've chosen the right plants for your garden fences, it's time to start planting. Before you begin, be sure to prepare the soil. Clear any present debris or weeds from the area, and amend the soil with compost or other organic matter to improve drainage and fertility.
When planting your greenery, be sure to follow the specific planting instructions for each plant. Some plants, such as climbing roses or ivy, may require a trellis or other support structure to climb up the big or small garden fences. Other plants, like clematis, may require regular pruning to keep them from becoming too heavy and damaging the fence.
3. Caring For Your Greenery
Proper care is essential for the health and longevity of your greenery. Be sure you are watering your plants daily, especially during hot and dry periods. Fertilize your plants as needed, following the specific instructions for each plant.
Regular pruning is also important to keep your greenery healthy and well-maintained. Be sure to remove any dead or diseased branches and prune back any overgrown areas that are crowding out other plants or obstructing your view.
4. Protecting Your Garden Fence
While planting greenery on your garden fences can be a beautiful and eco-friendly solution, it's important to protect your fence from damage. Be sure to use plant ties or other support structures to prevent your plants from pulling down or damaging your fence.
You should also be aware of any potential pests or diseases that could harm your greenery or your fence. Be sure to monitor your plants regularly and take action if you notice any signs of infestation or disease.
5. Provide A Sufficient Amount Of Water And Nutrients
Make sure your plants receive enough water and nutrients to thrive. Consider using a slow-release fertilizer or compost to give your plants the necessary nutrients.
Regular pruning helps your plants to maintain their shape. And regular pruning also prevents them from becoming overgrown or damaged. Prune away dead or diseased branches, and remove any growth encroaching on other plants or structures.
Keep your eye out for pests and diseases which can damage your plants. Using the natural pest control methods, like companion planting or organic pesticides, keeps your plants healthy.
Conclusion
Planting greenery on your garden fence is a great way to add beauty and interest to your outdoor space. If you are concerned about deer damaging your garden, installing a deer fence from https://www.critterfence.com/hemp-drying-mesh by a professional can provide the protection you need while adding value to your property.
By choosing the right plants, planting them properly, and providing proper care and maintenance, you can create healthy and thriving garden fences that will enhance the look and feel of your outdoor space for years to come.
Read Also:
5 Reasons Why You Absolutely Must Have Houseplants In Your Life
How To Plant Grass Seed On Hard Dirt? – Latest Update 2022
10 Best Bedroom Plants To Buy In 2022
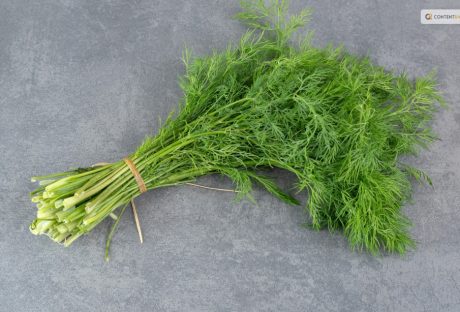
The tender, fern-like leaves of dill almost beg to be touched. If you want to cook them, trim the fresh dill foliage and gather the seeds for pickling. Or you can chop the feathery leaves and yellow umbels for attractive bouquets of homegrown flowers.
In addition, black swallowtail caterpillars love to feed on it. Its tiny yellow blooms are great at drawing in a wide range of pollinators. Dill grows as an annual for summer harvests in USDA Hardiness Zones 2–8. In other parts, it may self-seed and is hardy in the winter in Zones 9–11.
Here is everything you need to know about how to harvest dill. Keep reading for a comprehensive guide.
How to Harvest Dill?
Fresh dill clips easily, but it soon starts to droop. Sounds familiar to Cilantro, right? Its flower umbels may look lovely in a mixed bouquet, but after a few hours, don't be shocked if they start to wilt. When harvesting dill for recipes, use it as soon as possible because its flavor starts to fade after a few days.
Cut off the flower stalks of dill after the yellow blooms have faded but before the seeds start to ripen and come away from the umbel. Cover the entire flower head with a small paper bag that has a few tiny holes for ventilation.
Hang the plant upside down in a cool, dry place. Watch for the seeds to fall and collect them in the bag's bottom. The seeds should be kept in a cool, dry, and dark area in an airtight glass container.
When and How to Plant Dill?
Dill grows best outside and is simple to start from seed. Plant the seeds directly into the ground, 1/4 inch deep and spaced 1 to 2 inches apart, in the springtime following the last frost. If you want the dill plants to be able to self-sow, plant the seeds in tufts so the seeds can fall and sprout the following year.
Or you can plant them in rows spaced about 6 inches apart. You might want to think about succession planting if you want a reliable supply of dill. During the growing season, start by planting a small number of seeds from the packet at a time and then a few more every week.
Typically, seeds take 7 to 14 days to germinate. Also, dill can be grown from transplants grown in nurseries planted in the ground or in containers in spring. You can plant dill outside a few weeks before the last predicted spring frost because it can withstand light frost.
To achieve lush growth and stop crowded seedlings from producing seed heads, which stops the production of foliage, thinning is essential. Every 12 to 24 inches, reduce the number of seedlings to just the strongest one once they reach 3 or 4 inches in height.
As they get bigger, some start to flop. Plants can be kept upright by placing a stake or a sturdy twig in the ground close to the plant's base. To loosely secure the plant to the stake, use garden twine.
You can start the dill seeds indoors four to six weeks prior to the last frost. And you can move the seedlings to the ground once the risk of frost has passed. Transplanting mature dill does not work well, so plant your seedlings where they will be able to grow and thrive.
Where To Plant Dill?
Dill should be planted in a spot with well-drained soil and at least 6 to 8 hours of daily full, direct sunlight. Particularly for cottage gardens, the delicate foliage gives garden beds and borders textural interest. Choose a location for your dill that will shield it from the wind if possible.
Just like spinach, high winds can easily damage its stalks if you do not stake the dill. You can plant dill's fragrant foliage in perennial garden container plantings. Or you can plant them alongside other herbs or vegetables in a traditional kitchen garden.
In an edible garden, cruciferous vegetables such as Brussels sprouts, collard greens, broccoli, and cabbage are good companion plants for dill. Dill draws beneficial insects like ladybugs and bees and drives away common brassica pests like loopers and cabbage worms.
But avoid planting dill close to carrots. Carrots can be stunted by dill, and because they are closely related, dill can cross-pollinate with carrots to produce inferior hybrid plants. Planting dill close to tomatoes is also not recommended.
Mature dill will probably stunt your tomatoes' growth, even though some studies have indicated that tomatoes and dill can be beneficial companions when they are young.
How to Propagate Dill?
Seed is the most effective method of dill propagation. Cuttings can also propagate Dill, though this isn't as dependable.
Seed: Direct sow the dill seeds in early spring at a depth of 1/4 inch in a prepared garden bed. Dill does not tolerate transplanting well. Thin the seedlings so they are 12–24 inches apart when they are 3–4 inches tall.
Cuttings: Using shears or scissors, cut off the stem with at least 3 to 4 inches of new growth to take a dill cutting. Place the cutting in a water-filled container, making sure to remove any leaves below the water's surface, and allow the roots to grow for two to three weeks.
Fertilizer and rooting hormones are not required. Plant the dill in a container or on the ground once the roots are 2 to 3 inches long.
Is Dill a Type of Weed?
No, I am not talking about WEED weed (read: marijuana). Although dill isn't technically a weed, some individuals and spice companies call the plant dill weed, possibly due to its feathery leaves. Dill weed is a dried or fresh foliage plant. Flower umbels are yellow and used to make dill seeds.
How Should Dill Be Stored for Optimal Quality?
You can keep fresh dill in the fridge by wrapping its leaves in a moist paper towel. Or you can tuck its stems into a container of water. Fresh dill can be frozen by submerging it in water in ice cube trays. Place the cubes in cooked dishes that have enough moisture to withstand them.
Dill seeds and leaves can also be easily dried for later use, though the flavor is a lot more muted.
Water and Soil
Sow dill in soil that is moist but well-drained. If there is a lot of clay in your soil, add organic matter to the top few inches to aid in drainage. If you have trouble with poor soil drainage, plant this herb in raised beds or containers. Growing dill requires proper irrigation.
As the seeds germinate, keep the soil evenly moist. Dill plants require one to two inches of rain or extra water each week once they begin to grow.
Humidity and Temperature
Dill tolerates temperatures as low as 25ºF, but 70ºF is the ideal temperature for it. Dill often bolts, sending up flower stalks to set seeds when temperatures rise. This annual herb dies after it flowers and produces seeds. Get rid of the flowers to prolong the plant's growing season.
Apply Fertilizer
While most herbs, including dill, don't require extra fertilizer, you can give them once or twice during the growing season by applying a balanced 10-10-10 fertilizer. When planting, either mix a liquid fertilizer with water or etch a time-release fertilizer into the soil.
Refer to the product label for instructions on how much to use.
Trimming
Dill should be pruned early in the growing season to prevent limb bending. Cut off the top leaves of the plant to promote more growth of the lower leaves. Food preparation and cooking can be done with anything that has been pruned.
Repotting and Potting
You can grow dill in pots on a sunny balcony or deck, even if you don't have an outdoor garden. Due to the deep taproot that dill plants have, choose a container that is at least 12 inches deep. Because clay and terracotta pots don't retain as much moisture as plastic or glazed ceramic pots.
They are ideal for growing dill. Make sure the container you select has good drainage and is big enough to allow you to space your plants 12 to 24 inches apart. It is best to start over in a new, larger container. Especially if your dill plant outgrows its current one because it does not take well to transplant.
If the temperature where you are planting is not too high, you can keep planting seeds into the summer.
Types of Dill
Dills can be of many types with each of their distinct looks and flavors. Here are the three different types of dill you can grow in your kitchen or backyard.
Long Island Mammoth
Also known as Long Island Mammoth this one is an old-time favorite. Its fern-like leaves can be dried and stored for a long time, or they can be harvested fresh. It produces big clusters of yellow flowers with flat tops. They turn into brown seed heads, and they can reach a height of five feet.
Fernleaf
Grown to a height of only 18 inches, Anethum graveolens, or Fernleaf, is a highly productive dwarf variety. It works well in container gardens or small in-ground beds. Its feathery, delicate foliage has a great flavor of dill. From midsummer into fall, it blossoms.
Bouquet
The 'Bouquet' cultivar produces plants up to thirty inches tall with fine bluish-green foliage. The enormous, six-inch-diameter yellow flower heads are ideal for drying, creating an enduring arrangement. Or you could chop them for fresh floral arrangements.
How to Keep New Dill Fresh?
Dill weed quickly wilts after harvesting and gradually loses its distinctive flavor and aroma. If you know how to store your freshly harvested dill, this shouldn't be a problem. Here are two straightforward techniques that you can use:
Put It in the Crisper Drawer of the Refrigerator
Loosely wrap the recently cut and cleaned leaves in damp kitchen towels before putting them in a container or sealed bag. Put the container in the crisper drawer of the refrigerator, which has a lower humidity than the other sections of the appliance.
Utilize the herbs before they begin to wilt and dry out, which should happen in a few days.
Put It in Water
To make this method function, when harvesting the herb, you must cut off the entire stem. After gathering the stems, put them in a glass of water and seal the opening with a plastic bag. Every day, change the water. Unlike potatoes, dill leaves can remain fresh for up to a week when stored in this manner.
How to Freeze Fresh Dill?
Freezing is the best way to preserve extra dill for later use if you've harvested more than you can use at once or in a few days. Dill freezes most effectively when chopped into smaller pieces and added to ice cube trays with just enough water to cover the freshly minced dill.
This allows the herbs to be kept for four months or longer. This will ensure you always have dill on hand for when a recipe calls for it.
How to Dry Fresh Dill?
Dried fresh dill is a popular method if you're searching for another way to store dill for a long time. The herb has many uses, even though it won't have as much flavor as when it's fresh or frozen. All year long, you can use it as a herb in cooked dishes or to make tea.
Stick to hang-drying if you don't want much of the flavor to be lost. This is a very easy method to use. All you must do is gather a few dill leaves and then bind them with a string. Later, place them in an area with adequate ventilation upside down.
Place them in an airtight container once they're crumbling and dry. Even though fresh dill is always preferable, make sure to save some for later use. Particularly if you don't have a year-round indoor herb and spice garden.
Wrapping Up
Growing dill is a great way to add flavor to fish and seafood dishes. A little goes a long way because fresh dill leaves have a strong licorice flavor. It is best that you add dill toward the end of cooking, in salads, or as a garnish for soups. Because once cooked, it tends to lose its flavor.
If you have thoughts to share or questions to ask about how to harvest dill, please leave a comment below. We would love to hear from you!
Read Also:
Asparagus 101: When, How, And How Often To Harvest?
How To Harvest Sunflower Seeds: A Fun And Easy Activity For The Whole Family
How TO Harvest Lemongrass: Tips AND Tricks FOR Growing AND Using This Versatile Herb


 As already discussed above, the fastest growing plant on earth is Duckweed, also known as Wolffia. This plant is a tiny type of duckweed that grows faster.
On the other hand, you are probably familiar with this plant (duckweed) that is found on ponds where several green beads seem to form a lid on water sources. The genetics underlying this strange little plant’s success has long been a mystery to scientists.
The Genome Research of February 2021 will help scientists to know how plants grow up so fast and what are the functions that allow them.
As already discussed above, the fastest growing plant on earth is Duckweed, also known as Wolffia. This plant is a tiny type of duckweed that grows faster.
On the other hand, you are probably familiar with this plant (duckweed) that is found on ponds where several green beads seem to form a lid on water sources. The genetics underlying this strange little plant’s success has long been a mystery to scientists.
The Genome Research of February 2021 will help scientists to know how plants grow up so fast and what are the functions that allow them.
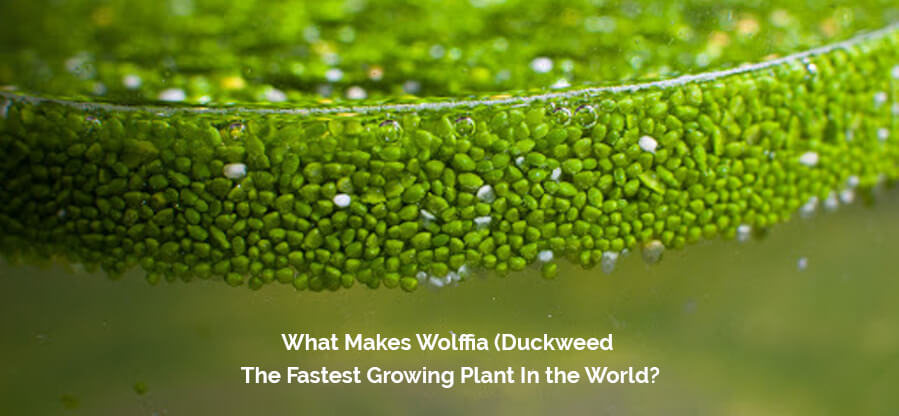 There are various reasons why Wolffia is known as the fastest-growing plant in the world. Many individuals are taking the benefit of this unusual crop as it is extremely high in protein and is a part of some Southeast Asian cuisines.
This plant reproduces very quickly. According to many types of research, Wolffia is regarded as the fastest growing plant in the globe. About forty percent of the plant’s genes are influenced by this time of day factor. Wolffia, clocks in with only 13 percent of its genes restricted by time.
There are various reasons why Wolffia is known as the fastest-growing plant in the world. Many individuals are taking the benefit of this unusual crop as it is extremely high in protein and is a part of some Southeast Asian cuisines.
This plant reproduces very quickly. According to many types of research, Wolffia is regarded as the fastest growing plant in the globe. About forty percent of the plant’s genes are influenced by this time of day factor. Wolffia, clocks in with only 13 percent of its genes restricted by time.
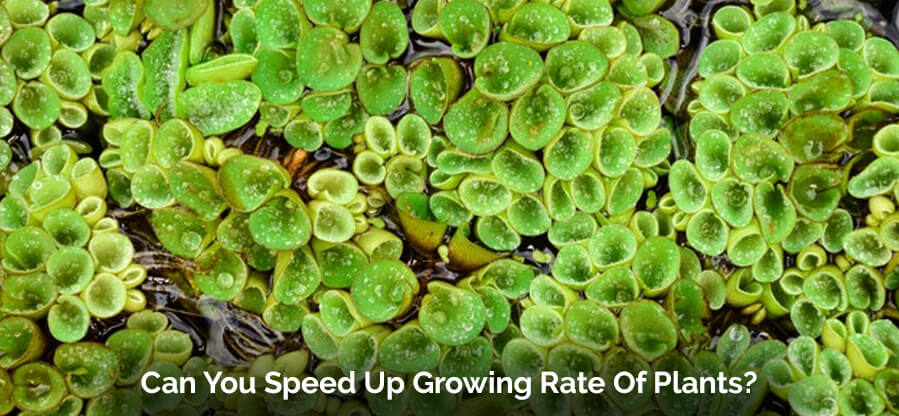 Smaller plants and trees grow faster than bigger versions of the same tree and plant because of the root ratio. These variants grow fast as they highlight a great balance of roots to top growth.
On the other hand, the plant and trees can place all their strength into top growth enables it to grow taller. And fast-growing plants only grow as fast as their roots support.
Besides, if you are growing plants, they must be planted right. In order to encourage deep root growth, you can also give continuous watering to the same.
Smaller plants and trees grow faster than bigger versions of the same tree and plant because of the root ratio. These variants grow fast as they highlight a great balance of roots to top growth.
On the other hand, the plant and trees can place all their strength into top growth enables it to grow taller. And fast-growing plants only grow as fast as their roots support.
Besides, if you are growing plants, they must be planted right. In order to encourage deep root growth, you can also give continuous watering to the same.