Published on: 15 August 2021
Last Updated on: 11 February 2026
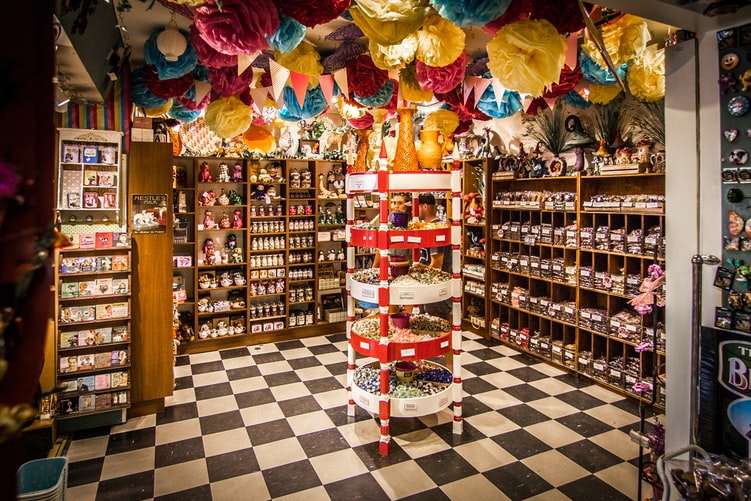
The skill of molding confections is known as Confectionery. What are confections? These are food products that are made of carbohydrates and sugar abundantly. A store that engages in producing and selling these delicacies is called a Confectionery shop.
The main target market of these goods is children. Young ones have a big love for candy as they consume them in a substantial number. A confectionery store has different names depending on the geographical area.
In Australia, it is known as a lolly shop, a sweet shop in the United Kingdom, and North Americans call it a candy shop. Despite the different names, all of them produce and sell the same goods.
Well, there are a lot of ways to increase your sales, but you could try these out and find out just how effective they are.
History
Initially, confections were made out of honey as sugar was not readily available in the foregone western world. The Romans, Chinese, Egyptians, Indians, and the Greeks used honey to cover flowers and fruits to conserve them and produce sweetmeats in ancient times.
Between the 4th and 6th centuries BC, Persians and the Greeks engaged Indians to produce "reeds that produce honey without bees," which is sugarcane. The cane is primeval in Southeast Asia and the tropical Indian subcontinent.
Sugarcane agriculture was advanced and spread afterward. With the introduction of sugar, confectioners gradually started renouncing honey in the production of confections. The Indians came up with a mechanism to create sugar crystals.
In the local dialect, the crystals were known as khanda, where the name candy originated. Kransekake is one of the ancient confections from Scandinavia.
According to Guinness World Records, the most ancient candy shop in the world that is still functioning to date is located in Pateley Bridge village. Pateley Bridge is now a small market town in England.
What is in a Confectionery Shop
As explained above, a confectionery store engages in producing and selling confections mostly to the kids. The produced confections in a Confectionery store can be fractionated into two, bakers and sugar confections.
Baker's Confectionery
It is one of the confectioneries and is also known as flour confections. These are sugary foodstuffs that use flour as their major component.
After they are made, these confections are baked hence the name baker's Confectionery. They include sweet pastries, scones, cookies, doughnuts, and cakes.
However, baker's confections are baked, bread is not considered as a baker's confectionery.
You may go through: The Need for Speed-to-Lead in Sales
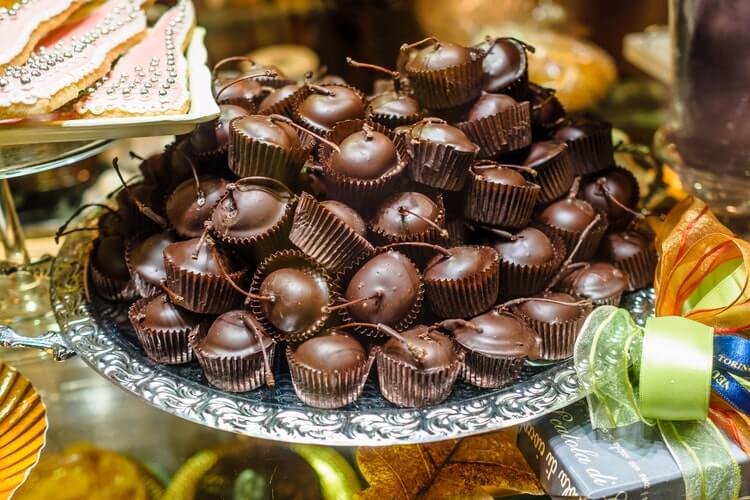
Sugar Confectionery
Unlike baker's, sugar confectionery is mainly made of sugar. The most crucial substances used in this category are glucose syrups, sucrose, and invert sugars.
A concoction of fructose and glucose, which is turned out by hydrolysis of sucrose, is called invert sugar. Confectioner's glucose is also known as glucose syrups which are intensive, cleansed, aqueous solutions of nutritious saccharides from starch.
This confectionery can be divided into two, fondant and boiled sweets. Click here to see how you can start this business.
a) Fodant
Fondant is tiny sugar crystals in concentrated sugar syrup. It is used in embellishing cakes and as a creamy filling in biscuits and chocolates.
Fondant is manufactured in two ways. It is an inverting agent and refrigerating speedily while riveting or mixing sugar solution with glucose syrup then boiling them. The sugar in fondants is in a crystalline state.
These foodstuffs include coconut paste, chocolate centers, marzipan, fudge, and chews. The articulation of fondant is made up of 22% w/w water, 16% w/w confectioner's glucose, and 62% w/w sucrose. Sucrose is the primary component in this formulation.
b) Boiled Sweets
Boiled sweets are made by boiling water and sugar at extremely high temperatures ranging between 150 and 166 degrees Celsius.
When boiling, the water evaporates, and a translucent mass is formed on cooling. In boiled sweets, their sugar is in a glassy state as it is hard-boiled.
This confectionery includes barley sugars, caramel, fruit drops, toffee, butterscotch, and hard gums. The articulation of boiled sweets comprises 20% w/w water, 32% w/w glucose syrup, and 48% w/w sucrose.
Three Essential Tips on How to Increase the Volume Sales in Your Confectionery Shop
The core obligation of any business enterprise is making profits. A huge amount of gain is obtained through more sales for your confection. So how do you increase the volume of your sales?
1. Location
The most fundamental factor in this business is where you set up your shop. Children are primary consumers of confections as they take them in huge numbers.
To escalate the number of your sales, your shop should be set up in a location where there are more children than adults. An outlet erected in an area where kids are innumerable will make more sales than the other in a setting with scarce younger ones.
A store that is put up in an area where there are more adults than the kids will hardly make sales as the main market target of confections is youngsters.
2. Delivery Services
The world is evolving so are the buying behaviors from customers. Many people do not like making long queues to be served. Instead, they prefer home delivery services.
With the pandemic, many people refrained from going to stores physically to contract the virus in your maneuvers. Many people are adopting online shopping where you order goods online, and the buyer delivers at your doorstep.
If you can incorporate delivery services, you will attract the attention of potential customers who do not like going out to the stores. This increases the volume of sales, which means more profit.
3. Social Media
The most convenient way to market your products in the 21st century is through social media. There are a million users of social media all over the world.
Advertisements of your shop can be run on Facebook, Twitter, Instagram, Tiktok, LinkedIn, to mention a few.
Through social media, you can reach many potential customers for your product in the comfort of your store. See this link to learn how you can market your business using social media https://www.marketingdonut.co.uk/social-media/social-media-strategy/use-social-media-to-market-your-business.
Conclusion
Confectionery shops produce and sell confection. Before purchasing from any store, research to establish if they produce the best products in town. The duration a store has operated means they have experience in production that keeps them moving. Online product reviews can help you on settling the perfect store for your needs.
Read Also:
Content Rally wrapped around an online publication where you can publish your own intellectuals. It is a publishing platform designed to make great stories by content creators. This is your era, your place to be online. So come forward share your views, thoughts and ideas via Content Rally.
Christmas is just a couple of weeks away, and it gets busy at this time of the year.
Moreover, with all the festive celebrations, you will definitely want some fast food. But, what fast food is open on Christmas? The answer is many fast-food restaurants, and food stalls are open on 25 December to fulfill your cravings.
In this article, you will learn about what fast food chain is open on Christmas. Apart from that, this article will also give you details about the types of fast-food chains open on Christmas. Moreover, you will also get tips on finding open fast-food locations. Hence, to learn more, read on to the end of the article.
The Popularity Of Fast Food On Christmas
Recently, more fast-food chains have been choosing to operate on Christmas Day. This is great news for people who do not celebrate by going out or who just want to take a break on Christmas. This is also helpful for people who are just looking for a convenient option for lunch and dinner.
Generally, in the United States, unlike many other countries across the world, fast-food chains are quite popular.
This is because of the following reasons:
It is easy to get quick and easy fast food. Also, you will find it cheaper than preparing a meal at home.
If you live in a city, the fast-paced city life and professional commitments make fast food an easy-to-get option.
Generally, fast food is more affordable than healthy meals, organic food, and fresh food alternatives.
Convenience is the biggest reason for the popularity of fast-food chains. Moreover, since Americans value time and money a lot, it makes fast food easy on the pocket as well as on time-savings.
In fact, you can order cheeseburgers, sodas, and supersize items, each within a dollar. Basically, when it comes to Christmas, people want to take a break from making food and spend more time with their families. Hence, fast food has become the go-to alternative.
On the other hand, many fast food chains use marketing campaigns to promote their food during holidays. Apart from that, fast food items also contain some ingredients that make people feel good, like saturated fats, sugar, trans fats, high calories, etc.
Types Of Fast-Food Chains Open On Christmas
The following are the major types of fast-food chains that are open on Christmas:
Snacks
Generally, these fast-food chains include a snack bar, beverage establishments, and simple meals like sandwiches, burgers, and hotdogs. Here, the serving person will serve you at the counter or on the table.
Burger Shops
This is a popular option in some places. In those shops, you will find upscale burgers and a variety of cheeseburgers. Moreover, you will find different types of concept burgers that emphasize variety and freshness. Generally, these are takeaway counters.
Food Court
These places are full of different small takeaway counters. Here, each customer pays independently and eats in a common room. In these places, each owner of the food island contributes to the dining room rental.
Healthy Fast Food
Healthy fast food options are also common in some places. For example, you will get nutritious wraps, vegetarian food, and a variety of vegan options. Basically, if you want a balanced diet, this is a great option. Also, it helps you a lot, even when you are on the move. Hence, if you are health-conscious, this can be a great alternative.
Niche Fast Food
Many new themed and niche fast food restaurants are opening up. Here, you can personalize your fast food. Here, the restaurant fuses fast food with many other food options to create something new.
What Fast Food Chain Is Open On Christmas?
The following are some of the fast food chains that are open on Christmas:
1. McDonalds
The Golden Arches are the most popular fast-food options during Christmas. Yes, McDonald’s is open on Christmas and throughout the festive season.
No matter which state you are from, you will find many locations open on Christmas Day and even on Christmas Eve. However, the hours may change depending on the location you are from.
2. Starbucks
Sipping a Cafe Mocha on the evening of Christmas with a book in hand. This is heaven for people who like to celebrate Christmas alone. However, even if you have your family and friends with you on Christmas day, Starbucks is always a go-to option.
Generally, you will find most Starbucks locations open on Christmas. However, individual store hours may differ depending on the place you stay. Basically, it depends on the cultural and climatic conditions of the place. Hence, before you visit the nearest Starbucks, make sure to call.
3. Burger King
A juicy burger on a Christmas day is like heaven to many. Head to the nearest Burger King to get your burger. However, you might find some locations closed on Christmas Day. Hence, it is better to call beforehand. This is because the holiday hours are different in every location.
4. Dunkin’ Donuts
If you have a sweet tooth, Dunkin’ Donuts is there to satisfy your needs. In fact, most of the Dunkin’ Donuts locations stay open on Christmas Day. Hence, if you are looking for a quick breakfast or an afternoon treat, order something from Dunkin’ Donuts. However, make sure to confirm the timings of your local store by calling them beforehand.
Tips For Finding Open Fast-Food Locations
The following are the steps you must follow if you want to find an open fast-food location near you:
Open your smartphone.
Tap on the Google Maps app to open it. Make sure your GPS is on.
Tap the name of the shop and add “near me” after that.
You will find all the locations of that shop near you.
Check the opening and closing times of the shop. Also, note down the phone number of the shop.
Call that shop and ask whether they are open within the time frame within which you will visit.
If the storekeeper confirms that they are open, head on to that fast-food shop quickly.
This way, you can visit a fast-food store near you and try out your favorite meal.
Alternatives To Fast Food On Christmas
A good home-cooked meal is always the better option if you want to compare it with fast food. Whether you are alone or with your family, spending some time cooking something you like is a great way to spend your Christmas in an amazing manner.
Depending on how much time you have, you can also try out a new recipe. All you need to do is open YouTube and check out a cooking recipe.
If possible, you can even involve your family members in the preparation. Basically, if there are many hands, the workload will be less. Moreover, this will strengthen the family bonding.
Summing Up
What fast food chain is open on Christmas? You can see that the popular fast food chains that are open on Christmas are McDonald’s, Burger King, Starbucks, and Dunkin’ Donuts. Apart from that, if you have any other local fast-food shop open, you can visit there.
Do you have more suggestions on how to find a fast-food shop nearby? Please share your ideas and opinions in the comments section below.
Read Also:
Is Walmart Open On Christmas? Get To Know What Is Open And What Is Not
Best Bulking Foods That You Need For Fast Muscle Gains
All you need to know about kashkaval cheese
Unveiling home décor ideas for Christmas
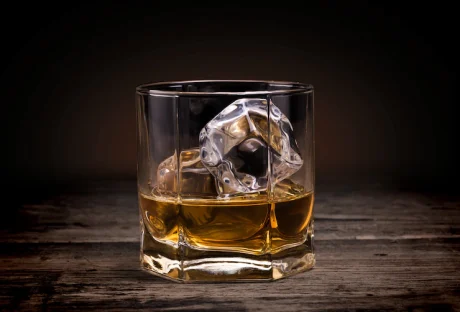
Even though it is acceptable to consume whiskey neat or on the rocks, a whiskey cocktail is a delightful alternative for drinkers of any age, gender, or nationality. Everyone appears to enjoy the classic and contemporary cocktail concoctions that bars and nightclubs serve.
Well-known whiskey cocktail recipes, such as the Old Fashioned, Irish Coffee, and Manhattan will be a delight to recreate at home. And while the list of popular alcoholic beverages is constantly evolving and expanding, there are a few that every skilled bartender should know by heart.
These whiskey cocktail recipes highlight the versatility and quality of whiskey, which wine enthusiasts have enjoyed for several decades. This is the ideal starting point for a home bartender seeking to master whiskey cocktail recipes.
14 Whiskey Cocktail Recipes For Home Bartenders
1. The Old Fashioned
According to cocktail historian David Wondrich, the Old Fashioned is a descendant of the oldest cocktail. In 1806, it was created with a small amount of water, sugar, liquor, and a few dashes of bitters.
2. Whiskey Sours
The Whiskey Sour recipe is a traditional and excellent option. It is a classic because the fruity red wine and smoky-sweet bourbon are perfectly balanced. The sour lemon flavor will complement the whiskey and syrup's sweetness. It would be best to serve it chilled by shaking it with ice cubes. You can also add egg whites to your shaker to create a unique mouthfeel; you may skip it if it's not for you.
3. The Manhattan
In the world of whiskey, a Manhattan is a classic. It's made with a traditional blend of sweet Vermouth, rye whiskey, and bitters. It serves as the basis for many classic whiskey cocktails and is as vital to whiskey as the martini is to gin.
4. Irish Coffee
Original Irish coffee is a delicious way to spice up your coffee after dinner or on a cold winter night. This whiskey cocktail recipe demonstrates that great drinks require little effort and only high-quality ingredients. It's just coffee, Irish whiskey, and brown sugar with freshly whipped cream on top.
5. Vieux Carre
According to wine experts from an Edwards liquor store, the Vieux Carre is a sophisticated whiskey cocktail that combines cognac, sweet Vermouth, and Benedictine. Although it is a New Orleans classic, you do not have to be in the city to appreciate it. Additionally, stick to the recipe to ensure a refined flavor balance.
6. John Collins
This whiskey-based cocktail recipe is an excellent choice for happy hour, consisting of whiskey sour and club soda. After mastering this recipe, you can create any alcoholic beverage you desire.
7. High Ball
A highball is a two-ingredient cocktail that is both refreshing and delicious. Ginger ale pairs well with blended whiskeys, rye whiskeys, and bourbons. It is optional, but you can add club soda to lighten the flavor.
8. Mint Julep
The mint julep, a whiskey drink recipe classic, is one of the most refreshing drinks you will ever taste. It requires fresh mint, sugar, your preferred bourbon, and a muddler. This recipe is so popular that it has inspired numerous julep variations.
9. Whiskey Cobbler
What is the best way to dispose of the fruit in your refrigerator? Make a cobbler with whiskey. Use seasonal fruits to sweeten and garnish your whiskey, then add club soda. You can also choose to drink it straight.
10. Fancy Whiskey Cocktail
This rendition of a classic is delectable and refreshing. This sophisticated whiskey cocktail recipe with orange liqueur, sugar, and bitter is as good as any contemporary recipe and is ideal for mixing whiskey.
11. Algonquin Cocktail
The cocktail Algonquin is an excellent illustration of how whiskey and pineapple can coexist. The dry Vermouth in the tropical whiskey martini combines the two flavors. It is a wonderful way to enjoy summertime meals due to its complex flavor.
12. Whiskey Tonic
All types of soda water are used in simple whiskey cocktail recipes. Dry soda is an excellent choice, particularly when combined with Irish whiskey. On the other hand, tonic water is the most popular.
13. New York Sour
You can enjoy the New Your Sour with bourbon or rye whiskey. This cocktail mimics the whiskey sour by adding fresh lemon juice and simple syrup to the whiskey sour base. The floating red wine elevates the flavor and appearance of this cocktail.
14. Sazerac
Sazerac is a distinct flavor of rye whiskey. Simple ingredients such as sugar, bitters, and anise liquors such as absinthe complement the spiced rye.
Key Takeaway
These recipes can serve as building blocks that you can update, modify, and make your own as you hone your bartending skills at home. Since there is no specific version of any given cocktail, you're free to make a version of your own. Consider all the suggestions above and enjoy your concoctions in the comforts of your home.
Additional:
7 Daring Party Drinks to Try This Winter
Tips to Follow When Ordering Alcohol Online
Fresh seafood is a culinary delight that tantalizes the taste buds and adds a touch of elegance to any meal. For seafood lovers, finding the highest quality products at affordable prices can be a quest in itself. That's where buying seafood from a wholesaler comes into play.
You can bypass the traditional retail route and go straight to the source. There you can unlock a world of benefits that go beyond just savings. In this guide, we’ll talk about why buying seafood from a wholesaler is a good idea.
Also, we discuss how it can elevate your seafood experience to new heights. It will also help if you purchase seafood wholesale from Manettas or other trusted sources.
Seafood Industry: Facts and Data
Before we delve deeper into seafood wholesale and its features like freshness and variety, a discussion of the economy can be interesting.
According to data, the revenue generation from the seafood industry is around US$ 3.75 bn in the year 20230. Experts project the market to grow at around 4.11% between the stretch of 2028 to 2028. China, with a whopping 88.90 bn in 2023, is the global boss in this reign.
Continuing with Australia, the processed fish and seafood market will be around 0.95 $bn in 2023. Though the growth remains constant during the period, the stakeholders have high expectations from the industry in the coming days. So there is scope for growth in freshness and economy.
How Do The Consumers Get Fresh Supply?
You may have noticed that the fishing industry delivers high-quality catches to have a high consumer experience. This pursuit of offering better services has enabled them to procure high-quality fish.
The fishermen use technology like Pulse Electric Field, Ultrasound, Pulse light technology, Microwave processing, big data, and blockchain. With the help of these technologies, they are making it safe to procure fish from the sea. They also supply the best technology to the customers. As a result, it has enabled you to get fish of such high quality and variety.
The Benefits of Buying Seafood Wholesale
Seafood is popular not only in Australia but all around the world. Even the data we gave supports that seafood is quite common, and its benefits are galore. Let us try to unlock your benefits while buying seafood wholesale online.
Unmatched Freshness And Quality
When you buy seafood from a wholesaler, you gain access to an extensive network of suppliers and distributors who specialize in sourcing the freshest catch from the sea.
Unlike retail outlets, wholesalers receive seafood directly from fishing vessels, ensuring it reaches your table in the shortest time possible. This means you get to enjoy seafood at its peak freshness, with vibrant flavors and firm textures that are a testament to its quality.
Wide Selection Of Seafood Delights
One of the major advantages of buying seafood from a wholesaler is the incredible variety available. Wholesalers typically offer an extensive range of seafood options, from popular favorites like salmon, prawns, and scallops, to more exotic catches like lobster, octopus, and oysters.
Whether you're a seafood connoisseur or looking to experiment with new flavors, the diverse selection offered by wholesalers allows you to explore and indulge in an ocean of culinary possibilities.
Cost-Effective Solution
Buying seafood wholesale can be a financially savvy decision. Wholesalers often offer competitive pricing due to their direct relationships with fishermen and the ability to purchase in bulk.
By eliminating the middleman, you can enjoy significant savings without compromising on quality. This makes buying seafood from a wholesaler an attractive option for restaurants and catering businesses. Even home cooks who wish to stretch their budgets without compromising on the taste and freshness of their seafood dishes can leverage the benefits.
Convenience And Customisation
Wholesalers provide convenience and customization options that cater to your specific needs. With their vast inventory, you can easily find the quantities and cuts of seafood that suit your requirements.
Whether you need large quantities for a special event or smaller portions for everyday cooking, wholesalers can accommodate your requests. In addition, some wholesalers offer value-added services, such as filleting, portioning, and packaging, saving you time and effort in the kitchen.
Supporting Sustainable Practices
Many seafood wholesalers prioritize sustainability and responsible fishing practices. By buying from them, you contribute to the preservation of marine ecosystems and the livelihood of fishing communities.
Wholesalers often work closely with suppliers that follow sustainable fishing methods, ensuring you can enjoy seafood guilt-free, knowing that it has been sourced ethically and with the future of our oceans in mind.
Since many wholesalers support sustainable practices, you play a part in preserving our oceans for generations to come. So, the next time you're in search of the freshest catch of the day, consider turning to a trusted seafood wholesaler like Manettas—it's a decision that brings unparalleled freshness, variety, and savings to your plate.
Custom Packaging
One of the benefits that you can reap while being seafood online is the custom processing and packaging of them. Some companies provide customized packaging according to the buyers’ specifications and requirements. This denotes that you, too, can get the benefits of them like the restaurant owners have on account of bulk buying.
Expertise Knowhow
The wholesale seafood suppliers can help you with knowledge and inputs on the quality aspects of the storage of fish. At the same time, they also advise you on the cuts and even the spices you need to prepare a good dish.
Hence you become well knowledgeable not only on fish procurement but also on recipe development. You will have a thorough knowledge of a high-quality dining experience.
Final Words
Buying seafood from a wholesaler offers many advantages that elevate your seafood experience to new heights. From the unrivaled freshness and wide selection of choices to the competitive pricing and convenience, wholesalers provide a pathway to indulging in the finest seafood delights.
The stakeholders directly involved with the industry follow the best technology and sustainable practices. This helps them bring in a sea change in the industry. This is how you are getting it the best way possible.
Read Also:
How Restaurant Space Landlords Can Be Successful
6 Tips to Maximize Refrigerator Use in Your Restaurant


 Initially, confections were made out of honey as sugar was not readily available in the foregone western world. The Romans, Chinese, Egyptians, Indians, and the Greeks used honey to cover flowers and fruits to conserve them and produce sweetmeats in ancient times.
Between the 4th and 6th centuries BC, Persians and the Greeks engaged Indians to produce "reeds that produce honey without bees," which is sugarcane. The cane is primeval in Southeast Asia and the tropical Indian subcontinent.
Sugarcane agriculture was advanced and spread afterward. With the introduction of sugar, confectioners gradually started renouncing honey in the production of confections. The Indians came up with a mechanism to create sugar crystals.
In the local dialect, the crystals were known as khanda, where the name candy originated. Kransekake is one of the ancient confections from Scandinavia.
According to Guinness World Records, the most ancient candy shop in the world that is still functioning to date is located in Pateley Bridge village. Pateley Bridge is now a small market town in England.
Initially, confections were made out of honey as sugar was not readily available in the foregone western world. The Romans, Chinese, Egyptians, Indians, and the Greeks used honey to cover flowers and fruits to conserve them and produce sweetmeats in ancient times.
Between the 4th and 6th centuries BC, Persians and the Greeks engaged Indians to produce "reeds that produce honey without bees," which is sugarcane. The cane is primeval in Southeast Asia and the tropical Indian subcontinent.
Sugarcane agriculture was advanced and spread afterward. With the introduction of sugar, confectioners gradually started renouncing honey in the production of confections. The Indians came up with a mechanism to create sugar crystals.
In the local dialect, the crystals were known as khanda, where the name candy originated. Kransekake is one of the ancient confections from Scandinavia.
According to Guinness World Records, the most ancient candy shop in the world that is still functioning to date is located in Pateley Bridge village. Pateley Bridge is now a small market town in England.
 As explained above, a confectionery store engages in producing and selling confections mostly to the kids. The produced confections in a Confectionery store can be fractionated into two, bakers and sugar confections.
 Unlike baker's, sugar confectionery is mainly made of sugar. The most crucial substances used in this category are glucose syrups, sucrose, and invert sugars.
A concoction of fructose and glucose, which is turned out by hydrolysis of sucrose, is called invert sugar. Confectioner's glucose is also known as glucose syrups which are intensive, cleansed, aqueous solutions of nutritious saccharides from starch.
This confectionery can be divided into two, fondant and boiled sweets. Click here to see how you can start this business.
Unlike baker's, sugar confectionery is mainly made of sugar. The most crucial substances used in this category are glucose syrups, sucrose, and invert sugars.
A concoction of fructose and glucose, which is turned out by hydrolysis of sucrose, is called invert sugar. Confectioner's glucose is also known as glucose syrups which are intensive, cleansed, aqueous solutions of nutritious saccharides from starch.
This confectionery can be divided into two, fondant and boiled sweets. Click here to see how you can start this business.