10 Best Aesthetic Big Leaf Plants To Buy In 2022

big leaf plants

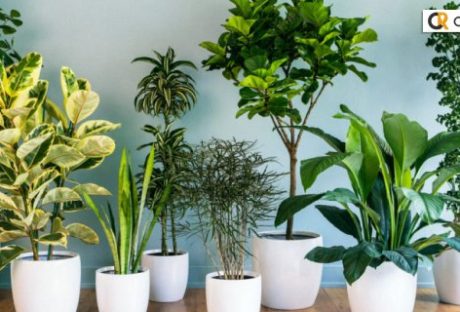
Big leaf plants can add an aesthetic touch to your home. If you are an admirer of home decoration, you cannot miss indoor plants as a part of your decoration. 

Indoor plants require very minimum sunlight, and they are pretty easy to take care of. But, most important of all– they keep your indoor environment refreshed and fill it with fresh oxygen. 

So, if you want to decorate your sweet home with beautiful big leaf aesthetic plants, you need to check out the few recommendations I have here in this article.

10 Best Big Leaf Plants For Indoors

If you are looking for recommendations for indoor plants with big leaves, please check out the ten recommendations I have here. 

1. Swiss Cheese Plant

Swiss Cheese Plant

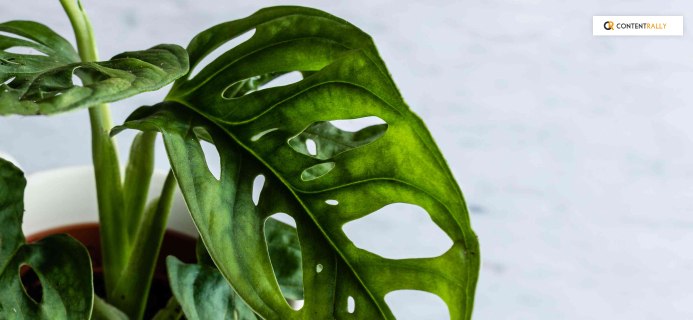
The botanical name of the Swiss Cheese Plant is Monstera deliciosa. This tropical beauty is enough to add a green touch to your indoors. It has big heart-shaped leaves to adorn your indoors. They do well if you keep them in indirect sunlight. 

The heart-shaped leaves can grow up to 36 inches in length, and they are healthy for your indoor environment.

Sun: They need bright but indirect sunlight.

🌡️Temperature: They are tropical plants, so you need to keep them in warm places. A temperature between 20°C – 30°C is ideal

💦Watering: You need to keep the soil wet most of the time. Watering them ⅔ times every week is enough. 

🌷Type Of Soil: The soil needs to be moist and adequate fertilizers. A pH level of 5.5 to 7.5 works the best.

2. Dwarf Banana Plant

Dwarf Banana Plant

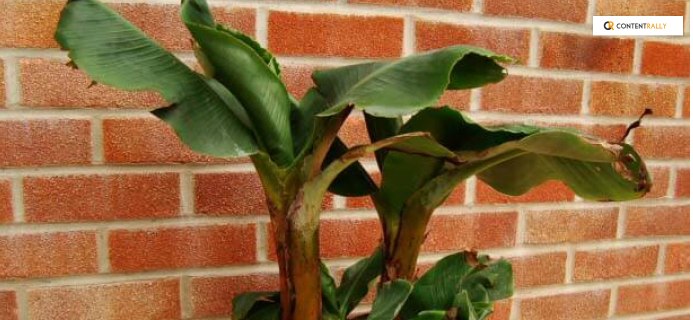
You can keep a large banana plant indoors. They are also big leaf plants. This is a tropical foliage plant that you can plant in a large plant. The leaves have quick growth, and the leaves are harmless to children and animals.

☀Sun: You can keep your Dwarf Banana Plant in full sunlight or in light shade.

🌡️ Temperature: They are big leaf tropical plants, so they enjoy a warm atmosphere. You can keep them at a temperature between 10°C to 33°C.

💦Watering: They need regular Watering– twice/ thrice every week in the warm season water them. Once every week is enough for the cold weather.

🌷Type Of Soil: The soil needs moisture. They need regular fertilizers.

3. Bird Of Paradise

Bird Of Paradise

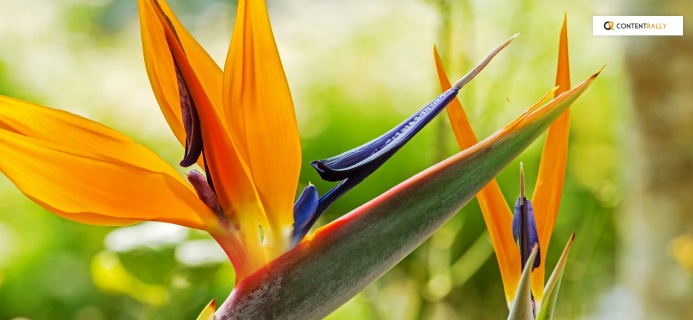
If you want some flowers to highlight the big leaf plants you have indoors, then Bird Of Paradise is just the right plant to choose. These plants have long-lasting flowers and waxy leaves that add extra beauty to your indoors.

☀ Sun: Keep them in semi-shade or in full Sun.

🌡️ Temperature: Medium Temperature between 18°C to 22°C is just fine.

💦Watering: Keep the soil moist. The soil should not get completely dry.

🌷Type Of Soil: They need fertilizers in spring. Well-drained soil is better.

4. Elephant Ear Plant

Elephant Ear Plant

These are the cheapest big leaf house plants. You can pull them from anywhere and plant them indoors. You can find these plants growing outdoors. These plants are toxic for small children and animals, so if you want to keep them, you need to be very careful.

☀Sun: They don’t need full sunlight. Indirect bright sunlight is the best.

🌡️ Temperature: A temperature between 20°C to 30°C is best. 

💦 Watering: The soil needs consistent moisture.

🌷Type Of Soil: Acidic, moist soil is the best.

5. Pinstripe Houseplant

Pinstripe Houseplant

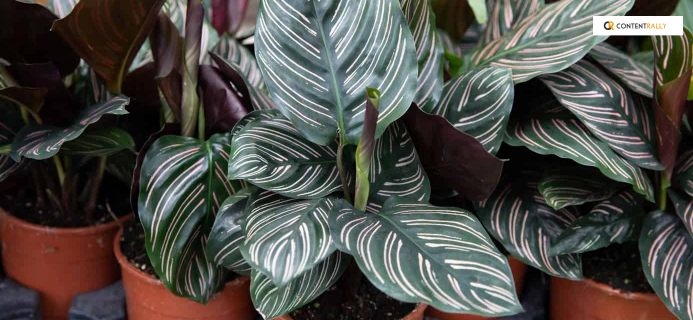
Not many tabletop plants look as pretty as the Pinstripe Houseplant. These big leaf plants have gorgeous jungle green color with pink stripes to compliment the big leaves. They aren’t too fond of direct bright sunlight. These plants are not harmful to animals and children. 

☀ Sun: Keep them in indirect sunlight.

🌡️Temperature: 18°C to 30°C temperature is good enough.

💦Watering: You need to maintain the soil moisture.

🌷Type Of Soil: You peat and pebbles to balance the moisture.

You May Like To Read This: 10 Best Trailing Indoor Plants To Buy In 2022

6. African Mask Plant

African Mask Plant

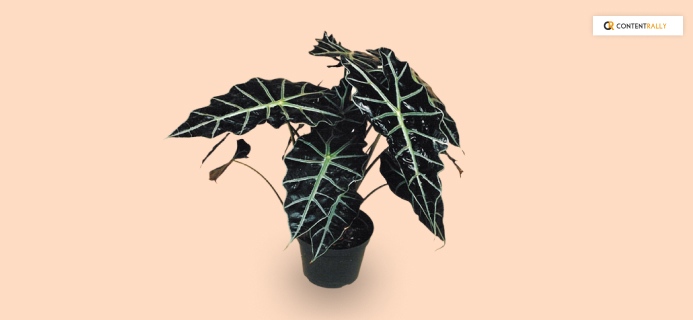
These big leaf plants are native plants of the Philippines. They get their name from their resemblance to an African mask. The large dark leaves can grow up to 18 inches. The silvery-white veins of the leaves make them even more attractive.

☀ Sun: Avoid direct sunlight. They love diffused sunlight.

🌡️Temperature: 15°C to 30°C is ideal for them.

💦Watering: They need regular watering during growth. Keep the pot moist and well-drained. 

🌷Type Of Soil: Keep the soil well-drained using pebbles. Fertilize frequently after ⅔ months.

7. Majesty Palm

Majesty Palm

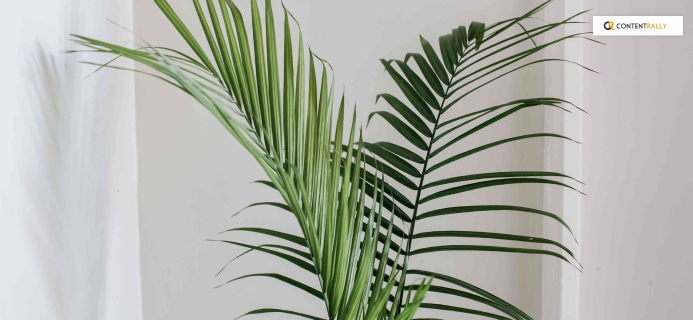
If you are looking for long leaf plants or big leaf indoor plants, the Majesty Palm is the one. They grow ten feet tall indoors. The leaves are toxic for animals and children, so you need to be careful if you are planting them indoors.

☀ Sun: Bright indirect sunlight is best.

🌡️Temperature: 18°C to 30°C is best.

💦 Watering: Water once after 1 or 2 weeks. Let the soil get dry before watering again.

🌷Type Of Soil: The soil is best if it is acidic.

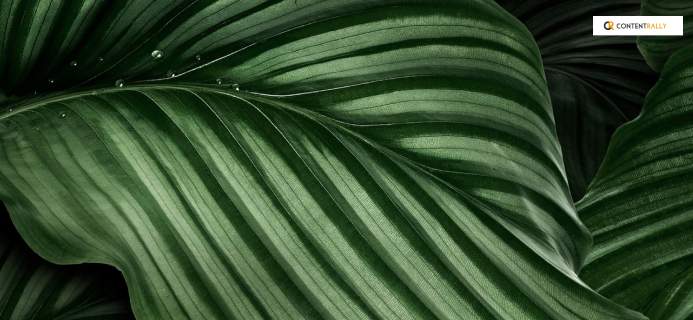
8. Calathea Orbifolia

Calathea Orbifolia

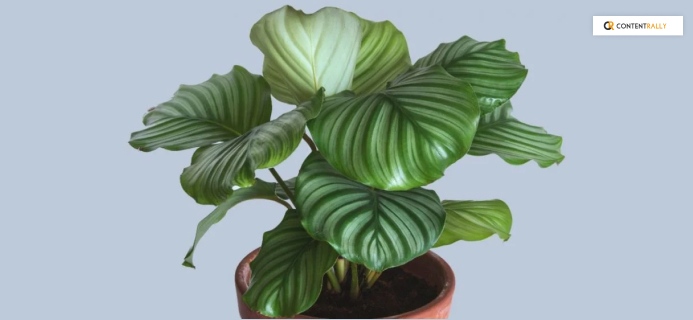
Are you looking for low-maintenance plants that keep the indoor air purified? Then there is no better option than Calathea Orbifolia. They can remove toxins from the air while also looking pretty with big textured leaves. There are silvery-white forks in the leaves that make them appear outwardly beautiful.

☀ Sun: They love bright sunlight but not direct sunlight.

🌡️Temperature: 18°C to 30°C is enough.

💦Watering: You can water them once or twice every two weeks. 

🌷Type Of Soil: Well-drained soils rich in fertilizers are the best. 

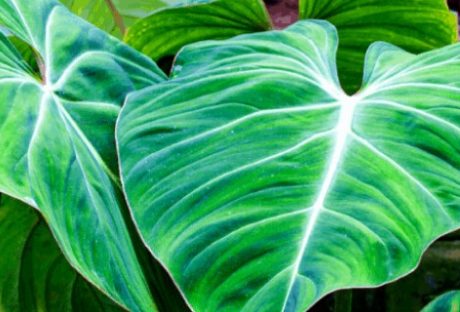
9. Philodendron Gloriosum

Philodendron Gloriosum

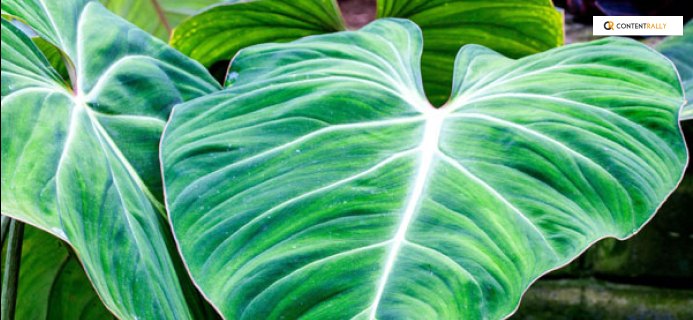
A native plant of Colombia, the Philodendron Gloriosum is a big leaf foliage plant. These plants love to crawl and climb. In humid weather, you can keep them indoors. These big leaf plants have gorgeous pink, light green, and white running across the leaves. The leaves, stems, and roots are toxic for humans and animals. 

☀ Sun: Indirect and right sunlight is best.

🌡️Temperature: 7°C to 35°C is good enough.

💦Watering: The soil needs to be damp. You can water two to three times every week. 

🌷Type Of Soil: Organic soil rich in fertilizers works the best. 

10. Fiddle Leaf Fig

Fiddle Leaf Fig

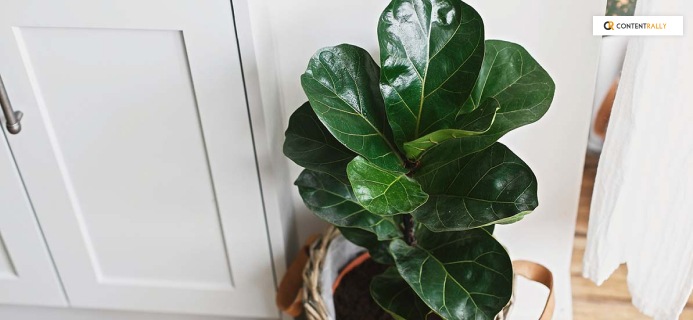
The fiddle-shaped leaves of the Fiddle Leaf Fig are large and waxy. They inhabit their pots quite well. These big leaf plants are poisonous to humans and animals. But they are aesthetic-looking bedroom plants, and they are gorgeous.

☀ Sun: These plants need bright sunlight. Do not keep them in the shade.

🌡️Temperature: 15°C to 30°C is good enough for them.

💦 Watering: Regular Watering is necessary. 

🌷Type Of Soil: You need well-fertilized moist soil. 

Frequently Asked Questions (FAQs):

Here are some frequently asked questions that you may find interesting.

Q1. How To Care For Big Leaf Plants?

Taking care of big leaf  aesthetic plants is easy. You need to keep them in medium indirect sunlight and keep the potting soil moist. They don’t need frequent fertilizing; once or twice every year is enough. 

Q2. How Do You Encourage A Big Leaf To Grow?

The water, light, fertilizer, soil, and care are all crucial to growing your big leaf plants.

Q3. Why Is My Big Leaf Plant Dying?

There can be several reasons for this; excessive Watering or little Watering can cause your plant to die. Varying sunlight and bad incompatible soil can also be the reason behind your indoor plant’s death.

Q4. What Affects Leaf Size?

The amount of Sun, water, air, and fertilizer your plant gets has an effect on the leaf size.

Bottom Line

If you want to grow big leaf plants indoors, then you can choose from these ten plants I have recommended here. All of these plants are low maintenance, and they are pretty in look. Aside from that, some of these plants purify your indoor environment.

Did you like this list? Please let us know in the comment; also, if you purchased any of them, let us know which once was your favorite.

Read Also:

  1. 10 Best Tall House Plants To Buy In 2022
  2. 10 Best Spiky Plants To Decorate Outside Your House
  3. What Are Trailing Plants? – What Are The Types Of Trailing Plants?

Shahnawaz is a passionate and professional Content writer. He loves to read, write, draw and share his knowledge in different niches like Technology, Cryptocurrency, Travel,Social Media, Social Media Marketing, and Healthcare.

View all posts

Leave a Reply

Your email address will not be published. Required fields are marked *

Related

how to harvest dill

How to Harvest and Preserve Dill for Year-Round Use?

The tender, fern-like leaves of dill almost beg to be touched. If you want to cook them, trim the fresh dill foliage and gather the seeds for pickling. Or you can chop the feathery leaves and yellow umbels for attractive bouquets of homegrown flowers. In addition, black swallowtail caterpillars love to feed on it. Its tiny yellow blooms are great at drawing in a wide range of pollinators. Dill grows as an annual for summer harvests in USDA Hardiness Zones 2–8. In other parts, it may self-seed and is hardy in the winter in Zones 9–11. Here is everything you need to know about how to harvest dill. Keep reading for a comprehensive guide. How to Harvest Dill? Fresh dill clips easily, but it soon starts to droop. Sounds familiar to Cilantro, right? Its flower umbels may look lovely in a mixed bouquet, but after a few hours, don't be shocked if they start to wilt. When harvesting dill for recipes, use it as soon as possible because its flavor starts to fade after a few days. Cut off the flower stalks of dill after the yellow blooms have faded but before the seeds start to ripen and come away from the umbel. Cover the entire flower head with a small paper bag that has a few tiny holes for ventilation. Hang the plant upside down in a cool, dry place. Watch for the seeds to fall and collect them in the bag's bottom. The seeds should be kept in a cool, dry, and dark area in an airtight glass container. When and How to Plant Dill? Dill grows best outside and is simple to start from seed. Plant the seeds directly into the ground, 1/4 inch deep and spaced 1 to 2 inches apart, in the springtime following the last frost. If you want the dill plants to be able to self-sow, plant the seeds in tufts so the seeds can fall and sprout the following year. Or you can plant them in rows spaced about 6 inches apart. You might want to think about succession planting if you want a reliable supply of dill. During the growing season, start by planting a small number of seeds from the packet at a time and then a few more every week. Typically, seeds take 7 to 14 days to germinate. Also, dill can be grown from transplants grown in nurseries planted in the ground or in containers in spring. You can plant dill outside a few weeks before the last predicted spring frost because it can withstand light frost. To achieve lush growth and stop crowded seedlings from producing seed heads, which stops the production of foliage, thinning is essential. Every 12 to 24 inches, reduce the number of seedlings to just the strongest one once they reach 3 or 4 inches in height. As they get bigger, some start to flop. Plants can be kept upright by placing a stake or a sturdy twig in the ground close to the plant's base. To loosely secure the plant to the stake, use garden twine. You can start the dill seeds indoors four to six weeks prior to the last frost. And you can move the seedlings to the ground once the risk of frost has passed. Transplanting mature dill does not work well, so plant your seedlings where they will be able to grow and thrive. Where To Plant Dill? Dill should be planted in a spot with well-drained soil and at least 6 to 8 hours of daily full, direct sunlight. Particularly for cottage gardens, the delicate foliage gives garden beds and borders textural interest. Choose a location for your dill that will shield it from the wind if possible. Just like spinach, high winds can easily damage its stalks if you do not stake the dill. You can plant dill's fragrant foliage in perennial garden container plantings. Or you can plant them alongside other herbs or vegetables in a traditional kitchen garden. In an edible garden, cruciferous vegetables such as Brussels sprouts, collard greens, broccoli, and cabbage are good companion plants for dill. Dill draws beneficial insects like ladybugs and bees and drives away common brassica pests like loopers and cabbage worms. But avoid planting dill close to carrots. Carrots can be stunted by dill, and because they are closely related, dill can cross-pollinate with carrots to produce inferior hybrid plants. Planting dill close to tomatoes is also not recommended. Mature dill will probably stunt your tomatoes' growth, even though some studies have indicated that tomatoes and dill can be beneficial companions when they are young. How to Propagate Dill? Seed is the most effective method of dill propagation. Cuttings can also propagate Dill, though this isn't as dependable. Seed: Direct sow the dill seeds in early spring at a depth of 1/4 inch in a prepared garden bed. Dill does not tolerate transplanting well. Thin the seedlings so they are 12–24 inches apart when they are 3–4 inches tall. Cuttings: Using shears or scissors, cut off the stem with at least 3 to 4 inches of new growth to take a dill cutting. Place the cutting in a water-filled container, making sure to remove any leaves below the water's surface, and allow the roots to grow for two to three weeks. Fertilizer and rooting hormones are not required. Plant the dill in a container or on the ground once the roots are 2 to 3 inches long. Is Dill a Type of Weed? No, I am not talking about WEED weed (read: marijuana). Although dill isn't technically a weed, some individuals and spice companies call the plant dill weed, possibly due to its feathery leaves. Dill weed is a dried or fresh foliage plant. Flower umbels are yellow and used to make dill seeds. How Should Dill Be Stored for Optimal Quality? You can keep fresh dill in the fridge by wrapping its leaves in a moist paper towel. Or you can tuck its stems into a container of water. Fresh dill can be frozen by submerging it in water in ice cube trays. Place the cubes in cooked dishes that have enough moisture to withstand them. Dill seeds and leaves can also be easily dried for later use, though the flavor is a lot more muted. Water and Soil Sow dill in soil that is moist but well-drained. If there is a lot of clay in your soil, add organic matter to the top few inches to aid in drainage. If you have trouble with poor soil drainage, plant this herb in raised beds or containers. Growing dill requires proper irrigation. As the seeds germinate, keep the soil evenly moist. Dill plants require one to two inches of rain or extra water each week once they begin to grow. Humidity and Temperature Dill tolerates temperatures as low as 25ºF, but 70ºF is the ideal temperature for it. Dill often bolts, sending up flower stalks to set seeds when temperatures rise. This annual herb dies after it flowers and produces seeds. Get rid of the flowers to prolong the plant's growing season. Apply Fertilizer While most herbs, including dill, don't require extra fertilizer, you can give them once or twice during the growing season by applying a balanced 10-10-10 fertilizer. When planting, either mix a liquid fertilizer with water or etch a time-release fertilizer into the soil. Refer to the product label for instructions on how much to use. Trimming Dill should be pruned early in the growing season to prevent limb bending. Cut off the top leaves of the plant to promote more growth of the lower leaves. Food preparation and cooking can be done with anything that has been pruned. Repotting and Potting You can grow dill in pots on a sunny balcony or deck, even if you don't have an outdoor garden. Due to the deep taproot that dill plants have, choose a container that is at least 12 inches deep. Because clay and terracotta pots don't retain as much moisture as plastic or glazed ceramic pots. They are ideal for growing dill. Make sure the container you select has good drainage and is big enough to allow you to space your plants 12 to 24 inches apart. It is best to start over in a new, larger container. Especially if your dill plant outgrows its current one because it does not take well to transplant. If the temperature where you are planting is not too high, you can keep planting seeds into the summer. Types of Dill Dills can be of many types with each of their distinct looks and flavors. Here are the three different types of dill you can grow in your kitchen or backyard. Long Island Mammoth Also known as Long Island Mammoth this one is an old-time favorite. Its fern-like leaves can be dried and stored for a long time, or they can be harvested fresh. It produces big clusters of yellow flowers with flat tops. They turn into brown seed heads, and they can reach a height of five feet. Fernleaf Grown to a height of only 18 inches, Anethum graveolens, or Fernleaf, is a highly productive dwarf variety. It works well in container gardens or small in-ground beds. Its feathery, delicate foliage has a great flavor of dill. From midsummer into fall, it blossoms. Bouquet The 'Bouquet' cultivar produces plants up to thirty inches tall with fine bluish-green foliage. The enormous, six-inch-diameter yellow flower heads are ideal for drying, creating an enduring arrangement. Or you could chop them for fresh floral arrangements. How to Keep New Dill Fresh? Dill weed quickly wilts after harvesting and gradually loses its distinctive flavor and aroma. If you know how to store your freshly harvested dill, this shouldn't be a problem. Here are two straightforward techniques that you can use: Put It in the Crisper Drawer of the Refrigerator Loosely wrap the recently cut and cleaned leaves in damp kitchen towels before putting them in a container or sealed bag. Put the container in the crisper drawer of the refrigerator, which has a lower humidity than the other sections of the appliance. Utilize the herbs before they begin to wilt and dry out, which should happen in a few days. Put It in Water To make this method function, when harvesting the herb, you must cut off the entire stem. After gathering the stems, put them in a glass of water and seal the opening with a plastic bag. Every day, change the water. Unlike potatoes, dill leaves can remain fresh for up to a week when stored in this manner. How to Freeze Fresh Dill? Freezing is the best way to preserve extra dill for later use if you've harvested more than you can use at once or in a few days. Dill freezes most effectively when chopped into smaller pieces and added to ice cube trays with just enough water to cover the freshly minced dill. This allows the herbs to be kept for four months or longer. This will ensure you always have dill on hand for when a recipe calls for it. How to Dry Fresh Dill? Dried fresh dill is a popular method if you're searching for another way to store dill for a long time. The herb has many uses, even though it won't have as much flavor as when it's fresh or frozen. All year long, you can use it as a herb in cooked dishes or to make tea. Stick to hang-drying if you don't want much of the flavor to be lost. This is a very easy method to use. All you must do is gather a few dill leaves and then bind them with a string. Later, place them in an area with adequate ventilation upside down.  Place them in an airtight container once they're crumbling and dry. Even though fresh dill is always preferable, make sure to save some for later use. Particularly if you don't have a year-round indoor herb and spice garden. Wrapping Up Growing dill is a great way to add flavor to fish and seafood dishes. A little goes a long way because fresh dill leaves have a strong licorice flavor. It is best that you add dill toward the end of cooking, in salads, or as a garnish for soups. Because once cooked, it tends to lose its flavor. If you have thoughts to share or questions to ask about how to harvest dill, please leave a comment below. We would love to hear from you! Read Also: Asparagus 101: When, How, And How Often To Harvest? How To Harvest Sunflower Seeds: A Fun And Easy Activity For The Whole Family How TO Harvest Lemongrass: Tips AND Tricks FOR Growing AND Using This Versatile Herb

READ MOREDetails
Water Filter Pitcher

The 5 Best Brita Alternatives For Water Filter Pitchers

A water filter pitcher is something everyone should have in their home. It’s one of the simplest ways to guarantee that the water you’re drinking is clean, safe, and deliciously chilled. Unfortunately, getting a great water filter pitcher isn’t as easy as you might think. Popular brands like Brita do a great job of filtering out substances like chlorine thanks to their activated carbon filters; however, they’re far from comprehensive. The fact is, mass-produced, store-bought water filtration systems are a far cry from true filtration options. They’re limited by their simple filter media and only work when it comes to high-turbidity contamination—lots of suspended solids. These filters do almost nothing to neutralize VOCs or microbiological threats. If you’re on the lookout for a water filter pitcher, you can do better than Brita. Here are a few of the best Brita alternatives for water filter pitchers and why they’re worth the investment. 1. Aquaspace® Carafe® Pitchers You might not even need to finish this list, because we’ve put the very best Brita alternative front and center, right at the top. There’s simply no beating the performance of Aquaspace® Carafe® Pitchers! Not only are there options for specific filtration such as fluoride, but there are also alkaline options for those who prefer the benefits of water with a slightly higher pH. The specifications of these filters are second-to-none when it comes to filtration capabilities. First, there’s an amazing 500-gallon capacity on Aquaspace® filters—as opposed to a meager 40 gallons on most Brita systems. On top of this, there’s filtration power to consider. The Aquaspace® filter goes above and beyond any activated carbon filter, to deliver comprehensive filtration that spans both organic and inorganic compounds. Need more proof that Aquaspace® comes out on top? Look at the pour-through funnel to the filter media, which ensures powerful filtration, instead of pass-through sieve filtration. If you’re going to spend the money on a water filter pitcher, there are few better options than Aquaspace®. 2. Pūr Classic 11-Cup Pitcher One of the competitors to Brita that you’re likely to find in stores is Pūr. This brand is mass produced, but its filter media is a step above others on the market. It doesn’t just rely on activated carbon media; its MAXION® filter technology also addresses pharmaceuticals and industrial pollutants to provide a more encompassing level of cleanliness to water. Like other store-bought filters, Pūr has some bells and whistles that make it worth looking at—including the LED filter indicator. While the filter lifespan is only a meager 40 gallons, an LED reminder will let you know when it’s time to swap in new media. Moreover, the filters themselves are relatively inexpensive. One of the best things about this water filter pitcher is its convenience. It has a relatively low cost of ownership and is easy to fill, pour and clean. It’s also BPA-free. If you’re shopping in-store, it’s hard to do better than Pūr. 3. Travel Berkey Gravity-Fed Water Filter If price isn’t an option, the Travel Berkey Water Filter is worth a look. We’re not kidding when we say it’s pricey, though—you’re looking at a $250 purchase price and $120 replacement filters. If you’re reading this aghast, take a moment to consider the benefits. First off, the Travel Berkey Water Filter and its filtration media will cleanse up to 6,000 gallons before you need to replace the filters. This is enough to justify the cost of the filters themselves. As for the cost of the unit, it’s probably the most well-made on this list and features stainless steel that’ll last you a lifetime. The system itself is also a gravity-fed setup, which means you can expect superb filtration and extremely clean drinking water. Outfitted with the right filters, it’ll eliminate just about any contaminants in your water, including arsenic. The downfall of this system? Well, it’s not exactly a pitcher and you can’t keep it in the fridge. It’s meant as a countertop option that holds 1.5 gallons, which makes it equally as convenient. 4. ZeroWater 6-Cup Pitcher If you live in an area with heavy lead content in the water supply, this pitcher is an upgrade over Brita filters. While it only boasts a 6-cup capacity, the filtration power of the ZeroWater filter pitcher is well-worth the extremely affordable $20 price tag. Thanks to its five-stage filtration capabilities, this pitcher does what only activated carbon filters can’t. Aside from the usual hard water culprits, this system also filters out compounds like fluoride, nitrates and other inorganics. This, in conjunction with its ability to filter out most unwanted organic compounds like arsenic and mercury. It’s one of the best filtration systems for the cost. The unfortunate aspect of the ZeroWater filter pitcher is its 20-gallon filter lifespan. If you’re relying on it frequently, you could end up spending a fortune in filter replacement costs. This is an option best left for those who also have some point-of-use filtration system. 5. Clearly Filtered 10-Cup Pitcher While its claim of being “the most powerful water pitcher on the market,” might be a little dubious, the Clearly Filtered pitcher is certainly a leader in its class. Sure, you’re going to spend more than the off-the-shelf filters on this list, but you’ll also get better performance. First, you’ll love the 100-gallon filter capacity on this model. This, in combination with its powerful filtration capabilities, makes it a great everyday option. Its 10-cup capacity means you’ll need to replace the filter roughly every 10 times you refill it. When it comes to filtration quality, expect this system to remove more than 230 unwanted organics and inorganics, including fluoride, lead, plastics, hormones, and more. It’s a truly encompassing filtration option. The only real downfall of this pitcher is that it’s a bit bulky and can be difficult to fit into a small fridge. Replacement filters aren’t cheap, either ($50), but they do offer good value thanks to their longevity. Pay Attention to Pitcher Performance When selecting a water filter pitcher, the best way to understand what you’re getting for your money is to look at the specifications of the product. What type of filter media does it use? How quickly does it filter? What’s the filter lifespan? These factors all matter when it comes to the clarity and safety of your water. At the end of the day, a water filter pitcher is all about convenience—and health. When you pull that pitcher out of the fridge and pour yourself a refreshing glass of crisp, cool water, you should be able to enjoy every sip. It starts by having confidence in the filter pitcher you’ve chosen. Looking for the best water filter pitcher available on the market? Look to Aquaspace for all your filtration needs! Read Also: How Many Jobs Are Available In Real Estate Investment Trusts? 2021 0123Putlockers And Servers – Watch Movies Online

READ MOREDetails
how to harvest lettuce

How to Harvest Lettuce: A Step-by-Step Guide for Fresh and Crispy Salads

Since lettuce plants grow best in cool growing seasons, most lettuce varieties are classified as spring or fall greens. However, if the longer days are keeping your lettuce plant producing leaves well into the summer and it hasn't bolted yet, here are some excellent tips to follow to maximize your harvest. Taking individual leaves off the plant is one way to increase its yield. Alternatively, you could sow in succession every two weeks in the early spring or fall to continue the harvest. To offer lettuces shade and protection from the hot summer sun and high temperatures, a third method is to interplant with a taller crop. Lastly, cultivators should seek out cultivars known for their slow bolting, like the looseleaf varieties "Slobolt" and "Sierra." Here is how to harvest lettuce so you can eat some leaves right away and encourage the plant to continue growing more. How To Harvest Lettuce? If you want to harvest lettuce and do not know how to go about it, here are all the details. Follow the steps closely to get the healthiest and crispiest lettuce for your salads and sandwiches. Plant Looseleaf Varieties Your lettuce variety should be ready to harvest in 35 days, according to the seed packet, which means you should have large enough leaves to pick a little more than a month after planting. By regularly picking the outer leaves, you may be able to extend the harvest until late June if you sow seeds in March or April. Begin Harvesting Early in The Season Young lettuce plants will be harmed by light frost, but mature plants can withstand it. If you live in an area where there is no winter frost, you can plant early and begin harvesting the outer leaves when they get to be 4 or 6 inches long. Your harvest can last up to 30 days longer if you plant and harvest early. Pick Lettuce in The Morning It is ideal to harvest lettuce early in the day to avoid the leaves wilting due to the intense heat. The leaves are crispest and flavorful in the morning because they contain the most water. Look For Plants with Large Outer Leaves The center of the crown is where the new growth starts on the lettuce. You must remove the largest, oldest leaves that are about 4-6 inches long. You will find these leaves on the outside of the plant. Cut or Pinch The Outer Leaves At 1/4 to 1/2 inch from the base, pinch off each outer leaf. To break the leaf off the crown, apply just enough pressure with your thumb and forefinger. Another option is to use a sterile, sharp scissor or snipping tool, though there is disagreement about whether doing so accelerates the browning of cut edges. Harvest Until it Flowers When older, mature leaves are consistently removed, the lettuce plant is encouraged to grow new leaves in their place. Harvesting individual leaves is possible until the plant produces a flower stalk, which indicates that it is ready to bolt and set seed. Lettuce turns bitter once it bolts. When to Harvest Lettuce? As soon as the lettuce is large enough to pick, it can be harvested. A seed packet will typically tell you how many days it will take to harvest. For the "cut and come again" method of harvesting loose leaves, standard-size varieties are the most effective. When outer leaves are 4 to 6 inches tall, that's the best time to begin harvesting. There are many varieties of lettuce seeds available, including blends and mesclun mixes. The best varieties to plant for a continuous harvest are called bi-colored, spotted, or loose-leaf lettuces in green and red or burgundy tones. The following are some varieties you might want to try: Black Seeded Simpson Green Salad Bowl Freckles Lolla Rossa Gourmet Mesclun Blend Deer Tongue Garden Leaf Blend Loose leaf lettuce varieties yield the best results from the cut-and-come-again method. Red, green, and oak leaf lettuce are a few examples. Additionally, you can wait to pick until a full head has matured or harvest early leaves from loose-heading varieties like butterhead and romaine. When and How to Gather Lettuce Heads The growth habit of head lettuce is akin to that of cabbage. In order to form a dense, rounded, or clumped shape, younger leaves emerge from the center, and older leaves form layers. There are two types of head lettuce: loosehead (similar to romaine) and crisphead (like iceberg). Let the crisphead varieties mature for a single harvest and keep an eye on them in accordance with the days to harvest specified on the seed packet. When the heads are dense and the appropriate size, they are ready to be picked. If you remove the outer leaves once or twice, loosehead lettuces will still head. However, the size of the fully mature head may decrease as a result. These lettuces can produce a head of looser layering or wrapping leaves (butterhead) or a clump of tall, straight leaves (romaine). Remove crispheads by chopping off the stem just below the center. Loose heads can be trimmed similarly or removed, with roots and subterranean stems cut back to the leaf base, depending on size. What Happens If a Flower Stalk Bolts A lettuce plant will eventually shoot up a flower stalk in the center, a sign that it has reached the end of its life and is ready to bolt, or bloom, and set seed. Though they might still be edible, the lettuce leaves are starting to get tough and bitter. There is no stopping flowering once this process has begun. Throw away the plant and plant again if the weather permits. Types of Lettuce There are four types of lettuce you can choose from when choosing which to grow: leaf, butterhead (loosehead), romaine, and head lettuce. When it comes to cultivation and harvesting, the main distinction is that leaf lettuce crops yield several harvests, whereas head lettuce varieties, such as iceberg, romaine, and butterhead, only yield one harvest. Leaf lettuces are, therefore, a favorite among home gardeners since you can grow them in raised beds, on the ground, or in patio containers. Keep in mind that lettuce is a cool-season crop, so you should schedule your harvest for the spring when the temperature is still cool. Such temperatures are usually around 70 degrees. Find out when the first frost occurs in your area each fall and plant appropriately. Starting fall crops from seed indoors and moving them outside as the weather cools down may be the best option. Seek out head lettuce cultivars such as Crisphead and Iceberg that you can grow from seed. In roughly six weeks, the lettuce will reach maturity and be ready for harvest after the seeds have germinated in 10 to 21 days. One loose butterhead variety that you can grow from seed or seed tape is called Buttercrunch. It takes 65 days to be ready for harvest. Vivian is one of the romaine varieties that yields soft, flavorful leaves. Directly sow seeds in the garden in the spring. Start seeds indoors in the fall and transplant them to your garden. Varieties of loose-leaf lettuce grow quickly and are enjoyable to experiment with in salads, sandwiches, and other culinary creations. Look for mesclun mixes and heirloom cultivars such as "Black Seeded Simpson." Many come in simple-to-grow seed tapes that can be harvested in roughly seven weeks. How to Harvest Leaf Lettuce? When the weather gets chilly, you can harvest salad from a leaf lettuce crop in your home garden whenever you're ready to eat. You can harvest an entire crop of lettuce at once by waiting for it to mature. However, cutting fresh lettuce leaves off as they grow is the easiest way to prepare them for consumption at any time. Depending on the variety, lettuce leaves should be harvested when they reach a length of 3 to 6 inches. Gather leaves continuously until the lettuce plant "bolts." This indicates that the plant has focused its energy on developing seeds and flowers, and as a result, the leaves typically develop tough stems and a bitter taste. How to Harvest a Full Head of Lettuce? A lettuce plant can continue to grow until it produces a full head of leaves. Use the "one and done" approach when harvesting head lettuce. Just make a clean, above-soil knife cut across the entire head of lettuce at the base of the plant. For this, a harvest knife comes in handy. Remember the seed packet and note the maturity or harvesting days. As your plants get bigger, keep an eye out for indicators of maturity, which are typically firm, full heads. Harvest in the spring before it gets too hot, usually when the daytime highs hit 70 degrees Fahrenheit. The bitter taste of the leaves and the mushy head of lettuce can result from warm weather. How to Store Lettuce? When the lettuce is inside, you can use a colander to wash the leaves and thick cotton towels to dry them so you can use them in salads and sandwiches. In case you cultivate a lot of lettuce, investing in a salad spinner would be wise. It helps dry and wash Lettuce quickly. Lettuce leaves without water should be refrigerated. For most greens, store the leaves in a loose plastic bag for approximately a week. When the salad greens are ready to be eaten, give them a good rinse in several runs of cold water and then pat dry. How to Harvest Lettuce Microgreens? Microgreens are incredibly simple to harvest! When the first true leaves appear, after ten to fifteen days of planting the seeds, they will be ready. When the microgreens are two to three inches long, harvest them if you are measuring them by height. Investigating the flavor profiles of the microgreens at various heights is enjoyable. Cut the entire plant ½ inch above the soil line with a pair of scissors or grass shears. If you need more inspiration, check out our many other interesting gardening tips for growing microgreens, like growing lettuce microgreens! How to Harvest Romaine Lettuce? The leaves of romaine lettuce (also known as cos) have the perfect amount of crunch or crispness. The lettuce plant's outer leaves can be harvested as it grows. The leaves can be chopped off one to two inches above the ground. Gathering these tender green leaves now will give the lettuce more time to ripen before full plants can be harvested. Before Romaine lettuce reaches maturity, it can take 55–70 days to grow from seed. To determine when the lettuce is ripe, examine it directly. When the romaine lettuce leaves are 6 to 8 inches tall, the ribs are firm and juicy, and the leaves have formed a tightly compacted head, the lettuce is ready for harvesting. To test if the lettuce head is firm, squeeze it. Overripe head lettuce will be tough, while young head lettuce will be soft. Harvest by making a cut an inch above the ground, saving the crown for a subsequent harvest. You can harvest the lettuce head by digging up the entire plant if it is nearing the end of its garden lifespan. Read More: Everything You Need To Know About Harvesting Basil! Loose Leaf lettuce The harvest window for leaf lettuce varieties is quite broad. After planting, the young, baby lettuce leaves can be harvested 25 days later, and the plant will mature fully in 50–60 days. Make sure your crop is harvested prior to it bolting. Since you can harvest loose-leaf lettuce more than once during the growing season, it's ideal for repeated harvesting. You can chop the entire lettuce plant 1-2" above the soil line once the leaves reach 4".  In 10 to 15 days, fresh leaves that have sprouted from the base will be ready for harvesting again if the crown is left intact.  Try spreading out your seed sowings and doing multiple sowings to ensure a consistent harvest all season long. If you want to preserve the crisp flavor of the young baby greens, you should sow them again. Another method of harvesting involves leaving the inner leaves to grow while pruning the young leaves on the outside of the head for greens. When the plants are 4 inches tall, you can begin harvesting lettuce by cutting them just above the soil line. Crisphead Lettuce When grown locally, crisphead or iceberg lettuce makes for incredibly tasty salad greens.  You might not get a whole head of lettuce, but this can be a cut-and-come-again harvest.  A single harvest is more appropriate for this green lettuce. After planting, there is a 50 to 75-day window for harvest. Iceberg lettuce can be harvested as soon as the head appears before the outer leaves turn brown and as soon as the center feels firm, and the leaves are compacted tightly. Before the crisp lettuce starts to open and the seed stalk starts to form, harvest it. More importantly, if you see the lettuce beginning to bolt—a common issue in hot weather—or the seed stalk, harvest it right away. Harvesting iceberg lettuce is best done by digging up the entire plant and then cutting off the stalk. Because of its thick stem, this lettuce plant can be challenging to harvest while it is still in the ground.  If you decide to harvest the lettuce while it's still in the ground, please take care not to harm it.  You can cut the stem just below the leaves by lifting the lettuce upwards. Wrapping Up Nothing compares to the sheer satisfaction of harvesting and regrowing fresh, new lettuce from the same plant. You are far superior to other lettuce owners if you can figure out how to harvest lettuce correctly so that it keeps growing. Thus, if you want to become a rich lettuce farmer, make sure you constantly and meticulously follow all the above steps! If you have thoughts to share or questions to ask about how to harvest lettuce, then please leave a comment below. We would love to hear from you. Read Also: Some Facts You Need to Know About Rainwater Harvesting Asparagus 101: When, How, And How Often To Harvest? Exploring Ideas For A Biophilic Home Design

READ MOREDetails