Published on: 15 October 2022
Last Updated on: 15 May 2026
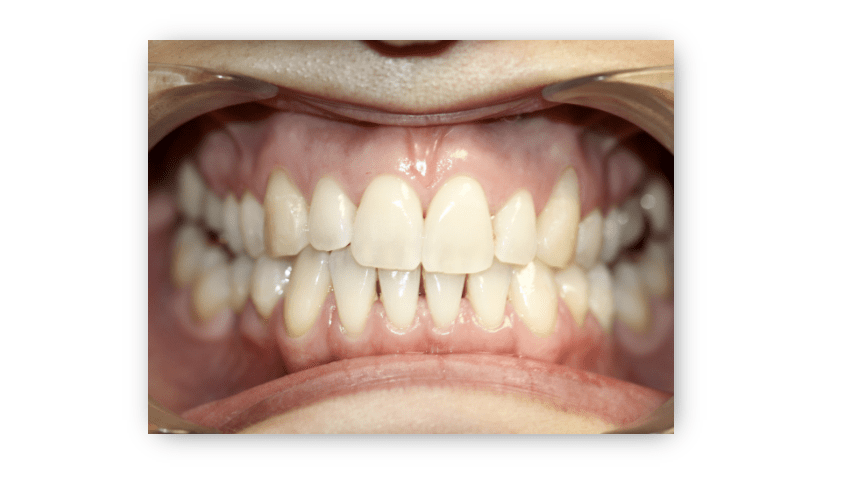
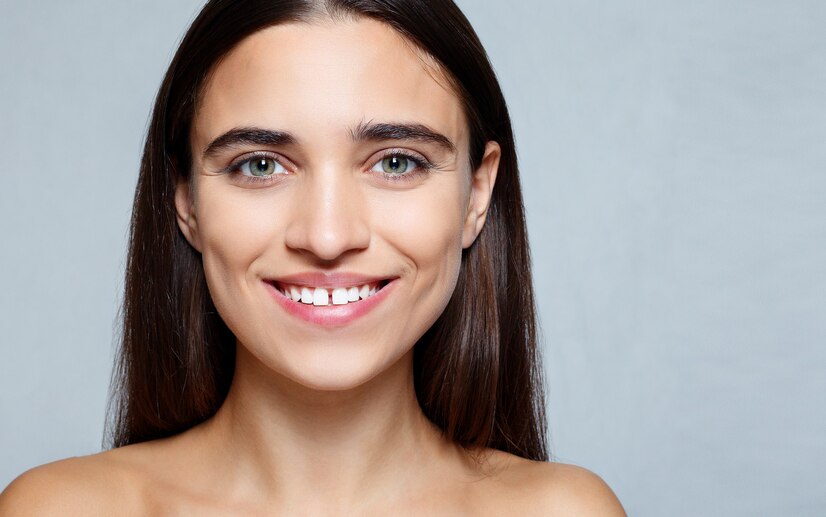
Celebrities with bright smiles are now more popular than ever, which may lead people to start noticing their teeth's cosmetic problems. Black triangle teeth are one of the most common dental problems people don't address or pay attention to.
You can check for yourself if you have black triangles between your teeth. Smile with your teeth exposed in front of a mirror. If you can see any black areas between your gums and teeth, you have black triangle teeth or gingival embrasures.
They are initially harmless, but they can be dangerous if not treated immediately. It's important to understand how they develop and what you can do to treat them.
What Are Black Triangle Teeth?
These black, triangle-shaped gaps between your gums and teeth are known as open gingival embrasures. They are usually associated with dental habits, age, and bone injury. They are also called black triangle teeth, which occur when your teeth and gums don't fill the gaps between them.
Black triangles between teeth are a common problem; nearly 76% of adults over 20 have black spaces between their teeth, according to a study.
Food debris and plaque can accumulate in these gaps, making teeth susceptible to cavities and gum infections. The risk increases the more a person doesn't practice good oral hygiene. Most want to fix them for cosmetic reasons and to keep their teeth and gums healthy.
What Causes Black Triangle Teeth?
It is important to see your dentist immediately to discuss how to treat this condition. They will use your dental history and the cause of your black triangle teeth as their guide in recommending treatments that best address it.
According to sunrise-dentistry.com, some of the reasons black triangle teeth occur are:
1. Receding Gums
Gum disease, infections, age, and smoking can lead to gum recession and thinness. Bacteria exposure and tooth decay can lead to cavities and other infections. Getting help immediately from a dentist is important if you find gaps between your teeth, regardless of their size.
2. Aggressive Dental Hygiene Techniques
Brushing or flossing too hard can damage the tissues between your teeth. Using a toothbrush with the right head size is also important; a toothbrush with a large head can make the gaps between your teeth larger.
3. Fragile Gum Tissue
Every person's gum tissue thickness and stability are different. Experts believe that thinner gum tissues are less resistant to dental procedures. If you have fragile gum tissue, getting fullness back after dental implants will not be easy.
4. Teeth Shape
Apart from the gum thickness, each person's tooth shape also differs. A person with triangular-shaped teeth is more likely to develop black gaps. Their teeth have wider biting surfaces than their bottom part near the gum line.
5. Mistakes During an Orthodontic Procedure
Black triangle teeth and other dental conditions can develop when an orthodontic procedure goes wrong. Small gaps can also form when teeth shift into new positions. You may need to repeat your dental treatment or visit a more reliable dentist.
How To Get Rid Of Black Spaces Between Your Teeth?
Now that it's clear that the black gaps between your teeth are not just cosmetic issues, it's best to learn how to eliminate them.
Consult your dentist before making any changes in your lifestyle or treatment for your dental health. They can help you understand the nature of your dental condition and determine the best approach to manage them.
According to the British Dental Journal's study, patients have several treatment options for the black triangles between their teeth.
Safe surgical techniques like pinhole surgery repair and tissue transplantation to preserve gums
Tissue engineering, where dentists use regenerative cells to restore gum tissue
Hyaluronic acid treatment to reduce black gaps between teeth and volumize gum tissues
Using prosthetics made of composite or porcelain with a pink shade to bond teeth and conceal the appearance of black triangles between teeth
Installing a removable gingival cover to close the triangle spaces between the teeth
Repositioning or reshaping teeth to reduce or eliminate the black spaces between them
Proper Dental Hygiene and Black Triangle Teeth
Brushing and flossing your teeth every day will help prevent gum disease, blackening of your teeth, and other serious conditions. Routine dental checks help you know how your lifestyle choices impact your dental health and help your dentist check for early signs of dental problems.
The American Dental Association has developed guidelines for how to brush your teeth and perform interdental cleaning. They also recommend using a toothbrush with soft bristles.
Key Takeaway
The black triangles between your teeth are more than just a cosmetic problem. They are caused by oral health problems like receding gums, aggressive oral hygiene techniques, and fragile gum tissue. Mistakes during an orthodontic procedure and the shape of your teeth may also cause black triangles between your teeth.
You should consult your dentist about them; they are the best people suited to help you determine the best course of action to take. They can also address the dental problems causing the black triangles between your teeth.
Content Rally wrapped around an online publication where you can publish your own intellectuals. It is a publishing platform designed to make great stories by content creators. This is your era, your place to be online. So come forward share your views, thoughts and ideas via Content Rally.
Going to the dentist requires that you take an active role in your dental health care and maintenance. Although professionals are trained to look out for dental issues and to clean your mouth to meet standards of optimal health, you should still pay attention to the specific dental procedures your dentist or dental hygienist recommends and performs during your appointment.
In this article, we discuss the routine dental care that should commence during your routine visits. Here are three routine dental care procedures for a brighter, healthy smile.
1. Consistent Teeth Cleanings:
While you should already be brushing your teeth at least twice a day, when you go to the dentist, make sure that you’re given professional teeth cleaning.
The devices that dentists use to remove plaque and build-up in the mouth are much more effective than your daily brushing. For this reason, you must make sure that a teeth cleaning is performed at each of your visits. Without this routine cleaning, you are more susceptible to gum disease, and issues like gum disease and cavities.
2. Ask For a Deep Cleaning:
In addition to your routine teeth cleaning, you should also ask your dentist to perform deep cleaning at one of your yearly appointments.
The purpose behind deep cleanings is to ensure that the area beneath the gums stays healthy. The focus is to target the buildup that has accumulated underneath the gums. In doing so, you will further reduce your risk of gum disease, teeth whitening, and other dental complications that could compromise your health.
3. Teeth Whitening and Strengthening Services:
If you are interested in preserving the appearance of your teeth, you might also consider asking your dentist to perform a routine teeth whitening service at one of your appointments. Choose teeth whitening for a cost-effective way to maintain a brighter smile.
Your provider might be willing to perform the teeth whitening themselves or will offer you at-home professional-grade products that you can use to complete the teeth whitening yourself. You can expect to pay around $50 for a professional teeth whitening by your dentist.
In addition to routine brushing and flossing, you can reduce acid buildup with regular fluoride treatments. Fluoride makes it easier for your teeth to resist acidity.
Your enamel becomes more deeply protected and less likely to dissolve. Many kinds of toothpaste contain fluoride, which is part of the reason dentists recommend brushing twice a day. The more you work to build up your resistance to dentin decay, the healthier your teeth will remain.
Fluoride treatments only take a few minutes to complete, so be sure to inform your dental provider that you are interested in a quick fluoride treatment when it is time for your regular visit.
The Bottom Line:
It is wise to trust your dental professional, but that does not mean you should not keep track of your dental health on your own. Check off these routine treatments as you go about your yearly checkups for the best dental health possible.
Read Also:
The Process of Invisalign
How To Get a Better Smile Whatever Your Budget
What Is A Good Alternative To Wearing Dentures?
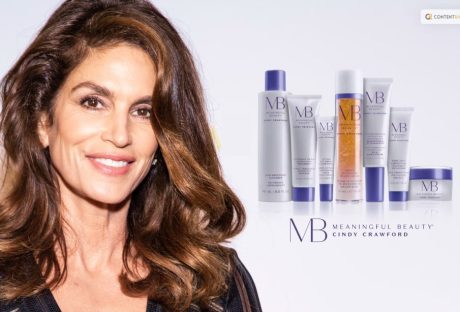
Are you searching for Meaningful Beauty reviews? If your answer to this question is a YES, then you have reached the right place!
Meaningful Beauty is a skincare brand made by Cindy Crawford as a team with French cosmetic specialist Dr. Jean-Louis Sebagh. The brand offers a scope of hostile to maturing skincare items that plan to address normal skin concerns and advance young looking skin.
Keep reading this article till the end to learn more about this brand and its product…
Meaningful Beauty Reviews: Everything You Should Know!
Image Source: meaningfulbeauty.com
Most people find it hard to believe that Cindy Crawford is in her mid-50s because she looks almost exactly the same as she did when she was a model. What is her secret after all?0
Having access to celebrity dermatologists and estheticians who have shared their best tips for maintaining Crawford's flawless skin over time certainly helps. But is that all?
Dr. Jean-Louis Sebagh, a French anti-aging specialist, is the skincare expert who has had the greatest impact on Crawford's life. Cindy and Dr. Sebagh began working together more than ten years ago to bring his anti-aging formulas to women all over the world. Meaningful Beauty was born as a result of that.
Crawford is said to know the Meaningful Beauty products that give her skin a youthful glow. But are you really going to get skin like Cindy Crawford with these products?
In this blog, these are the questions that I will be addressing and reviewing. So, if that is something that you want to know, keep reading this article till the end…
Who Is Cindy Crawford?
Image Source: images.squarespace-cdn.com
Cindy Crawford is an American supermodel and actress who gained fame during the 1980s and 1990s. She was born on February 20, 1966, in DeKalb, Illinois, United States. Crawford's career took off in the mid-1980s when she appeared on the covers of various fashion magazines, including Vogue, Elle, and Cosmopolitan. She quickly became one of the most recognizable and sought-after models of her time.
Crawford's distinctive features, including her signature mole above her lip, helped her stand out in the fashion industry. She worked with renowned photographers such as Richard Avedon, Herb Ritts, and Helmut Newton. Crawford's modeling career included numerous high-profile campaigns for major brands, such as Pepsi, Versace, Revlon, and Omega.
Beyond modeling, Cindy Crawford ventured into acting, appearing in films and television shows. Some of her notable acting credits include appearances in movies like "Fair Game" (1995) and "The Simian Line" (2001), as well as guest roles in TV shows like "3rd Rock from the Sun" and "According to Jim."
If there is one thing that makes her the talk of the town still now, it has to be her age-defying looks.
What Is Meaningful Beauty?
Image Source: meaningfulbeauty.com
Meaningful Beauty is a skincare brand created by Cindy Crawford in collaboration with French cosmetic surgeon Dr. Jean-Louis Sebagh. The brand offers a range of anti-aging skincare products that aim to address common skin concerns and promote youthful-looking skin.
Meaningful Beauty focuses on incorporating key ingredients and advanced formulations to target signs of aging, such as fine lines, wrinkles, and loss of firmness. The products are designed to hydrate, nourish, and protect the skin, with an emphasis on promoting a radiant and healthy complexion.
The brand's flagship product is the "Crème de Serum," which combines the benefits of a cream and a serum to deliver hydration, antioxidants, and other anti-aging ingredients. Other products in the Meaningful Beauty line include cleansers, toners, moisturizers, eye creams, serums, and masks.
Why Is Meaningful Beauty Popular?
Image Source: dietsinreview.com
Searching for Meaningful Beauty reviews, you might be wondering why this brand is becoming so popular. Well, I have the right answer for you!
Meaningful Beauty places importance on the use of antioxidant-rich ingredients, such as superoxide dismutase (SOD), melon extract, and coenzyme Q10, to help combat the effects of environmental stressors and promote overall skin health.
The skincare line has gained popularity not only due to Cindy Crawford's endorsement but also through its availability for purchase online and through select retail channels. The products are marketed as part of a comprehensive skincare routine aimed at providing visible improvements in the appearance of the skin.
What Are The Ingredients In Meaningful Beauty?
Image Source: dev.rodpub.com
Melon fruit extract is a key component that is utilized in the entirety of the Meaningful Beauty collection. The brand claims that this uncommon French melon extract is utilized due to its presence of superoxide dismutase (SOD). I will be discussing the advantages of this ingredient and the supporting key ingredients in these products. Here are some of the main ingredients of this product:
1. Vitamin C
Although French melon extract is a novel ingredient, we are pleased to see that several Meaningful Beauty products contain tried-and-true vitamin C. Vitamin C is not a miracle cure for aging, but it comes pretty close. It is a potent antioxidant that shields your skin from free radical damage from the environment.
Additionally, Vitamin C aids in the removal of dark spots evens out skin tone, and boosts radiance. As if that weren't enough, research shows that applying vitamin C to the skin significantly reverses structural changes caused by aging by influencing the synthesis of collagen and elastin.
It is included in the Meaningful Beauty Dark Spot Correcting Treatment, which also contains glycolic acid and hydroquinone, two skin brighteners.
2. SOD
SOD, or superoxide dismutase, is an antioxidant enzyme that is present in all living cells. Free radicals, unstable molecules that contribute to the development of premature wrinkles and fine lines on the skin, are limited in their ability to cause oxidative damage by antioxidants. In particular, the dismutation of the superoxide free radical into oxygen and hydrogen peroxide is catalyzed by superoxide dismutase.
It has been demonstrated that topical application of superoxide dismutase protects cell membranes and type I collagen from fragmentation caused by free radical damage. In the end, this aids in the prevention of age spots, wrinkles, and fine lines. Superoxide dismutase may also aid in wound healing, soften scar tissue, and shield against UV rays, according to research.
3. Retinol
SOD, or superoxide dismutase, is an antioxidant enzyme that is present in all living cells. Free radicals, unstable molecules that contribute to the development of premature wrinkles and fine lines on the skin, are limited in their ability to cause oxidative damage by antioxidants. In particular, the dismutation of the superoxide free radical into oxygen and hydrogen peroxide is catalyzed by superoxide dismutase.
It has been demonstrated that topical application of superoxide dismutase protects cell membranes and type I collagen from fragmentation caused by free radical damage. In the end, this aids in the prevention of age spots, wrinkles, and fine lines. Superoxide dismutase may also aid in wound healing, soften scar tissue, and shield against UV rays, according to research.
Best Selling Products From Meaningful Beauty
Image Source: m.media-amazon.com
One of the major things that you need to keep in mind while looking for Meaningful Beauty reviews is the list of products that you should try. Cleansers, toners, exfoliators, masks, eye creams, moisturizers, sunscreens, and serums are all included in the Meaningful Beauty product collection.
Here are some of the bestselling products from the Meaningful Beauty:
1. Meaningful Beauty Creme De Serum
The purpose of the formulation of Meaningful Beauty Creme De Serum was to combine the moisturizing properties of a cream and the potency of a serum. As you will see, the main ingredient in every Meaningful Beauty product is a French melon extract (more information about this extract can be found in the Key Ingredients section below).
2. Meaningful Beauty Dark Spot Correcting Treatment
The most widely used ingredient for treating hyperpigmentation is included in this treatment for dark spots: Hydroquinone at 2% The American Osteopathic College of Dermatology asserts that hydroquinone causes reversible skin lightening by interfering with the melanocytes' production of melanin.
3. Meaningful Beauty Skin Softening Cleanser
This gentle soap-free cleanser gently removes excess oil, impurities, makeup, and mascara while preserving the skin's natural pH balance. The primary cleanser in the formulation is sodium laureth sulfate. Despite their similar names, sodium laureth sulfate (SLES) and sodium lauryl sulfate (SLS), both of which are known to irritate the skin, are not the same thing. Instead, SLES is a gentle cleanser that cleans the skin without making it dry, tight, or irritated.
4. Meaningful Beauty Glowing Serum
The Meaningful Beauty Glowing Serum is packed with isoflavones thanks to its high concentration of hydrolyzed soy protein. Isoflavones may be able to thicken skin because they have a weak estrogenic effect. This serum also contains vitamin E, kelp extract, pumpkin fruit extract, and ascorbyl methylsilanol pectinate, a vitamin C derivative.
5. Meaningful Beauty Youth Activating Melon Serum
It is claimed that this Meaningful Beauty serum helps to shield the skin from future environmental damage while also visibly increasing firmness and elasticity. Encapsulated melon leaf extract is one of this serum's most important components.
6. Meaningful Beauty Anti-Aging Day Cream
Anyone with even a passing interest in skin care is aware of the significance of using a day cream that blocks UV rays from the sun. It is the most effective method for avoiding wrinkles, lines, and dark spots.
The Meaningful Beauty Anti-Aging Day Creme, which contains chemical sunscreen ingredients (avobenzone, homosalate, octisalate, and oxybenzone), provides broad spectrum SPF 30 protection for your skin. Despite the fact that these chemical sunscreen ingredients do not leave a white cast like mineral sunscreens do, research has demonstrated that they do absorb through the skin and into the bloodstream.
Meaningful Beauty Reviews: What About Their Ultra 5-Piece?
Image Source: instyle.com
If you are looking for a package, Crawford is ready to deliver that for you and your skincare needs as well. And that is where the Ultra 5-Piece cones in the picture!
What Is The Ultra 5-Piece?
The Meaningful Beauty Ultra 65-Piece contains five items that are intended to cooperate as a total framework that smoothens out your skincare schedule. The kit will help visibly firm, smooth, increase radiance, and improve clarity while also reducing the appearance of fine lines and wrinkles when used regularly. Overall, the system gives skin a more youthful and radiant appearance.
What Does It Contain And How To Use?
The kit has everything that you need. The products that you get in this kit are Skin Softening cleanser, Creme de Serum, Anti-Aging Day Creme with Environmental Protection SPF 30, Ultra Lifting and Filling treatment, and Lifting Eye Creme Advanced Formula.
Here is a how you can utilize the skincare kit for your daily routine:
Step 1: Cleanse dry skin directly with the cleanser. Use circular motions to massage. Use a cotton pad and warm water to rinse.
Step 2: In the morning, apply a thin layer of Ultra Lifting and Filling Treatment to a clean face and neck.
Step 3: Apply a thin layer of Environmental Protection Broad Spectrum SPF 30 to the neck and face in the morning. Apply a light amount of SPF and evenly massage it to the skin. Apply Crème de Sérum as an overnight serum and cream at night.
Step 4: Apply a small amount of Lifting Eye Crème Advanced Formula to the under-eye area with a gentle pat every morning and evening.
Frequently Asked Questions (FAQs):-
If you were searching for Meaningful Beauty reviews, I hope that this blog has answered most of them for you. However, it is never too bad to learn a bit more. Here are some of the questions that readers and users often ask about the products and the brand. So read them a little before you leave…
Q1. Does Meaningful Beauty Have A Money-Back Guarantee? Ans: Yes! Return the product containers within 60 days of receiving them for a full refund of the purchase price (less shipping and handling), even if they are empty, if you are not satisfied for any reason, and purchased from an authorized retailer. You can keep any freebies you receive! Q2. How Do I Cancel My Subscription? Ans: If you want to cancel your Meaningful Beauty, you can do so very easily. You can cancel your subscription anytime by accessing their online chat feature or contacting Customer Service. Their customer contact number is (800) 927-0047. Q3. How Does Auto-Delivery Work In Meaningful Beauty? Ans: A membership or "auto-delivery" is a basic method for guaranteeing you get the items you need, when you need them. Your favorite Meaningful Beauty products will arrive at your doorstep immediately. You can also cancel, reschedule, or modify it at any time.
Wrapping It Up!
It's worth noting that while Meaningful Beauty has garnered a dedicated following and positive reviews from some customers, individual experiences with skincare products can vary. It's always advisable to research and consider personal skin type and preferences when choosing skincare products.
In case you were searching about the Meaningful Beauty reviews, I hope that this article has been of great help to you in understanding the products and how they work. If there are any other questions that you may have related to the same, please feel free to let me know. All that you need to do is scroll down till you reach the end of this blog and leave your comments and queries in the box below. And I will be there to answer them all for you!
Learn More About:
Are CBD Lotions Good For Your Skin?
What Is The Best Vitamin To Take For Dry Eyes?
Is the 10 Step Korean Skincare Routine Worth the Hype?
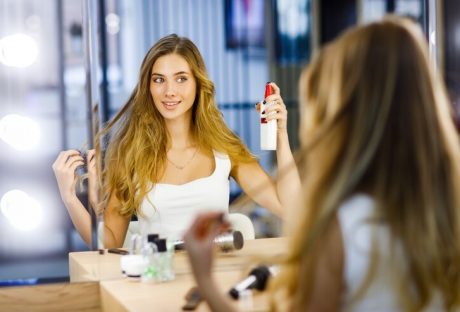
Hey there, beautiful people! Let's chat about something we all love: great hair. We all want fabulous locks, but how do we get there without all the confusing beauty jargon and expensive treatments?
One of the secrets to achieving that hair nirvana is tapping into the Arkive of salon-quality haircare products. These unassuming bottles and tubes might just be your ticket to hair heaven, and today, we're going to tell you why they matter and why you should consider making them a part of your daily hair routine.
The Good Stuff: Your Hair Deserves It
Ever wonder what makes your hair feel so amazing after a salon visit? It's those salon-quality products! They're like a gourmet meal for your hair, packed with nourishing ingredients that your locks crave.
We're talking about vitamins, proteins, and oils that work together to make your hair happy, healthy, and oh-so-gorgeous. No more dull and lifeless locks – salon products bring the party back to your hair!
No More Mystery Ingredients
Have you ever tried deciphering the ingredients list on a cheap shampoo bottle? It's like reading a foreign language. Salon-quality products don't play that game.
They're all about quality, not quantity. You won't find harsh chemicals or weird fillers in these gems. Your hair deserves better than that, and salon products deliver the good stuff without the confusing extras.
Tailored To Your Unique Hair
One size fits all doesn't work for hair, and salon-quality products know it. They come in a variety of formulas specifically designed for different hair types.
Whether you've got fine and straight locks or thick and curly ones, there's a product that's tailor-made for you. No more guessing games at the drugstore aisle – it's time to give your hair exactly what it needs.
Professional-Level Results At Home
Remember how your hair looks and feels fantastic after a professional salon treatment? Well, salon-quality products bring a little piece of that magic into your daily routine.
They're formulated to give you those jaw-dropping professional results without the hefty salon price tag. Who doesn't want to feel like they just stepped out of a luxurious spa in their bathroom?
Protection And Strength, All In One
Let's face it: we put our hair through a lot. Heat styling, coloring, and environmental stressors can take a toll on your tresses. Salon-quality products often include ingredients that protect your hair from damage and strengthen it from the inside out. It's like a suit of armor for your precious locks!
Smell Like A Dream
We must remember the scent. Salon-quality haircare products often come in the most delicious fragrances. Using them is like a mini aromatherapy session in the shower. Plus, who doesn't want their hair to smell like a field of flowers or a tropical paradise? It's a little slice of luxury every time you wash your hair.
An Investment In Your Hair And Wallet
Sure, salon-quality products might seem a tad pricier upfront, but here's the kicker: they last longer!
You typically need less product to get the job done, meaning a bottle of shampoo or conditioner will stick around for a while. It's an investment in your hair's health and your wallet's happiness. Over time, you'll find they're cost-effective, keeping your hair looking its best.
Conclusion
So there you have it, folks. Salon-quality hair care products aren't just a luxury but a necessity for fabulous hair. Say goodbye to bad hair days and hello to luscious, healthy locks. Your hair will thank you, and you'll feel like a superstar daily. Go ahead, treat yourself and your hair to the best!
Read Also:
Understanding Certifications In Organic Haircare Products: Ensuring Transparency And Quality
The Art Of Hair Regrowth: 3 Techniques For Restoring Your Crowning Glory
5 Essential Hair Care Products To Combat Frizz And Humidity