Basic Idea on Power Tools for Home Improvement

Published on: 06 October 2017 Last Updated on: 04 September 2024
Home Improvement

There are times where you will need to make repairs and modifications to your property. This is because some jobs are simply just too small to call for the services of a trade’s person. Power tools are very much indispensable for home improvement and DIY projects as well. More so, you may be the type that prefers fixing things yourself where you can. For this reason, you would need some basic tools that can make improvements and repair your home easier.

Read also: 3 Tips On How To Plan The Best Cheap And Fabulous DIY Bedroom Makeover

Some of these basic tools are discussed below:

Tools for the beginning DIYer - Power tools

Power tools

These are one of the most common devices that are required to ensure a maximum level of perfection in virtually all type of DIY projects. More so, they are highly useful, especially if you want to ensure a satisfactory level of precision in your DIY projects. So they are capable of yielding the best results when used with safety gear. Handling these tools with extreme carefulness is important. The essence is to avoid disconnecting it from its receptacle.  Some basic power tools are as follows:

Miter saw:

If you are handling any woodworking projects, then a miter saw is highly suggested for you. This unique type of saw is known for framing corners, and it is one of the types of saws that cut accurately. There are different types of miter saws. And some of them can sometimes be very expensive.

Read also: 5 Other Uses For Your Garage

The manual has lesser features when compared with the power miter ones. Therefore, the former tends to be more expensive and are the best miter saws. There are different types of power miter saws. These are the dual compound, standard and sliding compound amongst others. And are expensive than the manual ones. This is because they are the best miter saws that make special cuts more portable.
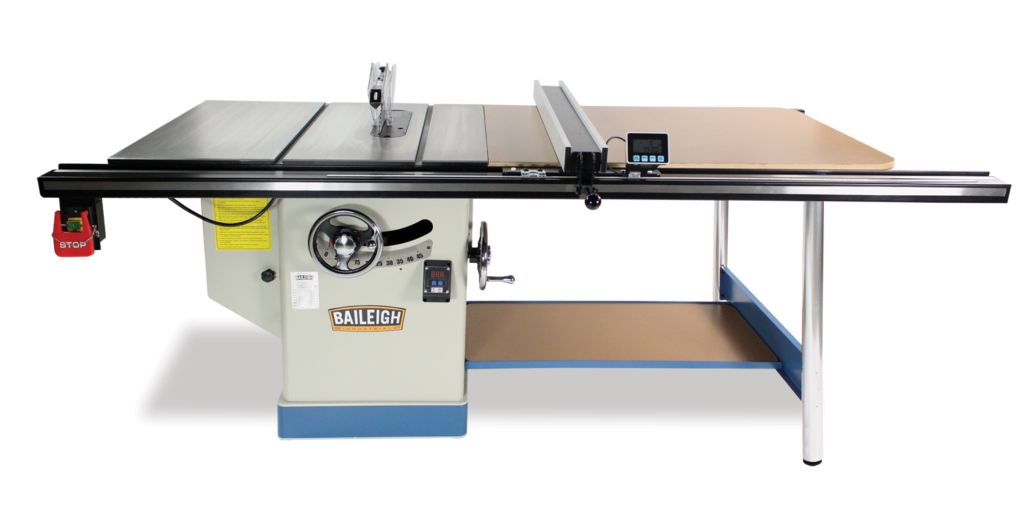
Miter saw
Via Amazon.com

Table Saw:

This is one of the ‘hearts’ of any workshop that is devoted to all types of fine woodworking projects. However, you can go as a woodworker to determine the type, quality and capabilities of your table saw. For this reason, it is important to have in-depth knowledge of the type and capabilities of the table saw you intend using for any woodwork. More so, before investing your dollars in any table saw, seek the services of a more knowledgeable individual or expert in such or related fields to help you get the best table saws.

The essence is to avoid making mistakes that would result in the waste of both human and material resources.  The types of table saw such as the cabinet saw is lightweight. So it should also be taken into consideration, especially if you want to purchase any of the best table saws.
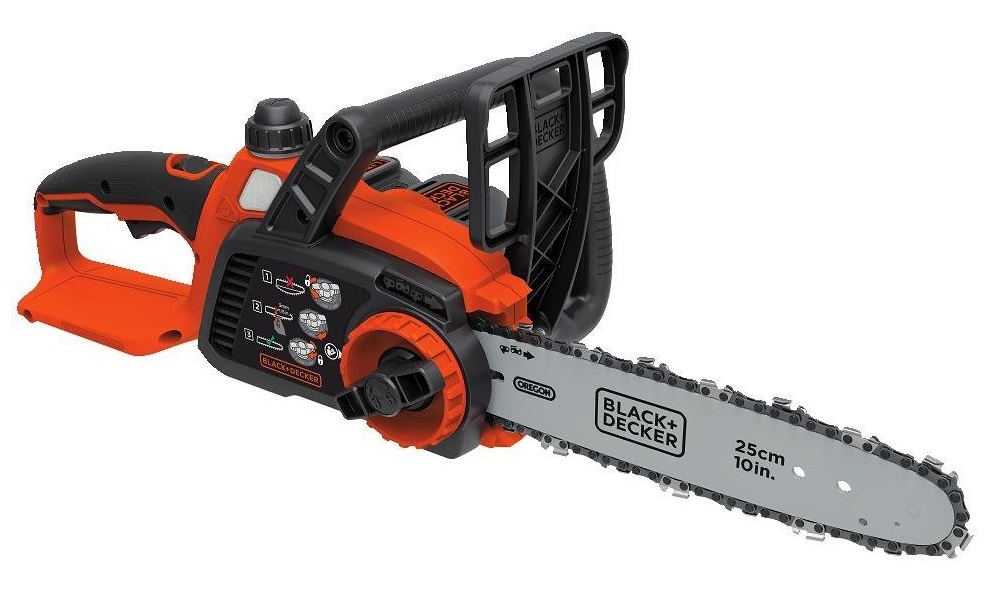
Table Saw
Via Baileigh.com

Chain Saw:

Shopping for a chainsaw is amongst the most significant investment choices a woodworker can make. However, knowing what you want and being able to differentiate it from a table saw is paramount. Interestingly, they are pretty much the same with saws, apart from the fact that they are much more portable. Unlike most other types of saws, they are usually powered by more than one source. Some of these sources are compressed air, electricity and hydraulic power etcetera. And all of these parts are provided by a two-stroke engine. They are, however, usually used by woodworkers that always perform bucking.
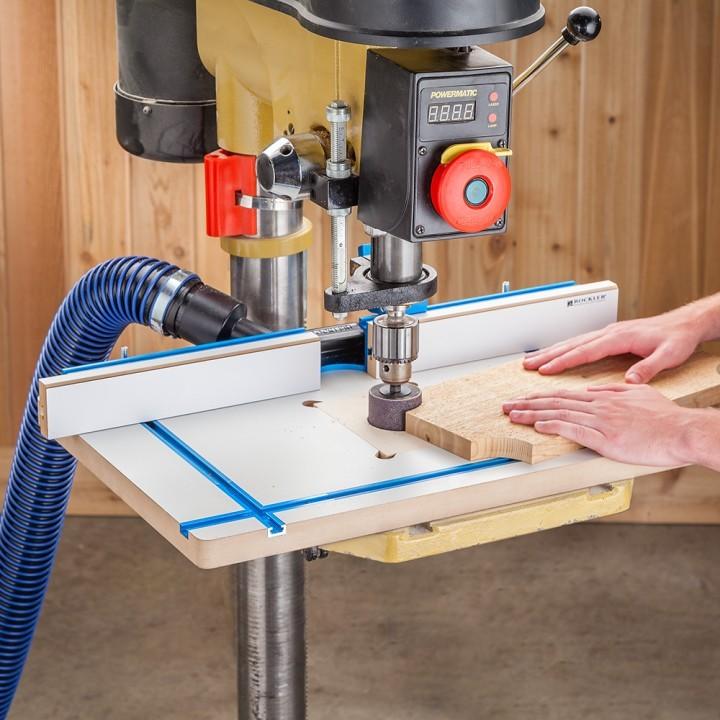
Via Amazon.com
Via Amazon.com

Drill Press:

These are the most popular and versatile power tools. In addition to drilling, a drill press is capable of performing different types of secondary tasks, especially when attached to the right type of attachments. Interestingly, they can be used as a power sander, with the right sanding attachments. Although not as good as a dedicated power sander, a drill is more suitable and efficient when it comes to carrying out household tasks except that you have the intention of doing lots of woodworking. Using a drill and a hammer is paramount, especially if you intend carrying out any work on exterior walls.

Drill Press
Via Assets.rockler.com

Circular saw:

There are different types of circular saws. Unlike most other types of saws, this type of saw is characterized by the circular blade that lumps in it a group of different types of saws that uses that type of blade. With saw teeth and a metal disc, the blade of this type of saw can spin around, which is paramount to achieving an accurate cut.

Apart from making a big difference, power tools are necessary for success, especially when it comes to large projects or even those that involve heavy-duty landscaping works. If therefore, you intend buying a power tool, it is important to think of what you intend building and the time available. So power tools are suitable for DIY projects, and it is an integral part of home improvement services.

Read also: Floor Cutting Using Diamond Saw: What You Need To Know

Content Rally wrapped around an online publication where you can publish your own intellectuals. It is a publishing platform designed to make great stories by content creators. This is your era, your place to be online. So come forward share your views, thoughts and ideas via Content Rally.

View all posts

Leave a Reply

Your email address will not be published. Required fields are marked *

Related

log cabin construction

Timber! 8 Facts About Log Cabin Construction You Should Know

Thought log cabins were a thing of the past? Think again. Today, log cabin construction has become a chic, upscale way to build a modern home with a unique look. In fact, some people have even built high-rise buildings that pull design elements from cabin construction. Log cabins have a solid place in modern architecture. They meld old-fashioned traditions that endure for a reason with popular modern elements like environmentally-friendly designs. Wondering what else you don't know about log cabins? Keep reading to learn more fascinating cabin facts! 1. You Can Calculate Exactly How Many Logs You'll Need How many logs does it take to build a log cabin? Turns out it's all a matter of simple math. For example, by determining the height of each wall, then the height of each individual log, you can calculate how many logs you'll use per wall. From there, it's simple to add up the number of walls in a room to get the total. Of course, other design aspects like the addition of doors or window can make things more complicated. When there's an opening in the wall, it will get flanked by shorter logs, which can increase the total number of logs used. If the roof is built of logs, that will also change the numbers. While you'll want to leave it to the professionals when it comes to deciding how many logs to order, it can still be fun to try your hand at calculating the number of logs in a cabin. 2. You Can Build from a Kit: Did you know that you can order a log cabin kit for a major DIY moment? With a log cabin kit, you don't have to be a pro to have a rustic cabin of your own. Most companies also offer plenty of customer service support, so you'll know where to turn if you run into problems along the way. It also doesn't take a lot of extra tools to work from a kit. Most people can get the job done with just a few basics (think drills and hammers). Since this is a more rustic form of the building, it appeals to many environmentally-savvy consumers. You're not bringing in heavy machinery to pollute the area and disrupt local wildlife. 3. Log Homes Stay Warm: Having trouble keeping warm in the winter? A log cabin just might hold the answer. Wood naturally keeps heat in -- that's why wood furniture tends to feel relatively warm, even if the rest of the room is cold. Many modern building materials, from concrete to sheetrock, get cold fast. This lowers the overall temperature of your home fast. With walls made of solid wood, your home actually soaks up and stores heat, dispersing it into the home over time. This helps your home stay warmer, while you save on heating costs. 4. Moisture Matters: When you're building a log home, one of the keys to success is keeping your logs completely dry. You can actually choose to buy logs with different levels of moisture content. The lower the moisture, the better, because you won't have to worry about what happens when the logs shrink and settle over time. You'll also need to take care to keep your home as dry as possible after it's complete. This can mean installing different design elements (read more here) to keep water away from the walls. Sturdy log cabins often include an overhanging roof or protective landscaping elements. You'll also need to take care to keep other sources of water, like an automated sprinkler, away from the log walls. 5. Log Homes Last a Long Time: There's a reason many historic log cabins from 100 or more years ago remain to this day. This is one of the most durable ways to build a home that will remain sturdy for years to come. Although American architecture doesn't date back so far, you can find homes and churches made of logs in Europe that have stood strong for many hundreds of years. This natural building material offers the perfect balance of strength and flexibility to withstand all kinds of threats. 6. Log Cabins Work Best in Shade: In addition to keeping your cabin away from moisture, you'll want to build it so it's shaded from the sun as much as possible. Sun won't destroy a log home, but it will mean you'll need to re-finish the logs more often to make them last. If you can build in a shady area that's guarded against moisture, your log cabin will require virtually no maintenance at all. 7. Log Homes Save Energy: In log cabin construction, it's super-important that you seal up the spaces between the logs carefully. But as long as that's done properly, you'll have an incredibly energy-efficient home to enjoy. Spaces, where energy can escape, include the connection between individual logs, the space between the foundation and the lower logs, and space between the walls and roof. But when those spaces get sealed, your home will be significantly more energy-efficient than most. The solid wood walls offer great insulation, so keeping your home warm or cool becomes far easier than with other materials. 8. Air-Dried Logs Work Best: Drier is generally better no matter what, but if you have a choice between air-dried and kiln-dried, opt for the first choice. Logs that get air-dried for the proper amount of time have already adjusted to the outdoor environment where they'll be placed. This reduces settling even more because the moisture content of an air-dried log isn't likely to change much further. Kiln-dried logs tend to absorb more moisture when they first get placed outside. Then, as they lose that moisture over time, they'll settle, creating a need for more home maintenance. Will You Try Log Cabin Construction at Home? Whether you build it yourself or hire the professionals, log cabin construction can give you a durable, unique, cozy home that you'll love. These tips will help you plan ahead for the best possible cabin construction. Once you build a log cabin, it's time to decorate the inside! For a rustic look that matches perfectly, try these cork board ideas. Read Also: Best Ways To Maintain A Shower Cabin Why Kiln Dried Wood Is Better For Furniture

READ MOREDetails
Driveway

Updating the Driveway on Summer Time: What You Need To Know

Does your driveway look worn out? Or is it starting to fade and crack? If that’s the case, you should note that your driveway can affect the curb appeal of your property. Sadly, most people hold on to repairing their driveways until they start noticing major issues like water drainage problems and potholes. However, this should be the case. You should always schedule periodical driveway upgrades—especially during the summertime. Generally, summertime is the perfect period to update your driveway and address some of these issues. With that said, let’s look at some of the things to keep in mind when upgrading your driveway. Paving material The first thing you need to consider is the paving material. While concrete comes in various options, it can be quite difficult for you to find a pre-fab material that perfectly matches your budget. Here are some of the most common materials used when upgrading driveways: Asphalt pavement - This paving material tends to be less expensive than other types. However, asphalt can fill up with water rather easily, leading to drainage problems down the road. On the upside, asphalt pavements come in various textures and designs, allowing you to choose a layout that best fits your property. Pea gravel - Though this option is slightly more expensive than asphalt pavements, it’s far more durable. However, it also tends to be less aesthetically appealing. Concrete pavement - This paving material is typically the most expensive and durable choice for your driveway—especially since you can customize the layout and design as you like. On top of that, concrete comes in a wide range of textures and colors—so it’s easier to find something that perfectly matches your property. Drainage solutions If there are no major drainage issues on your property, then you’re all set to begin work on updating your driveway. However, before you start this process, it’s important that you first mark where each water outlet is located—such as drains and downspouts. This step isn’t 100% necessary; however, it makes sense because it can help prevent any work from happening near these areas—which could ultimately cause damage to both outlets and the new surface of your driveway. Also, note that if there’s stagnant water anywhere on your property after setting up temporary markers, then this means that there are some drainage issues on your property. Lastly, if you’re experiencing major issues with water drainage on the property—such as pooling or puddles—after completing updating your driveway, then it may be time to get in contact with a professional who will help encourage the proper flow of water throughout your property. Even though there are ways to fix these drainage problems on your own, it is best to leave these issues up to a professional. This is because they usually have more advanced tools at their disposal—which can make solving these types of problems much easier for them from the very beginning. Sealer Once you have marked the location of all necessary outlets, it’s time for you to mark off where new layers will be placed—which includes marking off where any new edges need to be placed around your driveway. Also, you should use spray paint or chalk to draw out how much space is required between each layer—this step helps ensure that you don’t accidentally apply any materials on top of one another during this part of the process. Then after applying the sealer, it needs at least 24 hours to dry up before applying any additional layers of paint. Add layers As mentioned before, you should create some space between each layer as you apply them on top of your existing driveway. If anything overlaps, then this could cause issues with both texture and color—and may even lead to added expense if extra materials need to be purchased for re-applying the materials properly onto the surface of your driveway. This is the main reason why you must use a large enough tarp to ensure that all materials are applied at a safe distance from one another. Once everything is dry or completely hardened, it’s time to add additional material around the edges of your property—this step helps ensure that water doesn’t run off the sides of your driveway when it rains. To make this part of the process easier, you should use a garden hose to help draw out where the edges will be placed to learn how much materials are needed. Then once that’s finished, it needs at least 24 hours (ideally longer) for everything to completely dry up before applying any sealer. There’s one more thing you need to know about updating your driveway. If there was ever a time when you experienced foundation damage on your property from natural elements—such as water, weeds, or vegetation—then get rid of all grass and weeds near the affected area before adding any new surface layers on top of paint on its own. The reason being is that these things will probably grow out of control on top of your driveway, which can lead to additional maintenance problems. Bottom Line According to the Florida asphalt paving experts from ABC Paving, upgrading your driveway around summertime doesn’t always need to cost a lot of money. Sometimes, it can be as simple as making sure you use the proper materials for protecting your existing driveway before adding new layers on top. Suppose there are any issues with drainage or standing water after doing so. In that case, getting in contact with a professional is usually the best solution—and this also applies regardless of whether you live in an urban area or rural location because everyone will benefit anyway. Read Also: Asphalt Pavement Maintenance Tips Floor Cutting Using Diamond Saw: What You Need To Know All You Need To Know About Concrete Repair Solutions And Services

READ MOREDetails
wood flooring

What you must know about wood flooring?

Everyone wants their house to be more beautiful than others. They try to go for new designs, new ideas about interior decoration available in the market. One of the ideas that attract many of us is wooden flooring. Wooden flooring gives your house a fresh and sophisticated look making it far better than others. If you are going to remodel your house, it is a beneficial idea to opt for wooden flooring in a couple of rooms. When researching this topic, you will get tons and tons of information. Thus while going for wooden flooring, you should keep in mind certain basic things. Going for a wooden floor gives you three main options: solid hardwood laminate flooring engineered wood Solid hardwood flooring: As the name suggests, this sort of flooring comprises of solid wood everywhere; right from the top to the bottom. No materials are added to this flooring. The material is the raw wood which is directly extracted from the logs of the trees. They are the typical wooden floors. Hardwood flooring comes in two type- unfinished or pre-finished. The unfinished ones are seen to be quite cheaper than the prefinished ones. The unfinished ones need quick light sanding, followed by staining (non-compulsory) and sealing; whereas with the prefinished ones, you can walk on it right after the installation. With the prefinished ones, the advantage is that it does not take much time and can be used instantly. In the case of the unfinished ones, the usage should be limited until the sealing has been done. The sealant takes around forty-eight hours to dry. Additional coatings may also be needed afterward. This has the advantage to get the exact specifications demanded by staining it. A popular type of hardwood flooring is bamboo flooring. It is a grass rather being hardwood and is highly valued for its environment-friendly qualities. The hardwoods need to be cut and nailed to a wooden sub-floor or else it is not possible to install it. Unlike others, it does not get installed straight on concrete or top of the existing floor. Because of this requirement, it is necessary to hire hardwood floor installers. Hardwoods are prone to scratches and dents, thus looking for the perfect hardwood type satisfying your pocket and lifestyle is very necessary. This flooring method can be changed again and again and stays for many years but this type of flooring is also not suitable for most areas. Engineered wood flooring: Engineered wood flooring can be called as an option to the solid form of hardwood flooring. They are made of plywood and finish wood. The finished wood is the visible portion and on which we walk on. The lower portion i.e. the plywood comprise 80 to 90 percent of the floor. The plywood differentiates the engineered form of wood flooring from the solid ones. Engineered wood flooring comes with a variety of installation choices. The thinner models can be discarded and the thicker ones can be set up as floating floors. They are easy to install and can be easily installed by anyone as it does not comprise of any largely sized staplers to drag around or any sub-floors. The floating floor can be installed on top as long as the current floor is flat and firm. One disadvantage of engineered wood flooring is that the thinner top layer can be sanded but not many times. It can be sanded like around once or twice. In this type of flooring, it is difficult to sand out the dents and scratches like the solid hardwood type. It is better to consult the flooring firm prior to sanding or taking any action as it can cause any damage which may not be fixable. Laminate flooring: this is the third type of flooring and is not genuine wood flooring like the previous ones. The top layer comprises a resin-infused sheet, and it is usually quite thin. So it can be termed as wood but does not satisfy the name in literal terms. This is a popular kind of flooring as it has a great imitation of wood. The layer of resin is nothing but a photo of wood very finely crafted. This artificial texture cannot be differentiated by the naked eye from the real ones. This kind of flooring is in high demand and is seen as an option of wood flooring. This type of flooring is very easy to install and is scratch-resistant and works very well in moist environments thus has a lot of advantages. This flooring is again slippery, hard to walk on and can’t be sanded. Thus we can come to the conclusion that before going for any kind of wood flooring, everyone must know about these different types of flooring along with their pros and cons. A very efficient flooring company is Evolution Floors Brisbane who can make it easier for you and help you to create a better home with better flooring. Read Also : Hardwood Timber Flooring: Gives A Classic Look To Your Home List Of Most Durable Kitchen Flooring

READ MOREDetails