Recover Data from MacBook using EaseUS Data Recovery Wizard

Published on: 04 April 2018 Last Updated on: 09 October 2020
Recover Data

Are you scared about your lost data from the MacBook?  Don’t Worry… In this article, we provide our readers with the right information for recovery data using EaseUS Data Recovery Wizard for Mac.

EaseUS Data Recovery Wizard is a mac data recovery solution that one can use to recover his or her lost data. This software is the best free Mac data recovery application that gets back your lost data from Mac in minutes. This software product is over 36,160,000 users’ choice and is 100% safe and reliable.

Steps for Data Recovery :

1. Launch the Program :

You need to install the software product (Do not install on a drive of your lost data) and then launch the program to start the recovery process.
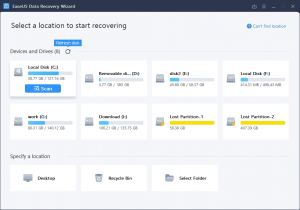
2. Scan the drive :

The second step is to scan the location on which you had a data loss. User can perform deep scan also. Deep scan takes little time but provides better recovery as compared to normal scan.

3. Recover the data

After a scan is completed, you can preview the data or recover the data.

EaseUS Data Recovery Wizard supports various kinds of data failure situations like accidental deletion of data, formatted data, hard drive failures, system crash, virus attacks, partition loss, RAW partition, etc. This kind of variety helps the user to scan and recover the data from a variety of situations.

EaseUS data recovery wizard supports various editions and has a good number of features associated with each edition

EaseUS Data Recovery Free Wizard :

  • Amount of Data that can be recovered: 2 GB
  • Supports various data loss situations like inaccessible data, formatted, etc.
  • Supports recovery of different file types like photos, document, videos, audio, email, compressed files, etc
  • Export and Import scanning results

EaseUS Data Recovery Free Wizard

EaseUS Data Recovery Wizard PRO :

  • Cost: $69.95 Only.
  • Amount of Data that can be recovered: Unlimited
  • This version provides a lifetime free upgrade
  • It also provides free lifetime technical support
  • Type of License is Single License

EaseUS Data Recovery Wizard Pro + WinPE :

  • Cost: $99.90 Only.
  • It provides bootable media for emergency recovery. This helps us to recover the data even when a system fails to start or crash

EaseUS Data Recovery Wizard supports a variety of languages like English, Japanese, German, French, Brazilian, Spanish, Portuguese, Italian, Chinese (Traditional), Dutch, Chinese (Simplified), Turkish, Swedish, Russian, Danish, Polish, Norwegian, Hungarian, Arabic, Indonesian and Korean.

EaseUS Data Recovery Wizard comes with two modes

1. Quick Scan :

When you launch the recovery wizard then Quick Scan mode is default activated. It gets through your lost data on your Mac or your storage devices at a faster speed.

2. Deep Scan :

You need to perform a Deep Scan to track down all lost files in through depth and to find formatted, hidden or inaccessible files on your Mac. We should never risk on overwriting of our original data.

What News in Version 11.0!!!

  • UI is more optimized, data is recovered more efficiently.
  • Recovery Quality of Canon Camera Video files (.mov files) is improved.

Storage Devices Supported

EaseUS Data Recovery Wizard supports a large scale of storage devices. Below mentioned are few of those.

  • Mac Notebook/ Desktop
  • HDD
  • SSD
  • Memory Card
  • USB Drive
  • Digital Camera
  • iPod/ MP3/ MP4 player
  • SD Card
  • Camcorder

Conclusion:

Hope you found some interesting information to come out of data loss situations on your MacBook. Please share your comments below.

Read Also :

Content Rally wrapped around an online publication where you can publish your own intellectuals. It is a publishing platform designed to make great stories by content creators. This is your era, your place to be online. So come forward share your views, thoughts and ideas via Content Rally.

View all posts

Leave a Reply

Your email address will not be published. Required fields are marked *

Related

com.android.phone has stopped

How To Fix Com.Android.Phone Has Stopped Error In Your Phone?

We all have a mobile phone, and it almost runs smoothly until and unless there some glitches or issues happen. And com.android.phone has stopped is one of them. Are you also facing these issues? Are you looking for ways to fix it? Here, in this article, I will guide you with some easy and simple steps that you can try at home really quickly for fixing this issue. Generally, at the time of receiving a call, this com.android.phone has stopped issue occurs and shows an error message “unfortunately the process com.android.phone has stopped.” Fix Com.Android.Phone Has Stopped Error In Your Phone Here, I will tell you the easy steps to fix the com.android.phone has stopped the issue. You can try all these techniques on any android phone, including Samsung, Xiaomi, and many more. So, let’s get started with the fixes.  1. Reboot Your Phone When you are sending a text message or making calls, or opening any app, this com.android.phone has stopped eros happens. In case you are facing this issue for the first time, you can try restarting your device. After you have done rebooting your phone, check whether the eros is still there or not. In case the error still persists, do not worry; I have some more options to fix this error. So, let’s look into other available options.  2. Clear App Data And Cache Clearing your cache and data for the phone app can help you in fixing the com.android.phone has stopped error. Follow the steps to perform this solution. To open the apps list, click on the Menu option. Select the Settings icon from the list. Go to the Devices section. Search and tap on Apps, or App Manager, or Application Manager.  Now select the app for which you want to clear data from the App window. Once the Storage section opens, tap on the option names Clear Data. Tap on the Clear Cache button under the Cache section. Reboot your phone. Check if the issue is solved or not. If the issue is still there, go on to the next option. 3. Clear Data And Cache Of The SIM Toolkit If you are facing com.android.phone has stopped error, you can try to fix the issue by clearing the cache and data of the SIM toolkit. Follow the below-mentioned steps to do this. Go to the Settings menu. Select Apps. Tap on SIM Toolkit. Tap on Clear Data and also on Clear Cache. Reboot your phone. Now check if the issue is fixed or not. In case you are still facing the issues, try the next option. 4. Stop Automatic Updates Some users also state that stopping the automatic date option has solved the com.android.phone has stopped error. In order to do that, follow the below-mentioned steps. Tap on Play Store. Now tap on the Menu icon. Tap on the Settings option. Now tap on Auto-update apps. Choose the option of Do not auto-update apps. Reboot your phone. Once your phone turns on, check whether the issue is still there or not. If the error continues to show, try the following option to fix it. 5. Wipe The Cache Partition Wiping the cache partition also has helped many users to fix com.android.phone has stopped error. Sometimes, if caches get corrupted, but the system keeps using them continuously, some issues like this happen.  As you can not delete the cache one by one, you need to delete the entire directory in order to solve this issue. And for doing that, you need to follow the steps that I have mentioned here. Power off your phone. Now, press and hold the Home and Volume Up keys. Now press and hold the Power key. Now release the Power key but keep holding the Home and Volume Up keys.  Now release both the buttons and wait for around 30 seconds to 60 seconds until the Android logo shows. Using the Volume Down key select the option Wipe cache partition.  Now press the power key for selecting the option. Now using the Volume Down key go to the Yes option and again press the power button to select it. Now, wait till the time wiping your cache partition finishes. After it completes, no go to the Reboot system now, and for selecting it, press the power button. It will take longer to reboot your phone. Once your phone reboots, check if the problem is fixed or not. If the issue is still there, here is another option for you to try.  6. A Factory Reset If you have tried all the fixing options that I have mentioned till now and still you are facing com.android.phone has stopped error, there is one last option for you. You can factory reset your phone to fix this error.  In case you do not know the process of factory reset your phone, follow the steps below. First, you need to power off your android phone. Now press and hold the Home key, Volume Down button, and Power button at the same time. Your phone will boot into recovery mode. Now use the Volume Up and Volume Down button to scroll through the entire menu. Go to the option, Wipe Data or Factory Reset. To select it, press the Power button. For confirming the reset, go to the option Yes and select it.  Once the reset process is complete, and the same recovery mode menu screen will open. Select the Reboot system now option. I believe this will fix the com.android.phone has stopped error.  Final Tips If you are facing com.android.phone has stopped error in your phone, try all the fixing options that I have mentioned here in this article. Any one of these 6 options will surely fix the issue you are facing, and your phone will be back again into proper functioning. Make sure you are backing up all the necessary data before starting with all these steps.   FAQ( Frequently Asked Questions)  How do you can cast from Firefox to Chrome cast?  If you want to enable the casting you can connect to the Wifi on the Chromecast. You can connect to the cast Icon of the video. Choose the device to cast too. How do you can cast Firefox on your TV?  All you need to do is to send the Cast to play button on the device Icon to play the playback controls on the URL. Where is the Cast button on Firefox?    There are certain steps you have to follow for playing the video to view the control buttons. First, you need to start the videos and you need to view the cast or the control button. Click on the top of the screen tap on the cast button. From the menu option select the fire TV device. The video will start playing on the Fire TV.   More Resources:- Best iPhone Spy Apps Without Jailbreaking. 8 Incredible Tricks That You Didn’t Know Your iPhone Can Perform. How To Use Chromecast From Firefox – Step By Step Guide In 2021

READ MOREDetails
Website Development Services

Everything You Need to Know About Website Development Services

In today's digital world, a website is a crucial aspect of any business or organization. It serves as the online face of your business and can be an excellent tool to attract and engage with potential customers. However, creating a website is not as simple as it seems. It requires expertise in website development services which include website design, website development, website maintenance, and website optimization. In this article, we will discuss everything you need to know about website development services, and it's benefits. What are Website Development Services? Website development service refers to the process of creating, designing, and maintaining a website. This process includes everything from designing the layout and graphics to programming the website's functionalities. Website development services can deliver by freelance web developers or web development companies. Types of Website Development Services There are several types of website development services that businesses and organizations can opt for. These include: Front-end Development: This type of website development service deals with the website's user interface (UI) design. Therefore, it will include the layout, graphics, and overall look and feel of the website. Back-end Development: This type of website development service deals with the server-side programming and database management required to run a website. Full-stack Development: This type of website development service covers both front-end and back-end development. Therefore it includes everything needed to build a fully functional website. E-commerce Development: This type of website development service specializes in developing e-commerce websites and includes features such as shopping carts, payment gateways, and inventory management. Website Development Process The website development process involves several steps, including: Planning: This involves defining the website's purpose, target audience, and website goals. Design: This involves creating the website's layout, graphics, and overall look and feel. Development: This involves writing code and programming the website's functionalities. Testing: This involves testing the website's functionalities to ensure that it is bug-free and works correctly. Launch: This involves making the website live on the internet. Maintenance: This involves keeping the website up to date and fixing any bugs or issues that arise. Benefits of Website Development Services Here are some benefits of investing in website development services: Increased online presence: Hence a well-designed and optimized website can help improve your online presence and attract more visitors to your website. Improved user experience: A well-designed website with a user-friendly interface can help improve the user experience. Also, it increases the time users spend on your website. Competitive advantage: A well-designed and optimized website can give your business a competitive advantage over your competitors. Better brand awareness: A well-designed website can help improve brand awareness. Therefore it creates a positive image of your business. Choosing the Right Website Development Service Provider Selections of the right website development service are another important thing. If you want to have the best services, theses are the first thing that you must know. Your website development service requirements and what types of services your website development service can provide you. To select the best website development services you can match up the following qualities. Therefore choosing the right website development service provider can be a daunting task. Here are some factors to consider when choosing a website development service provider: Expertise and experience: Look for a website development service provider with expertise and experience in your industry. Portfolio: Check the website development service provider's portfolio to see their previous work and ensure that their style and quality match your requirements. Pricing: Compare pricing from different website development service providers and choose the one that offers the best value for your money. Customer service: Look for a website development service provider that offers excellent customer service and is responsive to your needs. Conclusion Website development services are essential for businesses and organizations that want to establish a strong online presence. Hence from designing the website's layout to programming its functionalities, web development services can cover everything which required to build a fully functional website. By investing in web development services. Read Also: How You Benefit From Getting Custom Approach To Software Development Looking To Build A Photography Website: Here Is How You Can Build One Ecommerce Software Development Trends

READ MOREDetails
steam disk write error

How To Troubleshoot Steam Disk Write Error? [Fixed]

Steam is a well-known name in the video gaming industry. It is a social gaming website, which allows you to play, buy, and discuss games. If you are using steam for some time, then there is a lot to know about it. Have you ever faced the Steam disk write error? Are you looking for the solution to Steam disk write error windows 10? Are you unable to solve the issue? This article will help you with multiple solutions in order to remove the error. Go through the steps and enjoy an interruption-free gaming experience.        What Is The Steam Disk Write Error? While you are updating or downloading any game you bought from the Steam Platform, you may face the Steam disk write error. At the time you are attempting to download or install a new game, this message can appear on the screen. You also can face the same issue when you are trying to update a game that you have installed earlier. In case your game needs an update, at the time of launching the game, the screen will show this error. Reason For Steam Disk Write Error? Whenever Steam is not able to download and save the data of the game to the storage drive of your computer during a new installation or an update. One of the messages mentioned below will appear on the screen, Any error occurred at the time of updating the  game_title Any error occurred at the time of installing game_title The steam disk write error can happen, when There are no defects on the hard drive. The Steam folder or drive is write-protected. There are outdated or steam corrupt disk files in the Steam directory. Your firewall or antivirus is blocking Steam from saving and downloading data.  Fixing Steam Disk Write Error If you have encountered the steam error while downloading, error while installing, updating, or launching the Steam game and want to know the ways of fixing disk write error steam, here are the answers #1. Restart The Steam Open the Steam window Click the word “Steam” on the top-left corner The Dropdown menu will open For Windows, click on “Exit,” and for Mac, click on “Quit Steam.” Again open Steam. In case you have been logged out, log in another time Check for the Steam disk write error is gone or not #2. Restart Your PC Click on the start icon Power Icon Restart #3. Clear All Download Cache Open steam Go to “settings.” Click on “downloads.” Select the option “clear download cache.” Reopen and check if it is working or not #4. Repair All The Steam Disk Bad Sectors EaseUS Partition Master to check bad sector Install it Click on the disk which you want to check Click “surface test.” It will red mark the bad sectors. In case of any error, it is a good idea to replace the drive or clone it to another HDD apart from the steam disk write error SSD. You can take help from EaseUS Partition Master to replace the failing disk. After opening the EaseUS Partition Master, select the disk, which you want to clone. Click on “Clone” Select your destination or SSD/HDD whenever you want to clone it Click on “Next” Click on “Continue” to wipe out all data. If you have any valuable data, take a backup of it. Click on “Autofit the desk” or “Edit disk layout” or “Clone as the source.” Click on “Execute the operation.” Click on “Apply” to solve the steam disk write error #5. Run As Administrator Go to your Steam folder Right-click on “Steam.exe” Click on “Properties” Select the tab named “Compatibility.” Click in “Run this program as an administrator.” Click on “Apply” then “OK.” See whether the Steam disk write error is solved or not #6. Move The Game Folder Sometimes transferring the game to a healthy drive can solve the issue. But here, manual transferring will not work. You can use EaseUS Todo PCTrans for transferring the file.  Connect your computer with the destination drive Select the games that you want to transfer Now transfer them to the destination drive #7. Confirm Integrity For Steam Game Files  Reboot the system Launch Steam Click on the “Library” tab Right-click on the game that is causing the error Select “Properties” Click on the “Local Files” tab Click on the “Verify Integrity Of Game Files…..” button It will take some time to verify the game files Once the verification is done, try to install the updates and see if the Steam disk write error is showing or not.  #8. Remove The Write Protection From The Steam Drive For Steam Disk Write Error Press “Win + R.” Type cmd Command Prompt will open. Type “disk part” there Press “Enter” Type “list disk.” Press “Enter” Type “select disk 0.” Press “Enter” Type “attribute disk clear read-only.” Press “Enter” After the write protection process is done, type “Exit.”  Press “Enter” The disk part window will close.  #9. Some Other Fixes Of Steam Disk Write Error Apart from all the steps mentioned earlier or techniques, there are two more ways to eliminate the Steam disk write error. You can uninstall Steam and reinstall it. In order to uninstall  Go to “Control panel.” Open “Add or Remove programs.” Search for Steam and select it Click on the “Remove” After selecting the automatic option, click on “Next.” Click “Finish” Once the uninstallation is completed, you can install it again. For installing Steam, follow the below steps. Visit https://store.steampowered.com/about/ Click on “Install Steam” After the download is completed, click on “Open” or “Run.” Follow the on-screen instruction to install Steam. Open steam and log in. Final Talk Though you have tried and everything to resolve the issue, it is not working. You can seek help from Steam’s official support. Opt for the Steam support team. You also can visit the community forum of Steam for any further or additional help. Apart from the above-mentioned nine solutions of steam disk write error, if you know any other practical solution, do let us know.   More Resources: The Complete Guide To Choosing VPS Hosting Best Server Management Tips for Startups Best Bulk Sd Cards Of 2020 – Review And Buying Guide

READ MOREDetails