Published on: 09 March 2016
Last Updated on: 29 May 2021
A Rudraksha means-‘tears of Rudra’ in Sanskrit. It is a sacred bead, which is fashioned into rosary in Hinduism. Hindus regard the Rudraksha with great reverence and believe that it bodes good health and prosperity. It can be worn as a bracelet or as a chain.
The 3 Mukhi (face) Rudraksha consists of three natural lines on the surface. It is a symbol for Agni- the fire, which consumes everything. It helps the wearer handle and overcome any situation.
The ruling planet is Mars and days of wearing are Monday and Thursday. It is recommended for:
Children suffering from chronic fever
Gallbladder and liver disease
Stress and depression
Control of blood pressure
Influence on body organ is throat
Other Benefits of 3 Mukhi:
Just as fire destroys everything, this Rudraksha destroys one’s Karma.
It is believed that all past sins of the wearer are forgiven. It is a way of attaining Moksha.
It removes obstacles faced by a person due to past Karma.
It provides remission from the sin of committing an abortion.
It helps attain purity of soul and to live a life, free of guilt.
Protects from all sorts of diseases, accidents and blood poisoning.
Mantras:
Shiva Purana: Om Kleem Namaha
Padma Purana: Om, Om, Namaha
Skanda Purana: Om Dhum Dhum Namah
Om Namah Shivaya
Mode of Wearing:
Take the beads. Wash them with sacred Ganga water or unboiled milk.
Wear in the neck, chanting Mantra.
Who Should Wear?
Those who want to avoid the malefic effects of Mars.
Those suffering from the disease.
Those who are weak, lazy and have an inferiority complex
Those suffering from stomach disorders, skin diseases, eye defects.
Those who are depressed and need a boost of self-esteem.
Rules to Wear:
Wearers and devotees of Rudraksha enjoy peace, good health, and prosperity. But one must take some precautions:
The Rudraksha must be worn only after Siddhi (purification rites and chanting of Mantras).
Rudraksha mantra is to be chanted 9 times daily, after removing at night and wearing in the morning.
It must be kept in the Puja room at night and worn after the bath in the morning.
The wearer should not consume alcohol or non-vegetarian food.
He must speak only truth and visit Shiva temple.
Rudraksha must not be taken while visiting a baby or to the cremation ground.
Women must remove it during menstruation.
Keep Rudraksha clean and tidy. Pores of the beads can attract dirt and dust. Clean this with any soft material with fine bristles. Change the thread if it becomes dirty. After it has been cleaned, wash Rudraksha with holy water. This is to maintain its sanctity.
Keep Rudraksha constantly oiled. After the beads and chord have been cleaned, periodically apply oil and treat with incense. This is crucial when you have kept the Rudraksha in storage for a long time and want to use it again.
These are some safeguards for wearing and maintaining Rudraksh chains and bracelets. Since it is a sacred ornament, most Hindus are not affected by 3 Mukhi Rudraksha price. Don’t be confused by the shape and size of the beads. One has to buy the beads according to one’s gut instinct.
Abdul Aziz Mondol is a professional blogger who is having a colossal interest in writing blogs and other jones of calligraphies. In terms of his professional commitments, he loves to share content related to business, finance, technology, and the gaming niche.
If you're a foodie looking for new tastes and experiences in northern Colorado, visit Lafayette. Chefs use locally sourced food to create tasty dishes delivered by friendly staff. Lafayette is nestled between Boulder and Denver, so when you stay in Colorado, you can visit modern restaurants in these cities as well. Don't miss these local culinary favorites.
The Post Brewing Company:
When you have a hankering for fried chicken, pull up a chair at The Post Brewing Company. This American brewpub offers classic dishes like chicken and waffles alongside gluten-free fried chicken. You'll feel at home in this casual eatery with homemade meals. Give your chicken meal an extra kick with the variety of hot sauces you'll find on each table.
Cool off with a craft beer brewed on-site like an Elkhorn lager or a Big Rosie porter. If you want something other than chicken, try the meatloaf or shrimp and grits. Diners rave about the friendly service, too. You'll find this brewpub on Emma Street just south of State Route 7 in Lafayette.
Community:
If you prefer sustainable, farm-to-table meals, head over to South Public Road and add Community to your list of Lafayette eateries to visit. Sample local comfort food and artisan cocktails. Start with small plates to share including Shaolin-style duck nachos and Curry cauliflower tots. For your entree, choose from favorites like meatloaf, lamb, and pork tenderloin.
Save room for some dessert like key lime pie or an after-dinner drink to top off your meal. Community doesn't take reservations, but if you have a large group, you can call ahead to see if the staff can accommodate you.
Stay local and take a short ride to Boulder or Denver. Reserve a room in Lafayette for easy access to top-rated restaurants in these nearby cities known for their culinary delights.
Oak at Fourteenth:
Image via Flickr by Ken Lund
Don't miss having an upscale meal at Oak at Fourteenth on Pearl Street in downtown Boulder. Try the pan-roasted sablefish paired with an Oak martini. You can also share a family plate of crispy pork shoulder prepared with pineapple fried rice. Menus are updated seasonally and feature locally grown ingredients. Call ahead to reserve a table.
Izakaya Den:
When the foodie in you craves fresh sushi and sashimi, take a short trip to Denver and make yourself at home at Izakaya Den: The Sake House with Tapas. Order specialty rolls created with tuna and salmon served tapas-style that you can share with your table. Mix and match rolls and fresh seafood.
Your catch of the day may be Tasmanian king salmon, bluefin akami, or wild tai snapper. Izakaya Den also offers a Japanese menu featuring Ramen and Udon noodle bowls. You may call the restaurant or reserve a table online to make your reservation.
Your culinary tour of Lafayette will deliver delicious meals at local hot spots with a family atmosphere. You can also travel a short distance to Boulder or Denver and experience a wider variety of modern fare in an upscale setting.
Read Also:
Stay Away From These Foods To Remain Healthy
Meals That Matter: The Best Foods And The Ways They Make You Fit
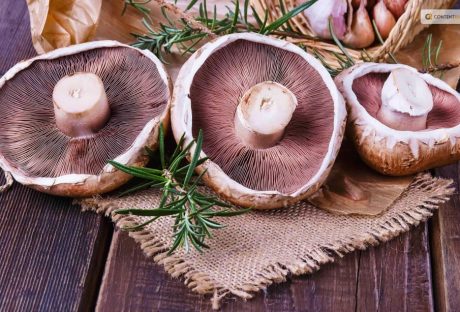
Although mushrooms have been used in cooking and customs for over a millennia, their popularity has increased recently. Previously unfashionable and difficult to market, portobello mushrooms are now in high demand all across the world.
These big, meaty mushrooms taste fantastic when grilled, stuffed, or used as a meat substitute in burgers and sandwiches. They also have a delightfully rich flavor.
But do portobello mushrooms have any health benefits over other foods? What are the negative effects of portobello mushrooms? Here we will talk about different methods to incorporate portobello mushrooms into your diet and their positive and negative aspects.
What Are Portobello Mushrooms?
Image Source: tastingtable.com
The delicious Agaricus bisporus fungus, which also produces cremini and button mushrooms, is the source of these large mushrooms. Actually, despite being in various stages of development, all of these mushrooms are the same. The biggest and darkest of the three mushrooms, portobellos are the most mature. They can occasionally reach a width of around 6 inches and have a deep brown color.
Large-scale portobello mushroom cultivation is famous all over the world. These mushrooms, however, are from the meadows of Eurasia and North America in the wild.
They have a less spongy texture than other mushrooms. These mushrooms have a meatier texture which makes them a good substitute in vegan and vegetarian meals.
Portobello mushrooms are generally thought to be a fantastic source of important nutrients that are good for your body. It is believed that portobello mushrooms are rich in beneficial plant-derived nutrients like B vitamins, selenium, potassium, copper, and selenium. If they are exposed to UV radiation while developing, they can also be a rich source of vitamin D.
Mushrooms were initially not acceptable to the general public and to persuade people to add them to their shopping baskets- voluntarily. In order to make that happen they were given the rather glitzy-sounding name Portabella in the 1980s.
Today, 90% of all mushrooms produced in the USA are portobello mushrooms. They are also a common addition to recipes by professional chefs at restaurants and for recipes cooked at home.
Next time you see these delectable mushrooms you're shopping and they're labeled portabella rather than portobello, don't worry—they're the same!
Many people think that mushrooms, in general, offer a number of health advantages. The same is true of portobello mushrooms, which are a rich source of protein, fiber, and important vitamins and minerals.
However, it is important to remember that there has been little research on the health advantages of portobello mushrooms. It cannot be suggested for consumption without necessary caution.
Benefits Of Portobello Mushrooms
Image Source: a-z-animals.com
Here are three positive health benefits of having portobello mushrooms based on popular research:
Portobello mushrooms are an excellent addition to any diet because they lower fat and calories, like all mushrooms. Portobello mushrooms have a low calorie and fat content of 22 per 100 grams. They also contain 2.11 and 1.3 grams of protein and fiber.
High concentrations of B vitamins riboflavin, niacin, and pantothenic acid enrich portobello mushrooms. They are essential for many bodily functions, like energy production and the metabolism of macronutrients.
According to research, portobello mushrooms are rich in potassium, which is essential for maintaining muscle health and strength. 128g of cooked portobello mushrooms contain 440mg of potassium. It is roughly 9% of the daily adult intake.
Negative Effects Of Portobello Mushrooms
Image Source: cdn.britannica.com
Like any meal, portobello mushrooms may not be suitable for everyone. The following are a few possible drawbacks of portobello mushrooms:
Allergic Reactions
Portobellos and other mushrooms may cause an allergic reaction in certain people. The degree of allergic reactions can vary. It can range from minor symptoms like irritation and hives to more serious ones like breathing difficulties or anaphylaxis. Consumption of portobello mushrooms can cause a severe reaction if you have a mushroom allergy.
Digestive Problems
Portobellos and other mushrooms contain chitin, a form of carbohydrate. Humans find chitin difficult to digest, and for some people, it can be uncomfortable. If ingested in large numbers or not cooked well, mushrooms can cause symptoms like bloating, gas, or upset stomach.
Risks Of Contamination
If you don't handle, preserve, and prepare portobello mushrooms correctly, they may become contaminated with bacteria, molds, and other hazardous germs. In this regard, they are much like other mushrooms. Food poisoning from eating contaminated mushrooms can cause symptoms like nausea, vomiting, diarrhea, and abdominal pain.
Medication Interactions
Portobello mushrooms, like several other foods, may have an effect on how some medicines work. For instance, they might impact how some medications and anticoagulants work. To be certain. There are no reported interactions. However, you can talk to a healthcare provider or pharmacist if you are taking drugs.
How To Cook Portobello Mushrooms?
Image Source: zardyplants.com
Portobello mushrooms are ideal veggies in a variety of ways, including grilled, stuffed, and fried. However, you can also serve them on their own. They are very popular in Italian recipes like spaghetti and even as toppings on pizza.
In a variety of vegetarian and vegan meals, including burgers and steaks, portobello mushrooms' are an ideal meat substitute. Here are a few of our favorite methods for preparing delicious portobello mushrooms:
You may substitute a grilled portobello mushroom for a traditional meat burger or eat it alone as a plant-based steak.
To prepare portobello mushrooms for pasta dishes and sauces, put them in a skillet and cook briefly until fork-tender.
Portobello mushroom stuffing is an all-time favorite! Load a generous amount of cheese into the mushroom's center before baking it in an oven until it turns golden.
Slice up a few of these chewy deliciousnesses. Put them on toast or toss them over for a savory stir fry!
How To Choose The Right Portobello Mushrooms?
Image Source: boomieskitchen.com
Pick fresh, firm portobello mushrooms when you're shopping. Avoid portobello mushrooms that have bruises, or that have soft patches, as they are not suitable for consumption. You must consume fresh mushrooms right away because they are bad for your health when old.
Fresh portobello mushrooms are best when in a paper bag or their original container in the refrigerator. These fresh mushrooms should be kept in an airtight container and kept at room temperature. It will prevent the formation of dangerous bacteria that could cause botulism.
To help avoid cross-contamination, wash your hands both before and after handling portobello mushrooms. Before preparing and eating, immediately wash mushrooms under running water. Other than water, there is nothing else you need to use to clean your mushrooms. Never pre-wash mushrooms since the dampness will hasten their deterioration.
Wrapping Up
So it appears that portobello mushrooms may be more than we originally thought! There are so many good reasons to include portobello mushrooms in your diet. The possible health advantages and their distinctive texture and flavor make them super palatable.
Remember that the negative consequences are not all-encompassing and might not be relevant for everyone. When included in a balanced diet, portobello mushrooms are a generally healthy and safe food option. However, it is advised to speak with a healthcare provider or allergist for specialized guidance if you have known allergies.
Learn More About:
7 Benefits Of Eating Protein Rich Snacks
5 Ways To Use Medicinal Mushroom Extracts
Great Health Benefits You Get From A Protein Coconut Bar
These days, all the love goes to boneless skinless chicken breasts. Maybe because they cook quickly, they are healthy and they are cheap. Baked Chicken Thigh Recipe is very delicious. How about making a case for skin-on bone-in chicken thighs, because honestly, they are all-around better. Thighs are better because they contain more fat and as you know fatter means more flavor. Skin-on together with dark meat is a bit more extra fat, which makes a huge difference in the flavor. Is there really any delicacy more delicious than a crispy chicken skin?
Chicken thighs are not difficult in cooking, but compared to chicken breasts, they need a little more style especially if you want to bake them. Just follow the below simple rules and you will never have to sit through a single boring chicken dinner.
Baked Chicken Thigh Recipe Procedure You Need To Follow
Pat the chicken thighs dry:
This easy procedure makes a big difference when going through a garlic butter baked chicken thigh recipe because while baking, moisture forms steam that will provide you pale, flabby skin rather than delicious golden skin. Pick up a couple of paper towels and dab the thighs on each side.
Let the chicken thighs come to room temperature:
Placing out your chicken thighs to reach room temperature delivers huge things as the end result. Basically, if you bake your chicken cold, the outside cooks quicker than the inside which is colder, and the outside will be overcooked by the time the piece at the center reaches up to room temperature. Basically, it is simple to overcook chicken thighs when they are cold, therefore forming dry meat. The process does not take long, so you do not need to worry. Chicken thighs are quite tiny, so they will only take about thirty minutes to arrive at room temp. If you take them out at a similar same time as you preheat the oven, you will be good to go!
Generously season the thighs:
In a baked chicken thigh recipe, the thighs are better when seasoned generously. Season each side using salt and remember to not season the inside. While the thigh cooks, the salt will dissolve its way inside it, thus entirely flavoring every piece. Salt assists the meat in maintaining its moisture, making the thighs more juicy and plumper.
Garlic Butter Baked Chicken Thigh RecipeIngredients
One unsalted butter maintained at room temperature
One lemon zest
Ground black pepper
Five minced cloves garlic
Kosher salt
One tablespoon freshly chopped parsley, for garnish
One tablespoon fresh thyme leaves
One lb. quartered baby potatoes
Three lb. bone-in, skin-on chicken thighs
One lemon, slit into rounds
Garlic Butter Baked Chicken Thigh RecipeDirections:
Preheat your oven up to 425 degrees and pat the chicken thighs dry using a paper towel. Season the meat using pepper and salt.
Stir thyme, lemon zest, garlic, and butter together inside a medium bowl.
Rub the butter mixture on the chicken thighs.
Put chicken thighs, potatoes and lemon rounds inside a 9"-x-13" baking dish. Bake the thighs until it registers 160°F on an instant-read thermometer, about thirty-five minutes.
Read Also:
7 Surprising Benefits Of Alkaline Foods
6 Tips To Improve Your Cooking Overnight
10 Best Protein Shake Recipes For Weight Loss