Published on: 02 April 2017
Last Updated on: 11 September 2024
Container garden is a great idea for those who don’t have too much space in their house. Besides that, with a container garden, you will not have to spend too much time and effort to take care of it, such as mowing regularly with a lawn mower. So, in this article, I would like to introduce you to some ideas about choosing the right containers for your garden. I may be useful if you are intending to build one.
There are two essential things to successfully choose a container for use in a container garden: size and material. The size of the content relates to the optimal growth of the plant. Choose one that’s too small, and your plant might not reach its full potential. The material, of which the container is made, is of almost equal importance. Which material works best depends on the situation.
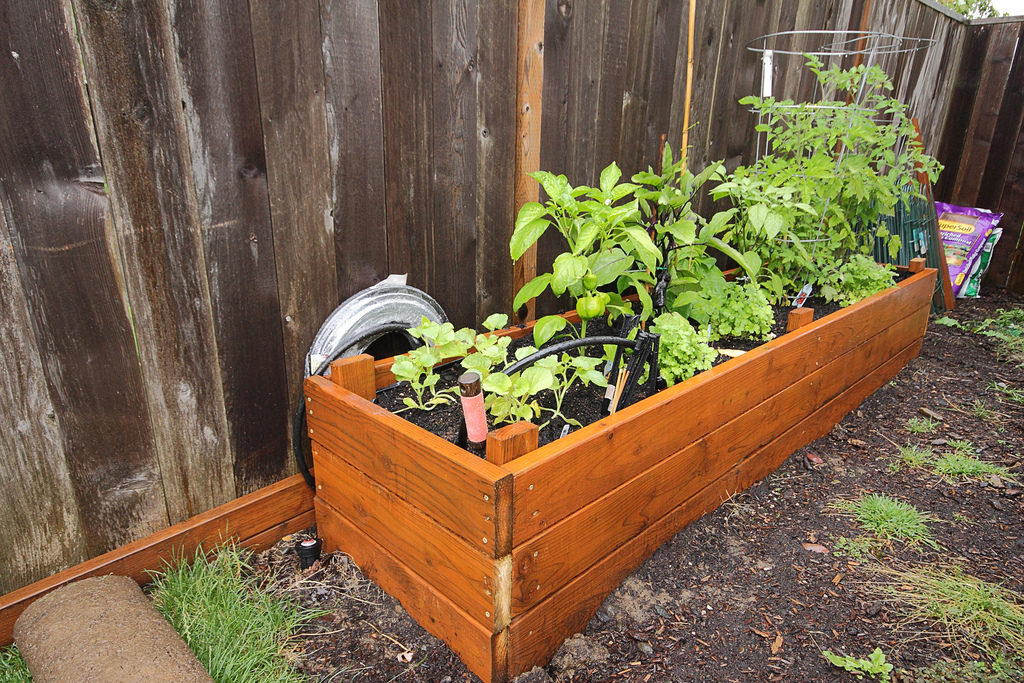
Larger perennial plants (those that grow for more than one season) do quite well in a large wooden container. Most container gardeners prefer wood for use with perennials. It’s also a good choice for plants that will be grown outside in a visible location.
Although wooden containers tend to be more expensive than other materials, the cost is balanced by their extreme durability.
Should the wood be treated? Yes and no. Yes for the outside, no for the inside of the container. If the inside is treated, the chemicals could leach into the soil. Remember, whatever is in the soil ends up in the plant. At best, your plant will be damaged. At worst, if it’s an edible plant, it could actually make you ill.
Plastic pots are widely used in container gardens. The main reason for this is cost. Plastic pots are the cheapest option in most cases. There’s nothing wrong with saving money, but plastic may not always be your best choice.
Plastic pots are fine to use if you don’t intend to keep it up. Maybe you don’t even know if you’ll enjoy it or if it will work for you. But if there’s any chance you will continue to garden in the future, you should realize that plastic pots are not very durable.
They look durable, but looks can be misleading. Regardless of how thick or hard the plastic seems to be, outdoor elements can quickly crack and warp this type of container. Once the pots are damaged, they’re essentially useless. Not much future in cracked pot gardening.
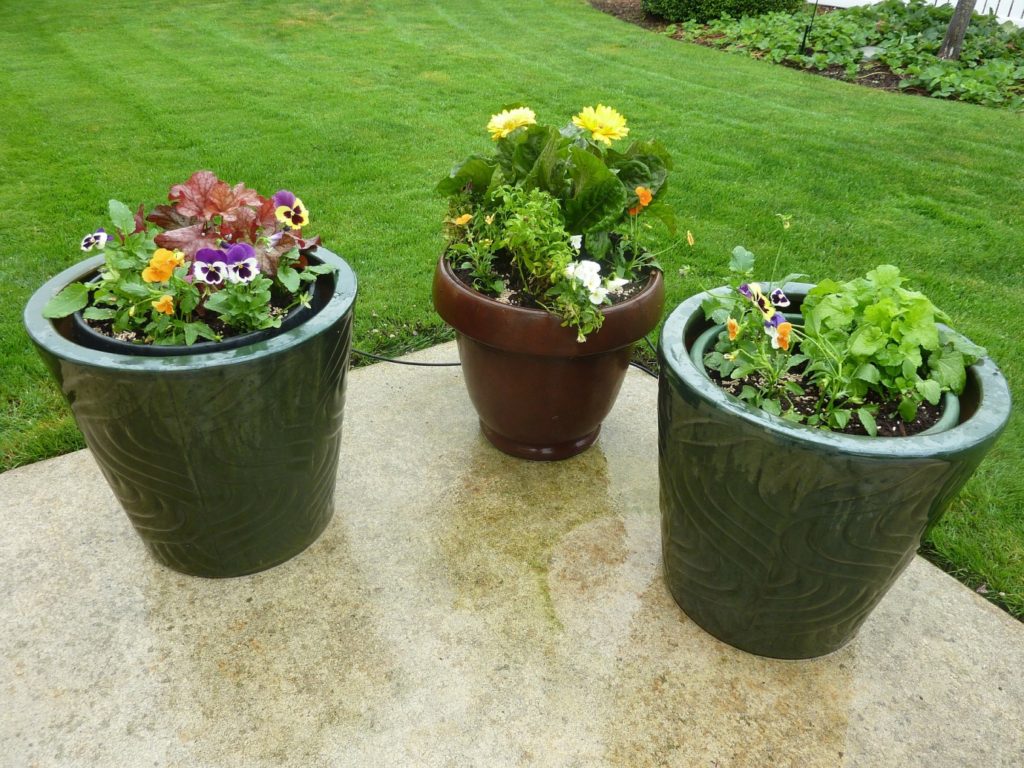
Pots made from terra cotta clay are also quite inexpensive. The only plastic is cheaper. Unfortunately, clay can be delicately made and easily broken. This material doesn’t handle freezing temperatures very well either. If your area experiences below-freezing weather, plants in terra cotta containers should be brought indoors during the winter.
Okay, so far wood is expensive, plastic is cheap and clay can break. What’s next? You can often do well with fired ceramic pots. Sometimes they are somewhat delicate but relatively durable. Look for the glaze on the outside with unglazed insides. The outside glaze enhances appearance, but inside glaze could leach into the soil.
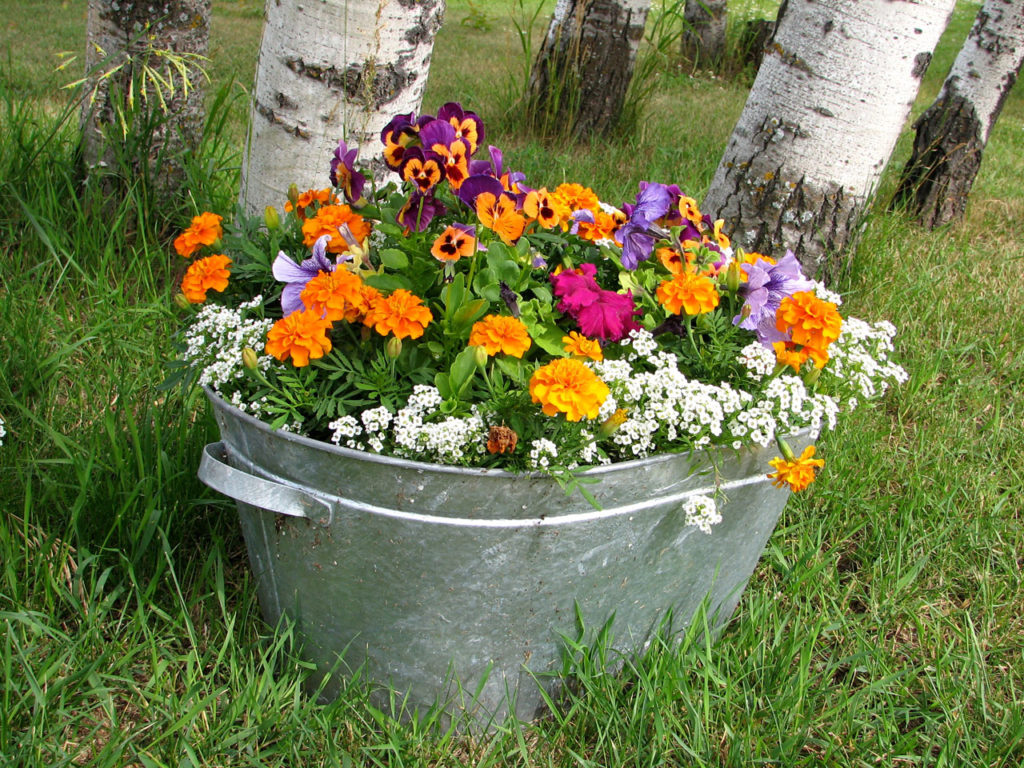
Another option is to construct containers from things around your home. If you find something large enough for the plant, cut some drainage holes in the bottom and you’re good to go. The possibilities are wide open. Milk jugs, soda bottles, and even margarine tubs have all been used. For larger plants, trash cans and plastic tubs could work.
If you really want to go minimalist, then use a bag of soil. Cut a hole in the bag and plant something in the exposed soil. This simply proves that almost anything can be used. Just make sure it’s big enough for the plant, will last as long as you want it to, and allows for proper drainage.
Abdul Aziz Mondol is a professional blogger who is having a colossal interest in writing blogs and other jones of calligraphies. In terms of his professional commitments, he loves to share content related to business, finance, technology, and the gaming niche.
The global housing market is reportedly shifting. Now, some of the most luxurious homes around the world are being sold at a fraction of what they cost a few years ago.
While it may be the dawning of a worldwide seller's market, there are plenty of expensive homes exceeding the average buyer's price range.
Even if you can't fork over mega-millions for a mansion of your own, it's fun to imagine what it might be like to live in the world's most luxurious residences.
Amazing Abodes: 10 Stunning Homes Around the World
Read on for an inside peek at ten of the world's most stunning abodes!
1. Beverly House, Beverly Hills, California:
The Beverly House is within walking distance of the iconic Sunset Boulevard and has been in many major motion pictures. It appeared on-screen in major box-office hits, such as "The Godfather" and "The Bodyguard".
Designed by the famous architect, Gordon Kaufman, the Beverly House is on the market for a cool $135 million dollars. But, if you don't want to commit to a mortgage, you can rent the star-studded digs for a mere $600,000 dollars a month.
If you're looking to move out west, you could always sell your home to Otranto Real Estate. It won't get you $135 million, but it's a start, right?
2. Luxury Italian Villa, Otranto, Italy:
This luxury Italian villa has stood the test of time since its construction, which dates back to 1840. Perched on the coast, overlooking the sandy shores, and full of charming courtyards and gardens, this one-of-a-kind 16-room property is breathtaking, even in pictures.
It's currently for sale, but the price isn't open to the public. The price tag on this stunning display of Italian architecture is available by application only.
3. Buckingham Palace, London - One Of The Most Famous Homes Around The World:
It's easy to see why this royal beauty is fit for a queen.
As the home of Queen Elizabeth, there's no chance of buying this castle for yourself. But, you can visit and tour the castle's grounds. Buckingham Palace is open to the public during specific times throughout the year.
It's unlikely that you will get around to viewing all 775 rooms. But, many of the staterooms are available for viewing and they are every bit as glorious as you might imagine. In fact, every inch of Her Majesty's royal homestead is worth the price you will pay for admission to the royal grounds.
While you're there, make sure that you swing by Windsor Castle, which marks 900 years of royal architecture. If you want to see the actual home of the Queen, you will want to head to Edinburgh where you can visit the Palace of Holyroodhouse. Both are open to visitors all year.
4. Antilla, Mumbai, India:
The Antilla is a 27-story skyscraper that's owned by the fifth richest man in the world.
Mukesh Ambani, the world-famous billionaire, had the luxurious tower built for his own private use. His wife visited New York and fell in love with Asian interior design, causing him to design the tower for her.
Antilla is the world's largest and most extravagant residential property. The home cost the businessman around $2 billion dollars.
5. The Playboy Mansion, Beverly Hills, California:
It's not the original Playboy Mansion, which was in Chicago, but Hugh Hefner's final party house is bigger and better than the first.
Hefner, known for his partying lifestyle and hosting exclusive soirees, placed his mansion on the market for $200 million. However, the deal included a caveat that he would be able to use the address to party until he passed.
Eventually, the Playboy Mansion sold for half of the original asking price. The Greek millionaire who owns Hostess, the brand that makes Twinkies dessert cakes, bought the home.
6. Fleur de Lys Mansion, Los Angeles, California:
The former home of Mariah Carey recently sold for $102 million dollars, paid in cash by an anonymous buyer. Its spread includes 12 bedrooms and 15 bathrooms. There's also a 3,000 square foot wine cellar, tasting room, two-story library, expansive ballroom, swimming pool, tennis courts, and a spa.
The Fleur de Lys Mansion, built in 2002, modeled the French castle known as the Palace of Versaille, which had been the most decadent home of its time. The Palace of Versaille was the home of Marie Antoinette, who became famous for her narrow-minded extravagance.
Supposedly, a crowd of peasants once stood in arms outside of her palace complaining that they hadn't even a crumb of bread to eat. The wealthy Mademoiselle supposedly responded "Let them eat cake", even though we now know that isn't accurate.
The socialite's supposed response, absurd to those hearing it, has defined Antoinette as one of the most out of touch characters to ever grace the pages of history books.
The quote is still cited when referring to the overwhelming differences in thought between social classes.
7. Xanadu 2.0, Medina, Washington:
Owners Bill and Melinda Gates built their sprawling Washington home with many cutting-edge features. As the mastermind behind one of the century's most notable companies, Gates created the tucked away abode to match his tech-savvy image.
A few of the unique amenities of Xanadu 2.0 include an underwater music system, a separately-housed swimming pool, and a trampoline park with 20-foot ceilings.
The 66,000 square foot home has 24 bathrooms in all, 10 of which are full baths.
In addition, it also has 6 kitchens, male and female locker rooms, a sauna, and a 2,300 square foot reception hall. The reception hall has a wall-to-wall limestone fireplace and a massive video screen for entertaining. It can seat up to 150 people or accommodate up to 200 guests if standing.
Also interesting is the home's heating and light system. They are controllable using a pin-passcode that guests can set according to their personal preferences. The house's sheltered design aids in reducing energy usage and regulating temperatures.
Gates also houses his ancient Da Vinci manuscripts here, which he acquired in 1994 for over $30 million dollars at an auction. He can display additional artwork, stored on $150,000 worth of storage devices, via the $80,000 computer screens adorning the walls.
8. Acqua Liana, Florida:
This property's claim to fame is that it holds the title for the world's most luxurious eco-mansion.
The 15,000 square foot home boasts 7 bedrooms, 11 bathrooms, a waterfall spa that's lit with fire, floating sun terraces, and an arched aquarium wet bar. It's almost hard to believe that such extravagant details could also be eco-friendly.
Still, for any doubters, there are plenty of "green" qualities throughout the luxurious homestead. Acqua Linea has superior air quality, $120,000 worth of solar panels, ultra-efficient appliances, and extra LEED features. This helps the eco-mansion to maintain an energy-neutral setting most days.
Its' designer created the home, not only to be sustainable living quarters but also as a work of art. His visits to exotic tropical locations such as Bali and the South American rainforests inspired him.
9. Palazzo Di Amore, Beverly Hills, California:
Jeff Greene, an LA real-estate mogul, owns the Palazzo Di Amore, which is Italian for "Castle of Love". He listed the home for $195 million dollars but has since lowered the asking price by at least $66 million.
The sprawling compound is an entertainment mecca. It features a rotating dance floor, laser light system, and a high-tech DJ booth. There's also a bowling alley, game room, theater, and parking space that can accommodate up to 150 cars at a time. The hard part is getting your friends to come over, it's getting them to leave!
10. Kensington Palace, London:
Valued at $222 million dollars, Kensington Palace sits on one of Britain's most exclusive streets, which also known as London's "Billionaire Row".
When the homeowner, Laski Mittal of India, purchased the 55,000 square foot palace for $128 million dollars, it was the most expensive address on the market. In addition to owning the famous mansion, Mittal also owns the world's largest steel manufacturing company.
Kensington Palace was once home to the de Rothschild family. It's located near the current home of Prince William and Duchess Kate Middleton.
Looking Into Buying a Mansion of Your Own?
If you're interested in purchasing one of the mansions above, you'll be happy to know that several of these properties are currently up for sale. But, there are also plenty of other homes around the world priced for much less in the event you aren't prepared to spend millions (or billions) of dollars.
But, before you invest in any type of real estate, there is some crucial information that you need to know.
Ready to start searching for your own dream home?
Check out this post for a list of essential things to know before buying a new house!
Read Also:
Top 5 Most Expensive Beachfront Homes
Different Types Of Conversions To Make The Most Of Spare Space In Your Homes
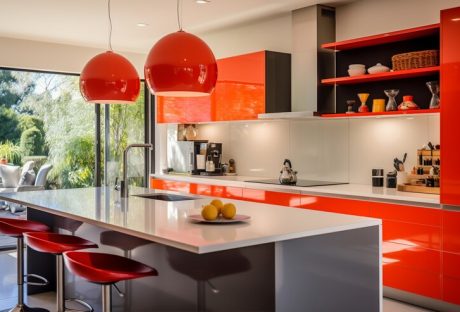
In the heart of every home, the kitchen stands as a hub of activity. It's where culinary masterpieces are born, where families gather, and where memories are created. But what if your kitchen is no longer inspiring or functional? That's where the magic of "ny kitchen remodeling" comes into play.
In this article, we'll explore the exciting world of kitchen remodeling in New York, guiding you through the process, trends, and tips to transform your kitchen into a stylish and functional space.
Understanding the Need for Kitchen Remodeling
Kitchen remodeling is the need of the hour, and you must understand it for convenience. Here, we discuss some points that will provide you with an idea of kitchen remodeling.
Assessing the Current State of Your Kitchen
Before diving into the renovation process, it's essential to assess your existing kitchen's layout, design, and functionality. Identify what works and what doesn't. Take note of any outdated appliances, worn-out cabinets, or inefficient use of space.
Setting Clear Goals for Your Remodel
Once you've identified the shortcomings, set clear objectives for your kitchen remodeling project. Do you want to enhance storage space, improve the flow, or create a more modern aesthetic? Having a clear vision will guide your decisions throughout the process.
Exploring Design Trends
When you look for kitchen design, the first thing you look into is aesthetics. This section discusses some of the trends in the new kitchen's design. The design of the modern kitchen must sync with the present requirements. So let us understand them all here.
Modern Minimalism
Minimalistic designs with clean lines, neutral colors, and streamlined appliances are gaining popularity in New York kitchens. This trend emphasizes functionality and simplicity, making the kitchen a serene space for cooking and socializing.
Open Concept Layouts
Breaking down walls to create an open-concept kitchen and living area is another prevalent trend. This approach fosters a sense of togetherness, making it easier to interact with family and friends while preparing meals. The open layout can easily fit today's requirements, and at the same time, they elevate the aesthetics and the utility of modern kitchens.
Sustainable Kitchen Remodeling
Eco-friendly designs and materials are on the rise. Incorporating energy-efficient appliances, recycled materials, and sustainable practices not only reduces your carbon footprint but also adds value to your home. Sustainability is the need of the hour. Here, we discuss some of the approaches to earn it. Let us get started with the discussion here.
The Kitchen Remodeling Process
Here we bring forth some areas of kitchen remodelling.
Budgeting
Setting a realistic budget is a crucial step. Determine how much you're willing to invest in your project, and allocate funds for each aspect, from cabinetry and countertops to lighting and flooring.
Hiring Professionals
Engaging experienced contractors, designers, and craftsmen is vital. They can help you bring your vision to life and ensure that the remodeling process goes smoothly.
Choosing Materials
Selecting the right materials is key to achieving the desired look and durability. Explore options for countertops, cabinets, backsplashes, and flooring that match your style and budget.
Adding Personal Touches
Personalize your kitchen by incorporating elements that reflect your personality and preferences. Whether it's unique lighting fixtures, custom cabinetry, or a bold color scheme, these touches will make your kitchen truly yours.
Benefits of Kitchen Remodeling
There are some of the benefits of kitchen remodeling. Some people might relate it to aesthetics. But if you discuss it in the long run, it indeed has its benefits for not one but multiple reasons. Let us look at them here.
Enhanced Functionality
A well-planned kitchen remodel can significantly improve the functionality of your space, making cooking and daily tasks more efficient.
Storage
In the UK, space is depleting; therefore, everyone within their capacity is trying their level best to enhance the storage facility. A kitchen removal focuses on using the space and creating new space.
It indeed has its own advantages. Therefore you can say that storage indeed becomes one of the factors. With a good storage facility, you can remodel your kitchen and make it smart.
Increased Home Value
Investing in a kitchen remodel can increase your home's resale value, making it a wise financial decision.
Improved Aesthetics
Aesthetic upgrades can transform your kitchen into a visually stunning space, providing joy and inspiration daily.
Safety
The majority of kitchen accidents occur due to safety reasons. If your oven is outdated, If the screws of your cupboard fittings are not ready, it can indeed put you at risk. A kitchen remodel provides you with an opportunity to replace whatever is old. Thus, it reduces the risks. This is the reason people try to move whatever is old for safety reasons.
Adding personal Touches
There is nothing better than personalization. Personalizing your kitchen is all about the efforts that you made in decking and improving the features it has. There are myriads of areas in your kitchen where you have room for personalization. You can try different ways to personalize your kitchen.
First, you can create a noticeboard corner in your kitchen. You can leave comments or directions there for the other family members. You can also use the potted plants on the window sill. Thereafter, you can create a pegboard so tha you can access the utensils you use most frequently.
Conclusion
To conclude, one can say that kitchen remodeling must be one of the projects that a household must prioritize.
In the bustling city of New York, kitchen remodeling is more than just a renovation project; it's a way to enhance your daily life. By embracing the latest design trends, carefully planning the process, and personalizing your space, you can create a kitchen that reflects your style and meets your needs.
Read Also:
Simple Ways To Prevent Insects From Taking Over Your Kitchen
How To Choose the Right Brass Range Hood for Your Kitchen
Five Essential Components For Your Outdoor Kitchen
Comply with OSHA Standards :
Employers are required to comply with OSHA guidelines and specifically to the Bloodborne Pathogen Standard. Employers must also create Exposure Control Plans. This is the case for any workplaces where employees are in contact directly with blood or other infectious body fluids while on the job.
Employees and workers that work in financial institutions and banks do not perform jobs where they have reason to believe they will come in contact with blood. In the event of an accident, these workers must know how to handle cleaning up blood properly.
Workers must learn how to use precautions and treat any blood or bodily fluids as if they are contaminated. They must treat them as though they have pathogens or are infected with HBV or HIV. Hepatitis B vaccines should be made available within 10 days of exposure on the job to pathogens.
As an employer, you have an obligation to follow the guidelines set forth by OSHA regarding biohazard waste. To be a good citizen, you must comply with all government regulations and make the health and safety of others your priority.
What You Need to Clean Minor Spills :
Before starting the process of cleaning up blood, be sure you have:
Protective equipment for all personnel
A registered disinfectant with the ability to clean broad-spectrum pathogens
Biohazard bags and labels
Brush and dustpan
Forceps and tongs
Leak-proof sharps containers
Disinfectant wipes
To clean a blood spill from a surface:
Equip Yourself Properly :
Use gloves, masks, gowns, and eyewear to protect yourself from splashes. Make sure that your protective gear fits comfortably and has no holes in it. You do not want pathogens to come into contact with your body.
Remove :
With your brush and dustpan or your forceps and tongs, remove any shards of broken glass from the area. You want to avoid ripping your protective clothing. Put each piece in the leak-proof sharps container. Do not remove them by hand once they are inside.
First Cleaning :
Use cloth towels to cover the blood spill and let them absorb as much as possible. The disinfectant will not work if blood is on the surface. Once covered and cleaned toss the towels in a bag designed for biohazards.
Second Cleaning :
Go on to the second cleaning only after the room has been properly ventilated. Pour the disinfectant on the surface and let it stay there for 10 minutes. Then, scrub from the outside to the center using cloth towels. Toss these towels in the biohazard bag after doing the second cleaning.
Third Cleaning :
Use more towels and disinfectant on the surface. Put these in a biohazard bag when you are through. Leave the surface to dry.
Disposal :
Dispose of any protective gear and equipment the same way you did the towels. Put them in a biohazard bag. Seal it and place into a second container. Be sure to label the container clearly and call the local health department for instructions on how to dispose of things correctly.
Decontaminate :
After doing this, use the registered disinfectant to decontaminate any brooms, buckets, dustpans or other items you can use again. Scrub the tools thoroughly and then rinse with water.
Check :
Do a final check to make sure no area of your body has been contaminated. Make sure no blood has splashed on your feet or on your shirt.
Wash Your Hands :
Wash hands thoroughly with water and disinfectant soap. Disinfectant wipes can also be used if you are not near a sink.
Report Incident :
This is crucial. Fill out the incident report clearly as soon as the cleanup is complete. File it as instructed, and be sure
It is important that you and your employees know how to clean up the blood in your workplace. Get help if you need it from a blood cleanup company. Keep your workers healthy and safe with the instructions in this guide.


 Container garden is a great idea for those who don’t have too much space in their house. Besides that, with a container garden, you will not have to spend too much time and effort to take care of it, such as mowing regularly with a lawn mower. So, in this article, I would like to introduce you to some ideas about choosing the right containers for your garden. I may be useful if you are intending to build one.