Published on: 20 February 2020
Last Updated on: 18 February 2023
Who doesn’t like the taste and flavors of vape oil, but what about the cost of vaping? Well, there’s a little secret, the cost of concentrates used to prepare vape oil is nothing as compared to vape oils available in the market, and the best part is that you can easily turn concentrates into vape oil yourself.
What are Vape Concentrates?
Vape concentrates are vegetable-based and that’s why vape oil is also safe for you to use. Nicotine is added to the vape oils which you buy from the market but it’s not a necessary ingredient. The added benefit of preparing vape oil yourself is that you can keep it totally Nicotine free. Avoiding Nicotine can keep you safe from developing addiction and from the side effects as well.
What are the Different Types of Concentrates?
Concentrates are of different types but all of those are not that good to be turned into vape oil. Some of the ideas concentrate for making it are:
Shatter: Shatter is one of the most popular vape concentrates as it’s high in potency and is also flavor-rich. Moreover, it’s very easy to turn to shatter into vape oil.
Crumble: Crumble is also another great option for high-potency vape concentrates.
Wax: Wax is a comparatively low-potency concentrate recommended for beginners. Its price is also very low.
Budder: Budder is also a low-potency concentrate. It’s an ideal concentrate for those who like to have low potency but still want a greater taste.
How to Turn Concentrates into Vape Oil:
Things you’ll Need to Turn Concentrates into Vape Oil
Things you’ll need are:
Your choice concentrate (Shatter, Wax, Budder, Crumble, or BHO) - 1 gram
Wax liquidizer of your favorite flavor – 2 ml
Microwaveable glass container for mixing the concentrate
A syringe for measuring wax liquidizer and for filling the vape pen cartridge
Method of Turning Concentrates into Vape Oil
So let’s learn the secret formula for turning concentrates into vape oil:
Vape oil can be prepared by using a variety of concentrates. The best ones for this purpose are Shatter, Wax, Budder, Crumble, and BHO. So, first of all, decide on the one you’d like to use by comparing their properties.
Next, you should choose the flavor of wax liquidizer for preparing your favorite flavor of vape oil. You can get wax liquidizers in almost all the flavors of your choice. Bananas, pineapple, strawberries, and menthol are among a few all-time favorites.
Take just one gram of your favorite concentrate and put it in the microwaveable glass container which comes with the wax liquidizer for mixing it with the concentrates. Check terpenes for sale.
Now take a syringe to measure wax liquidizer and take only 2 ml of it for mixing in one gram of concentrate.
You should now put it in the microwave oven for just 10 seconds and not more than that.
After taking it out of the microwave, you need to stir the mixture well for preparing the perfect vape oil.
Now it’s time to fill this tasty, self-prepared, and economical vape oil into your vape pen cartridge and enjoy.
Is Vape Oil Safe to Use?
Vape Oil is a healthy alternative to smoking. If you love the flavors of vape but don’t want to risk your health for this taste, all you need to do is stay away from Nicotine based vapes. You must read the ingredients of vape oil carefully before buying it. And if you’re preparing one yourself using concentrates and wax liquidizers, then it’s the best. In this way, you’ll know each and every ingredient which you’re adding to your vape oil. Even Wax Liquidizers are prepared very thoughtfully and carefully using safe and great-quality ingredients. So there’s no risk in using vape oil if you know what your vape oil is made of.
So now if you’re thinking of trying this method to turn concentrates into vape oil yourself, you‘ll find it so much more cost-effective that you won’t believe it. Just with a small quantity of your choice concentrate and wax liquidizer you can fill many cartridges of vape oil that would have cost you 6 to 8 times more if you would have bought them from the market.
Read Also:
Content Rally wrapped around an online publication where you can publish your own intellectuals. It is a publishing platform designed to make great stories by content creators. This is your era, your place to be online. So come forward share your views, thoughts and ideas via Content Rally.
Christmas is just a couple of weeks away, and it gets busy at this time of the year.
Moreover, with all the festive celebrations, you will definitely want some fast food. But, what fast food is open on Christmas? The answer is many fast-food restaurants, and food stalls are open on 25 December to fulfill your cravings.
In this article, you will learn about what fast food chain is open on Christmas. Apart from that, this article will also give you details about the types of fast-food chains open on Christmas. Moreover, you will also get tips on finding open fast-food locations. Hence, to learn more, read on to the end of the article.
The Popularity Of Fast Food On Christmas
Recently, more fast-food chains have been choosing to operate on Christmas Day. This is great news for people who do not celebrate by going out or who just want to take a break on Christmas. This is also helpful for people who are just looking for a convenient option for lunch and dinner.
Generally, in the United States, unlike many other countries across the world, fast-food chains are quite popular.
This is because of the following reasons:
It is easy to get quick and easy fast food. Also, you will find it cheaper than preparing a meal at home.
If you live in a city, the fast-paced city life and professional commitments make fast food an easy-to-get option.
Generally, fast food is more affordable than healthy meals, organic food, and fresh food alternatives.
Convenience is the biggest reason for the popularity of fast-food chains. Moreover, since Americans value time and money a lot, it makes fast food easy on the pocket as well as on time-savings.
In fact, you can order cheeseburgers, sodas, and supersize items, each within a dollar. Basically, when it comes to Christmas, people want to take a break from making food and spend more time with their families. Hence, fast food has become the go-to alternative.
On the other hand, many fast food chains use marketing campaigns to promote their food during holidays. Apart from that, fast food items also contain some ingredients that make people feel good, like saturated fats, sugar, trans fats, high calories, etc.
Types Of Fast-Food Chains Open On Christmas
The following are the major types of fast-food chains that are open on Christmas:
Snacks
Generally, these fast-food chains include a snack bar, beverage establishments, and simple meals like sandwiches, burgers, and hotdogs. Here, the serving person will serve you at the counter or on the table.
Burger Shops
This is a popular option in some places. In those shops, you will find upscale burgers and a variety of cheeseburgers. Moreover, you will find different types of concept burgers that emphasize variety and freshness. Generally, these are takeaway counters.
Food Court
These places are full of different small takeaway counters. Here, each customer pays independently and eats in a common room. In these places, each owner of the food island contributes to the dining room rental.
Healthy Fast Food
Healthy fast food options are also common in some places. For example, you will get nutritious wraps, vegetarian food, and a variety of vegan options. Basically, if you want a balanced diet, this is a great option. Also, it helps you a lot, even when you are on the move. Hence, if you are health-conscious, this can be a great alternative.
Niche Fast Food
Many new themed and niche fast food restaurants are opening up. Here, you can personalize your fast food. Here, the restaurant fuses fast food with many other food options to create something new.
What Fast Food Chain Is Open On Christmas?
The following are some of the fast food chains that are open on Christmas:
1. McDonalds
The Golden Arches are the most popular fast-food options during Christmas. Yes, McDonald’s is open on Christmas and throughout the festive season.
No matter which state you are from, you will find many locations open on Christmas Day and even on Christmas Eve. However, the hours may change depending on the location you are from.
2. Starbucks
Sipping a Cafe Mocha on the evening of Christmas with a book in hand. This is heaven for people who like to celebrate Christmas alone. However, even if you have your family and friends with you on Christmas day, Starbucks is always a go-to option.
Generally, you will find most Starbucks locations open on Christmas. However, individual store hours may differ depending on the place you stay. Basically, it depends on the cultural and climatic conditions of the place. Hence, before you visit the nearest Starbucks, make sure to call.
3. Burger King
A juicy burger on a Christmas day is like heaven to many. Head to the nearest Burger King to get your burger. However, you might find some locations closed on Christmas Day. Hence, it is better to call beforehand. This is because the holiday hours are different in every location.
4. Dunkin’ Donuts
If you have a sweet tooth, Dunkin’ Donuts is there to satisfy your needs. In fact, most of the Dunkin’ Donuts locations stay open on Christmas Day. Hence, if you are looking for a quick breakfast or an afternoon treat, order something from Dunkin’ Donuts. However, make sure to confirm the timings of your local store by calling them beforehand.
Tips For Finding Open Fast-Food Locations
The following are the steps you must follow if you want to find an open fast-food location near you:
Open your smartphone.
Tap on the Google Maps app to open it. Make sure your GPS is on.
Tap the name of the shop and add “near me” after that.
You will find all the locations of that shop near you.
Check the opening and closing times of the shop. Also, note down the phone number of the shop.
Call that shop and ask whether they are open within the time frame within which you will visit.
If the storekeeper confirms that they are open, head on to that fast-food shop quickly.
This way, you can visit a fast-food store near you and try out your favorite meal.
Alternatives To Fast Food On Christmas
A good home-cooked meal is always the better option if you want to compare it with fast food. Whether you are alone or with your family, spending some time cooking something you like is a great way to spend your Christmas in an amazing manner.
Depending on how much time you have, you can also try out a new recipe. All you need to do is open YouTube and check out a cooking recipe.
If possible, you can even involve your family members in the preparation. Basically, if there are many hands, the workload will be less. Moreover, this will strengthen the family bonding.
Summing Up
What fast food chain is open on Christmas? You can see that the popular fast food chains that are open on Christmas are McDonald’s, Burger King, Starbucks, and Dunkin’ Donuts. Apart from that, if you have any other local fast-food shop open, you can visit there.
Do you have more suggestions on how to find a fast-food shop nearby? Please share your ideas and opinions in the comments section below.
Read Also:
Is Walmart Open On Christmas? Get To Know What Is Open And What Is Not
Best Bulking Foods That You Need For Fast Muscle Gains
All you need to know about kashkaval cheese
Unveiling home décor ideas for Christmas
Whether you’re a passionate mocktail mixer, an expert bartender, or just looking to add some flavor to your favorite dishes, non-alcoholic bitters are the perfect way to add a layer of complexity and depth. Not sure where to start? That’s ok.
We’ve put together this comprehensive guide on five things you should consider when shopping for non-alcoholic bitters, including their unique health benefits.
Here Are Five Prime Things To Consider When Shopping For Non-Alcoholic Bitters
Read on as we show you everything you need to know about buying the best non-alcoholic bitters around.
1 - Don’t Mistake Alcoholic Bitters For Non-Alcoholic
We'll start with the most obvious point. It's essential to make sure you’re buying non-alcoholic bitters, like the ones that can be found at All The Bitter. Most bitters look alike when shopping at the grocery store, so sometimes it’s hard to tell the difference between the two. Shopping online for non-alcoholic bitters is probably your best bet because these niche stores have exactly what you’re looking for.
2 - Organic and Wild-Foraged Ingredients
Make sure that the ingredients in your non-alcoholic bitters are organic and wild-foraged. This means that they haven’t been exposed to harsh chemicals or synthetic additives, so you can be confident that they are as natural as possible.
This also ensures that your drink is free from artificial flavors and colors, which can take away from the authentic taste of a mocktail. Mom-and-pop stores do better with this versus big-name brands that can be found at your local grocery store. Let’s face it, handmade is always better than processed.
3 - Beneficial Botanicals And Health Benefits
Finally, consider what beneficial botanicals and health benefits each non-alcoholic bitter has included in its recipe.
Such as the following:
gentian root (helps digestion)
dandelion root (a natural diuretic)
Burdock root (anti-inflammatory properties)
milk thistle seed (liver detoxifier)
holy basil (antioxidant effects)
orange peel (to aid digestion)
ginger root (anti-nausea effects)
yellow dock root (rich in iron)I
Not only can these ingredients help support well-being, but they also bring an added depth of flavor and complexity to any mocktail – so choose wisely.
4 - Vegan
If you follow a vegan lifestyle, you will want to check if the non-alcoholic bitters have been made with vegan ingredients, as some may contain animal products such as honey or beeswax. Even if you’re not vegan, it’s always good to keep vegan-friendly bitters on hand for guests who may follow that lifestyle.
5 - Gluten-Free
If you follow a gluten-free diet, check if the bitters are gluten-free before adding them to your cart. While many brands use gluten in their recipes, there are some options available that don't contain gluten at all, so be sure to thoroughly check the label before making a purchase.
Consider These Tips When Shopping For Non-Alcoholic Bitters
As more people switch from alcoholic drinks to mocktails, there is an ever-growing demand for good quality non-alcoholic bitters. But not all products are created equal. So when shopping for them, make sure you keep these five things in mind.
This way, you can guarantee yourself an enjoyable mocktail experience every time. With so many great options available, it shouldn't be too hard to find something perfect for you – happy sipping, and thanks for reading.
Read Also:
How To Quit Alcohol: Consider Non-Alcoholic Drinks
Tips to Follow When Ordering Alcohol Online
Delta 8 Vs Delta 9: What’s The Difference?
Although mushrooms have been used in cooking and customs for over a millennia, their popularity has increased recently. Previously unfashionable and difficult to market, portobello mushrooms are now in high demand all across the world.
These big, meaty mushrooms taste fantastic when grilled, stuffed, or used as a meat substitute in burgers and sandwiches. They also have a delightfully rich flavor.
But do portobello mushrooms have any health benefits over other foods? What are the negative effects of portobello mushrooms? Here we will talk about different methods to incorporate portobello mushrooms into your diet and their positive and negative aspects.
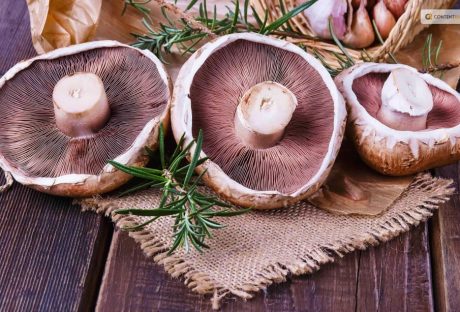
What Are Portobello Mushrooms?
Image Source: tastingtable.com
The delicious Agaricus bisporus fungus, which also produces cremini and button mushrooms, is the source of these large mushrooms. Actually, despite being in various stages of development, all of these mushrooms are the same. The biggest and darkest of the three mushrooms, portobellos are the most mature. They can occasionally reach a width of around 6 inches and have a deep brown color.
Large-scale portobello mushroom cultivation is famous all over the world. These mushrooms, however, are from the meadows of Eurasia and North America in the wild.
They have a less spongy texture than other mushrooms. These mushrooms have a meatier texture which makes them a good substitute in vegan and vegetarian meals.
Portobello mushrooms are generally thought to be a fantastic source of important nutrients that are good for your body. It is believed that portobello mushrooms are rich in beneficial plant-derived nutrients like B vitamins, selenium, potassium, copper, and selenium. If they are exposed to UV radiation while developing, they can also be a rich source of vitamin D.
Mushrooms were initially not acceptable to the general public and to persuade people to add them to their shopping baskets- voluntarily. In order to make that happen they were given the rather glitzy-sounding name Portabella in the 1980s.
Today, 90% of all mushrooms produced in the USA are portobello mushrooms. They are also a common addition to recipes by professional chefs at restaurants and for recipes cooked at home.
Next time you see these delectable mushrooms you're shopping and they're labeled portabella rather than portobello, don't worry—they're the same!
Many people think that mushrooms, in general, offer a number of health advantages. The same is true of portobello mushrooms, which are a rich source of protein, fiber, and important vitamins and minerals.
However, it is important to remember that there has been little research on the health advantages of portobello mushrooms. It cannot be suggested for consumption without necessary caution.
Benefits Of Portobello Mushrooms
Image Source: a-z-animals.com
Here are three positive health benefits of having portobello mushrooms based on popular research:
Portobello mushrooms are an excellent addition to any diet because they lower fat and calories, like all mushrooms. Portobello mushrooms have a low calorie and fat content of 22 per 100 grams. They also contain 2.11 and 1.3 grams of protein and fiber.
High concentrations of B vitamins riboflavin, niacin, and pantothenic acid enrich portobello mushrooms. They are essential for many bodily functions, like energy production and the metabolism of macronutrients.
According to research, portobello mushrooms are rich in potassium, which is essential for maintaining muscle health and strength. 128g of cooked portobello mushrooms contain 440mg of potassium. It is roughly 9% of the daily adult intake.
Negative Effects Of Portobello Mushrooms
Image Source: cdn.britannica.com
Like any meal, portobello mushrooms may not be suitable for everyone. The following are a few possible drawbacks of portobello mushrooms:
Allergic Reactions
Portobellos and other mushrooms may cause an allergic reaction in certain people. The degree of allergic reactions can vary. It can range from minor symptoms like irritation and hives to more serious ones like breathing difficulties or anaphylaxis. Consumption of portobello mushrooms can cause a severe reaction if you have a mushroom allergy.
Digestive Problems
Portobellos and other mushrooms contain chitin, a form of carbohydrate. Humans find chitin difficult to digest, and for some people, it can be uncomfortable. If ingested in large numbers or not cooked well, mushrooms can cause symptoms like bloating, gas, or upset stomach.
Risks Of Contamination
If you don't handle, preserve, and prepare portobello mushrooms correctly, they may become contaminated with bacteria, molds, and other hazardous germs. In this regard, they are much like other mushrooms. Food poisoning from eating contaminated mushrooms can cause symptoms like nausea, vomiting, diarrhea, and abdominal pain.
Medication Interactions
Portobello mushrooms, like several other foods, may have an effect on how some medicines work. For instance, they might impact how some medications and anticoagulants work. To be certain. There are no reported interactions. However, you can talk to a healthcare provider or pharmacist if you are taking drugs.
How To Cook Portobello Mushrooms?
Image Source: zardyplants.com
Portobello mushrooms are ideal veggies in a variety of ways, including grilled, stuffed, and fried. However, you can also serve them on their own. They are very popular in Italian recipes like spaghetti and even as toppings on pizza.
In a variety of vegetarian and vegan meals, including burgers and steaks, portobello mushrooms' are an ideal meat substitute. Here are a few of our favorite methods for preparing delicious portobello mushrooms:
You may substitute a grilled portobello mushroom for a traditional meat burger or eat it alone as a plant-based steak.
To prepare portobello mushrooms for pasta dishes and sauces, put them in a skillet and cook briefly until fork-tender.
Portobello mushroom stuffing is an all-time favorite! Load a generous amount of cheese into the mushroom's center before baking it in an oven until it turns golden.
Slice up a few of these chewy deliciousnesses. Put them on toast or toss them over for a savory stir fry!
How To Choose The Right Portobello Mushrooms?
Image Source: boomieskitchen.com
Pick fresh, firm portobello mushrooms when you're shopping. Avoid portobello mushrooms that have bruises, or that have soft patches, as they are not suitable for consumption. You must consume fresh mushrooms right away because they are bad for your health when old.
Fresh portobello mushrooms are best when in a paper bag or their original container in the refrigerator. These fresh mushrooms should be kept in an airtight container and kept at room temperature. It will prevent the formation of dangerous bacteria that could cause botulism.
To help avoid cross-contamination, wash your hands both before and after handling portobello mushrooms. Before preparing and eating, immediately wash mushrooms under running water. Other than water, there is nothing else you need to use to clean your mushrooms. Never pre-wash mushrooms since the dampness will hasten their deterioration.
Wrapping Up
So it appears that portobello mushrooms may be more than we originally thought! There are so many good reasons to include portobello mushrooms in your diet. The possible health advantages and their distinctive texture and flavor make them super palatable.
Remember that the negative consequences are not all-encompassing and might not be relevant for everyone. When included in a balanced diet, portobello mushrooms are a generally healthy and safe food option. However, it is advised to speak with a healthcare provider or allergist for specialized guidance if you have known allergies.
Learn More About:
7 Benefits Of Eating Protein Rich Snacks
5 Ways To Use Medicinal Mushroom Extracts
Great Health Benefits You Get From A Protein Coconut Bar