Considerations When Choosing the Ceramic Bathroom Tile

Published on: 27 May 2019 Last Updated on: 06 December 2021
Bathroom Tile

Covering floors means looking for an appropriate tile that will make the bathroom look attractive to give the person using the space to find peace and comfort. Ceramic  bathroom tile comes in different sizes and shapes. You can opt for traditional or basic designs.

Ceramic tiles add the missing attractive touch to the floors and walls of your bathroom. They are an ideal choice for the bathroom because they resist moisture and are available in different patterns. Depending on the type of taste you have for ceramic tile bathroom, there is always a guarantee that you will find one that will serve you for many years.

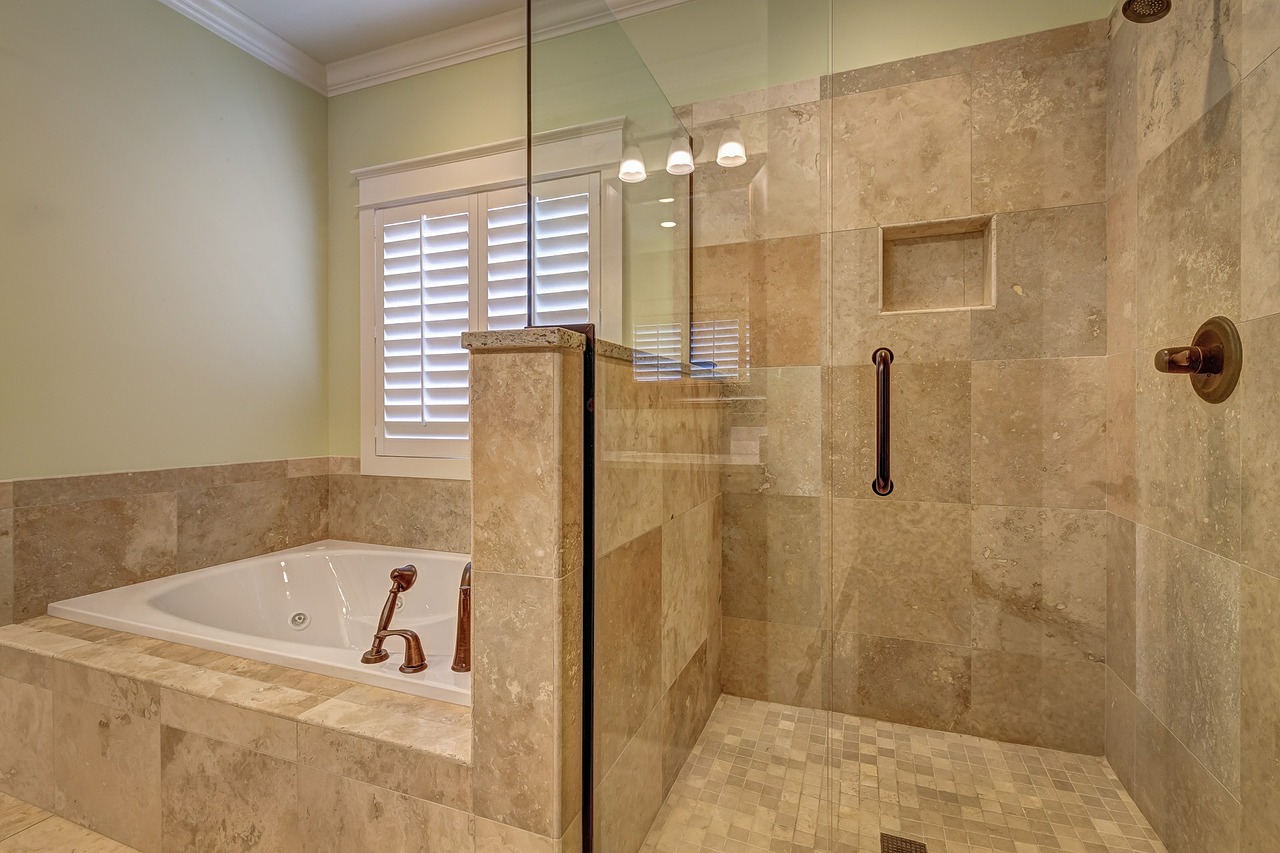
Bathroom tiles are versatile in that they are appropriate in the shower, walls, around the bathtub, etc. their available in different materials such as ceramic or allow for beautiful mosaic designs. You can do a perfect mix and match to create a design that uniquely defines you.

Why Do You Need a Ceramic  Bathroom Tile ?

Ceramic tiles are available in a wide range of colors and designs fit for any home. You can get the look that you need for that specific area at home without compromising the design or quality of materials.

Water Resistance

Ceramic tiles do not absorb water that lands on their surface and are naturally dry in wet and humid conditions.

Durability

Ceramic tiles are incredibly durable and not like to crack due to wear and tear. They have a lifespan of between 10 and 20 years. The strength makes it a popular material for many homeowners.

They are affordable

Other tiles, cannot offer the affordability and can take any form or design without a problem. A  ceramic tile bathroom is durable and justifies the cost of purchase for which you can brag about.

Tiles are Low Maintenance

These bathroom tiles can be cleaned quickly  by wiping away or mopping up dust with a liquid or stain remover. Using this low maintenance, tiles on the floor gives busy homeowners time to maintain a healthy and clean environment.

Regardless of whether you are looking for simplicity, neatness, or detailed designs, here are ideas that could help in making the final decision.

Color

One striking feature that leaves a lasting impression on you and visitors is the color. Pick colors that define your purpose or the purpose of the room. From the choices of elegant shades to choose from, one color will fit your bathroom walls and floors.

Price

The price range depends on your budget. Some people will say that some features only money can buy and others have what you need but may not last long as expected. Play with what features you want to stand out once you get inside the bathroom and the amount of money you intend to spend on specific ceramic tile bathroom.

Buying Bathroom Tile to Satisfy a Need

Ceramic tiles can undergo customization to define the kind of interaction you want to have with it. The need could be determined by mixing shapes and sizes or playing with styles and designs to see what comes out as what you want.

With all these in mind, you are bound to make the best decision when choosing an appropriate ceramic tile bathroom. Make sure to get a tile that will provide the service that you need.

Read Also:

Content Rally wrapped around an online publication where you can publish your own intellectuals. It is a publishing platform designed to make great stories by content creators. This is your era, your place to be online. So come forward share your views, thoughts and ideas via Content Rally.

View all posts

Leave a Reply

Your email address will not be published. Required fields are marked *

Related

Maintain Garden

4 Essential Tools Needed to Maintain Your Garden in the Winter

You may not expect that it is necessary to do yard work in the winter, but it is more important than you think. Properly preparing your lawn in the beginning months of cold weather and even though snowy conditions will ensure you have the best-looking lawn come springtime. These four tools are essential in maintaining a healthy yard during the winter. 4 Essential Tools For Maintaining Your Winter Garden When you love to spend your leisure time in front of your lawn. The maintains of your garden is quite an important task to preserve the beauty of your favorite garden. Every time seeking professional help is costly so better look at how you can maintain a garden in winter using some simple tools. However, you need to understand that maintaining your garden during winter can be a tough affair. Not only will freezing temperatures deter you from engaging in outdoor work, but the tools and machines can become non-operational. This is why a good idea would be to engage an expert to do the needful. Tree Service Round Rock can maintain your garden during the winters and ensure that you stay safely and cozily within the warm confines of your home. Here are the names of four tools to maintain a garden in the winter season. 1. Aerator: Cool-season grass, which is the most common type, should be aerated in the early spring and late fall. For those of you that may not be familiar with this machine, it digs small plug-like holes out of the ground. This helps the grassroots have access to more water, nutrients, and air. The point of this is to make the roots deeper and healthier so the grass has a stronger foundation to grow. Use this equipment on a day that the ground is slightly moist, maybe the day after rain, for the best results. It will relieve the soil from compaction that causes the roots to be starved and suffocated. Making sure your grass gets all the nutrients it needs before it is covered in snow will help it grow back better when the weather warms up. 2. Chainsaw: Pruning your trees and bushes during the wintertime is an essential part of a healthy yard. Plants will waste too much energy trying to send nourishment to dead limbs which affect the living ones. Investing in a chainsaw would be beneficial so that you can cut down the dead branches. If you are a seasoned expert, you will know to not only trim dead branches but also cut any that are rubbing together. Damage to the tree from the rubbing can create an entry for bugs to get inside. When it comes to finding a good quality chainsaw, get this it works! The better the quality of equipment, the less risk when it comes to the safety and wellbeing of your yard. 3. Drop Spreader: Fertilizer is the basis for giving your lawn what it needs to look its best for next year. There are winterizing products that slowly release nitrogen during the offseason. Using a spreader makes this task time-efficient and well done. It allows you to evenly distribute the fertilizer throughout the lawn, maximizing the benefits of this product. Putting grass seed down at the beginning of the winter can help maintain your yard as well. You will use the same drop spreader to put this down, but you’ll want to make sure you set the amount it is releasing slightly less than recommended. In doing this, you can overlap your passes, so nothing is missed, and you still have enough to do the whole yard. As a pro tip, it is encouraged to spread a thin layer of compost before laying the seed. Combining the seed and the compost keeps your grass moist and germinated during dry and cold weather. 4. Rake: Before a snowfall, it is crucial to clear your yard of any leaves, branches, or debris. When this waste sits on your grass all winter it will cause these patches to brown or die. Simply raking every once in a while will prevent dead spots and inconsistency in height and color. Raking will also help mix in any seed or fertilizer you have laid down in the soil previously. Something to keep in mind is to make sure you are not raking when the ground is frozen. The protective layer in the frozen blades of grass gets destroyed from the pressure of footsteps. While this will not kill the grass, it may cause it to be brown when it grows back in. Get a leg up on those who do not know to still maintain during the winter months. Investing in these tools will ensure you have the lushest green grass on the block come spring and summertime. Wrapping It Up: Maintain Garden is simple when you are already having the essential tools to do the job. But the professional touch every time required. When you already have these tools your hard work related to garden maintains in the winter is becoming a much easier process. So what is your opinion? Are you going to maintain your garden on your own? Or do you seek professional help? Do not forget to share your opinion with us. Read Also: 5 Summer Garden Maintenance Tips And Tactics You Have To Know 5 Essential Tips To Designing A Beautiful Front Yard Garden

READ MOREDetails
Natural ways to get rid of flea in your lawn

Natural ways to get rid of flea in your lawn

It may be a challenging task to remove fleas from your lawn. This can drive somebody crazy, sick and tired of spending a huge sum of money to buy chemicals with a view to expelling fleas for good. All efforts go up in smoke due to wrong methods. Is there any right, natural way to make their dream come true? Yes, here is the answer that is proven for green pest control in Minnetonka. Natural ways to kill fleas in your lawn : source Spray thoroughly your whole lawn with natural ingredients: Nowadays, many industrial products are available for your choice, yet they can be harmful to your health. Why don’t you make use of fewer but multifunctional things right in your kitchen? Vinegar or lemon is accepted. As for vinegar, mix ½ vinegar with ½ fresh water. As for lemon, slice them and boil in at least 20 minutes. Either vinegar or lemon, you also end up pouring the combined water into a spray bottle in order to sprinkle your lawn. This handmade flea killer is friendly to the environment, hence you can utilize it day in and day out. Flood your lawn: After spraying, don’t rush to flood right away. Take some time, about at least 2 hours, to kill the adults. So, what about larvae and eggs? Just flood your lawn slightly to soak up and eradicate them. Maintain the flood in a couple of minutes, and drain your lawn as fast as possible. Natural ways to prevent fleas re-infesting : Source  Rake your lawn to get rid of all shrubs, littered pots, trash and leaves: In fact, this step is indispensable in the whole process of getting rid of tenacious pests. Many people are wondering why they treat flea inside their home and in their pets already, but flea infestation does not decrease or boom just after a short period. Simply it is because of your uncompleted treatment, and you have skipped one of the most potential areas, your lawn. Fleas can live outdoors until they find a good chance to jump into your house or your pets, and their favorite environment is a moist, dark place. They can find it easier to escape from your “checking-radar” if hiding under a bottle or rotten leaves. After raking all useless items, don’t pile them up. Instead, clear up and throw away as soon as possible. The cleaner your lawn is, the lower the percentage of being infestation is. Mow your lawn: Mowing is one of the most useful methods to remove flea in the lawn. It can be understandable because to let your lawn long also means to create “an ideal shield” for fleas’ larvae and eggs. In addition, short lawn also allows sunlight to deeply penetrate into while fleas really hate daylight. Nonetheless, don’t try to cut your lawn as short as possible as the too-short, on the contrary, can make your lawn weaker and more attractive to fleas and even other animals like ants. Don’t overwater: As aforementioned, fleas prefer moist, as a result, you should prepare for an appropriate watering schedule and leave your lawn to dry. Moreover, a good drainage system is enormously useful. Minimize other animals’ contact to your lawn: Outside your fence may be a huge potential to be infested by fleas, coming from wildlife animals. Build up a fence around your lawn to protect your lawn and your house as well. Sound simple, right? In fact, it really is. All the mentioned methods are so cost-effective and practical. They are really worth a try. Read More : Grow These Flowering Plants In Your Home Garden To Remove Vastu Related Problems How To Choose The Right Containers For Your Container Garden Does Organic Gardening Improve Soil Quality? featured image Source: https://pxhere.com/en/photo/994438

READ MOREDetails
Repairing Your Roof

Repairing Your Roof – How Should You Get Started?

Your house's roof is its ultimate defense against harsh weather, pesky creatures, and infestations.  If your roof is not in top condition, your entire house is at risk. It's crucial to schedule roof repair as soon as you notice a leak, even if it's small, as it can cause significant damage.  Repairing your roof is more cost-effective than replacing it entirely and is vital to maintain its integrity.  Left unaddressed, roof leaks can cost you tens of thousands of dollars.  This article will discuss the basics of roof repair, what you need, and how to do it. Ensuring your roof is in top condition is essential to protect your home from the elements and ensure its longevity. Steps For Repairing Your Roof Given below are the steps that will guide you in the process of roof repairing at your home— 1. Examine The Damage Following a systematic approach is vital when searching for a leak in your roof. Begin by surveying the visible damage to your roof, including shingles, gutters, and roof edges.  It's essential to start with the most obvious issues and progress to less apparent ones. Once you've assessed the exterior, examine the interior for signs of water damage.  Look for indications of water stains, dripping water, sagging, pooled water, and dampness. Inspect during rainy weather, as some leaks are intermittent and only occur when there is enough rain.  Access the attic using a flashlight to locate the water source through the roof deck. Check around all rafters for indications of water.  Water can travel through the roof decking and rafters due to the force of gravity, which may result in dripping in different areas. If you observe water dripping, trace it back to its origin. 2. Find A Reliable Contractor After a thorough inspection of your roofing system by a professional roofing consultant, you will receive an accurate and detailed bid or estimate.  The estimate will be based on the materials you choose for your roofing projects. Moreover, you must consider the unique measurements of your roof.  The roofing consultant will also consider any special conditions that may affect the cost. This can include the complexity of the roof design or any existing damage that needs repairing. Once you receive the bid or estimate, your roofing contractor should provide a written contract outlining the details.  This contract should include a comprehensive breakdown of the costs, the expected timeline for completion, and any warranties or guarantees included.  Therefore, you must carefully review and understand the contract before agreeing to any work to ensure everything is clear and fair for both parties. 3. Select The Suitable Material  It's crucial to have a complete set of roofing tools when undertaking any repair project. These hand tools have various uses throughout the house. They include the following: Roofing hammer. Pry bar. Nail puller. Utility knife. Shears. Tin snips. Handbrake. Tape measure. Chalk box. Roofing nails (also known as roofers). Speed squares. A pencil for notes or markings. A 10 oz clay gun. Choosing the right roofing sealant depends on the roofer's needs, but any kind will suffice.  While shingles are optional, matching them is optional. For flashing work, it's recommended to use aluminum coil stock, which is available in various colors at most box stores. A tape measure is recommended for all measurements and layout work, and a chalk box is ideal for snapping reference lines and general layout work.  Roofing nails, or "roofers," are recommended for their durability. The materials used for the roofing sealant, shingles, and aluminum coil stock are also essential. 4. Ensure That All Cracks Are Sealed Using an uncomplicated roofing sealant is important to seal any cracks on your roof.  To apply a sealant, you must pierce a thin aluminum membrane with the tube, allowing the sealant to flow.  Next, load the sealant into a caulk gun and aim it at the crack or hole to seal it.  The sealant will dry in a few hours and be set entirely in 24 hours without intervention.  Finally, you can cover the hole with shingles or flashing and move on to other projects. Ensuring that the roof sealant is compatible with your caulk gun is crucial. This is because some construction materials come in 28-ounce tubes that won't fit a standard 10-ounce gun. 5. Ensure The roof Is Insulated When planning to replace your roof, it's also a good opportunity to consider upgrading your insulation.  However, if you opt for new blown-in insulation, your roofing contractor will install it while they remove the decking.  This insulation process requires running a hose through the exposed roof and into your attic. It allows the insulation to be installed quickly and easily without causing any damage to your walls or ceilings.  Therefore, with the new insulation, you can enjoy improved energy efficiency and a more comfortable indoor environment. 6. Leave It Clean After the roofing crew installs your new roof, they should clean up any debris around your home. This includes loose shingles and nails and leaves them in their original condition.  They should also haul away old roofing materials for proper disposal. Additionally, you must ensure not to dispose of in landfills, which can contribute to pollution. The roofing expert must inspect the final product to ensure it meets all industry standards and building codes.  They should also check for potential leaks or damage and address any concerns. It is important to address any concerns and take steps to correct any issues. Therefore, ensure you’re completely satisfied with the new roof and its reliable protection for years. Can You Repair Your Roof Yourself? Understandably, as a homeowner, you may want to save money. Therefore, taking care of some home maintenance tasks can help you save a lot.  However, it is important to know your limits when it comes to your roof.  You may be capable of handling minor tasks such as replacing caulking or cleaning gutters. On the other hand, leaving any roofing projects to the professionals is highly recommended.  Moreover, roofing maintenance requires specific skills, knowledge, and equipment that only experienced and trained professionals possess.  Even a seeming DIY project can quickly spiral into a much bigger roof repair if something goes wrong.  Therefore, it's always wise to prioritize the safety of your home and family. Look for an efficient roofing service provider and explain the damage. You can get your roof cost-effectively repaired under expert supervision! Read Also: How Often Do You Need A Roof Inspection? Elevate Your Roof’s Health With Aerial Roof Inspections Choosing A Siding And Roofing Companies In Delaware

READ MOREDetails