Create A Stunning Outdoor Space With These Residential Landscape Lighting Tips

Published on: 01 November 2017 Last Updated on: 22 February 2020
Landscape Lighting Tips

When you think about landscaping, you probably think about visiting a nursery to pick out plants or planting flowers to create a beautiful accent garden. Flowers, plants, and trees are only one part of the equation, however. You also need to think about how your landscape will look after the sun goes down. Residential landscape lighting can enhance the look of your home after dark, drawing attention to key architectural details of your house and highlighting the beautiful plants that surround it. Use these tips to boost your home’s curb appeal today.

Understand that landscape lighting goes beyond solar path lights

Landscape Lighting Tips

Lighting up your landscape involves far more than just sticking a few solar lights along the edge of your sidewalk and calling it good. Instead, it is about creating a specific feeling in your yard after the sun goes down. When done correctly, landscape lighting can transform your outdoor space, turning it into a beautiful accent for your home. This type of lighting is not only meant to be functional but also to enhance the look and feel of your home.

Decide what you hope to achieve

Stunning Outdoor Space

Before you start picking out lights and deciding where to place them, come up with an overall plan for what you hope to achieve. Are you trying to make your yard safer by lighting up your sidewalk or patio area? Do you want to create a well-lit area where you can entertain? Do you want to draw attention to certain areas of your home, highlighting its unique architecture? Are you trying to improve the security of your property? By identifying your objectives before you begin, you can do a much better job of designing a lighting setup that will help you achieve your goals.

Take care of an essential lighting first

There are certain parts of your yard that should definitely be lit. Here are some of the key components that you should include in your overall design:

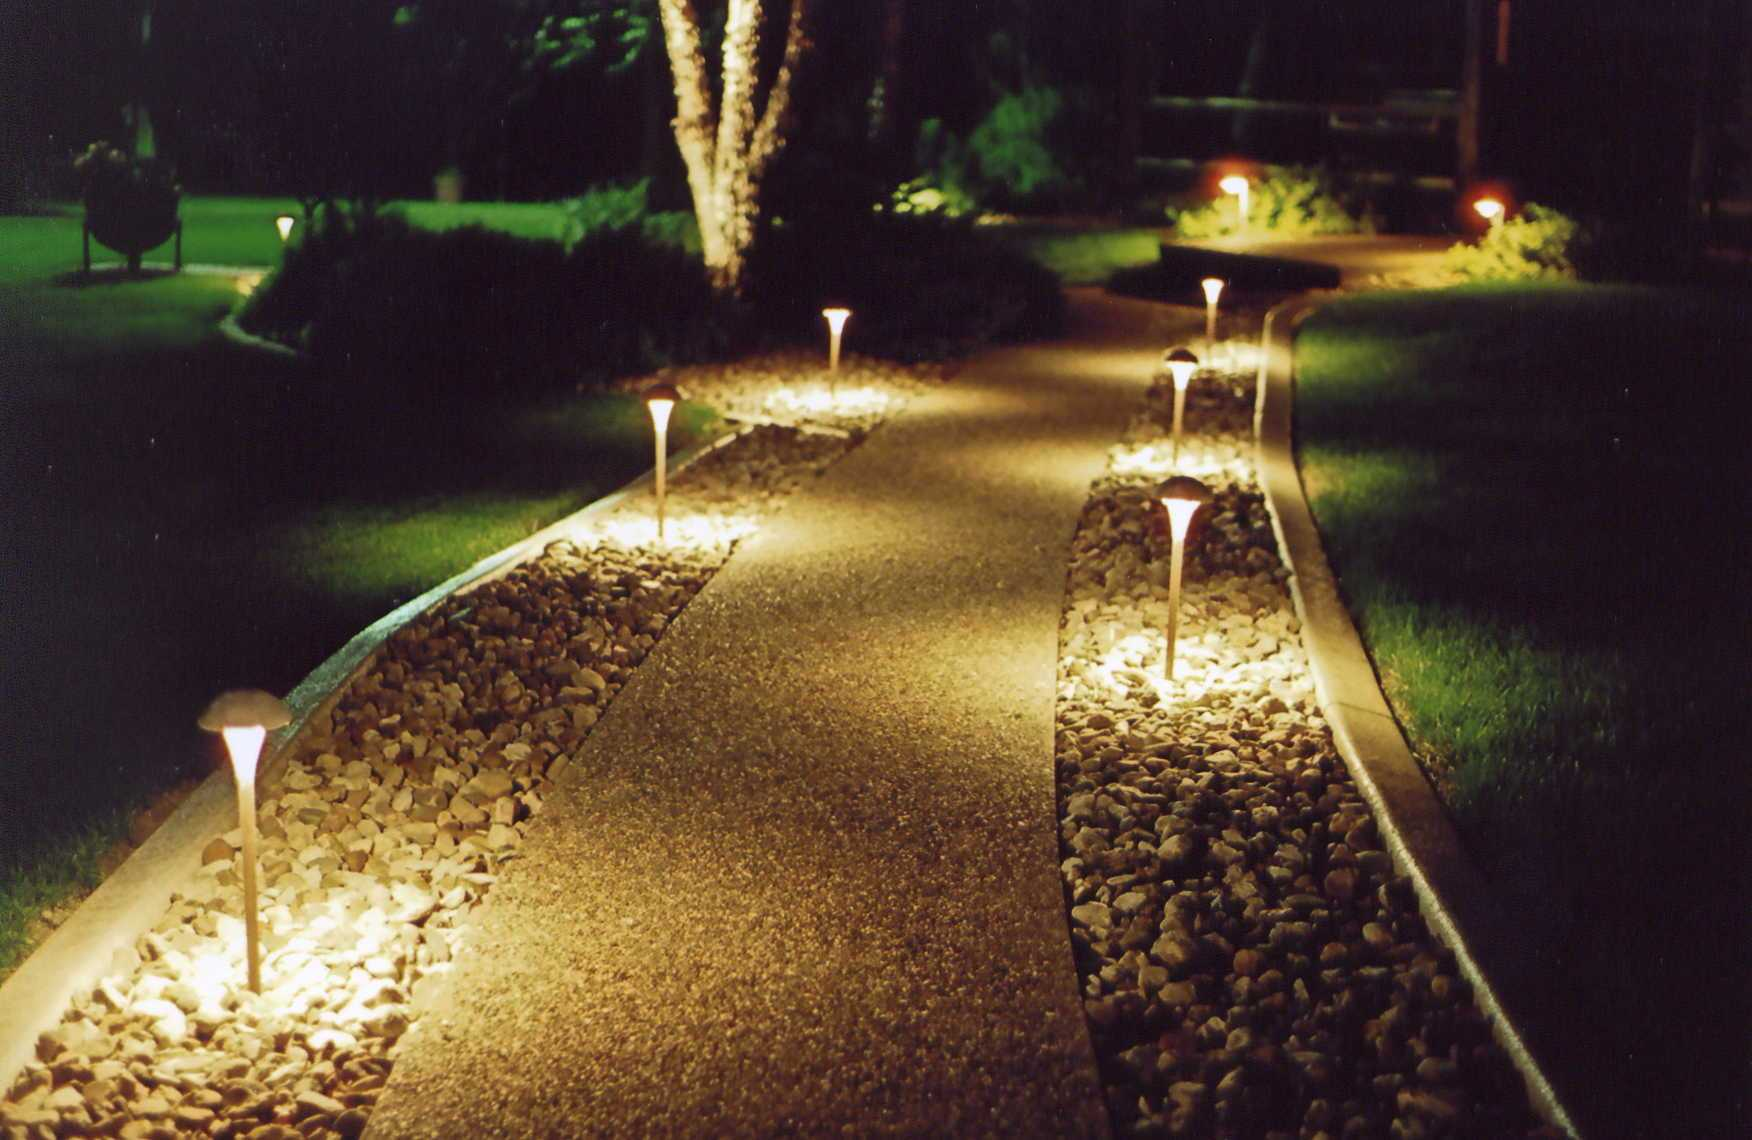
    • Pathway lights. Any sidewalks, pathways, or entrances should be well lit to make it easy for people to see.
    • Driveway lighting. You should incorporate plenty of light in your driveway area so that you can get to and from your car with ease.
    • Stairs. If you have stairs leading up to your home, make sure that they are well illuminated so that people don’t trip and fall.
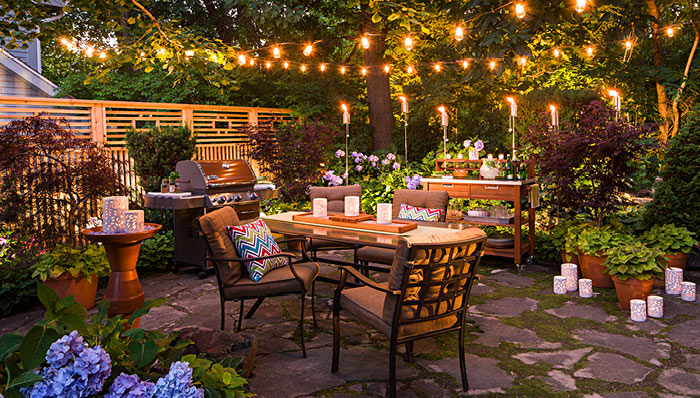
    • Patios or decks. Any outdoor gathering area should incorporate lighting so that it can be used after dark.
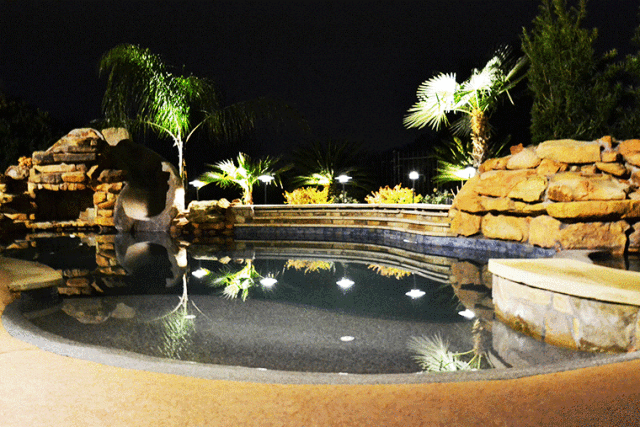
    • Trees. If you have any trees that you want to highlight, you can easily do it with lighting.
    • Key architectural features. You can use lighting to enhance the architecture of your home. If you have any water features on your property, you should also consider lighting them.

 Choose LED lights

LED lights

Rather than going with halogen bulbs, opt for LED lighting. Not only do these bulbs last a long time but they are extremely energy-efficient.

A single bulb can last as long as 100,000 hours. That means that you won’t have to replace them often – an important consideration since outdoor lighting fixtures are not always easily accessible.

LED lights can also stand up to the elements, making them perfect for use outdoors. No matter how bad the weather gets, you shouldn’t have to worry about your lighting.

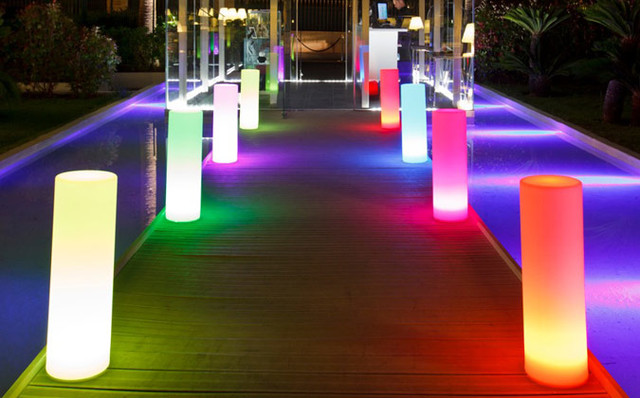
Another advantage of LED lights is that they are extremely versatile. You can change everything from the color of the light to its intensity. This can allow you to create a completely customized look for your outdoor space.

Read More : Secrets To The Perfect Bedroom Light

Incorporate multiple types of lighting to create an interesting design

lighting to create an interesting design

Your residential landscape lighting design should include ambient lighting, which is lighting that shines over the entire space. It should also incorporate task lighting, which is used to provide illumination for tasks like cooking. Finally, it should also include accent lighting, which is used to draw attention to certain features of your yard. For instance, you could put a spotlight on a tree to draw attention to it. Incorporating all three types of lighting will help create a balanced, professional look that will set your yard apart from others in your neighborhood.

Read More:


Content Rally wrapped around an online publication where you can publish your own intellectuals. It is a publishing platform designed to make great stories by content creators. This is your era, your place to be online. So come forward share your views, thoughts and ideas via Content Rally.

View all posts

Leave a Reply

Your email address will not be published. Required fields are marked *

Related

kitchen-2619008_960_720

Installing A Kitchen Tile Splashback – The Basics

Adding wall tiles to a backsplash can be a really simple and effective way to spruce up your kitchen sink area, as well as protecting the surface as well. Here we look at the basics. Home improvements needn't be expensive, all it takes is a little research and time and you can make a significant difference to the house you live in. Choosing tiles for a kitchen splashback can be a really simple and effective way to spruce up your kitchen sink area, as well as protecting the surface as well. For a project like this, you are likely to need little more than a couple of days to complete it, and a minimal amount of money to achieve a great result, depending on the equipment you already have. Before You Start Prepare The Wall Before you start, clear everything out of the way that may obstruct the job and/ or get broken or damaged while you work. You should also check that the wall is good for tiling as well – chances are you will choose porcelain tiles, which are heavier than more traditional ceramic tiles so the walls need to be up to support their weight. If there is any level of condensation you must wait for the wall to completely naturally dry out before you begin tiling. If the drywall you're working with isn't sound, you must repair it before you do any tiling. Plan The Design You'll need to plan your design before you can purchase your equipment or begin the project. Measure how high you want the backsplash to be from the countertop and consider the type of tiles you would like to use. If you are unsure, take a look at sites like Pinterest for inspiration. Get Your Equipment When buying your equipment, especially your wall tiles, try to start with more than you need. With porcelain floor tiles or wall tiles, it is always good to have extras in case some get damaged during the job or even years after and you need a replacement tile that matches. In order to determine how much tile requires you need to measure the length and width of the area, you are putting a backsplash on. Simply multiply the length by the width to get your desired wall tile amount. If you don't know what type of equipment you need for the job, speak to an advisor at the shop or warehouse and they will be able to advise you on the best tools for the job. Read also: Close Look At Top 5 Roofing Materials – Pros And Cons Install Once you have done all the correct preparation, it's time for you to install your backsplash. Safety First The first thing you need to do is make the area you are working in safe. All electrical appliances nearby should be either turned off if they are permanent fixtures, or moved away if they are temporary. Read also: Making Your Office Safer For Workers Clean The Area Using a clean cloth, gently wipe the area with warm water and let it dry naturally. Apply The Adhesive Using the manufacturer's instructions, apply your tile adhesive using a tile trowel. Make sure the adhesive is spread thinly and only apply enough adhesive for the area you are tiling, or it will dry before you have applied all the tiles. Lay The Tiles Place the first tile at the bottom of the backsplash in the middle. Firmly push the tile on to encourage it to settle into the adhesive and use a level to make sure it isn't wonky. Use a spacer or piece of cardboard on each corner of the tile and push them into the adhesive well. Continue to lay the tile's row by row, taking care to remove any adhesive that pushes up through the tile gaps. Ensure you are leaving enough room for grout and checking constantly that the tiles are level. Cut Tiles Away In A Separate Area Depending on the equipment you are using, you need to ensure you follow all safety procedures to ensure you are working safely. Ensure you only score tiles where the scored section won't be showing, and only score tiles when you need to, as the measurements needed may change as the job progresses. Wipe Once all the tiles have been laid you can wipe away any adhesive that has seeped out using a clean, damp cloth. Leave The Tiles To Dry You must leave the tiles to dry according to the time stated by the adhesive manufacturer. Trying to skip this process will result in an uneven backsplash and tiles that will not remain stable. Grout When mixing grout you should be wearing appropriate safety equipment such as gloves, goggles and a mouth mark. Grout the tiles precisely and carefully, taking care to wipe away any excess once it becomes firm. Once the grout has dried, you can then wipe the tiles off completely. Well Done! You should now have a fancy new backsplash to enjoy in your kitchen! Remember, if you take the time to do the job right, you should end up with a well-done backsplash that will look fantastic and last for years to come.

READ MOREDetails
gm36x60

How Activity Mirrors Add Value to Exercise Place!

The most important thing in anybody’s life is to get to know the best things around and to let it be in the right place. If you are going to win over a place and that too for a better reason for scope and action then think of making a positive change. It is right in front of different sorts of approaches that you can find a fair deal. You can provide a trendy look to your gym or the training center with Activity/Gym Mirror. At the same time, you can find a better reason for scope and action. You need to see the best sorts of things and that too for better exposure and reasons. The display is Very Important for Proper Ambiance You see things are going all well with the best sorts of things and reasons to explore for best products. It is just too important to look for the best sorts of deals and that too in a proper way of course. If anyone wants an exotic presentation at the gym with mirrors then you need to find the best sources, and how to look for the great opportunities around. Creating a proper display buzz for your best attitudes is a way out of different sorts of marketing tactics that you need to look for the best kinds of clientele. You need to see what kinds of things really matter and required as per marketing gimmicks are advertised. People are Getting Health Conscious Every Single Day The way of life is all too busy and it becomes more of a necessity to keep you all active and healthy. You are doing a typical 9 to 5 job, and then it’s all sitting and working. So, it is best if you join a proper job and do little exercise that is good for you. It is healthy and keeps blood circulation all moving. Eventually, it is all going to be the best way to look for the best kinds of options. If anyone enters any exercise arena with the purpose of regular joining then he will definitely look at the typical machines as well as the overall environment. Here keeping gym wall mirrors display all around is too good.   How to Purchase Great Quality Wall Mirrors Well, the range of wall mirrors is not limited and it varies from client to client. It is a need-based requirement and for bathrooms, there are different sizes. If someone wants to display it for beautification at an entrance then different sorts of designs and sizes are required. Here clients are going to look for their own preferences, and then gym mirrors will be best available through online stores. It is easy to select, pay and gets home delivery, without moving a single foot out of your exercise center. The sizes of gym mirrors are subject to walls, and how much a client requires and it will work great for sure.  It is an easy and effective method as technology develops and online shopping is paying off for sure.

READ MOREDetails
carrot

Can We Grow Carrots All Year Around?

Carrots are root vegetables. They vary from purple to red in color but most commonly found are bright orange ones. The orange color of carrot is due to its high content of beta-carotene. This helps suffice our body with necessary levels of vitamin A, which is required for proper functioning of our immune system. Yes, we can grow carrots all year round! Also, you may grow it anywhere, even in our small kitchen garden or as a potted plant. You must know how to grow and harvest carrot before you start the procedure of producing carrots yourself. I conducted various kinds of research including reading online resources and talking to farmers in my town before going ahead with carrots plantation. This is so because carrots are a low-acid plant and can catch contamination easily, which may make it inappropriate for human consumption. When can we Grow Carrots? Carrots are biennial plants that are they grow twice in a season. However, the seeds and flowers grow only in cold season. They take ten to twelve weeks to reach their full growth. They can be sowed in spring just before two weeks of the last frost date. In cold climate, we can continue to plant them every three weeks till mid-summer. Then again they can be sowed in summer for winter products that are due in next ten to twelve weeks. Preparing the soil First, you need to judge the solid where you want to plant your carrots. If the soil is sandy or clay soil, then it is not appropriate for growing carrots. Sandy soil and clay soil cannot retain nutrients and lacks good soil structure, which makes them inappropriate for growing carrots. Salty and loam soil is the best kind of soil for growing any vegetables. There is another variety of soil that is chalky soil. This is also not appropriate for growing carrots due to its alkaline nature. Read also: Does Organic Gardening Improve Soil Quality? Sowing Carrots Before sowing carrots, you need to dig in the soil well to about twelve to fifteen inches. Once done, you can introduce some earthworms and crawling critters who make the soil appropriate for growing carrots. Earthworms consume the organics from the soil and then scatter it throughout the soil to make the soil more fertile. Similarly, crawling critters would keep the bugs and insects away from the soil from harming the crop. You should be cautious about using chemicals to kill insects as they also take away the good part of the soil. Always organic gardening is recommended for the growth of any crop as organic gardening improves soil, its overall structure and gets it ready for next cycle as well. You can sow your carrot seeds into the sowing beds created three inches apart. The carrot seeds are very small so to distribute them evenly; you can mix them up with the sand and then sprinkle them into the sowing Cover the field with some warm blanket or a shield to avoid the tiny creatures from ruining your crop. This should be kept covered for at least three weeks to let the healthy growth of the crop. Carrot Sprouts While you decide to plant carrots, you should also be aware of how a carrot sprout looks like to differentiate it from other sprouts or just weed. The sprout is breaking out of the soil may be of cabbage or potato or some grass. Well, then how does carrot sprouts look like? You can very easily identify them. From the perspective of their appearance, they look like ferns or palm leaves. Well if that’s not all for you, then you can take the leave in your palm and crush it with your nails. Now smell the crush, and it will be like one of carrot. That’s how you can very easily identify the carrot sprouts from other growing vegetables and weeds in your kitchen garden. Harvesting Carrots You can judge the growth of the carrots by looking at their roots. The size of the roots is a good indicator of the growth of your carrots. You can pull them out in three weeks to enjoy baby carrots of wait for next ten to twelve weeks for fully grown carrots. Storing Carrots Now is the question of how to store carrots for prolonged use. You can seal the carrots in a polythene bag and store them in the coolest part of your refrigerator. One should never wash carrots until they need to be used as added moisture ruins carrot structure earlier. You can also store carrot in a box and cover it with a layer of sand. This will also help you preserve carrots for long. You can very well enjoy your garden-fresh carrots all year round once you know how to sow and harvest them. You can use them in a variety of ways in your kitchen like caramelize then with sugar syrup or bake a carrot cheesecake or eat them raw as part your daily salads. We have a lot of questions making rounds by our readers; therefore, in case, you have any further questions on how to grow carrots, or anything related to sowing or harvesting or storing them, then please comment below. Read also: Lawn Care Maintenance Services And Tips Smart Fun Gardening: How To Take Care Of A Money Tree

READ MOREDetails