Best Ways To Complete Google Bubble Level In 2023!  

Published on: 29 May 2023 Last Updated on: 13 June 2023
google bubble level

It is not always possible to carry a toolbox everywhere you go, and if you need to measure something quickly, I am here to help you. These days with the help of modern technology, there are a lot of tools available which help in performing such tasks.

In this article, I will be talking about some of the best applications which also function as measuring tools and will be of much use to you.

Keep reading till the end to find out more information about Google bubble level and other similar applications!

What Is A Bubble Level?  

What Is A Bubble Level?  

A Bubble Level or a Spirit Level is an instrument that is designed to indicate whether a surface is vertical or horizontal or even vertical. There are different types of spirit levels that may be used by stonemasons, bricklayers, carpenters, millwrights, and also during some video graphics or photographic work.

How To Use Google Bubble Level?  

How To Use Google Bubble Level?  

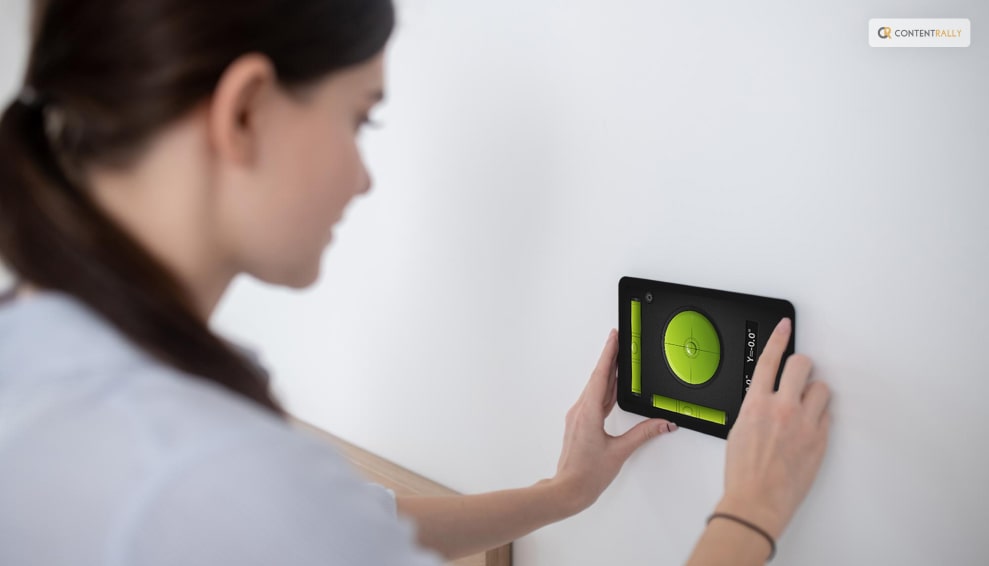
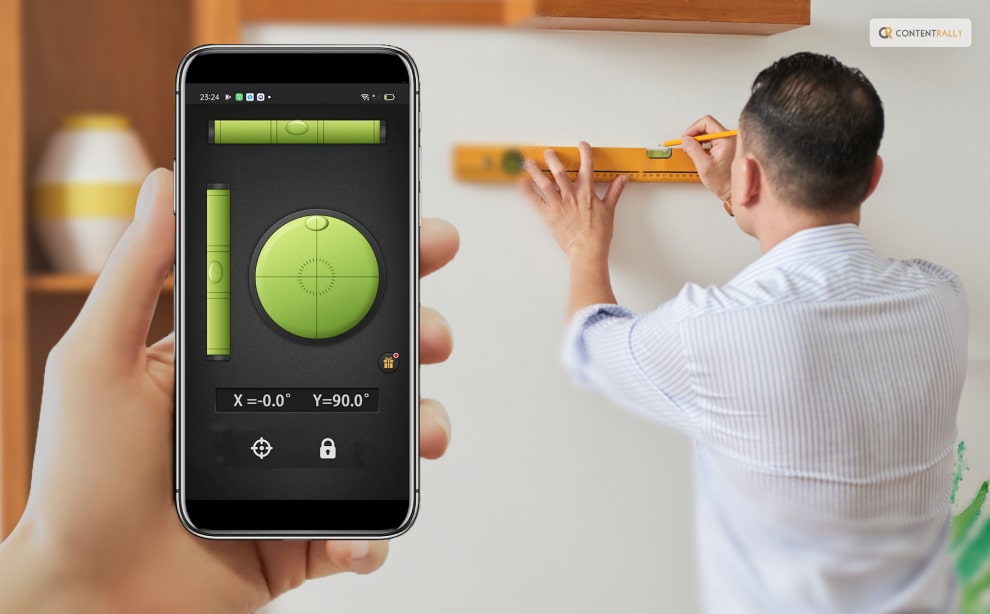
Google has many widgets known to appear on the “search results” page, like a measuring tool, Google search games, and even a metronome. As it turns out, a Google Widget is the easiest option for a bubble level. There is iphone level pre-installed on Apple devices – I would only be talking about accessing spirit level on Android.

For accessing a bubble level or spiritual level, on Android devices, one simply needs to install the Google app on the phone and then search for “bubble level.” A user searching for this tool can also try speaking into the mic after opening Google Assistant as well. Or a user might also just type in google bubble level and the search results would show up.

Using of this tool would be like using an actual tool. Just align the phone against a plain surface vertically or even horizontally to see how the level actually is. To get help in measuring, one must see how many degrees are off from zero. One must also watch the plus icon to ensure everything stays flat.

Tips: You do not need to install Level for iphone, as they already come pre-installed on Apple devices.

Other Useful Tools  

Other Useful Tools

Here is a list of some of the other tools that can be used to utilize your phone as a toolbox:

Measure  

Utilizing of AR (augmented reality) to provide measurements of everyday normal objects is a very useful way of creating a digital tape measure, which is exactly what Google’s Measure application does. It is one of Google’s great applications.

With this application’s help, one can measure the length, distance, and height using their camera. This application is very simple to use, unlike other related apps. It is also a very user-friendly app as well.

To get started with it, one would first need to scan the area with the application to detect the vertical or horizontal plane. Then one would need to select the measurement mode they want to use on their screen. One can even adjust the lines to the desired points, and the application would estimate the object’s size.

Smart Ruler  

This is a very simple tool as well. The Smart Ruler is known to act as a ruler meant for taking only small measurements. A user needs to put any object of their choice for measuring on the screen of the Android device, then touch the corner for detecting the length and width.

You are also bound to find a variety of applications available, but Smart Ruler is different because it has a very easy interface.

Sound Meter  

This application is known to measure the decibel values of the surrounding environmental noise. To help with guidance, the Sound Meter also provides various examples of similar noise levels for differentiation.

For instance, the thirty-decibel range of sound is very similar to the volume of a whisper, while on the other hand, seventy two decibels is closer to very loud music.

Laser Level  

Laser Level is a leveling application that is a handy tool just like google bubble level that features an incredibly useful bubble level/spirit mode. This basically means that with the application, it is possible to measure angles and determine whether or not a surface is “level” in various ways. Even better, it includes a built-in clinometer for those who want to measure angles precisely.

Metal Detector  

My phone’s metal Detector level performs exactly what it says it will. Based on the magnetic field, it utilizes the smartphone’s sensors to find the presence of metals. This can really aid in finding all the metal studs in the wall or even help in searching all the possible pipes in the ground.

CalcKit: All-In-One Calculator  

Even though CalcKit is not a traditional tool like a hammer, it is still an incredibly helpful tool as a conversions and calculator app for artisans and contractors. This application is well renowned for containing a large range of conversion tools that make it extremely applicable to a huge range of professions. For quick computations on the fly, even those in science-related fields could benefit from using it.

This application includes everything from mathematical equations to more complex and electronic calculations. It has lots of features and can even do fuel efficiency volume metric calculations.

Tool Box  

The tool Box application by Maxcom is a very lightweight and simple collection that consists of many related tools. This application includes features such as a decibel meter, leveler, barcode reader, protractor, and magnifier.

If you want a manageable all-in-one toolbox application, then this application is the perfect choice. Its tools are pretty basic as well, but this essentially means that the app takes very less storage space on the phone.

Smart Kit 360  

The Smart Kit has a very appealing look, and that gives it a very sleek and modern look. It also has one of the most extensive collections of different tools amidst all of the other toolbox apps that are available for Android.

It is also known to include tool replacements, such as a compass and a leveler. And It is also known to have a few modern tools, such as phone management and storage tools and a heart rate monitor. There are also a fair share of tools that one doesn’t get to see often in other similar apps available out there.

To Wrap It Up!  

Of course, the bubble level google app cannot replace an actual tool. If you just want to check the alignment of your things at home for fun, you can surely try out the Google bubble level tool for measurement.

Thank you for reading up till here. I hope you found the information useful. Let me know in the comments your thoughts on the same.

More Resource:

Abdul Aziz Mondol is a professional blogger who is having a colossal interest in writing blogs and other jones of calligraphies. In terms of his professional commitments, he loves to share content related to business, finance, technology, and the gaming niche.

View all posts

Leave a Reply

Your email address will not be published. Required fields are marked *

Related

sunroom

How Quickly Can I Install a Sunroom?

With fall already here, and winter fast approaching, there’s a certain urgency in the air to get any sunroom installation project booked, planned, paid for, and complete as soon as possible. Fortunately, a fall installation in Calgary is a relatively quick process, with your beautiful install sunroom being completed somewhere between 4 and 10 days once the plans have been finalized and approved. The actual speed of the project will depend on the results of the multiple decisions you have to make, which include the following: Different Ways You Can Quickly Install  Sunroom 3 or 4 season sunroom - this is the big factor in how long your project will take to install, and how much it will cost you in the long run. A 3 season room will be cheaper and quicker as there are less insulation, thinner windows, and the frame is usually made from aluminum. A 4 season room requires the room to be able to handle the Calgary winter conditions, so the walls have to be thicker, the windows double-paned and a heating option has to be built in and vented. You can install sunroom in your home. Wall thickness – the thickness of your walls is coupled with the number of seasons, but also how you plan on heating the room. Thinner walls with no insulation will rely on the sun on and thicker windows to keep your room warm, while thicker walls will take longer to install sunroom but provide room for internal insulation options. A number of windows – it’s possible to build a sunroom that has almost solid glass walls and the visual effect of these rooms are incredible. However, they take a much longer time to install as each piece has to be put into place manually and there’s no scope for external pre-fabrication. In this decision, you’ll also need to think about the number and shape of your skylights, and a general rule of thumb is that the more you have, the longer the installation process. Roof shape – there are two choices here; a studio roof, which is flat and literally sits across the top of your sunroom, or a gabled A-frame roof. The latter requires more time to install as the roofers will need to construct the A-frame, attach it to the walls and then add your chosen shingles or cladding to the roof structure. A studio roof often comes as one or two pieces that can be installed in under a day. You have to install sunroom in a better way. Kick plates – the final decision that has a bearing on the length of time for your sunroom installation project is whether to have kick plates at the bottom. The general industry recommendation is that if the room is more than 24 inches above the ground, then kick plates will provide the cover you need. Otherwise, a solid bottom will do the job and is much less costly. Install sunroom in your home for a better experience. Final Take Away  When you make these decisions, you will want to consider the impact they will have on the amount of time it will take for the construction, but also how they will impact the look and feel of your new sunroom. Read Also: How To Set Up Your Baby’s Room 5 Innovative Ideas To Lend Your Bedroom With More Space

READ MOREDetails

7 Unique Kitchen Design Ideas That Your Family Will Enjoy

The kitchen is usually the hub of many homes. It's the room where you gather to prepare meals for your family. It's also a room where you can gather to talk about everyone's day and celebrate special events. Aside from being a functional kitchen, it should also be a room that is comfortable to look at and spend time in so that your family will enjoy this room of your home. These are only a few of the unique design ideas that you can try in your kitchen to give it an updated look that can be enjoyed throughout the year. Beach Waves: Whether you live on the coast or hours away from the beach, you can enjoy the beautiful scenery of the coast any time you enter your kitchen. The best place to start is with a white background with blue trim. From there, add hardware that is a dark color, such as dark blue or black. Light fixtures that hang from the ceiling can be blue as well to blend with the nautical theme. Hang pictures of lighthouses, the coastline, or other images that you would see at the beach to complete the design. Windows can be designed to look like portholes along with doorways that have an arched design if you want to take the nautical theme a step farther. Subtle Elegance: If your kitchen is small and only has one or two functional areas with cabinets and counters, then consider a design that features a subtle elegant appearance. Wooden cabinets can be transformed with a fresh coat of off-white paint and faux legs that will give a raised appearance. This will make it seem as though there is additional space under the cabinets even though there isn't. Open shelves are an option as well that is trending in many homes. These shelves give you the additional space needed to display the beautiful dishes and decorations that your family and guests might not always see when they are in your kitchen. A chandelier in the kitchen adds to the elegance that you're trying to achieve. Lounging While Eating: No one ever said that you have to sit at a table when you're eating a meal with your family. Create a modern design in your home that features a table surrounded by comfortable bench seating. You'll have a place to sit at the end of a long day while enjoying time with your family and a delicious meal. When you're designing the lighting in the kitchen, consider fixtures that are under the cabinets to add a soft glow to the counter spaces. Colorful Oasis: Give your kitchen a facelift with bright colors and appliances that match. Find a color that suits the entire family, using the shade when you paint the cabinets and the lower half of a kitchen island. Find chairs that are in the same color family or wooden chairs that you can paint in a dipped design to match the theme of the room. Colorful dishes on open shelves and appliances that are the same colors of the kitchen complete the look and add a touch of vibrancy to a room that can be somewhat boring. Companies like Brisbane Alfresco Kitchen Unique Design have various colorful decorations that can complete your kitchen in a way that showcases the personality of your family. Designing With Wallpaper: You probably thought that wallpaper went down the drain with the dishwater, but if you know how to apply it to the walls in your kitchen, it can be a nice feature to consider. Apply wallpaper to the walls that don't have a lot of details on them and that aren't home to appliances or counters. If you put wallpaper behind the stove or near the sink, consider covering it with glass or a clear film so that it doesn't get destroyed in a short time. A benefit of wallpaper in your kitchen is that it can easily be changed when you want a new look. Get Cozy: When you spend time with your family in the kitchen, it should be a warm experience. This is usually where you'll gather for holidays and special occasions as well. Lower the ceiling, and change the floor so that it looks like hardwood. An island with barstools provides an intimate setting where it's easier to talk to each other. Add a few details to the cabinets and the walls to bring a feeling of warmth to them, such as decorations that you might see in a cozy lodge. Mugs on the shelves or hanging on hooks on the walls are an option to consider to deliver the warm appearance that you desire. When you're trying to determine the best type of lighting, consider pendants that hang over the island or kitchen table. Two Tones: Instead of using one color throughout your kitchen, add a little balance by using one color for the top half of the room and one color for the lower half. White is a good color to start with on the upper half of your kitchen. This will allow you to focus more of your efforts on the cabinets and drawers in a color that you enjoy. It's also easier to play around with the hardware that's included on the cabinets and drawers when you have a solid color on the lower half of your kitchen. Counters that are a dark color tend to easily divide the two colors and make each shade stand out as soon as you enter the room. Read Also: 9 Feng Shui Tips For A Calmer Kitchen The Best Countertops To Help Revamp Your Kitchen Five Bedroom Rug Ideas – Area Rugs And Decorating Ideas A Guide To Finding The Perfect Sofa For Your Living Room

READ MOREDetails
Painting Interior Doors

Tips for Painting Interior Doors

Freshly painted doors can enhance the makeover of any house. You can paint your doors on your own or hire a professional painter to do it for you. Many people prefer painting their doors themselves as they want to enjoy painting them on their own. However, if you don’t have any experience or want high-quality paintwork, you should always hire professionals for complete painting service. If you choose to paint or spray paint your interior doors, you need to know some tips and skills to do the job right. Let us explore some tips by professional painters that you can use to paint your doors. Remove or cover the door handles: Paint can stain the door handles and locks. So, it is better to remove them or cover them with painter’s tape to prevent them from getting stained. You will need a screwdriver with multiple heads to remove the handles and locks. Call a locksmith to remove the inbuilt lock systems as they are difficult to remove. Removing these things will make it easy to clean, sand and then paint the doors. Fill the cracks and holes: If there are any holes or cracks in your doors, you can fill them with a wood filler, gypsum plaster, or a filling compound. Put a small amount of wood filler or filling compound on a putty knife and put it into the hole or crack uniformly. Place it as uniformly as possible and leave it to dry for at least two hours. Check the filling the next day, and it requires more filling, add the required amount of filling compound to fill the space completely. Sand the surfaces: The old paint gets worn and imperfections develop with time on the door surfaces. That is the reason why homeowners want to repaint their doors. Sanding removes the worn paint and imperfections easily and prepares the surfaces for a clean and uniform finish. Start painting with a Roller: If you have already chosen the paint color, mix several cans in a bucket so that you can have the same shade on every door. Sometimes, the shade in different cars can vary a little, although not noticeable in the interiors in low light. Use a 4-inch roller to apply a thin layer of paint on the door starting from an edge. If you want to paint the trim first, you can use a 2-inch brush. To remove any lines, move the lightly loaded brush or roller from bottom to top. Using this technique will help you paint quickly and uniformly while leaving a wet edge. Painting a paneled door: Many homes have paneled doors and the technique to paint them is different from painting a flat door. Paint every panel beginning from the upper left side downwards in a sequence. Always use a brush of appropriate width to paint a paneled door. Don’t worry if you paint a bit outside the edges of a panel. Once the edges are painted, use a small roller to paint the space between the panels. If the rollers of appropriate size are not available, use a 2-to-4-inch brush to paint the center of the panels. Minimize the drying time: Paint in light and uniform coats to minimize the drying time. Thick coats of paint take a bit longer to dry and may look nonuniform after drying. If you are using a brush, you should dip its bristles halfway in the paint and tap the brush against the container edge slightly to remove the excess paint. If you plan to use a roller, place it in a pan and use the back-and-forth strokes to paint uniformly without soaking it. Let the paint dry before installing knobs and locks: Let the paint dry completely before installing the doorknobs and locks. Also, tell your kids and family members not to touch the doors until they dry completely. Once they dry up completely, you can install the accessories and start using the doors as you use them normally. Final Words: Painting the doors is not difficult, even if you are painting them for the first time. All you need to do is to follow the correct sequence of steps, use the right size of tools and prepare the surfaces before grabbing a brush or roller. Following these tips can help you to paint your interior doors easily and conveniently. Read Also: 10 Pro Tips To Minimize Commercial Door Repair & Maintenance Cost All About Commercial Fire Doors Why Should you Consider Security Doors for Your House?  

READ MOREDetails