Pros And Cons Of Mini Splits For Cooling

Published on: 27 May 2023 Last Updated on: 13 September 2024
Pros And Cons Of Mini Splits For Cooling

Today, the technology has so evolved that we are now talking about mini splits. If you do not know what mini splits are, then you are in luck as we will be discussing this innovation in this article. Our focus shall be on the pros and cons of using it. For those who may wish to know more about the history of ACs, you can read this article.

What Are Mini Splits?

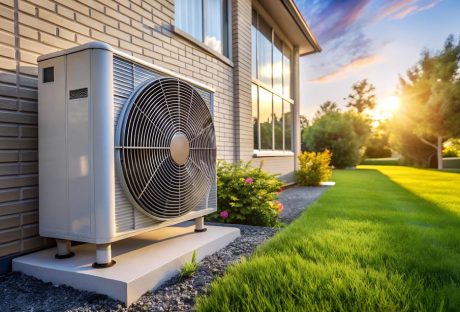
Mini-splits are the ductless evolution of air-conditioners. They are called “splits” because they are designed into two different parts, an indoor unit and an outdoor unit. These two split the traditional cooling process of window units into two.

What the outdoor unit comprises of are condenser coil, compressor and fan and while the indoor unit consists of a fan and an evaporator coil. These two units are linked by electrical wiring and a thin copper tubing to carry the refrigerant.

For the system to work, the compressor located in the outdoor unit pushes the refrigerant through the copper tube to the indoor unit. Here, the cold copper tube exchanges the heat in the indoor space with cooler air which the fan blows into the space. Through this exchange, the refrigerant heats up and changes to a gaseous state and is then cycled back to the outdoor unit where it is cooled back to a liquid form. This cooling process takes place as the coil in the outdoor unit removes the heat absorbed from the indoor unit. Having been cooled, the compressor pushes it back inside and the cycle repeats over and over again.

The Pros And Cons Of Mini-Splits

Having described how these ACs work, we want to look at some pros and cons associated with their use. Like most things in life, regardless of how good they may be, it’s almost impossible not to have a few cons.

Let’s start by looking at some of the Pros

Pros

There are obviously a lot of positives to using mini-splits for cooling your space. Some of the more common ones include the following:

Ease Of Installation

The design of this system makes its installation pretty easy. All you need is a small hole through which to pass the wiring and refrigerant tube. You then need to mount the indoor unit where you need it to be and do same with the outdoor unit. This is something that air conditioning services can send a single technician to install with ease, unlike the central cooling type that will require a lot of work and ducts.

Quiet Operation

Another benefit that you can enjoy with these ACs is their quiet operation. With the compressor and main fan located outdoors, its operational noise is drastically reduced. All you will hear indoors is the soft humming of the indoor fan spinning as it circulates the cooled air.

Effective And Precise Cooling

With the positioning of these mini splits, their cooling function is precise which is why it is usually positioned in strategic positions across the space. This allows different sections of a space to be cooled effectively.

Energy Efficiency

The power consumption of these units is far lower than what traditional HVAC units will consume. The savings you make from this can in the long run offset the initial high installation cost, giving you a great ROI.

Health Benefits

Every indoor unit has a filter installed. This filters the air, making it cleaner than it was. In addition to this, modern units come with ionization function that removes bacteria from the air, making it purer and healthier.

Cons

Now that we’ve looked at the benefits that these ACs offer, let’s also look at some of the cons that may come with their use. These include:

Installation Cost

The first con that you may come across is the initial installation cost. Unlike central systems, you will need to install these mini units in every space where you need the air cooled. The cost can add up, but like we noted above, the savings you will make from energy savings can make up for this initial cost over time.

Aesthetic Value

While these units are not necessarily unsightly, they have to be mounted where they are visible unlike the central variations that can be more discrete. There are however different designs that are marketed to make up for this. In fact, some have a frontal space where artwork can be mounted, making it look like a piece of artwork rather than an indoor cooling unit.

Conclusion

We’ve taken some time to explain what mini splits are and how they operate. We’ve also looked at some of the pros and cons that they offer. With this information, you can now decide if this is something you will love to install in your home or office space.

Read Also :

Abdul Aziz Mondol is a professional blogger who is having a colossal interest in writing blogs and other jones of calligraphies. In terms of his professional commitments, he loves to share content related to business, finance, technology, and the gaming niche.

View all posts

Leave a Reply

Your email address will not be published. Required fields are marked *

All Comments

Nice post. I learn something totally new and challenging on websites

Related

house painting

5 Interior House Painting Tips

Owning a house which you can modify according to your personal desire, is always something permanent and something incredibly profound. A home with well-painted walls and beams should tell the story of who you are and what you love. New paint with vibrant colors can change your mood, and make your home your favorite place to live in. Interior house painting can be a very intimidating and challenging task if you decide to take it upon yourself. You have two options, to either do it by yourself or hire a professional painting company to look over the project. If you opt with the first choice, these tips and techniques will help you to paint your own home, according to your likings, within a very friendly budget. When you want to paint your Boynton Beach home, be sure to give Gustafson Painting a call. The following steps are a guide on how to paint a house to meet your expectations: 1. Self Choosing Colors: The critical step, to begin with, is to choose a color which you like. Or at least you should have a good idea of what color combination suits your home, i.e. which colors you would like to paint to your rooms and which colors to paint washrooms, kitchen, etc. Select the color palettes and plan out which color combination gives your rooms the vibrant energy. Every color has its functions, e.g. Blue, green and purple are all relaxing colors. Moreover, other deep and shocking colors such as red, pink and yellow can be used in rooms which are mostly in use during the day, giving your rooms a lively, gaudy look. 2. Gathering Tools and Equipment: After this, you have to pick all the tools and equipment which are needed for painting the house; which includes sanding and scraping tools, wire brush, respirator, paint rollers, plastic sheets to cover the carpets and your valuable stuff, work gloves, drop cloth, ladder and scotch tape. This will ensure you are ready and won't have to leave your task in between, to search for something. 3. Repairing Damaged Parts: Once you have organized everything, the next step is to remove any dirt and dust buildups from the walls by using a pressure washer. After this, you can apply epoxy filler to cracks and fractures by using a putty knife. Allow it to let it dry. Once this is done, fill the gap around windows, doors, and ceilings to ensure a better coat of paint. When this is dried up, then feel the wall with your hand to ensure if there are any uneven spots left behind. Then, apply the primer to prepare the walls for paint when all damaged parts are repaired. 4. Brush the Walls: Before painting the walls with a roller, you should brush the walls. To brush the walls, mean to paint the corner of walls, ceilings, and trims. You can choose from paintbrushes which come in many shapes and sizes. The traditional method to paint the walls through brush is by the use of metal cans, which can be very difficult for you to carry along with the brush and can result in poor results. But nowadays, there are proper paint pails which will make the whole task a lot easier for you. 5. Ready to Paint Ahead! Finally, you are ready to paint with the rollers. But wait, before this you should mix a primer with paint to give a fresh and everlasting look. If you paint without using a primer, then the paint would peel off. For this, you have to scrap all the paint away, clean the surface before applying the first coat and after that, apply the second coat of your own choice. This is one way when you do not use a primer. But if you are using a primer with paint, then it will not cause any problem even if the first coat is not applied. And the most important order of painting as suggested by the experts of house painters in San Diego is that you should paint the trim first, then ceilings, and then walls. It will provide better adhesion throughout and will enhance the ability of the topcoat. Another pro tip is that don’t forget to open the windows and doors of your house during painting, as it provides better ventilation and the paint dries off quickly and efficiently. At the end of the painting, do the cleanup. Wash all the brushes and other stuff which you have used in the process. At last, give your house a final touch by placing all of the favorite furniture in place, to give your dream house a new look! With these interior house painting tips from the most experienced of the San Diego painting company, you will get pro results for your residence! Read Also: Find The Right Painters For Your Ann Arbor Home This Painting Season 5 Factors To Consider In Choosing The Right Floor Colors Roofing Painting Contractor Leads: Four Questions To Ask Before Hiring One

READ MOREDetails
content rally

Floor Cutting Using Diamond Saw: What You Need To Know

Concrete comes as the topmost choice when you are in need of durable, weather-proof, heat-proof and long-lasting flooring material. But there comes a time when you need to repair, remove or replace concrete floors and you need to look around for quality concrete cutting tools. Diamond floor saws are the no.1 choice of professional concrete cutting contractors. Diamond floor sawing is extensively used to effectively cut through all types of materials including reinforced concrete, asphalt, slab and stone. The unique design of diamond sawing machines makes them more convenient for operators to carry out floor cutting as a one man job. Floor sawing service helps you efficiently cut through concrete slabs, driveways, decorative concrete floors and many other structures in horizontal alignment. Diamond saws also let you cut through concrete roads overlaid with asphalt. Different floors demand different diamond blade and a different cutting procedure to be followed. In this article, you will read some general tips and safety guidelines for cutting concrete floors using a diamond saw. Tips You Need To Consider While Floor Cutting With A Diamond Saw Never think of playing loose with heavy diamond cutting machines. When deciding to use the diamond saw for concrete cutting, give top priority to safety. You must ensure that you have selected the right diamond sawing blade which is perfect for the kind of material you need to cut through. Make sure the floor saw and diamond blades you use are in most up-to-date condition. Check if there is no loose connection in the machine. If you are using wet cutting method for floor cutting, make sure you have arranged a source with an ample volume of water at the worksite. Supplying water to diamond blades during the operation will help prevent blades from overheating. Use of water as a coolant and lubricant help floor sawing London contractors get quality cuts. It also helps extend the lifespan of the blade. You need to wear protective gears to safeguard your body parts from any kind of physical injury while operating the machine. Manage to have ear, eye and head protection. Never wear loose clothing. And make sure you wear safety boots and a respirator mask to avoid inhaling silica from the dust particles produced during floor cutting. When cutting the floor using a diamond saw, never increase the pressure on the saw to boost speed. And remember, the diamond floor sawing machine always make straight cuts, you can’t steer it to cut curves. When you hold cutting, make sure you lock the machine or turn the power off properly. You need to be extra cautious when sawing on a steep surface. If you want to cut green concrete using diamond floor saw, do it within 24 hours of being poured. The selection of the diamond blade in the floor saw may vary based on the thickness and aggregate of the concrete structure that needs to be cut. For deep floor cutting, you will need to make multiple passes to obtain the desired depth. The thought of performing floor cutting on own doesn’t make sense unless you have the required skills and knowledge to accomplish the job with the best of industry-standard and safety guidelines. But you can always depend on a professional diamond floor sawing contractor in the town! Read More:  How To Salvage Your Furniture After A Flood List Of Most Durable Kitchen Flooring Hardwood Timber Flooring: Gives A Classic Look To Your Home

READ MOREDetails
Stainless Steel

Best Uses for Stainless Steel in Construction

Stainless steel is easily one of the most useful materials on earth. For several thousand years now, steel has been the standard choice for any purpose that requires extreme strength. Even though base iron may be harder, it is also more brittle and much more sensitive to oxidation (i.e. rusting). Stainless steel was a big leap forward because, for the first time, people had steel items that would not rust. Structural: Stainless steel isn't often what we think of as a material for structural supports, but it does an excellent job. If it were not for the fact that stainless steel is slightly more expensive than regular steel, it would probably be used for this purpose more often. There are many ways in which stainless steel can be used for structural purposes. Fittings from stainless steel are also very useful and reliable. For structural use, the best stainless steels to use are 304, 316, 409, 410-3, and 2205. These steels can be used for girders and other support members, as well as a rebar substitute for the reinforcement of concrete. Drainage Equipment: When it comes to rain gutters and downspouts, stainless steel is obviously your best choice. Its resistance to corrosion makes it uniquely suited for water-carrying purposes. Aluminum is a much more common material for this purpose, but it cannot even come close to matching the strength of steel. If you are adding gutters and downspouts to a large building, it is all the more important to use materials that will hold up to all of nature's abuse. Falling gutters and spouts can cause damage and injury to those below, so choose something that won't be ripped to pieces in the next large storm. Stainless steel is not only more attractive but also better-suited for this purpose. Barriers: Security is something that must be taken into account for any building project, especially if the building is located in a large city with a high crime rate. A stainless steel barrier is superior to most other choices in this regard because of its longevity, and also because it is very hard to destroy. For instance, you might want a few posts outside your building as a vehicle barrier, just to make sure that it isn't possible to ram a car through the front door. Concrete posts would work, but they will eventually crack from strain and weathering. This means you will have to pay for a new post. With thick stainless steel posts, you can be pretty sure that nothing short of a semi-truck is getting past, and that the weather will make no real difference. Roofing: Metal roofing has long been known as one of the best choices. Most homes are roofed with asphalt shingles that have an unpleasant habit of flying off in windstorms. Although they do a good job of shedding water, asphalt shingles just aren't very sturdy. They are only popular because of their low cost and high availability. Traditionally, tin has been the metal roof material of choice, but with the advancement of new and improved stainless steels, this is quickly changing. Check out this guide for the use of stainless steel in roofing, and you might be pleased with what you see. Read Also: Waterjet Vs. Laser Cutting: Which Is Worth The Hype? Maintaining Productivity: The Basics Of Industrial Safety

READ MOREDetails