Published on: 10 March 2023
Last Updated on: 07 February 2026
When it comes to installing power lines, it's important to have the right equipment and knowledge to get the job done right. From choosing the right conductor stringing equipment to understanding safety protocols, there are several steps to follow to ensure a successful installation.
In this ultimate guide, we'll take you through the process step-by-step.
Step 1: Choose The Right Conductor Stringing Equipment
Before you begin the installation process, it's important to choose the right conductor stringing equipment. There are several types of equipment to choose from, including tensioners, pullers, and reel stands. You'll need to determine which type of equipment is best for your specific project, taking into consideration factors such as the size and weight of the conductor, the terrain of the installation site, and the distance between towers.
Step 2: Plan Your Installation Route
Once you've selected the appropriate conductor stringing equipment, you'll need to plan your installation route. This involves surveying the installation site, determining the location of towers and support structures, and selecting the best route for the power line. It's important to take into consideration any potential obstacles or hazards that may need to be avoided during the installation process.
Step 3: Ensure Safety Protocols Are In Place
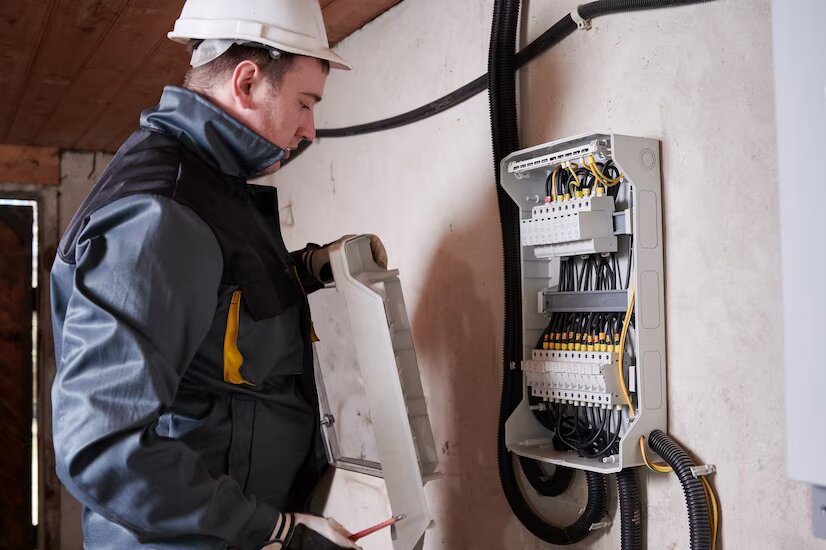
Before beginning the installation process, it's crucial to ensure that all safety protocols are in place. This includes having the necessary safety equipment, such as helmets, safety glasses, and gloves, as well as implementing safety procedures such as grounding the conductor and using safety barriers. It's also important to ensure that all personnel involved in the installation process are properly trained and qualified.
Step 4: Install The Power Line
Once safety protocols are in place, you can begin the installation process. This involves stringing the conductor between towers using the selected conductor stringing equipment. It's important to follow the manufacturer's instructions for the equipment being used and to ensure that the conductor is properly tensioned and secured to the towers.
Step 5: Conduct Quality Assurance Checks
After the power line has been installed, it's important to conduct quality assurance checks to ensure that the installation was successful. This includes checking for any defects or damage to the conductor or towers, as well as conducting electrical tests to ensure that the power line is functioning properly.
By following these steps and ensuring that the appropriate conductor stringing equipment is used, power line installation can be done with ease. With proper planning, safety protocols, and quality assurance checks, you can have a successful power line installation that will provide reliable power for years to come.
Conductor stringing equipment is a crucial part of the power line installation process, as it allows for the safe and efficient installation of conductors. There are several types of conductor stringing equipment to choose from, each with its own unique benefits and specifications.
By selecting the appropriate equipment for your specific project and following the installation steps outlined in this guide, you can ensure a successful power line installation that will provide reliable power for years to come.
Read Also:
Abdul Aziz Mondol is a professional blogger who is having a colossal interest in writing blogs and other jones of calligraphies. In terms of his professional commitments, he loves to share content related to business, finance, technology, and the gaming niche.
Moving is a very expensive decision — whether you DIY with a rented truck or hire the professionals. You probably budgeted for the truck or moving company before you started packing. But these are just some of the most obvious expenses involved in the typical move.
Unless you’re a seasoned professional or frequent mover, you may not realize plenty of other expenses are in your future. Things like child sitting, elevator charges, and parking tickets can up your costs significantly.
You can usually rely on a line of credit when you’re faced with unexpected expenses. But when you have already put down $2,000 on a moving company, you may not have a lot of room left on this account.
Part of managing your line of credit responsibly is learning to anticipate supposedly unexpected expenses before they happen.
This article is critical reading for anyone who wants to limit how often they use their line of credit during a move. Planning early means you can start saving for these expenses in advance.
1. Child Sitting
If you have children, you might have to think about getting a babysitter for your child. To save money, you can ask friends or family willing to look after your kids.
Either way, removing your kids from the equation is easier for you and your movers. That way, you don’t have to worry about them being underfoot when you move heavy furniture.
2. Pet Boarding
The same rules apply to your furry children. Keeping your dogs and cats away from the action protects everyone involved.
3. Takeout
With your kitchen packed up, you will be relying on takeout and readymade meals far more often. You can save money by preparing frozen meals in advance, moving them quickly from one freezer to the other. Keep shelf-stable snacks handy, too.
4. Parking Tickets
If your moving company parks illegally on the sidewalk or in a no-parking zone, you (not the company) will have to pay the ticket. Avoid this by seeking out a parking permit for your new neighborhood.
5. Security Deposit
That hole your friends caused when they moved your antique armoire? If you can’t patch it up before you move, you might lose out on the security deposit you put down when you first moved in. DIY repairs might help you avoid losing your deposit, but even DIY work costs money.
6. Elevator Fees
If you live in a condo, you will have to book the freight elevator to move your things. Depending on the condo company, they may apply a charge for this elevator. This fee is usually non-refundable and must be paid when you book the elevator.
To make matters worse, most moving companies also charge elevator fees if you live on an upper floor. They may also charge stair fees if you live on the top floor of a walk-up.
7. Utility Setup
Once you arrive at your new place, you have to set up utilities to heat and power your home. Some utility companies may require you to put down a security deposit before they start the service. They usually ask if you have poor credit or are a brand-new customer.
These deposits can be costly, charging as much as twice your average monthly use.
Keep this in mind as you create a moving budget. It’s better to struggle to save this amount than the opposite, being surprised by it when you go to hook up utilities! But if all else fails, your line of credit can pitch in.
Read Also :
5 Reasons Why SMEs Use Courier Services
DecoratorAdvice.com is an online resource for anyone interested in designing a more attractive, more comfortable, and functional living space without confusion, frustration, or unnecessary expenses.
Whether you are designing a living room from scratch, upgrading your rental apartment, or simply looking for easy ideas to refresh your home, DecoratorAdvice.com explains interior design in a way that is understandable, pragmatic, and day-to-day friendly.
Below is what the site stands for and what you can learn from it, especially in trying to create a smart, stylish, and functional living room.
What “Smart Living Room” Really Means?
A smart living room isn't just about filling your space with gadgets. In the opinion of DecoratorAdvice .com, "smart" implies much more:
It is meant to be a living room that works for your lifestyle, whether you entertain often, watch movies with family, or need a quiet reading corner.
It means maximizing space, improving flow, and making sure everything in it serves a purpose.
That means technology is integrated into the body instead of being the focus.
This site will teach you how to make a room intelligent and inviting, functional and beautiful.
Design Layout & Furniture for Smarter Flow
One of the biggest challenges with a living room design is layout. DecoratorAdvice .com explains how to:
Choose furniture that is the right size so your room will not feel crowded.
Place sofas and chairs in a way to encourage natural conversation.
Create movement pathways to prevent people from bumping into corners or squeezing through tight spaces.
Use multi-functional furniture, like a storage ottoman or an expandable table, for smaller homes.
Based on the layout advice given on the site, the living room gradually starts to feel more open, more comfortable, and easier to navigate.
Lighting, Ambience & Mood
Lighting can make or break any room, and DecoratorAdvice.com teaches how to do it right:
Use a three-layer lighting plan: ambient -- overall room light, task lighting -- reading lamps, accent lighting -- to highlight art or shelves
Choose warm or neutral bulbs to create a cozy atmosphere.
Add dimmers for instant mood control.
Let in the light by adding the right curtains or blinds.
You learn how to make your living room feel bright during the day and relaxing at night-with simple and affordable changes.
Color, Texture & Style Choices That Last
Instead of following fast trends that quickly fade, DecoratorAdvice.com helps readers make a choice between:
Timeless color palettes, such as neutrals with small pops of color
Combinations of texture-wood, fabric, rugs, and metal add depth.
Blends of styles that feel modern but not cold, cozy but not cluttered.
It also breaks down how to pair patterns, how to pick art for your walls, and how to create a look that is fresh today and still beautiful years from now.
Smart Tech That Blends, Not Overwhelm
The site covers how to use technology the right way:
Hidden or low-profile speakers
Smart lights that blend with your decor
Slim TVs with clever cable management
Smart plugs that reduce clutter
Voice assistants that remain subtly placed
DecoratorAdvice .com focuses on integration, aesthetics, and user-friendliness, not turning the living room into a showroom of gadgets.
Storage & Decluttering For A Serene Space
A peaceful living room is an organized one. On DecoratorAdvice.com, you'll find information on how to:
Floating shelves to save floor space
Closed cabinets for concealing wires and small items
Decorative baskets for holding blankets or toys
Coffee tables with built-in storage
Decoration must be minimal to avoid clutter.
The aim is a space that looks clean, remains clean, and feels calm each day.
Tricks To Make Any Room Feel Larger
Even small living rooms can feel spacious if you know the right strategies:
Use of mirrors to extend space visually
Lighter colored paints for walls
Keeping furniture off walls
Using rugs that define—but don't shrink—the space
Using slim-legged or transparent furniture
DecoratorAdvice .com offers practical, renter-friendly hacks that visually expand any room.
Budget Versus Luxury: Where To Spend And Where to Save?
Not everything has to be premium. The website helps you understand where your money makes the most impact:
1. Spend On
A comfortable, durable sofa
Quality lighting
Robust storage furniture
2. Save On
Pillows for accent
Art and wall decor
Rugs and occasional tables
Fashionable things that could go out of style at any moment
This helps them achieve a "luxury look" without blowing the budget
Common Mistakes To Avoid So Your Living Room Actually Works
Pitfalls highlighted at DecoratorAdvice.com include:
Buying oversized furniture
Pushing everything against the walls
Using only overhead lighting
Mixing too many colors or styles
Forgetting to store
Let the cables and clutter take over
By avoiding these mistakes, your living room is at once more functional and more beautiful.
What Can You Try First?
If you are getting started, DecoratorAdvice.com suggests attempting simple, cheap changes first:
Rearrange your furniture for better flow
Add layered lighting
Declutter surfaces
Introduce soft textures in the form of throws or cushions
Choose a simple, harmonious color scheme
These quick wins can be done in a weekend and will inspire you to keep upgrading.
Construction is on the rise across the United States. From single-family homes and apartment complexes to commercial projects, reports show that construction companies are going to have their work cut out for them in the years to come.
Having the right equipment on hand to complete that work is the key to their success. Heavy machinery holds a great deal of power in the construction industry, making it essential for several reasons.
Effective Project Completion
Being able to effectively complete projects is one of the most basic benefits of having a diverse heavy equipment supply at a construction company's disposal. Without the proper equipment for the jobs at hand, construction companies are bound to experience problems and delays. They may spend more time than necessary trying to complete tasks with inadequate equipment, which could impact their clients' timelines as well as their own profits.
With the heavy machinery they need, construction crews can complete projects faster and more effectively while remaining on budget. They'll be able to use their resources more efficiently, possibly reducing labor and material costs. Each piece of machinery has the potential to improve a company's performance, productivity, and bottom line.
Cost-Effectiveness
Cost-effectiveness is also a key consideration. Trying to complete a project with outdated, broken-down equipment can cause countless problems. Those include costly delays, wasted materials, increased workloads for crew members, and quality issues to name a few. Heavy machinery that's in good condition and suited to the specific requirements of a project greatly reduces those problems and the risks that come with them. It also reduces repair costs to further ramp up cost-effectiveness.
Improved Safety
Safety is crucial in the construction industry. Workers are up against numerous hazards on construction sites. Using the wrong types of equipment to complete certain tasks can exacerbate those dangers. Working with equipment that's in poor condition and prone to breakdowns makes matters even worse. Having the right heavy machinery on-site reduces the risks of injuries. Equipment that's in good repair improves worker safety as well.
Versatility
Having a variety of equipment on hand gives construction companies more versatility too. It allows them to accept projects with confidence that they'll be able to complete them. They won't have to limit themselves to only the projects they're equipped to handle. It also gives them the power to adapt to challenges and unexpected developments they face on the job. With the right heavy machinery in their arsenal, their projects can go smoothly no matter how many problems arise along the way.
Professional Reputation
Companies that have a selection of heavy machinery to work with tend to have more positive reputations as well. Those who are ill-equipped to handle certain jobs often end up with numerous complaints against them and low client satisfaction rates. On the other hand, construction companies that have the equipment they need to meet clients' expectations are more likely to develop reputations for excellence. That, in turn, can generate repeat business and draw in a steady stream of new clients.
Equipping Yourself for Success
Several types of heavy machinery are available for construction companies to take advantage of. Though not all companies need every piece of equipment on the market, having an extensive selection to work with can be advantageous. It helps construction crews to complete projects more safely and effectively. It also gives them greater versatility and leads to improved cost-effectiveness. All those factors enable them to better meet clients' demands and can help bolster their professional reputations.
Read Also:
Construction Safety Systems: Promoting A Safer Industry
Is Prefabricated Metal The Future Of Warehouse Construction?
7 Common Construction Project Management Problems


 Before you begin the installation process, it's important to choose the right conductor stringing equipment. There are several types of equipment to choose from, including tensioners, pullers, and reel stands. You'll need to determine which type of equipment is best for your specific project, taking into consideration factors such as the size and weight of the conductor, the terrain of the installation site, and the distance between towers.
 Once safety protocols are in place, you can begin the installation process. This involves stringing the conductor between towers using the selected conductor stringing equipment. It's important to follow the manufacturer's instructions for the equipment being used and to ensure that the conductor is properly tensioned and secured to the towers.