Everything You Need To Know About Steam Valves

Published on: 29 March 2022 Last Updated on: 08 April 2022
Steam Valves

You cannot regulate steam and hot water vapor flow and pressure without using steam valves. Steam is employed in a variety of industrial processes.

It is used to power turbines that generate energy, as well as to process food, chemicals, engine parts, and other products.

Cleaning, humidification, and heating are all done with steam. Therefore, most applications necessitate regulation, and steam control valves play a crucial role in this. The most common use of valves with steam lowers the incoming steam pressure for process purposes.

A state-of-the-art automated valve ensures maximum delivery and process efficiencies by adjusting steam pressure and flow.

What Are The Type Of Valves Used In Steam Applications?

What Are The Type Of Valves Used In Steam Applications

Many various kinds of valves are accessible for use in steam operations. But each valve must meet the requirements of the specific application. For example, 3-piece ball isolation valves with PTFE coated stainless steel gaskets and seals.

In a steam application, safe, high pressure steam valves are an essential component of equipment. These valves, also known as Pressure Relief Valves or PRVs, are created to be employed as a piping installation’s safety element. 

These have a pre-set strength rating to protect all gear in the pressure line if the pressure exceeds the valve’s maximum permitted pressure.

It works by releasing pressure and enabling steam to flow out from the line by releasing its set. Conversely, it will manually seal and preserve the specified pressure if it falls below the set pressure.

6 Major Applications:

The circulation of steam from the origin (boiler) to the point where it will be applied is controlled by valves. Steam valves are being used to regulate the steam discharge amount and hot water vapor in a system. Below are some prominent applications of steam valves:

1. Processing

Food processing facilities, along with special refineries, chemical plants, etc., all have steam heating applications. Process fluid heat exchangers, reactors, combustion air preheaters,  reboilers, and other forms of heat transfer equipment employ saturated steam valves as a source of heat.

2. Power

Steam valves are used to power turbines linked to generators in coal, nuclear, gas, and solar power plants. In these operations, both superheated and saturated steam is utilized.

3. Atomization

For segregating the liquids, steam valves can also be used to pulverize a liquid. Breaking up gasoline into tiny droplets to increase combustion efficiency is one example.

4. Moisturization

Steam can be used to provide water to an operation while also providing heat energy.

5. Cleaning

When it comes to industrial or residential MAINTENANCE & REPAIR, steam can be used to wash a variety of surfaces. Steam valves sterilize food prep gear at a high temperature.

Steam treatment has long been used to clean grease and debris from manufacturing machinery in readiness for maintenance or painting.

6. Heating

Low-pressure saturated steam valves are the primary heat source providing indoor heating in many big commercial and industrial buildings.

Existing plant steam can be used by HVAC units and air handlers effectively to humidify the airflow for interior shelter and convenience of goods and equipment. 

Additional notable steam valves applications include:

  •     Steam forming engines for felt
  •     Sterilizers with autoclaves facility
  •     HVAC equipment
  •     Fluid heat exchangers
  •     Directing the sanitary heaters with steam injection
  •     Ironers and press machines
  •     Water treatment facilities available plants
  •     Boilers & re-boilers
  •     Keg cleaners
  •     Commercial dishwashers
  •     Power generating turbines

4 Essential Specifications For Steam Valves

4 Essential Specifications For Steam Valves

When choosing the right valves, many considerations must be taken into account. There must be concerns about the environment, connection, actuators, pressure, temperature,  and other service variables.

After determining the right valve type and size depending on system pressure and flow requirements, valve bodies, actuators, connections, and component materials are chosen. Threaded, flanged, and compression-fit connections are used for steam valves. 

Aluminum, cast iron, bronze, steel, copper, brass, and stainless steel are all possible construction materials. Steam valve and actuation are accomplished using standard valve actuation techniques such as: 

  1. A hand-operating system while wheel or crank is used to open or close manual equipment.
  2. Electric actuators are used in electric equipment.
  3. Electric and pneumatic valves are widely available, and they are activated by solenoids and air pressure.
  4. The opening and closing of a pneumatic valve are controlled by a pneumatic actuator or cylinder.

 A temperature difference in the treated media activates thermally actuated valves. When a predefined temperature is attained, pressure and temperature relief usually occur.

5 Types Of Valves

Despite the fact that most examples of steam valves may regulate steam flow, steam has unique service requirements in terms of temperature and pressure.

Here is a list of the most regularly used valves:

  1. Ball valves
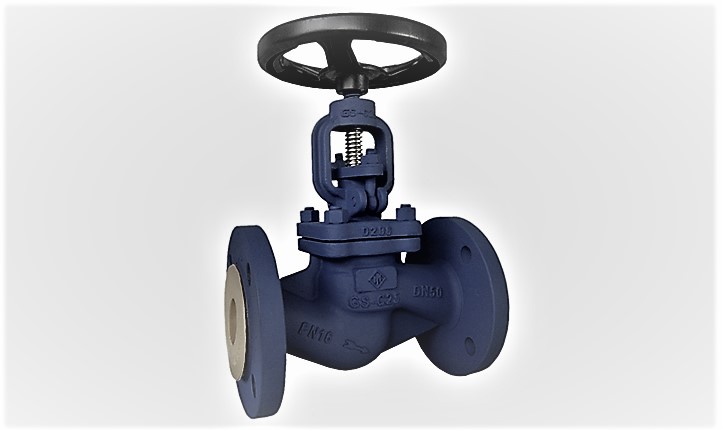
  2. Globe valves
  3. Butterfly valves
  4. Gate or knife valves
  5. Diaphragm valves

Conclusion

If you’re completely new to the world of steam valves, we hope the preceding guide will be helpful. Only if you have the proper knowledge can you choose the best product.

But for selecting the correct valves for your use. You have to pick the products which are matching up your exact requirements. So which types of valves are your current requirement? Comment back to us and let us know your opinion about valves.

Read Also:

Arnab is a professional blogger, having an enormous interest in writing blogs and other jones of calligraphies. In terms of his professional commitments, He carries out sharing sentient blogs.

View all posts

Leave a Reply

Your email address will not be published. Required fields are marked *

Related

Waterjet Vs. Laser Cutting

Waterjet Vs. Laser Cutting: Which Is Worth The Hype?

Waterjet and laser cutters can slice through materials that no other cutting tool can. They are invaluable for prototyping products and precision manufacturing. But which one is worth the hype - waterjets or laser cutters? This article provides everything you need to know about waterjet vs laser cutting units. Learn how they work and which one is best for your industrial manufacturing facility. Waterjet Vs Laser Cutting: Unlike the vast majority of blades and saws, waterjets and laser cutters don't have a blade. The lack of a blade makes engraving and detail work much more precise. And, waterjets and laser cutters are computer operated, as to achieve a very high level of precision. Both machines can engrave minute lettering and symbology into a wide range of manufacturing materials. But each machine goes about it a very different way. Both methods of cutting excel with 2D objects and engraving, but which is better: waterjet or laser cutting? What Is Laser Cutting? Laser cutting uses a high-focus laser to cut or engrave materials. Laser cutting is a method of subtractive manufacturing, which means it only takes away material. This is in opposition to additive manufacturing, like 3D printing. Special software guides the lasers using mirrors. A gas power source provides energy to the system, usually in the form of CO2. The CO2 fuels the laser which outputs between 1,500 and 2,600 watts. Some systems implement an additional gas jet to expel the excess material. Laser cutting is a very precise form of subtractive manufacturing. The intense heat of the laser cuts through material like a razor using a precision burn. Laser systems cut material from sheets or large panels. Laser Cutter Materials: Laser cutting systems make precision cuts in a wide range of materials. The only material that a laser cutter is not "cut-out" for is reflective metals. The reflective property of some metal reflects the laser off of the cutting surface, which can be dangerous. Laser cutters are great for cutting glass, wood, plastic, and a wide range of metals. Laser cutters encounter obstacles, however, when trying to cut compound materials. If the material contains multiple materials, then it has multiple melting points. If the material has multiple melting points, then a laser takes longer to cut through it, and cuts can become uneven. Laser cutting systems work the best with flat sheets of material, with a thickness range between 0.1 inches to just under a half-inch. And, most laser cutting systems proficiently perform the functions of cutting, drilling, engraving, welding, ablating, and structuring. What Is Waterjet Cutting? Waterjet cutting systems utilize a high-pressure waterjet to slice through materials. The water is shot through a very fine point and creates over 60,000 pounds of pressure per square inch. For tougher materials, a mixture of water and an abrasive acts like a diamond saw blade. Garnet is a common abrasive for use in waterjet cutters. Aluminum oxide is another common abrasive that you can use with a waterjet cutter. The process of waterjet cutting is a high-speed version of natural erosion. With a big enough waterjet cutter, you can make another grand canyon in a fraction of the time. Read more about how the best water jets can cut through anything nature makes. Waterjet cutters differ from laser cutters in that the power source does not reside with the cutting unit. Since a waterjet cutter outputs between 4 to 7 kilowatts, the water pump is located away from the worksite. This is also true because the water source is rarely nearby your bench. Waterjet Cutting Materials: Unlike a laser cutter, waterjet cutters can effectively cut almost any material. They have no problem cutting through compound materials with multiple material types. The pure pressure of the water jet is enough to cut cleanly through anything. Waterjet cutter units are especially useful for cutting precisely through masonry. They're also good for cutting and structuring stone, thick metals, ceramics, and glass. Waterjets handle thicker material than laser cutters. They can handle material that is up to around 2 inches thick. But they don't do as well with material thinner than 0.4 inches. Level of Waste from Waterjet vs Laser Cutting: Laser cutters create a minimal amount of off-fall and waste. Very little, if any, cleanup is required after cutting. The only waste that laser cutting produces is a small amount of dust that is easily vacuumed up. Waterjet cutting, on the other hand, creates a lot of waste. You might think that waterjet cutting would be cleaner, but it is not. The abrasive material in the water adds a toxic element to the off-fall liquid. For this reason, waterjet cutting requires special waste-water disposal, safety gear, and a bigger project budget. What's the Cost to Purchase and Operate a Waterjet vs Laser Cutter? A plasma laser cutting machine will cost between $15,000 to over $250,000 at the initial purchase. Waterjet cutters are more expensive because they require more specialized materials. They range from $100,000 to around $400,000. On average, either machine will cost around $350k. Expensive industrial machines can exceed $1,000,000. On average, a laser cutter costs between $13 to $20 an hour to operate. Waterjet cutting systems run between $15 to $30 an hour to operate. Final Thoughts: At the end of the day, waterjet cutters cost up to five times more to operate than laser cutters. Waterjet cutters can cut thicker and more complex materials, but they are slower than laser cutters. So, when considering waterjet vs laser cutting, laser cutting will save you time and money. If you like this article on which is better, share it with your friends on social media. And check out the blog for more resources on hardware and gadgets. Thanks for reading! Read Also: How Portable Metrology Tools Are Making Manufacturers More Flexible

READ MOREDetails
utility tools

Top Utility Tools You Need For Your Website

Whether you are a web developer or tester or a Project Manager, tools are always available at your disposal to help you. From our daily need tools like screenshotting tools to software testing tools we need a variety to make our work easier. Looking to share an image? Take screenshot Want to share a video? Use a screen recorder Need to tell the developer, the code doesn’t work? Use a communication tool From this to that, we need a ton of tools every day. Even you’re using one to read it! But which one is the best to use at a time is where one get stuck. And I’m here to help you with that! Let’s find out which tool to use for your website and for what. 1. Testing : LambdaTest If you own a website or web page or work for one, it is a must to perform its testing. LambdaTest in itself is a complete tool for your website to perform its cross browser testing (both manual and automation), visual screenshots testing, responsive testing, image comparisons, and a lot more. With a pool of 2000+ browsers and device combinations, it helps you make sure that your website works perfectly in all browser and device combinations and provides a seamless experience to your users. 2. Code Editor: Sublime Text Great websites need great environment and a code editor with well-designed, super efficient, and ultra speedy user interface to develop your code. Sublime Text is on top to fulfill this need of your best code editor tool for your website. Sublime is unique in terms of Ease of use, easy shortcut keys and Eyes friendly user interface. Developers spend 8-9 hours a day on code editor and Sublime text can prevent developers from getting frustrated. User-friendly and eyes friendly user interface is what one looks for while finalizing a Code editor tool and Sublime Text is all of them! 3. Design : AdobeXD Adobe XD is a vector-based UX/UI design collaboration tool developed and published by Adobe Inc for designing and prototyping user experience for web and mobile apps for macOS and Windows. XD supports vector design and website wireframing, and creating simple interactive click-through prototypes. 4. SEO: Uber Suggest When it comes to SEO, no one can ignore Neil Patel and his toys. Uber Suggest is one of the top SEO tools in the current decade by Neil Patel. SEO is what needs to optimize your website and make Google search friendly. Uber suggest can help in Keyword review whether it is for SEO or PPC, Keyword suggestion (from primary term to long tail phrases, you can get thousands of suggestion along with search volume, the competition, and even seasonal trends of that particular keyword), Keyword Difficulty and Competitive Intelligence. You can also assess your website against other competitors. 5. Design Mate: Zeplin To build a website, you need to design it first and when it comes to it, Zeplin is Designer’s best friend. With all CSS details and minute information available in the design itself, it makes it easier to collaborate between developers and designers. It provides integrations with top tools like Slack, Trello and allows a user-friendly designing environment. 6. Analysis: SEMrush SEMrush is an all in one tool for marketers. You can use it various analysis and help for your website. SEMrush has SEO toolkit, Advertising toolkit, Social Media Toolkit, Content Marketing toolkit, and Competitive Research toolkit to help you. You can analyze your competitors, check which keywords they are ranking upon, monitor your keyword ranking, your website's visibility, check which pages of your website are driving more traffic and a lot more. As said SEMrush is all in one tool for Marketers. 7. Design Assistant: Canva Canva is free to join and provides a vast variety of templates and graphics. It has everything that you need for an amazing design as a starting blogger, web designer, or app developer. If you are promoting your website through social media, Canva can help you with images. Banners, posts, thumbnails, insta, snapchats, Google display ads, Facebook ads in standard required sizes. Equipped with so many tools, Canva is an awesome tool for marketers, web designers, artists, and social media enthusiasts. 8. Chat bot: Intercom Putting a real-time chat bot is really a good option if you want your users and visitors of your website to connect to you any time. Intercom is undoubtedly the best tool to help you interact with your customers. 9. Screen Recorder:  OBS Studio Many times, we need to record our website’s animations for future reference or for forwarding it to some of our team members. OBS Studio is a screen recording tool along with various features like HD Streaming and recording. The best part about OBS studio is that there is no restriction upon the video length and it is very quick to set up. 10. Analytics: Google Analytics Analytics of visitors and user coming on your website or platform is key metrics to measure your company’s growth. You can set up custom channel from where you are getting traffic and can analyze which channel is performing good and which is not. Google analytics can help you play with numbers and take actions based on it. It’s a must-have tool if you are running your business online and have a website to showcase your products. As a very famous saying goes: We shape our tools and afterwards our tools shape us. - Marshall McLuhan Hence, once we learn to use these tools, these tools can help us improvise and grow more. It is wiser to take help of the following tools for your website and increase your productivity. So, go ahead, try these tools and enjoy the fruits they reap.  

READ MOREDetails
Remote Working

Try These Mac Screen Recording Software For Your Next Webinar

Sometimes, it's better to show than tell. That applies perfectly to your webinar. Maybe you want to show webinar attendees how to use your new product. Or perhaps, you plan on showing graphs and charts to drive a specific point home. Sure, you can describe these to your audience with the Mac screen recording software. But wouldn't it be better to show them instead? And suppose you are planning on using automated webinars to promote your products or services, establish industry authority, and build trust between your company and your target consumers. In that case, you'll need to find the best screen recording tools for webinars. Here's a brief rundown of the best screen recording software to choose from. A Few Important Things To Remember Before You Record A Webinar In the last few years of the pandemic, teachers, for example, have been forced to become aware of online streaming platforms and webinars. They have to hold sessions, take classes, become part of conferences and more. A good idea would be to learn from webinars for teachers and get the necessary knowledge to do better when you hold one on your own. Before choosing a webinar  Mac screen recording software, you should understand a few things out of the way. First, new things incorporating are always good when you are well aware that your work’s software is becoming simpler. For starters, you need to decide whether you are just going to share your screen with your viewers or if you are going to show your face on the screen. Most screen recording tools allow you to show your face while you are sharing your screen. Deciding on this is critical. It may take some trial and error to set the best configuration if you choose to show yourself while sharing and recording your screen. Next, you'll have to decide whether you are going to share a slide deck with your audience or just yourself while doing a presentation. For the former, you'll need to use presentation software like PowerPoint and Keynote. Alternatively, you can just display images on a slideshow using software like Canva. Finally, you have to make sure that you have everything that you need to record a webinar, from a good microphone to the right location that's free from unwanted background noise and other distractions. 5 Top Screen Recording Software To Choose From With these prerequisites out of the way, it's now time to choose the right  Mac screen recording software for the webinar recording. Here's a brief description of each option. 1. Camtasia Camtasia is a screen recording software that works with both macOS and Windows. One unique advantage of this software is that you can work on a project on either operating system. For example, you can record your screen on your Mac and then have someone who's using a Windows computer edit and polish your recording. With Camtasia  Mac screen recording software, you can record your whole screen or just a portion of it. Camtasia is also available on mobile, enabling you to use media stored on your smartphone. Camtasia also has video editing capabilities, enabling you to polish your recorded webinar before publishing and sharing it with your target audience. 2. Screenflow Screenflow is another good  Mac screen recording software that is a perennial favorite of people who host webinars. And there are a few reasons why. For starters, the software is affordable, making it accessible to small business owners. The software is also versatile. Aside from using it to record your screen, you can also use it to record your webinars. Other notable features include annotations, filters for both audio and video, zoom and pan motions, and more. 3. Screencast-O-Matic Screencast-o-Matic is a browser-based screen recorder. Before you can use this software to record a webinar, you will need to download and install an application and get an annual membership subscription. After installing the software and creating an account, you can then record your upcoming webinar. Although the software has a few nifty features like zoom and drawing on the screen, you have to take note that you can't record your entire screen. Instead, you can only record an area on your screen. 4. Tiny Take If you're bootstrapping, Tiny Take is one option you should strongly consider looking into. Although this  Mac screen recording software used to record a webinar may seem basic to some people, it's free and does an adequate job of recording your screen. It comes with basic features like zooming, panning, and a bunch of special effects. 5. Zoom Over the past few years, Zoom has emerged as a popular platform for holding meetings online. But unknown to some users, you can also use Zoom to record your screen. Plus, it has a free screen recorder feature, perfect for smaller businesses looking to minimize their expenses. You can then save your recording in mp3 or mp4 format. Take note that mp3 is audio-only. Meanwhile, the mp4 format records both audio and video, which you can polish through video editing. Webinar Recording For Your Next Show And Tell Showing yourself in front of an audience is a great way to humanize your company. Instead of just showing a product or a service, your prospective buyers can see and identify with another person who faces the same problems as they have. But sometimes, showing yourself in front of the audience is not enough. To explain and make a complex idea more accessible or to back up certain points, you might need to use a robust Mac screen recording software for your screen. Read Also: Top 10 Apps for Team Communication and Remote Work Top Utility Tools You Need For Your Website Why You Should Always Use Special Effects for Video Productions

READ MOREDetails