How to remove pname com Facebook orca

Facebook orca error

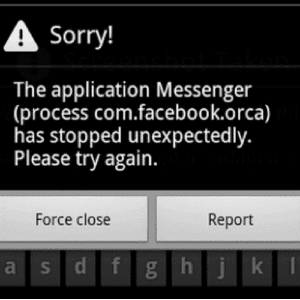
If you have ever noticed the Facebook pop-up message on your Android device screen showing that pname com Facebook orca has stopped, then it is probable that you are on Google searching for a solution to this problem that is annoying. Do you wish to solve the pname com Facebook orca error today? This article, therefore, will fit in the picture-perfect solution for what your needs.

In this write-up, you will get an explanation of all the info relating to the pname com Facebook orca error and katana.

The meaning of pname com Facebook orca :

Typically, pname com Facebook orca is the name of a package of Facebook messenger application on the smartphone. In simple terms, the orca folder belongs to the Facebook messenger application. In general, the orca folder acts as the storage for all images, files, videos, plugins, audios, videos, and cache from this app on the device.

What is the connotation of pname com Facebook orca?

Source

It is possible that you have an alternative folder termed the com Facebook katana. Essentially, this folder belongs to the Facebook application. And just like the orca folder, the katana folder gets generated automatically after installing the Facebook application on the device. Katana is just like any other folder and does not have to be a source for your worries.

Is pname com Facebook orca a malware?

It is not malware at all.

This Facebook orca folder is not a malware or virus. It is a folder that is just like other typical folders. It gets generated automatically after you install the Facebook messenger app on the device. Therefore, there is no need of getting worried or suspicious about anything.

What if my pname com Facebook orca stopped?

Majority of users of Facebook are faced with this problem. It is really irritating for the users when they have to deal with the pop-up message showing that Facebook has unfortunately stopped. Many people always ignore this message when it comes to the screen but it is good to note that it is never the right choice or solution.

Since it will aggravate you over and over again by the message popping up, it is advisable to prepare to solve it eternally.

Would you delete this folder?

No, it is not necessary to delete the pname com Facebook orca folder. Because, even though you may delete this folder, it will just regenerate automatically and the errors will start popping up once again. Therefore, it is wise to leave this folder in the memory of your device and handle the problem.

What is the importance or use of the pname com Facebook orca?

This folder is extremely helpful when you have the desire of retrieving messages of Facebook that had been deleted or conversation from the Facebook messenger application that was erroneously deleted. You can only achieve this when you do it from the Facebook orca folder.

Therefore, the pname com Facebook orca may be irritating but it is very helpful when you desire to retrieve the deleted Facebook Messenger tête-à-tête. One of the major utilities of the folder is that it restores your files of conversation in the same folder. And for that reason, the orca folder consumes so much space on the device when compared to other folders.

The final solution to fixing the pname com Facebook orca folder problem :

The first step is going to the option of settings found on the mobile device. You then go to the option of application then snap on the option of all apps. You will then have to locate the Facebook application and ensure that you clear data. After completing this, feel free to restart the Facebook application.

When you follow this procedure, it will be possible to solve this issue since, in this practice; you are deleting the app data of the messenger. You just have to reset the application and you will not face this error any longer.

What if you are being faced with a similar error after following this process?

Yes, if you desire to fix this issue, you can try following another procedure and see if it will really function. Therefore, all you need to do is just uninstalling the Facebook application found on the device and then restart the device. After restarting the device, you will have to download the Facebook application again and then install it from the Google play store. For sure, it is now clear. The pname com Facebook orca error will be something of the past.

In case you do not know the process of retrieving deleted conversations and messages by use of the orca folder, you will get the procedure to follow when it comes to retrieving deleted messages from the Facebook Messenger application.

Methods of retrieving deleted messages from the pname com Facebook orca folder :

02

Source

The Facebook Messenger has so many ruses that very few individuals know about and this is yet another opportunity of seeing you mistakenly deleted messages from the platform of chat. What do you have to do?

There are so many ways of recovering deleted texts from the Facebook messenger application. However, you will learn how to use the orca folder to recover your deleted messages. You need to follow these steps.

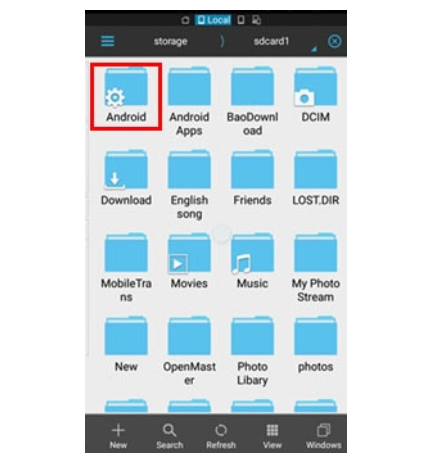
The first step is going to the file explorer on the device. The explorer will assist you to explore folders on the device. If the device does not have the explorer, then you will have to go to the file manager or just type file explorer. Install it after downloading.

After the installation, open the file explorer. Go the SD card at first. You will get an android file which has contents of all data relating to applications. Open the data folder and below it, you will get folders relating to all submissions. You will get the orca folder here and it belongs to the messenger. Click on it to open.

You can now go to the name com Facebook orca folder. Inside the cache folder, you will see the FB temp folder. All backup copies of the messenger are here, and you can retrieve all the info you desire for both group and individual conversations you had through the application.

You need to note that you can also retrieve that data minus using the file explorer application. For this, you just need to connect the phone to the computer by use of the cable and then find the pname com Facebook orca folder and then go to the folder to retrieve the info. The procedures above will give you the required understanding of clearing the pop-up error and you will enjoy using Facebook again.

Conclusion :

With all this information, you have all that is required to clear the pname com Facebook orca error. In case the problem persists, you can seek technical guidance from a reputable technician.

Read Also :

I enjoy writing and I write quality guest posts on topics of my interest and passion. I have been doing this since my college days. My special interests are in health, fitness, food and following the latest trends in these areas. I am an editor at Content Rally.

View all posts

Leave a Reply

Your email address will not be published. Required fields are marked *

Related

5 Steps on How to Market Your Business Using Social Media

5 Steps on How to Market Your Business Using Social Media

Social media has today become a popular way of enabling customers to research and discover brands of different products offered by different business entities. The platform has also helped marketers of various products reach their potential customers with just a click. Currently, a very high percentage of marketers prefer marketing their products and services using social media due to its high coverage, unlike other forms. Some of these social sites include Instagram, Twitter, Facebook among others. However, for you to successfully gain traction in this you need to follow the essential steps below. 1. Start By Reviewing Your Business Objectives : Although many people tend to skip this step, it is very important, to begin with, it in order to find a niche market on social media. However, an evaluation of your business objectives will help you to successfully develop an appropriate social media marketing plan for your business. For instance, if one of your business objectives aims at growing your market share in a certain region, develop a social media marketing plan that fully supports such an objective. Above all, remember to stick to your objectives when posting or engaging your fans and followers on your social media page. 2. Plan On Where To Spend Your Time : You need to have a clear digital strategy for you to successfully drive sales on social media. Since each social network has a different audience population, you should strategize on which platform to use on the basis of your target customers. The following is an example of population differences:Approximately 70 percent of people use Facebook, making it the topmost social network. Approximately 60 percent of Facebook users comprise of a female. Most of the Instagram users are aged between 18 years and 35 yearsFrom the above highlights, you need to choose a social network that will best work on your products and services in relation to the target audience. 3. Create High-Quality Contents : Coming up with high-quality contents can really engage your audiences. The contents can be shared across a number of platforms and harvest more interest in that particular brand. This means that the contents should be actionable, informative, shareable, and relevant to your target group of audience. 4. Always Be Active And Responsive : Potential customers, fans, and followers will always congregate to the business’ social site and post their comments. In the process, they will expect the business to be social to them. A timely response will always create a positive relationship between the company and the customers. However, some companies tend to create automated responses on their sites to the customer. As a result, the automation gets the company’s brands in trouble due to inappropriate responses. This can inadvertently promote negative attention making the business look uncaring the customers. For this reason, all automated responses should be avoided to give consumers a positive perception during the interaction. 5. Stay Updated Always : Always ensure that your social network marketing plan consistently reflects the times. This means that you should always stay ahead by developing a list of resources you are planning to use.In summary, although social media is widely used to market brands today, the marketing will be a success if the above steps are keenly followed. Reviewing the business objectives, creating high-quality contents will always attract a good number of customers. However, you should always be responsive and updated in order for you to maintain your potential customers.Read Also :5 Marketing Tips To Help Grow Your Business On Instagram Discovering A New Promotion Position For Your expanding Search Engine Marketing  Why Every Business Needs Digital Marketing

READ MOREDetails
how to create a group chat in messenger

Chat With Your Friends Group: How To Create A Group Chat In Messenger?

So you have been on Facebook for some time now - we all have been on the platform for some time, right? Being a part of Facebook also means using it primarily for chatting and keeping up with your ‘friends’ - so are you all part of different chat groups on the platform? Have you ever wondered how to create a group chat in messenger?Creating your own group is a good idea and not just for keeping up with your friends. You can also do the same for more practical purposes, as it could be for meeting purposes or even for running a small business. Whatever might be your reason, you can’t start if you don’t know how to start. So without wasting any time, scroll down to read all about starting your own chat group. Chat With Your Friends Group: How To Create A Group Chat In Messenger?So here we are, trying to find out how to create a group chat in messenger. Without just beating around the bush, let’s get started! It’s relatively easy and simple - you just have to follow the steps mentioned below to find out how to create a group chat in messenger. Scroll down to read about the same! Install And Open Facebook Messenger: Image SourceDon’t try to operate your Facebook messenger from your Facebook app. This is why your chat groups were perhaps not opening. So go to the play store in case you have an Android device, and install Facebook messenger on your device. Once you have installed Facebook messenger on your device, you need to open the app and log in with your details, waiting for your Facebook chat to open. Remember, this is the first step in finding out how to create a group chat in Facebook messenger! Creating A Chat Group On Facebook Messenger: Once you have opened your Facebook messenger and logged in, just go to ‘Home’ () and then tap on "". The moment you do so, you can tap on ‘new group.’ Once you do so, you have to find out who you want to message. Then you just have to click on the ‘Start group chat.’ That is your answer to how to create a chat group in Facebook Messenger. In case someone has already blocked you on Facebook, then you won’t be able to create a chat group with them on the platform successfully. But how will you know someone has blocked you on Facebook? In that case, the best thing that you can do is make a group without people you suspected of blocking you already and then see if you can make the group or not. If you can make the group without these people, then its probably because you have been blocked by others you were planning to add to your chat. Read More: What Is Facebook Jail – Overview And ExplainedFrequently Asked Questions (FAQs):Check out the most frequently asked questions related to how to create a group chat in FB messenger, mentioned below.1. How Do You Create A Group Chat On Messenger? Ans: Follow the steps mentioned below to create a group chat in your Facebook messenger. Tap on the people or person’s name located right on the top of your conversations.Click on ‘add people’ or even ‘create group’ with the name of your friend. Then type or select the people’s names you want to be added to your chat. Now click on ‘okay.’ 2. Why Can't I Make A Group Chat On Messenger? Ans: If the people you are planning to add to your chat group have already blocked you, then your group cannot be created. However, if you are already suspecting that someone has ended up blocking you on Messenger, then in that case, you can try to create a group again. And this time, don’t add them.  3. How Do I Start And Name A Group Chat On Messenger? Ans: Follow the steps mentioned below to start, and then name a chat group on Facebook messenger!➊ Click on your group conversations, the ones you want to customize. ➋ Tap on your contact names located at the top of your screen.➌ Tap on ‘edit’ located right on your screen’s corner. ➍ You can also click on ‘change name’ on the menu that appears on your screen.➎ Type in your group chat’s name.  4. Can You Share A Group Chat On Messenger? Ans: If the admin of your group chats switches on link sharing for any group conversation, you can opt to share that link with everyone else in order to make them join. On the top of the chat, click on your conversation’s name and then click on the ‘invite link.’ Then simply click on ‘tap copy’ while sending the same to someone else. And It’s A Wrap!So now you know how to create a group chat in messenger! That’s great. But what next? Why are you still here? Instead, open the Facebook app now, and try out the processes we just explained. If you don’t try it out on your own, then there’s no way you can learn how this works out. That’s perhaps the best way to learn!In the meantime, don’t forget to share your thoughts and experiences in the comments below. Read Also:How to remove pname com Facebook orcaBored So Much: Learn How To Play Games On MessengerThis Is Why Social Media Is Essential in the B2B Sales Process

READ MOREDetails
how to post on Reddit

How To Post On Reddit? A Step By Step Guide

Do you want to perform intelligent content marketing? If you are currently in the online content marketing sector, you have probably heard the name Reddit. But if you still have not heard about Reddit, we must inform you not to wait and start typing Reddit.com on your search engine bar.And exploring the massive source of content within a single website doesn't sound delicious? Do you know how to post on Reddit? Or see the other’s content postings?Take a look at why Reddit is the best choice. What Is Reddit?Reddit is the American social news aggregation where you can post your contents or simply read the other contents if you have an account. Along with content sharing, Reddit has its discussion platform.While you are writing content, all information can not be available on random websites. Especially when you are in content marketing or you are going to need a constant flow of new content. Along with the number of contents, Reddit maintains the quality of the content. The information accuracy is also playing a significant role here. And for this work, there is no other alternative that is better than Reddit. Find the right content and share the quality content.So let’s see how to post on Reddit The Step By Step Reddit Posting Guide Most of the content marketers have heard about the Reddit website, but they are unaware of the content posting strategies in Reddit. And when you are not able to take help from the world's most popular content posting website, your information research-related works are becoming more challenging. The knowledge regarding how to post on Reddit will solve all your problems regarding information gathering and sharing.Here we are elaborating the step-by-step details regarding how to make a post on Reddit. Step 1: Create Your Account In The RedditWhen you first enter the website, you will get notified the website is not very attractive or user-friendly. Apart from the pictorial representation, the website is full of written content.When you want to know how to post on Reddit, you have to take your first step through the account openings. Fill up the name and password field. It’s a simple two-step process. You do not have to confirm your email id. Email id confirmation is optional here. Step 2: Pick The SubReddit  After creating your account in Reddit, you have to choose the right subreddit for your post. Let’s see how to make a subreddit for your post. In your Reddit posts, the niches are playing an important role. If you do not pick the subreddit options, your actions regarding how to post on Reddit are incomplete.For example, if you are going to sell the food item. Your Subreddit choice would be /r/Food. Step 3: Fill The Reddit Submission FormAfter choosing the right subreddit for your account, you have to submit the submission form for your account. The other options are getting deleted when you select the subreddit options, and your subreddit option is starting over fresh. So when you are going to choose the subreddit for your Reddit post, be specific and pick the same niches as your content.You have to give the title, and the URL of your content, then press the submit button. And click the checkbox to enable the option to send replies to your inbox. Step 4: Submit Your Post  Now you have to reach the end step of how to post on Reddit. Click the submit option and wait for a while. Do not refresh or reload the page. Wait until your post is getting live. Increase your post engagement level through communication. When you are going to increase your engagement level, your Reddit submission ranks will also improve.  Step 5: Cross-Posting Of Your Submission Do you know how to post on Reddit or the Reddit cross-posting rules? Every time you can not provide unique content. The same content or the same subreddit choice is self-explanatory. But if you are not going to crosspost your submission.Reddit is treating your content as a spammy one. Edit the title of your content and add /r/#subreddit#. And replace the tile of the content. This is going to add some value to your content. And it works as the acknowledging factor for your Reddit posts. How To Post Anonymously On Reddit Human error is always possible. If you want to delete your content posts, you can hide your posts. Most of the fault makers are asking about how to post anonymously on Reddit. Even if it's not expected when you are professional in content creation, you can create an anonymous account. And start to post anything from there. How To Post Pictures On RedditNow you know how to post on Reddit, especially the contents? But how to post pictures on Reddit? Reddit mostly preferred the written contents along with the written contents. You also can spot the photos with a very simple few steps.Let’s see the easiest way to post a picture on Reddit.Step 1: First, log in to your Reddit accountStep 2: Open the homepage of your accountStep 3: Tap onto the upper right corner of your page under your profile pictureStep 4: Click the picture icon on your Reddit post windowStep 5: Choose the images that you want to postStep 6: Choose your image post communityStep 7: Add image title on your post title barStep 8: Confirm your image post How To Delete A Post On RedditFrom reddit.com, you just have to follow three steps to delete your Reddit posts from your account. The Deletion process is more important than how to post on Reddit. The error chances are huge for beginners, and these three steps answers for how to delete a post on Reddit will save your time and reputation.Let’s see how you can delete a post from your Reddit account.Step 1: Click on the profile icon of your Reddit home pageStep 2: Open your profile post optionStep 3: You will see the list of the posts which you are making Step 4: At the bottom of the post, you will have the option to delete the post. Choose the delete option for the post. Wrapping It Up From this article, you are getting the entire concept about using Reddit. For content sharing and viewing, Reddit is a big source of information. When you want to research any updating news, always look at the available Reddit contents.But the knowledge about how to post on Reddit is providing you a smart share and see the option. Do utilize it to start to shine from today. What is your experience with Reddit? Do not forget to share your experience with us. More Resources:The Top SEO Tools for 2021 Required Content Marketing for Your E-Commerce SEO Agencies Are the Experts at Improving Your Website Content

READ MOREDetails