Four things you need to know about Mesothelioma

by

23 September 2020

Health & Fitness

Mesothelioma

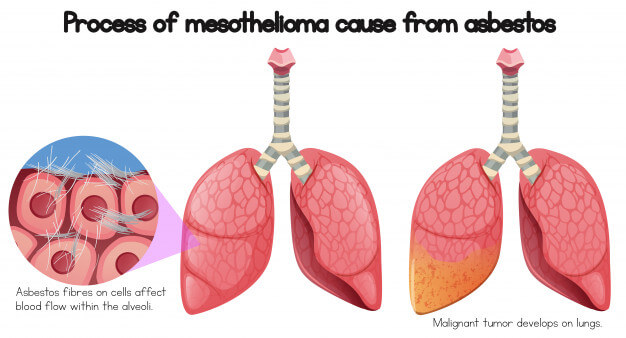
Are you familiar with mesothelioma? You might be familiar with lung cancer and the devastating impact it can have on people and their families; however, mesothelioma is classed as asbestos-related cancer that primarily affects the lining of the lungs. This asbestos-related disease affects thousands of people every year and tragically, is considered incurable – find a local Mesothelioma lawyer via the link if you have been affected.

Sadly, not many people know about this destructive disease, who is most susceptible to it, the symptoms, and how it’s diagnosed. So, with this in mind let’s explore four things that you need to know about mesothelioma.

Four things you need to know about mesothelioma:

1. The symptoms

So, how do you know that you have Mesothelioma lung cancer? Worryingly, the first signs of this asbestos-related disease start to manifest when the tumors in your lungs begin to grow and spread. It’s this process that will trigger certain symptoms like the ones listed below.

  • You have a dry, persistent cough
  • You’re struggling to catch your breath
  • You’re constantly battling chest infections and respiratory illnesses
  • You have pain in your chest/abdomen (this is caused by tumors pressing against your chest wall)
  • Fluid on your lungs
  • Weakness and fatigue

2. Who is most at risk?

As mesothelioma is an asbestos-related illness, it’s those who are exposed to asbestos in their daily lives (and for extended periods) who are most at risk. Certain occupations mean some workers are far more likely to interact with or handle asbestos than others. It’s also worth noting that second-hand exposure – such as amongst friends and family members – is also possible. The following occupations are renowned for the high-risk of mesothelioma.

  • Navy Veterans (those who work in shipyards)
  • Factory workers
  • Firefighters
  • Construction workers
  • Powerplant workers

3. How is mesothelioma diagnosed?

If you’re experiencing any of the above symptoms, then you should speak with your doctor, urgently. Having this dangerous illness diagnosed as soon as possible will increase your life expectancy and you may be able to have treatments that will extend your life.

Your illness may be diagnosed with a series of imaging scans, which may start as a simple chest X-ray to look for abnormalities and fluid on the lungs. If needed, you could also have an MRI or CT scan. Blood tests are also likely, as they can help confirm and back up other results that may lean towards a diagnosis. If an abnormality is found, your doctor may take a sample of the tumor for a biopsy to confirm whether or not you’re dealing with mesothelioma.

4. Your treatment options

Depending on the severity of your illness or the growth of the cancerous cells, you might not be eligible for all types of treatment. However, the most common types of treatments are what you would expect – surgery, for removing tumors and limiting the spread of cancer, chemotherapy to help shrink the tumors, and radiation therapy. You may also be offered experimental medications in a clinical trial.

Final thoughts…

Speak with your doctor if you’re concerned about mesothelioma and speak with a lawyer if you’ve been recently diagnosed.

Read Also:

Content Rally wrapped around an online publication where you can publish your own intellectuals. It is a publishing platform designed to make great stories by content creators. This is your era, your place to be online. So come forward share your views, thoughts and ideas via Content Rally.

View all posts

Leave a Reply

Your email address will not be published. Required fields are marked *

Related

Organic European Formula

4 Facts you should Consider in Organic European Formula

There are many positive reasons to transition to European baby formula. For example, unique nutritional opportunities such as goat milk, a trusted system in place to control heavy metal contamination, a close look at how and where nutrients are being extracted, and a mindful approach on their global impact. Let’s examine these reasons a bit closer:  Goat Milk: European formulas offer goat milk as an alternative for babies who present a cow milk protein intolerance/allergy. When a cow milk protein allergy presents itself and a mother’s milk is not an option, goat’s milk makes for an excellent alternative. Oftentimes, a soy-based or plant-based formula will have to be prescribed. However, many of these plant-based prescription formulas lack essential nutrients. Goat milk formulas in European brands are available as a stage 1 formula, making the formula available from birth onward. In contrast, the goat milk found in America is only acceptable for toddlers plus. Goat formula contains natural vitamins and minerals and does not have the unfavorable properties of soy milk formula: such as phytoestrogens. Phytoestrogens have been linked with the interference of hormonal balance. The A2 protein within goat milk allows it to be easier to digest, as the absence of the A1 protein, which is the protein typically found in cow’s milk, is responsible for intolerances and allergies. Goat milk is naturally A2 milk, making it more favorable for a baby with a sensitive belly. Heavy Metals: All product manufacturers must include in the label both naturally occurring minerals as well as added minerals and their quantities to ensure that even naturally occurring compounds are taken into account and kept within the safety margins. The European Union and the UK have strong regulations that outlaw, and heavily regulate the use and exposure of heavy metals. European legislation sets a maximum “allowed” in foodstuffs also. EU regulations cover the following heavy metals: cadmium, lead, mercury, inorganic arsenic, and inorganic tin. Contamination, sometimes found in heavy machinery, generally may imply a risk to human health and has a negative impact on the quality of food. Thankfully the EU has preventative measures in place to negate the chances of this contamination, which isn’t the case in other places. Artificial Nutrients: Another characteristic to consider is where the DHA/ARA are coming from. The common process of manufacturing and processing the DHA/ARA in the USA is by using hexane to extract it. Hexane is a petroleum-based solvent, which could cause this oil to end up in the formula and wreak negative effects on the nervous system. If a formula uses hexane extraction in Europe, there are strict regulations to ensure no remnants of hexane remain. Unfortunately, these same standards are not implemented in other places. DHA and ARA are good fats, or the naturally produced “omegas” found in breast milk. Some formulas use DHA and ARA that are artificially manufactured. The concern is that artificial extractions are not gathered from safe natural places, and they are generated in a lab. These extractions are not safe for human consumption. Studies have concluded that artificial DHA/ARA may be responsible for gastrointestinal issues. Palm Oil: There is no internal health concern from ingesting palm oil, however, many manufacturers are moving away from using palm oil. The use of palm oil has contributed to the exploitation of the Amazon. The extraction of palm oil leads to heavy deforestation in the amazonian rainforest; for this reason, it is more Eco-Friendly to not use palm oil. Kendal formulas and Loulouka formulas do not use palm oil. By not using palm oil, companies come together to promote ethical environmental practices globally. Holle uses palm oil in some of their products, but they ensure it is ethically sourced from sustainable farms in Colombia. Kendal and Loulouka for example, use coconut oils as their substitute. Conclusion: Whether your concern is for a higher quality product for a sensitive baby or simply a formula with less “pharmaceutical gunk,” the rise in popularity for European formulas is due to the excellent results. European formula seems to be a growing demand. It is worth investigating how these alternate options to USA-based formulas compare: how they differ and how to access safely. Hopefully, these many positive reasons to transition to a European baby formula have started your process of considering the change. Read Also: Ecig Outlet Products That You Can Buy Today What is the Ideal CBD Dosage for You? How To Make Your Own Cannabis Topicals

READ MOREDetails
Postpartum Exercise

Postpartum Exercise: What You Must Know

Exercise after pregnancy isn’t a one-size-fits-all, but it helps you stay healthy, and lose that baby weight. Also, it helps strengthen the abdominal tone, boost your energy level, and prevent postpartum depression. Most moms will immediately turn to postpartum wear, from belly wraps to incision care, nevertheless, how soon it is too soon to hit the gym depends on individual circumstances because no two pregnancies are the same. You may need to consult your obstetrician. There are benefits of postpartum exercise. Even more, the efforts of a physiotherapist and your doctor can help your body adjust after a child's birth. Therefore, postpartum fitness is needed, which allows the pelvic and other strained parts of the body to get their vibes back. Let's take you through what you need to know about postpartum exercises. Can You Exercise Just After Giving Birth? There is no hard-and-fast rule to a safe return to postpartum exercise, but you can determine if you are ready with the kind of signals your body gives you. Notably, the child delivery process will influence when to start and the types of exercise. For instance, normal vaginal delivery will take less time to heal when compared to a complicated delivery or a Caesarean delivery. Therefore, depending on the circumstances, hitting the gym might be quicker for a vaginal delivery patient than a C-section. You can jump right in after delivery to do light exercises such as walking or pelvic floor exercises. Before you start your exercise, see the doctor. Benefits Of Exercise for New Mums Excitement can distract you from the goals of exercise, which are not just to help you fit right into your wear, but as a means to elevate your body. Labour and birth can cause severe problems, including back pain and separated abdominal muscles. In this case, regular exercise can significantly benefit the body, including breathing re-coordination. However, be realistic, don't overdo it because high-impact exercise can lead to prolapse. It is best you stick to an easy routine because your body will only be ready after 6 weeks postnatal. Therefore, it is best not to return to your previous level of physical activity until 16 weeks after the baby is born, so be patient. Low-Risk Exercises For New Mothers Pregnancy hormones can alter your joints and ligaments for up to 6 months after birth, increasing your risk of injury. Avoid heavy weights, sit-ups, and high-intensity cardio activities for at least three months. There are safe exercises for new mothers, such as: Happy Baby Pose: Your pelvic muscles may contract and become uncomfortable after delivery. This yoga posture can help you gently relax and stretch your muscles to reduce discomfort. Raise your legs while lying flat on your back to your sternum. Your knees should be somewhat broader than your hips. As you work toward holding this stance for 90 seconds, focus on relaxing your pelvic muscles. Abdominal Exercise or Abdominal Bracing: Choose from sitting, standing, laying on your side, reclining on your back, or kneeling on all fours. Pull your lower abdominal button in towards your spine. And hold for 5 to 10 seconds before returning to regular breathing. Repeat 8 to 12 times each day, 4 times per day. Pelvic Tilt Exercise: Sit with your back straight and lean slightly forward. Squeeze and pull the muscles around your vagina as though you're attempting to halt a bowel movement. Hold for 8 seconds while counting to 8; relax for at least 8 seconds, and repeat 8 to 12 times more. A child's birth comes with body changes. You have to be intentional about postpartum exercises. Depending on your circumstance, you can choose to start a day or a few weeks after. Still, be care careful while at it. And while exercises are great, physio massage can keep your body in check till you feel ready to hit the gym. Read Also: A Set Of The Best Exercises For Truck Drivers Different Types Of Blood Circulation Exercise 7 Simple Exercises That Can Relieve Back Pain In No Time

READ MOREDetails
wall pilates free

An Ultimate Wall Pilates Free Workout Plan for Beginners

To start your Pilates workout, all you need is a wall. With wall Pilates free workout, you can blend traditional Pilates with home exercise. This workout can be helpful for you whether you are a beginner in Pilates or have been practicing Pilates for a few years. Consider starting out with wall Pilates if you want to transform your fitness journey. In this article, you will get a Wall Pilates workout plan. Apart from that, you will also get a general overview of what a wall Pilates exercise is as well as its benefits. Moreover, this article will also set a Wall Pilates free workout plan. Finally, you will also get essential tips to perform this exercise. Hence, to learn more, read on to the end of the article. What is Wall Pilates? Wall Pilates is a form of Pilates training. It is a low-impact exercise where you have to use a wall for support and resistance. Basically, the wall provides support for your back, shoulder, and hips. Hence, you can use it as a resistance to perform exercise. Generally, when you perform traditional Pilates, you have to exercise on a mat or a reformer machine. Here, you use your body weight or the machine for resistance. However, with wall Pilates, you press your body and its parts against a wall. You make movements by exerting force on the wall and by using it as a support. Actually, in this exercise, you have to do the same repetitive movements that you practice during a mat. Some examples of wall Pilates are single-leg stretch, criss-cross, the hundred, etc. Benefits of Wall Pilates Free Hand Exercises The following are some of the major benefits of Wall Pilates that you must: By performing wall Pilates daily, you can strengthen your core muscles. As a result, this will help you prevent injuries and maintain a good posture. With time, you will improve your flexibility with wall Pilates. Additionally, it also helps you to improve your coordination and balance. As you are using a wall for your support, the stable surface can help you maintain the right form. Thereby, with time, you will get a better spinal alignment, which will ensure a lower risk of injury. With wall Pilates, you engage your full body for the exercise. This way, you can target all muscle areas of the body. Moreover, Wall Pilates free hand exercises are also effective in reducing blood pressure. Hence, if you do it regularly, you lower your risk of heart attacks and strokes. Wall Pilates also involves mindful movement, which can help you work on your mental health. People of all ages and fitness levels can perform wall pilates. This is because it is a low-impact exercise. Apart from all these benefits, one of the biggest factors to consider Wall Pilates is that it is a budget-friendly exercise. All you require here is a wall. Who is Wall Pilates Good for? Since Wall Pilates is a low-impact exercise, it will not be physically demanding and exhausting. Hence, this form of exercise is good for people of all ages and fitness levels. Moreover, this exercise is also good for pregnant and injured people. Furthermore, if you are someone who finds it difficult to lie on your back, you can even do Wall Pilates. Generally, traditional Pilates, like mat or reformer Pilates, are difficult to perform. This is especially true for people who have physiological issues or injuries. Hence, if you want to perform a light exercise to stay fit, Wall Pilates is one of the best options to consider. 15-Minute Wall Pilates Free Hand Workout To start a Wall Pilates workout, you need an open wall and a yoga mat. Here are the steps you must follow to perform your Wall Pilates workout: Start your warmup with a Cat-Cow pose and Thread-the-Needle stretch. Warm up for 2-3 minutes. Once you complete your warmup, start your wall Pilates exercise. Here, make sure to have consistency with the reps for each move. Once you complete the five Pilates exercises, repeat the circuit twice more. The next section consists of 5 back-to-back exercises that you must perform in each circuit. 5 Wall Pilates Free Hand Exercises Here are the Wall Pilates exercises you must perform to complete each circuit: 1. Single-Leg Knee Crunch The following are the steps to follow if you want to perform a single-leg knee crunch: Sit one foot away from the wall. Then, lie down on your back. After that, place your feet on the wall so that your legs look like a tabletop, horizontally. Stretch your left leg diagonally so that your toes are just touching the wall. Then, extend your arms over your head. Meanwhile, be sure to press your lower back into the floor. This way, you can engage your core. Pull your left knee toward your chest and curl your shoulders, hands, and your head towards your core. Then, slowly, go back to the initial position. Repeat these fifteen times to complete one set. 2. Wall Bridge and Calf Raise The following are the steps to follow if you want to perform the wall bridge and calf raise exercise: Sit one foot away from the wall. Then, lie down on your back. After that, place your feet on the wall so that your legs look like a tabletop, horizontally. Press your feet on the wall. This way, you can engage your glutes and your hamstring. Then, lift your hips off the floor. However, do not arch your back in the process. Moreover, when your body makes a straight line from the knees to the shoulder, lift your heels for a calf raise. This will balance out the movement. Then, return to the starting position to complete one rep. Repeat these fifteen times to complete one set. 3. Reach Backs The following are the steps to follow if you want to perform reach-backs: Start with a high plank by pressing your feet on the edge of the wall. Here, ensure to keep your feet apart by shoulder-width. Also, be sure to place your shoulders directly over your wrists. Moreover, your body must be in a straight line from your heels to your shoulder. Use it as your starting position. Then, lift your hips up. When you are lifting up, touch your left foot with your right hand. Then, come back to the starting position. Do the same with your left hand by touching your right foot. Again, come back to the starting position. Make sure to repeat this 10 times for one set. 4. Marching Bridge The following are the steps to follow if you want to perform a marching bridge: Sit one foot away from the wall. Then, lie down on your back. After that, place your feet on the wall so that your legs look like a tabletop, horizontally. Then, press your feet to lift your hips off the floor. Here, make sure to form a straight line from your knees to your shoulder. However, make sure not to arch your back. Consider this as your starting position. Then, lift your left foot and bring your knee toward your chest. Meanwhile, make sure to keep your hips still. Here, maintain the same bend in your knee and stop when your thigh is at a right angle to your torso. Then, come back to your starting position by reversing the movement. This is one rep. By performing 10 reps, you complete one set of the marching bridge. 5. Wall Sit and Calf Raise The following are the steps to follow if you want to perform the wall sit and calf raise exercise: Become a human chair: Stand with your back against a wall and take your feet about a foot forward. Then, lower your hips down to a position such that your knees are perpendicular to your hips. Also, make sure your ankle is perpendicular to your knees. Then, extend your arms horizontally so that it is perpendicular to your torso. This is your starting position. Hold the squat position to raise your arms, and reverse the movement to the starting position. Simultaneously, raise your heels to do a calf raise and reverse the movement. This is one rep. Perform 12 reps to complete one set of Wall Sit and Calf Raise. Tips for Effective Wall Pilates Practice Here are some useful tips if you want to perform Wall Pilates free hand exercises effectively: Don’t over-exert yourself with your exercises. Basically, start with simple exercises and gradually increase your intensity. Make sure to breathe steadily and have control of your breathing. Use good-quality mats to support your back and hips. There is no substitute for a professional instructor. Hence, consult with an instructor to perform your exercises correctly. Do you have more suggestions on how to perform Wall Pilates free hand exercises? Please share your experiences and opinions in the comments section below. Read Also: 5 Rowing Machine Workout Tips Every Fitness Person should know Get up and Workout! Things to Consider

READ MOREDetails