10 Best Tropical Plants To Buy In 2022

Published on: 29 April 2022 Last Updated on: 17 February 2025
tropical plants

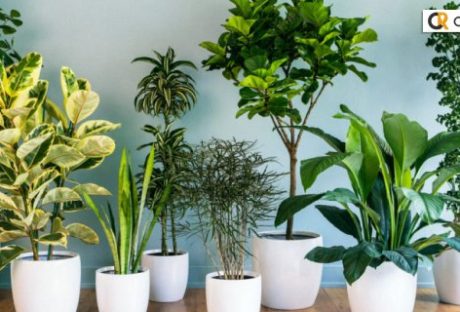
Want to add some of the fresh earthy vibes to your house interior decorations? Add the indoor exotic tropical plants to your house’s outdoor and indoor interior. Tropical plants have very fresh leafy kinds of vibes. Especially when you live in hot and humid weather, these plants bring an earthy and new look to your garden. Along with the nice look, every tropical plant’s leaves are unique, so tropical rainforest plants are always the favourite of every designer and gardener.

What are you thinking? How common tropical house plants can bring a fresh vibe to your garden. Let’s have a look at the few tropical plants which you can buy in 2022.

Read More: 10 Best Spiky Plants To Decorate Outside Your House

10 Market Best Tropical Plants To Buy In 2022

The indoor tropical house plants always make your room look fresh and elegant. Even if you are adding tropical green plants to your garden, it will look more colourful. Who does not like to have fresh green looks in their garden?

Here is the list of tropical plants which you can buy in 2022.

1. Bird Of Paradise

Bird Of Paradise

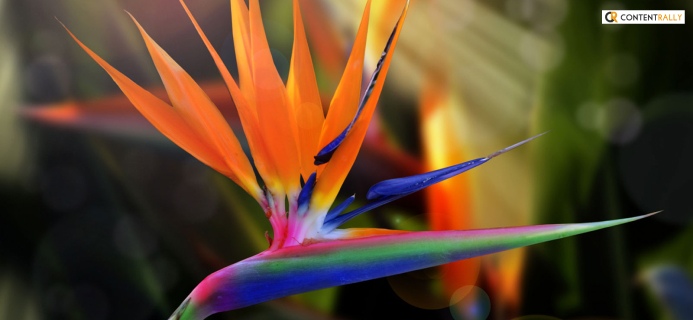
This name of the plant symbolizes its beauty. Bird of paradise also has a very well-known common name, the crane flower plant. This is one of the most beautiful tropical plants on the list of indoor tropical house plants. Bird of paradise is a good choice.

You will get an excellent attractive plant with vibrant, colorful flowers. The flowers of this plant look like a heavenly yellow bird.

Native Place: South Africa.

Where To Grow: This plant is more convenient for indoor and outdoor gardens. The warm weather is more suitable for it. The 65°F and 85°F temperatures in indoor places are the best places to grow it.

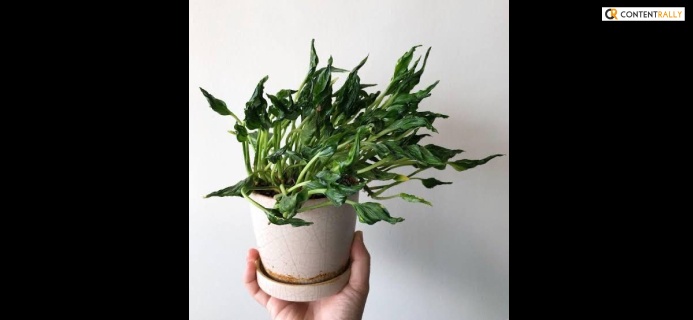
2. Philodendron Birkin

Philodendron Birkin

Do you like to have a tropical big leaf plant indoors? Then Birkin is going to be your best pick. These tropical big leaf house plants have lovely light and dark green colour stripes on the surface.

The leaves of these tropical plants are fresh in colour, and every branch is soft green tender. The only disadvantage of having these plants are they are not fast-growing plants. So you have to keep your patients in the right place to see the full-grown plant.

Native Place: Rainforest of Brazil and Paraguay.

Where To Grow: This plant is more convenient for indoor and outdoor gardens. The warm weather is more suitable for it. They have more than 50 species in the same category. The 55°F and 86°F temperatures in indoor places are the best to grow it. Direct sunlight is harmful to it.

3. Parlour Palm

Parlour Palm

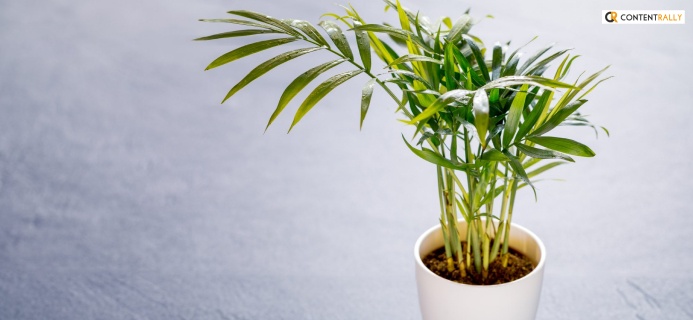
Parlour palms are another great selection of common tropical house plants. Even though they are the best plants for tropical areas, these plants can easily tackle the lowering temperatures.

The best experiences of growing these plants are that they are very compatible with every type of environment. And not only that, you do not have to spend hours taking care of them. For beginner plant enthusiasts, these parlour palms are very convenient to have.

Native Place: South Mexico and Guatemala.

Where To Grow: This plant is more convenient for indoor and outdoor gardens. The 65°F and 80°F temperatures in indoor places are most suitable for them.

Click Here To Read: 10 Best Low Maintenance Plants To Buy In 2022

4. Shangri La

Shangri La

Shangri La is a small and tender soft plant. Are you looking for fresh-looking tropical plants? Then you can select this plant. The indoor weather is more suitable for growing this plant. Why select this plant?

The fresh-looking green heart-shaped leaves always look fresh and more fragile. Every leaf is dark green in colour. They have more different species. And every type of Shangri La planet’s leaves shape is different.

Native Place: Southern part of China.

Where To Grow: This plant is more convenient for indoor and outdoor gardens. The 60°F and 75°F temperatures in indoor places are most suitable for them.

5. Money Tree

Money Tree

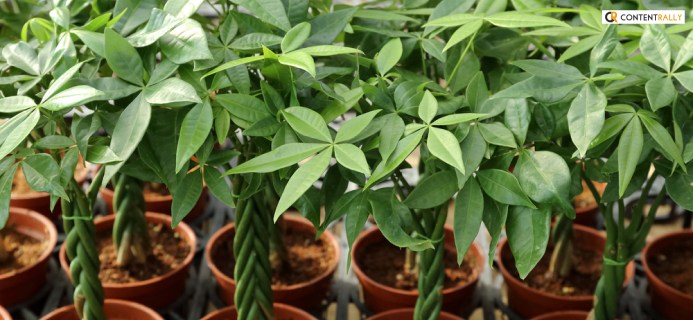
There are plenty of myths associated with the money plant. But the fact is the money plant looks fresh, and every leaf of the plant is tear-shaped. The shapes and size of the money tree are very compatible with indoor ambiances.

When you want to select any indoor plant, what types of characters you are searching for. The usual quality of the indoor plants should be they should be good for your health and easy to maintain. The money tree has all these characteristics. You do not have to make much effort for maintenance, and you will get a plant that will increase the oxygen level of the air.

Native Place: Central and southern part of South America.

Where To Grow: This plant is more convenient for indoor and outdoor gardens. The 65°F and 80°F temperatures in indoor places are most suitable for them.

6. Bromeliad

Bromeliad

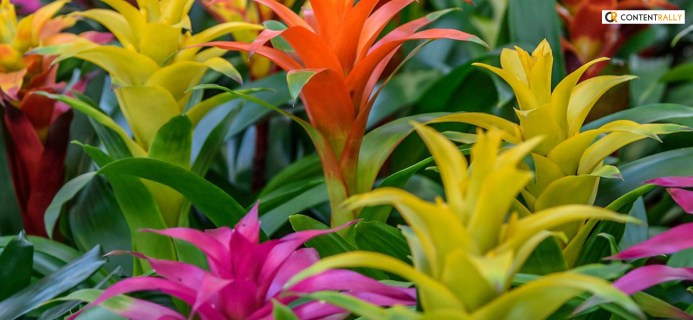
These tropical plants’ flower colours are like the birds of paradises. The flowers are like a bunch of golden birds. The vibrant colours of the flowers make it unique. Bromeliad has multiple different species. But my favourite is the orange one. These plants ‘ leaves have a distinctive look along with the nice glowing orange colours.

The leaves of the plants are thin and give the whole plant an excellent cone shape. You cannot separate the plant’s leaves and the flowers. Only the colours of the petals make the difference.

Native Place: Africa, South America, and Caribbean seaside tropical areas are their native places.

Where To Grow: This plant is more convenient for indoor and outdoor gardens. The 50°F and 65°F temperatures in indoor places are most suitable for them. However, highly humid and airy places are always the appropriate place for it.

7. Areca Palm

Areca Palm

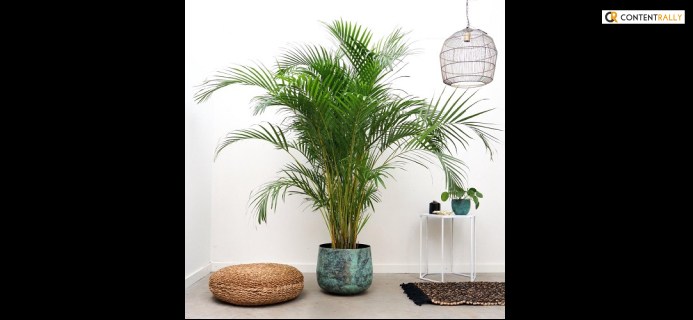
This tropical palm is another great selection for indoor and outdoor decorations. You can pick these Palm trees as they are low maintenance and for their gorgeous look. The authentic look and structures of the palms are present in the whole attire. The indoor Areca Palms can be more than 10 ft high, and in the outdoor areas, the height can be more than 35ft.

The fountain-like structures of these tropical plants are so magnificent that if you are putting the plant in your room corner, the whole look will change.

Native Place: Madagascar, Andaman Islands, El Salvador, Cuba, and Puerto Rico.

Where To Grow: This plant is more convenient for indoor and outdoor gardens. The 65°F and 75°F temperatures in indoor places are most suitable for them. Only you have to keep these plants away from the cold air and climates.

8. Shenzhen Nongke Orchid

Shenzhen Nongke Orchid

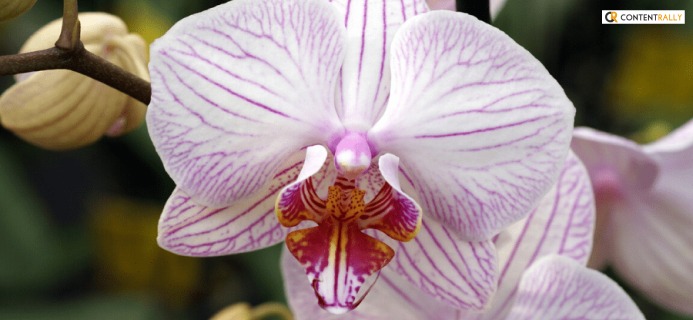
You can put these seven into the list of wholesale tropical plants. But do you want to buy an exotic one? Then why not select a lovely pink flower tropical orchid. Do you think only blood orchids are rare? This Shenzhen Nongke Orchid is also very rare. This is the reason you can put this orchid on the list of all exotic tropical plants.

But keep one thing in mind: these plants are costly. To buy a single plant, you have to spend about $201,000.Hence this single plant is no less than any nice art effect for your living room. But you can buy the recent plants from the tropical house plants for sale options. Usually, some of the firms offer sales of tropical plants yearly.

Native Place: China, Grece, and Rome are the original places of the orchid plants.

Where To Grow: This plant is more convenient for indoor and outdoor gardens. The 50°F and 80°F temperatures in indoor places are most suitable for them.

You May Like To Read This: 10 Best Aesthetic Plants To Buy In 2022
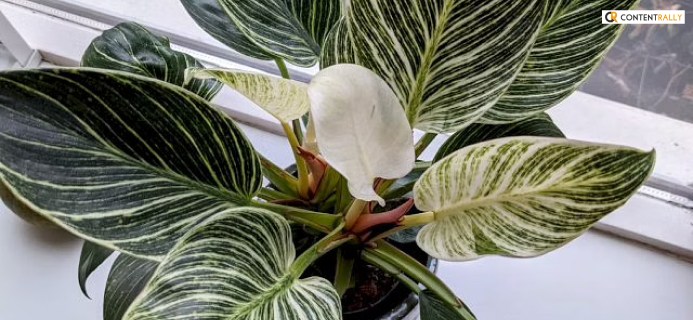
9. White Star

White Star

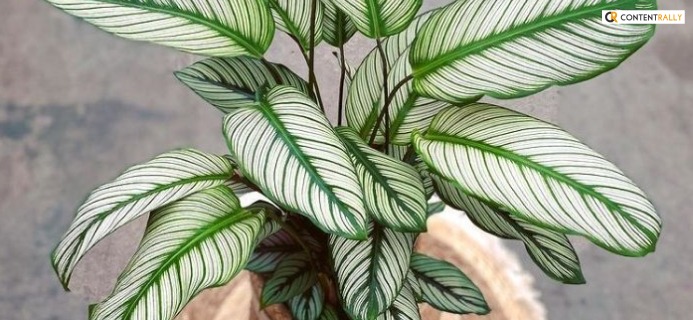
The catheter majestic white star tropical plants are great selections for the indoor garden. For household nurseries or indoor tropical house plants, these plants are good selections. The leaves are big in size. And on the surface of the plant leaves, you will find light green and dark green stripes. These light green shares look more like white colours.

The colour combinations of these plants are unique, and with this uniqueness, the plants give your room a beautiful look.

Native Place: Brazil rainforest.

Where To Grow: This plant is more convenient for indoor and outdoor gardens. The 65°F and 77°F temperatures in indoor places are most suitable for them.

10. Marginal Wood Fern

Marginal Wood Fern

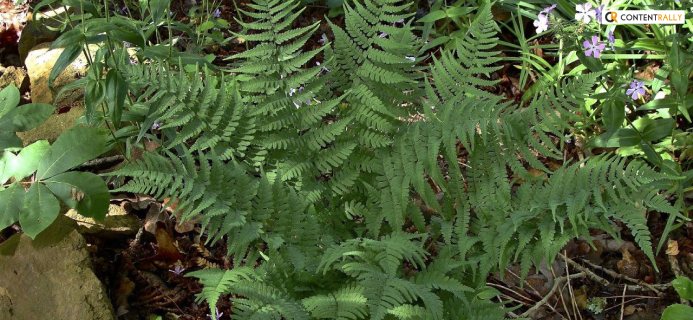
Can Marginal wood Ferns be the common tropical house plants? Yes, we all can see this plant’s in the rainforest. But you can bring a small part of the rainforest inside the interiors of your house and make your interior look picture perfect. These ferns commonly grow under the Oakwoods. But apart from the Oakwoods, you can also find these ferns in multiple areas of the rainforest.

The authentic look of ferns and leaves textures makes this plant popular among tropical plant lovers. In this long list of tropical plant names, wood ferns are very sophisticated and tender types of selections.

Native Place: North America.

Where To Grow: This plant is more convenient for indoor and outdoor gardens. The 65°F and 75°F temperatures in indoor places are most suitable for them. The direct sunlight is turning their fresh green leaves into brown.

Frequently Asked Questions (FAQs):

Q1.Name Some Of The Tropical Plants Which You Can Grow In Your Living Room?

When you want to buy some tropical plants for your living room, you have to check two qualities: one about their maintainers, and the other thing is their looks.

  • Dragon tree
  • Bird of paradise
  • Pine Norfolk Island
  • Caryota fishtail Palm
  • European Olive
  • Corn Plant

Q2. What Is The Easiest Tropical Plant To Grow?

Bromeliads are the easiest plant to grow. You only have to put these plants in a pot and leave them in the corner of your room. But shady and airy places are more suitable places to grow these plants.

Q3. How Much Sun Do Tropical Plants Need?

Usually! Tropical plants grow in shaded places. And indirect sunlights are more convenient nutrition sources for them. Even some of the plants can grow under indirect light sunlight. The comfortable temperatures for the tropical plants are always better. But water sources need to be more stable. Unlike the dry areas of indoor plants, these tropical plants need more watering.

Q4. Can You Grow Tropical Plants In Perth?

Yes, you can grow the tropical plants in the Perth.

Here are five tropical plants that you can grow in Perth.

  • Dragon tree
  • Hawaiian Hibiscus
  • Giant Bromeliad
  • Sago palm
  • Cane Palm

Bottom Line:

Each of these ten tropical plants is very convenient for indoor and outdoor gardens. But if you are living in an arid area, then my suggestion is to place this plant under the shaded places or inside your room. For any type of tropical plant, watering is very valuable. In most tropical regions, rainfalls are frequent. So be sure you are going to water your plant every day. Which plant are you going to select for your indoor or outdoor garden? And if you are already thinking of having a green natural living room, share your plant’s pictures in the comments sections.

Read Also:

  1. 10 Best Tall House Plants To Buy In 2022
  2. 10 Best Foliage Plants To Buy In 2022 – Must Read!

Content Rally wrapped around an online publication where you can publish your own intellectuals. It is a publishing platform designed to make great stories by content creators. This is your era, your place to be online. So come forward share your views, thoughts and ideas via Content Rally.

View all posts

Leave a Reply

Your email address will not be published. Required fields are marked *

All Comments

Hi, yes this paragraph is really nice and I have learned lot of things from it on the topic of blogging. thanks.|

Woah! I'm really digging the template/theme of this website. It's simple, yet effective. A lot of times it's very hard to get that "perfect balance" between superb usability and visual appeal. I must say you have done a excellent job with this. Also, the blog loads very quick for me on Internet explorer. Outstanding Blog!|

You have noted very interesting details!

Thank you for great content. I look forward to the continuation.

Your article helped me a lot, is there any more related content? Thanks!

Very nice blog post, definitely love this site,tick with it!

Related

Concreting Solutions

Ideal Concreting Solutions For Your Home

Choosing the right concreting solutions is a cornerstone in the journey of constructing or renovating your home. It not only guarantees durability and structural integrity but also elevates the aesthetic appeal of your living space. Concrete, with its unmatched versatility, stands as a pillar in residential construction, marrying the qualities of strength, longevity, and design flexibility. As we delve into the realm of concreting solutions suitable for various facets of home construction, from the foundational elements to decorative finishes, it becomes evident how these solutions significantly enhance both the functionality and appearance of our homes. Understanding Different Types of Concrete Concrete comes in various forms, each suited to specific applications in home construction. Here's a look at the primary types: Standard Concrete: The foundation of most construction projects, known for its strength and durability, suitable for driveways, sidewalks, and structural foundations. High-Strength Concrete: Offers enhanced durability and load-bearing capabilities, ideal for areas requiring superior strength. Lightweight Concrete: Used where less structural mass or better insulation is needed, it provides thermal efficiency and is easier to work with. Decorative Concrete: Enables aesthetic customization for home exteriors and interiors through options like colored, stamped, or polished concrete. Benefits of Concrete in Home Construction The benefits of using concrete in home construction are manifold. Its durability stands up to extreme weather, heavy traffic, and the wear and tear of daily life, ensuring structures that last generations. Concrete's thermal mass contributes to energy efficiency, helping maintain consistent indoor temperatures and potentially lowering energy costs. Moreover, its versatility allows architects and builders to explore creative designs, molding concrete into various shapes and finishes to complement any architectural style. Innovative Concreting Techniques for Homes Innovative concreting techniques, such as stamped concrete, polished concrete, and concrete overlays, push the boundaries of traditional concrete applications, offering homeowners unique ways to enhance the aesthetic appeal of their exteriors and interiors. Stamped concrete introduces textures that mimic natural materials, while polished concrete floors bring a sleek, high-gloss finish to any room. Concrete overlays provide a fresh look for existing concrete surfaces without the need for complete replacement, making them a cost-effective option for renovations. Choosing the Right Concrete for Your Project Selecting the appropriate concrete for your endeavor requires a thorough assessment of your project's unique demands, whether it's for construction or renovation. This entails evaluating the visual goals you aim to achieve, the structural requirements essential for stability and safety, and the adaptability of the materials to the specific climate conditions in your area. Additionally, financial considerations are pivotal in this selection process. The cost implications of various concrete types and their associated finishing methods can significantly influence your final decision. Engaging a Perth concreter, such as Project Concrete, ensures expert guidance in navigating these considerations, guaranteeing that your choice aligns with both your aesthetic preferences and budgetary constraints. Maintenance and Care for Concrete Surfaces Maintaining concrete surfaces is straightforward, involving routine sealing to protect against moisture and stains, regular cleaning to preserve appearance, and prompt repair of any cracks or wear to prevent further damage. Such care ensures the longevity and beauty of concrete installations, contributing to the overall value of your home. Disadvantages Of Concrete For Home When building concrete slab foundations, constructors are aware of the reason why it needs to be freezed. Apart from the worry that the foundation might crack, there is also concern about cost savings. One  thing that you might not have to worry about at all is when you use concrete for your home, it is quite safe. There is no problem when it comes to the base of the house and how it might decrease the risk of damage with regards to the instances of buying or building a home with concrete. There are several benefits which we have already mentioned, however, there are some drawbacks as well. You need to go through the disadvantages of using concrete so that you can consider all pros and cons. This will help you in understanding the need for concrete or should you choose another option when building a home. Read about the drawbacks that are described below in detail. You can decide on your own regarding making the choice of whether or not you would like to choose concrete as your choice for the house site! Labor Not everyone knows how to use concrete and accordingly, they know how to implement the concrete and tools that will help in building concrete structures. It is quite common to understand that you will need to learn about how concrete works and efficiently work on looking for laborers. These laborers must know how to use concrete and the tools or else it might be difficult especially when the process is expensive! Cost Using concrete is one of the most expensive ways of building a house! There is labor, material costs, transportation costs and market competition. When evaluating the conditions based on which you are building a house, there can be serious concerns regarding the expenses of a traditional home. Several factors influence the way your house is built! I agree that there are long term benefits to the use of concrete however, it can significantly impact your costing and budgeting when building a house. Pests With concrete becoming the foundation of your house, there can be a chance that there can be pests such as roaches and termites. Considering the house is closer to the ground, the insects and pests can easily enter through the walls accessing the infrastructure of the house. It will severely impact the woods across the house along with concerns if you sit on the ground! Heating And Cooling If there is a unit for air-conditioning or there is a furnace installed, there is a high chance that it will affect the concrete. These devices when installed in the ground floor will take up room directly impacting your purpose. Slab Cracks One of the most potential concerns when using concrete is that there can be cracks in the concrete! Now that we have already discussed about it being costly, it can be expensive to repair the house especially when there are cracks. It will look bad! Do you wonder how these cracks have developed? Earthquakes, frozen ground or tree roots are common concerns due to which the cracks in the concrete appear. Conclusion In conclusion, concrete offers a versatile, durable, and aesthetically pleasing solution for home construction and renovation projects. By understanding the different types of concrete, their benefits, and the innovative techniques available, homeowners can make informed decisions that meet their structural and design needs. Whether laying a new foundation, upgrading a patio, or seeking durable and stylish flooring options, the right concreting solutions can significantly enhance the livability and appeal of your home, ensuring it stands the test of time. Learn More About: 10 Points To Remember If You Are Building A Residential House Home Decoration At Its Best: 7 Key Ideas To Recreate Your Home Making Your Home Strong From Within: Tips To Build A Sturdy House

READ MOREDetails
Water Filter Pitcher

The 5 Best Brita Alternatives For Water Filter Pitchers

A water filter pitcher is something everyone should have in their home. It’s one of the simplest ways to guarantee that the water you’re drinking is clean, safe, and deliciously chilled. Unfortunately, getting a great water filter pitcher isn’t as easy as you might think. Popular brands like Brita do a great job of filtering out substances like chlorine thanks to their activated carbon filters; however, they’re far from comprehensive. The fact is, mass-produced, store-bought water filtration systems are a far cry from true filtration options. They’re limited by their simple filter media and only work when it comes to high-turbidity contamination—lots of suspended solids. These filters do almost nothing to neutralize VOCs or microbiological threats. If you’re on the lookout for a water filter pitcher, you can do better than Brita. Here are a few of the best Brita alternatives for water filter pitchers and why they’re worth the investment. 1. Aquaspace® Carafe® Pitchers You might not even need to finish this list, because we’ve put the very best Brita alternative front and center, right at the top. There’s simply no beating the performance of Aquaspace® Carafe® Pitchers! Not only are there options for specific filtration such as fluoride, but there are also alkaline options for those who prefer the benefits of water with a slightly higher pH. The specifications of these filters are second-to-none when it comes to filtration capabilities. First, there’s an amazing 500-gallon capacity on Aquaspace® filters—as opposed to a meager 40 gallons on most Brita systems. On top of this, there’s filtration power to consider. The Aquaspace® filter goes above and beyond any activated carbon filter, to deliver comprehensive filtration that spans both organic and inorganic compounds. Need more proof that Aquaspace® comes out on top? Look at the pour-through funnel to the filter media, which ensures powerful filtration, instead of pass-through sieve filtration. If you’re going to spend the money on a water filter pitcher, there are few better options than Aquaspace®. 2. Pūr Classic 11-Cup Pitcher One of the competitors to Brita that you’re likely to find in stores is Pūr. This brand is mass produced, but its filter media is a step above others on the market. It doesn’t just rely on activated carbon media; its MAXION® filter technology also addresses pharmaceuticals and industrial pollutants to provide a more encompassing level of cleanliness to water. Like other store-bought filters, Pūr has some bells and whistles that make it worth looking at—including the LED filter indicator. While the filter lifespan is only a meager 40 gallons, an LED reminder will let you know when it’s time to swap in new media. Moreover, the filters themselves are relatively inexpensive. One of the best things about this water filter pitcher is its convenience. It has a relatively low cost of ownership and is easy to fill, pour and clean. It’s also BPA-free. If you’re shopping in-store, it’s hard to do better than Pūr. 3. Travel Berkey Gravity-Fed Water Filter If price isn’t an option, the Travel Berkey Water Filter is worth a look. We’re not kidding when we say it’s pricey, though—you’re looking at a $250 purchase price and $120 replacement filters. If you’re reading this aghast, take a moment to consider the benefits. First off, the Travel Berkey Water Filter and its filtration media will cleanse up to 6,000 gallons before you need to replace the filters. This is enough to justify the cost of the filters themselves. As for the cost of the unit, it’s probably the most well-made on this list and features stainless steel that’ll last you a lifetime. The system itself is also a gravity-fed setup, which means you can expect superb filtration and extremely clean drinking water. Outfitted with the right filters, it’ll eliminate just about any contaminants in your water, including arsenic. The downfall of this system? Well, it’s not exactly a pitcher and you can’t keep it in the fridge. It’s meant as a countertop option that holds 1.5 gallons, which makes it equally as convenient. 4. ZeroWater 6-Cup Pitcher If you live in an area with heavy lead content in the water supply, this pitcher is an upgrade over Brita filters. While it only boasts a 6-cup capacity, the filtration power of the ZeroWater filter pitcher is well-worth the extremely affordable $20 price tag. Thanks to its five-stage filtration capabilities, this pitcher does what only activated carbon filters can’t. Aside from the usual hard water culprits, this system also filters out compounds like fluoride, nitrates and other inorganics. This, in conjunction with its ability to filter out most unwanted organic compounds like arsenic and mercury. It’s one of the best filtration systems for the cost. The unfortunate aspect of the ZeroWater filter pitcher is its 20-gallon filter lifespan. If you’re relying on it frequently, you could end up spending a fortune in filter replacement costs. This is an option best left for those who also have some point-of-use filtration system. 5. Clearly Filtered 10-Cup Pitcher While its claim of being “the most powerful water pitcher on the market,” might be a little dubious, the Clearly Filtered pitcher is certainly a leader in its class. Sure, you’re going to spend more than the off-the-shelf filters on this list, but you’ll also get better performance. First, you’ll love the 100-gallon filter capacity on this model. This, in combination with its powerful filtration capabilities, makes it a great everyday option. Its 10-cup capacity means you’ll need to replace the filter roughly every 10 times you refill it. When it comes to filtration quality, expect this system to remove more than 230 unwanted organics and inorganics, including fluoride, lead, plastics, hormones, and more. It’s a truly encompassing filtration option. The only real downfall of this pitcher is that it’s a bit bulky and can be difficult to fit into a small fridge. Replacement filters aren’t cheap, either ($50), but they do offer good value thanks to their longevity. Pay Attention to Pitcher Performance When selecting a water filter pitcher, the best way to understand what you’re getting for your money is to look at the specifications of the product. What type of filter media does it use? How quickly does it filter? What’s the filter lifespan? These factors all matter when it comes to the clarity and safety of your water. At the end of the day, a water filter pitcher is all about convenience—and health. When you pull that pitcher out of the fridge and pour yourself a refreshing glass of crisp, cool water, you should be able to enjoy every sip. It starts by having confidence in the filter pitcher you’ve chosen. Looking for the best water filter pitcher available on the market? Look to Aquaspace for all your filtration needs! Read Also: How Many Jobs Are Available In Real Estate Investment Trusts? 2021 0123Putlockers And Servers – Watch Movies Online

READ MOREDetails
how to harvest asparagus-

Asparagus 101: When, How, And How Often To Harvest?

If you are a gardener like me, you must have thought about harvesting greens that you eat at restaurants at your house. One of these days, I was with my friends from my university, and we were discussing the importance of eating veggies for staying healthy. And they could not figure out the best ways to effectively do so. Reading my previous blog about cilantro, Laila asked me, “how to grow and harvest asparagus?” Well, surely asparagus is one of the most delicious and nutritious vegetables you can grow in your garden. But what a lot of people do not know is that it's also one of the easiest once you know how to harvest asparagus properly. In this article, I will cover everything you need to know about harvesting asparagus, from when to start, how to cut, and how often to do it. Additionally, I will also share some tips on how to store and freeze asparagus, as well as the benefits of eating this green wonder. So, keep on reading till the end to learn more...  How Does Asparagus Grow? Before I dive into the seemingly difficult process of how to harvest asparagus, let me help you grow it.  Asparagus is a perennial plant that grows from a crown of roots that can live for up to 20 years. The crown produces spears, which are the edible part of the plant, every spring. The spears grow rapidly, sometimes up to an inch per day, and can reach a height of 6 to 10 inches. The spears are harvested before they open into fern-like leaves, which are edible and tough. Asparagus grows best in well-drained, sandy soil with a pH of 6.5 to 7.5. It prefers full sun and moderate temperatures and needs regular watering and fertilizing. Asparagus can be grown from seeds or crowns, but crowns are easier and faster to establish. Crowns are planted in trenches about 12 to 18 inches apart and covered with 2 to 3 inches of soil. As the spears emerge, more soil is added until the trench is filled Benefits of Asparagus  https://giphy.com/gifs/food-asparagus-taylor-lee-nicholson-pejh5q5BBXxi2m4PgF Asparagus is not only tasty, but also healthy. It's low in calories and high in fiber, vitamins, minerals, and antioxidants just like spinach. It can help lower blood pressure, regulate blood sugar, support digestion, and prevent urinary tract infections. Asparagus also contains a compound called asparagine, which is a natural diuretic that helps flush out excess fluids and salts from the body. Asparagus is also a good source of folate, which is essential for pregnant women and fetal development When to Harvest Asparagus? The first year after planting, you should not harvest any asparagus spears, as they need to grow and strengthen the root system. The second year, you can harvest a few spears for a short period, about two to three weeks. The third year and beyond, you can harvest asparagus for a longer period, up to eight weeks, depending on the climate and the health of the plants. The best time to harvest asparagus is in the early morning when the spears are crisp and tender. You should harvest asparagus when the spears are about 6 to 10 inches tall, and before the tips start to open up. If you wait too long, the spears will become woody and bitter. How to Plant and Care for Asparagus? Asparagus is a long-term investment that can reward you with years of delicious harvests. However, it requires some planning and preparation before planting.   Here are some steps to follow to plant and care for asparagus:  Choose the Day  Choose a sunny and well-drained spot in your garden, preferably with sandy or loamy soil. Avoid areas where water tends to pool or where weeds are hard to control. Asparagus also needs plenty of space, so make sure you have at least 4 to 5 feet between rows and 12 to 18 inches between plants. Prepare the Soil  Prepare the soil by adding organic matter, such as compost or manure, and adjusting the pH to 6.5 to 7.5. You can use a soil test kit to check the pH and nutrient levels of your soil. You may also need to add some fertilizer, such as 10-10-10 or 10-20-10, to boost the phosphorus and potassium content. Dig it Deep Dig a trench about 8 to 12 inches deep and 12 to 18 inches wide. You can make the trench longer or shorter depending on how many asparagus crowns you have. Asparagus crowns are the dormant roots of the plant that you can buy from nurseries or online. They usually have one-year-old or two-year-old crowns, which are more reliable and productive than seeds. Fertilize Spread some fertilizer along the bottom of the trench, about 2 pounds per 100 square feet. Then, cover the fertilizer with 2 to 3 inches of soil, forming a ridge in the center of the trench. Placing the Plant Place the asparagus crowns on top of the ridge, about 12 to 18 inches apart, with the buds facing up. The crowns should be slightly below the soil surface, about 1 to 2 inches deep. Do not bury them too deep, as this will delay the emergence of the spears. Focus on the Crown Cover the crowns with another 2 to 3 inches of soil, and water well. As the spears grow, gradually fill in the trench with more soil, until it is level with the ground. This will help protect the crowns from frost and weeds. Add Mulch  Mulch the bed with straw, leaves, or wood chips, to conserve moisture and prevent weeds. You can also add some organic fertilizer, such as fish emulsion or seaweed extract, every few weeks during the growing season, to encourage healthy growth. Keep in Mind Do not harvest any asparagus spears in the first year, as they need to establish a strong root system. In the second year, you can harvest a few spears for a short period, about two to three weeks. In the third year and beyond, you can harvest asparagus for a longer period, up to eight weeks, depending on the climate and the health of the plants. How to Harvest Asparagus? Now, coming to the most important part that you wanted to know about. Let us talk about the ways to harvest asparagus! To harvest asparagus, you need a sharp knife or a pair of scissors. You should cut the spears at the base, about an inch below the soil surface. Be careful not to damage the crown or the emerging spears. You should also avoid cutting too many spears from one plant, as this will weaken the plant and reduce the yield. A good rule of thumb is to leave at least one-third of the spears on each plant. You should harvest asparagus every day or every other day, depending on how fast the spears grow. You should stop harvesting asparagus when the spears become thinner than a pencil, as this indicates that the plant is running out of energy. You should then let the spears grow into ferns, which will replenish the crown and prepare it for the next season. How to Store and Freeze Asparagus? Unlike lettuce, which you can store for more than a week, asparagus is best eaten fresh, as it loses its flavor and texture quickly. If you can't eat it right away, you should store it in the refrigerator for up to a week. To keep it fresh, you should trim the ends of the spears and stand them upright in a glass of water or wrap them in a damp paper towel and put them in a plastic bag. If you want to preserve asparagus for longer, you can freeze it. To freeze asparagus, you should first wash and trim the spears, and then blanch them in boiling water for two to three minutes, depending on the thickness.  Blanching is a process of briefly cooking and cooling the vegetables to stop the enzyme activity that causes them to spoil.  After blanching, you should drain and cool the spears, and then pack them in freezer bags or containers, leaving some space for expansion. You can freeze asparagus for up to a year, and use it in soups, casseroles, or stir-fries. How to Prevent and Treat Asparagus Pests and Diseases?  Asparagus is generally a hardy and resilient plant, but it can still suffer from some pests and diseases that can affect its growth and quality. Here are some of the most common problems that affect asparagus plants, and how to prevent or treat them: Asparagus beetles These are small, black or red beetles that feed on the spears and the ferns, causing them to wilt and turn brown. They can also lay eggs on the spears, which hatch into larvae that chew on the stems and leaves. To prevent asparagus beetles, you should keep the area around the plants clean and weed-free, and remove any old or damaged spears. To treat asparagus beetles, you can hand-pick them and their eggs, or spray them with insecticidal soap or neem oil. Fusarium wilt This is a fungal disease that infects the roots and the crowns of the plants, causing them to rot and die. It can also cause the spears to become yellow, twisted, and stunted. Fusarium wilt is more likely to occur in poorly drained, acidic, or infested soil.   To prevent fusarium wilt, you should plant disease-resistant varieties, rotate crops, and avoid overwatering or injuring the plants. To treat fusarium wilt, you should remove and destroy any infected plants, and apply fungicides to the soil. Rust This is another fungal disease that affects the ferns, causing them to develop orange or brown spots and pustules. Rust can reduce the vigor and yield of the plants, and make them more susceptible to other diseases. Rust is more likely to occur in humid, wet, or shady conditions.   To prevent rust, you should plant resistant varieties, space the plants well, and prune any excess or infected ferns. To treat rust, you should apply fungicides to the ferns, and avoid watering them from above. Crown rot This is a bacterial disease that causes the crowns and the bases of the spears to become soft, mushy, and foul-smelling. Crown rot can spread quickly and kill the plants. Crown rot is more likely to occur in wet, compacted, or poorly drained soil. To prevent crown rot, you should plant healthy crowns, improve the drainage and aeration of the soil, and avoid overwatering or injuring the plants. To treat crown rot, you should remove and destroy any infected plants, and disinfect the tools and the soil. Bonus: How to Cook and Enjoy Asparagus?  There are many ways to cook and enjoy asparagus, from steaming, boiling, roasting, grilling, to sautéing. The key is not to overcook it, as it will become mushy and lose its flavor. You should cook asparagus until it is bright green and crisp-tender, which usually takes about 5 to 10 minutes, depending on the method and the thickness of the spears. You can season asparagus with salt, pepper, butter, lemon juice, garlic, herbs, cheese, or any other condiments you like. You can also pair asparagus with eggs, bacon, ham, chicken, fish, pasta, rice, or salad. Asparagus is a versatile and delicious vegetable that can complement any meal. Wrapping It Up! Asparagus is a wonderful vegetable that you can grow and harvest in your own garden. It's easy to care for, once you know how to harvest asparagus properly. You should harvest asparagus when the spears are about 6 to 10 inches tall and before the tips start to open up. You should cut the spears at the base and leave some on the plant to grow into ferns. It would be best to store asparagus in the refrigerator for later use. And yes, you should also enjoy the many benefits and flavors of asparagus, by cooking it in various ways and pairing it with different dishes. Asparagus is a springtime delight that you don't want to miss. Learn More About: Planting & Harvesting Mint 7 Health Benefits of Black Seed Oil Spirulina: The Complete Plant Based Protein Source | Health Benefits

READ MOREDetails