10 Best Trailing Indoor Plants To Buy In 2022

Published on: 10 March 2022 Last Updated on: 17 March 2022
Trailing Indoor Plants

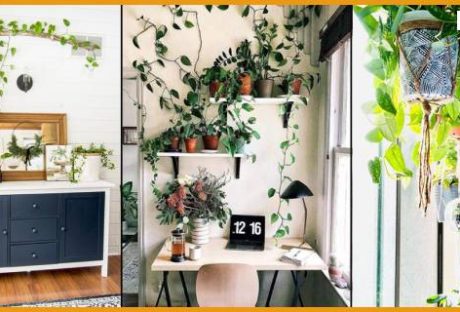
Your dream house needs some ornaments and decorations to stand out as the queen of all houses in your neighborhood. With trailing indoor plants, you can add the green your beautiful home was missing all this time.

For the urban dwellers, it is almost impossible to live inside the greenery. But, using indoor trailing plants, you can bring the green into your house.

Indoor plants are the lively jewelry of your home decoration, and it is no secret. It is only with the green plants that the brick walls and your house’s concrete get the touch of life.

Hanging a few vines here and there from the pots can add the touch of the goddess of green vines to your home.

You can keep a trail of the indoor plants on the railing of the staircase. You can hang some of them from the porch ceiling of your house. Maybe you can keep one or two containing some low-light plants for the interior?

As you start to live with the green, you add extra life and vivacity to your life. So now, if I have got you even a little bit interested in the indoor trailing plants, allow me to introduce you to the best trailing indoor plants that you can decorate your house with.

10 Best Trailing Indoor Plants

You can invite the wild indoors with these incredibly pretty green trailing indoor plants mentioned in this article.

1. Trailing Indoor Plants: Golden Pothos

Trailing Indoor Plants Golden Pothos

Golden pothos is just as beautiful as healthy for your surrounding environment. Not only can they thrive in the low light, but they also keep the air around you pure and refreshed.

They help eliminate odors and cleanse the air within your home with formaldehyde, benzene, and carbon monoxide.

If you have to stare at the computer screen all day long, you can look at them to reduce the irritation.

As for decorating the interior, it is one of the most beautiful trailing indoor plants that you can hang from the ceiling of your room or the balcony.

Read More: Grow these flowering plants in your home garden

2. Trailing Indoor Plants: Satin Pothos
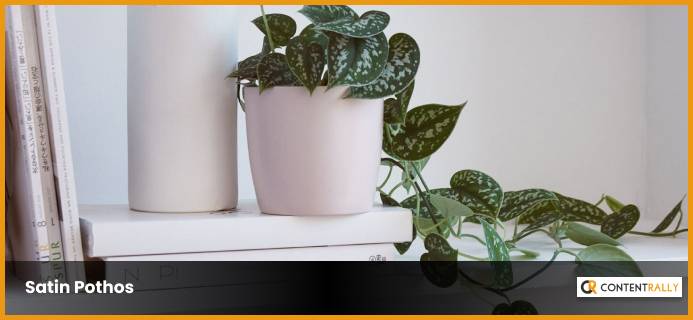
Trailing Indoor Plants Satin Pothos

Scindapsus pictusExotica’ or satin pothos is another vine you can keep within your home. It grows slowly, and the beautiful green leaves are splashed with silver color.

This plant takes only a little water to grow within low light. When 2 cm of the compost goes dry, you can water them. Even NASA recommends these plants for the refinement of indoor air.

The satin pothos are easy to propagate, and they are low maintenance. Many people keep them as good luck charms. If you have a flower vase with a stand in the drawing-room, you can place one of these plants there.

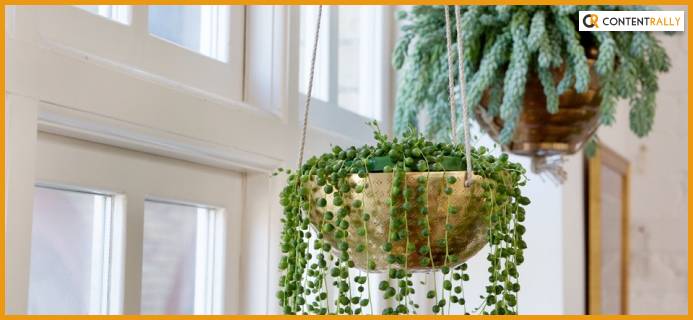
3. Trailing Indoor Plants: String Of Pearls

Trailing Indoor Plants String Of Pearls

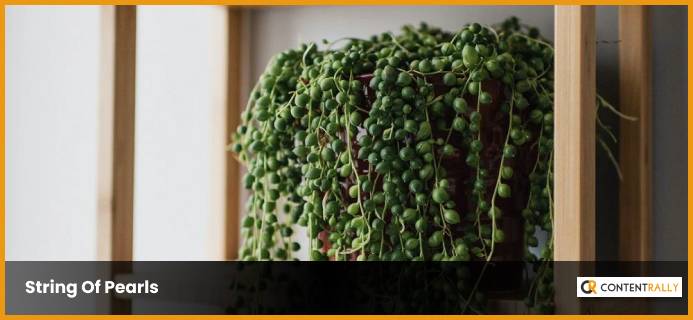
One of my favorites, Senecio Rowleyanus, or String of pearls, is another pretty member that you can add to your drawing room. The skinny stems of this plant grow green bubbles as if they are green pearls.

During winter, tiny white flowers grow out of the String of pearls plants. These are cascading plants, and they can be the attraction of your home decor.

It is a pretty trailing indoor plant that grows in low light and dry air. I will suggest you make a trail of these indoor green pearls. You can hang them from baskets or use a shelf to arrange a trail of baskets containing the String of pearls.

4. Trailing Indoor Plants: Burro’s Trail

Trailing Indoor Plants Burro's Trail

You can easily grow, propagate, and maintain the Burro’s trails. However, if you are worried about your children and pets, then allow me to assure you that these trailing indoor plants pose no harm to them.

They are nonpoisonous plants and are easy to grow and maintain. You can lay them on top of a pot full of compost and grow them quickly within a few days’ notice. The plant also requires minimal watering. You can water them when the 2 cm of the compost is dry.

You can decorate the interior with a few small baskets of the Burro’s tail hanging from the ceiling. Or, you can also keep them on top of the tables in the dining room.

You May Like To Read: 4 Essential Tools Needed to Maintain Your Garden in the Winter

5. Trailing Indoor Plants: Red Herringbone Plant

Trailing Indoor Plants Red Herringbone Plant

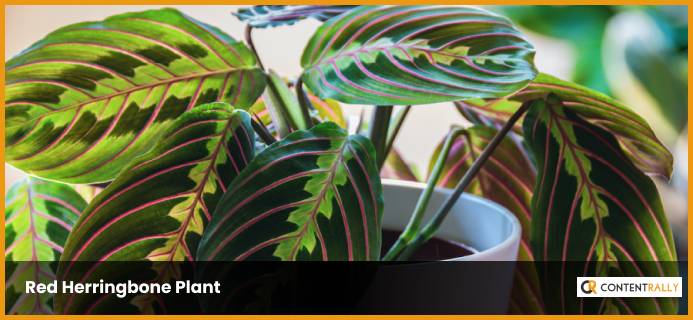
Maranta leuconeura, Red herringbone plant, also known as the prayer plant, is another beauty to decorate your interior.

The attractive patterns of this plant will amaze you both during the day and at night. Growing this plant may take a little experience. They require only a little water, but you need to water these plants when the pot is dry.

The prayer plant is one of the most common trailing indoor plants, which you can place on the table.

6. Trailing Indoor Plants: String Of Hearts

Trailing Indoor Plants String Of Hearts

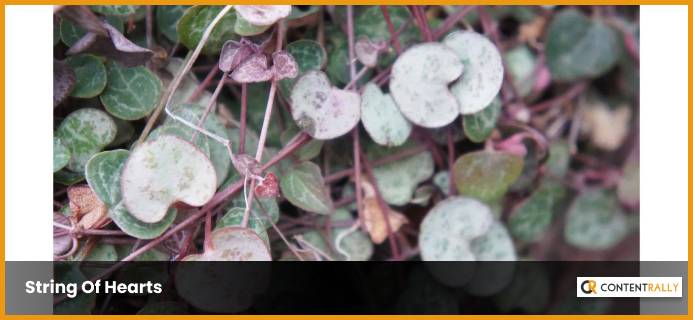
Also known as the Chain of hearts, sweet vines, rosary vines, String of hearts is another pretty indoor trailing plant. These are easy to grow and propagate.

They have tiny leaves with pink and purple shades, making your interior look prettier as they grow and thrive across your balcony. In addition, they create the best contrastive combination with a white wall or ceiling.

If you are a beginner and not much of a career giver, the String of hearts will bear with you. This plant grows within low light and requires minimum water.

7. Trailing Indoor Plants: Boston Fern

Trailing Indoor Plants Boston Fern

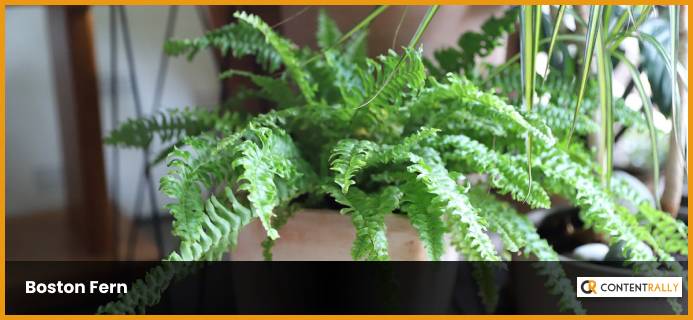
Do you want to keep a vase full of green and lively ferns on the tea table? If your need is something similar, you can consider giving the Boston ferns someplace within your house.

You can hang them from the ceiling or shelves. But unlike the other plants here, they are attention seekers. They need your daily care; from ample lights, humidity and regular watering are a must.

Do you have space beside your window? If you do, you can put them there. They shed dead leaves, so you also need to groom them occasionally. They are also excellent givers. And they keep the interior air fresh and maintain the moisture within the house.

8. Trailing Indoor Plants: Chain Of Cactus

Trailing Indoor Plants Chain Of Cactus

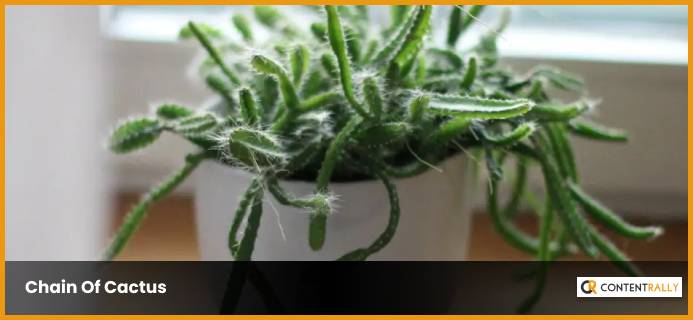
Rhipsalis paradoxa minor, or the Chain of cactus, grows pretty-looking white flowers during the spring. However, the winter stimulates the growth of these pretty flowers. These trailing interior plants are rich in antioxidants and vitamin C.

These are best for big hanging pots. You can keep a wide vase full of the Chain of cactus and let them grow wildly. They require minimum water and light, although you need to be a little experienced to grow them properly.

You May Also Like This: Best Material for Garden Sheds: A Guide for Everyone

9. Trailing Indoor Plants: Grape Ivy

Trailing Indoor Plants Grape Ivy

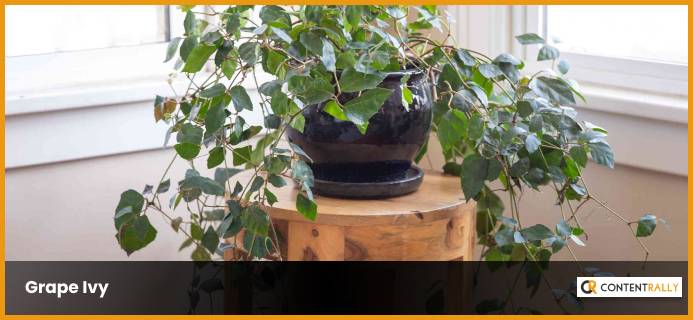
These trailing indoor plants are pretty underrated. The grape ivy is a good air purifier; they require moderate or low light to thrive within your interior. They also have antioxidant and anti-inflammatory benefits.

You can hang one or two baskets of the grape ivy inside and be amazed as they keep shining while getting older.

10. Trailing Indoor Plants: Maidenhair Fern

Trailing Indoor Plants Maidenhair Fern

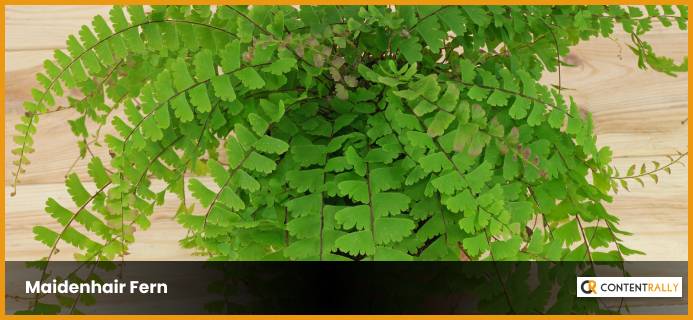
The cousin of the Boston ferns, not too distant from its relative, the maidenhair ferns take after the qualities of the Boston ferns. They also require lots of care, ample light, and regular watering.

They indeed maintain the various hues of greenkeeping a dazzling look within the interior of your house.

These trailing indoor plants possess anti-thyroidal, anti-diabetic, antifungal, wound healing, and anti-hair loss properties. So not only are they pretty, but they are quite beneficial for your health as well.

Let The Trailing Indoor Plants Decorate Your Home

Most of these plants only take a little care and light to grow healthy within the interior of your house. You can go from little pots of green plants to large vases full of them to decorate your interior wildly. These plants have some health benefits like refreshing the interior air or cleansing it. They are also good at keeping the air humid.

If you are looking for such plants, I suggest you choose from any of these vines, pothos, cactuses, and ferns. Also, if you think that we have missed out on any valuable plant, you can let us know through the comment.

Read Also:

  1. Garden Edging for Beginners
  2. How To Arrive At The Perfect Choice Of A Potting Bench For Your Gardening
  3. How To Install Artificial Grass In Your Garden – Installation Guide Step By Step

Shahnawaz is a passionate and professional Content writer. He loves to read, write, draw and share his knowledge in different niches like Technology, Cryptocurrency, Travel,Social Media, Social Media Marketing, and Healthcare.

View all posts

Leave a Reply

Your email address will not be published. Required fields are marked *

Related

how to harvest basil

Everything You Need To Know About Harvesting Basil!

Basil is one of the most popular and versatile herbs you can grow in your garden or indoors. It has a fresh and aromatic flavor that can enhance any dish, from salads and soups to pizzas and pastas. Basil is also rich in vitamins, minerals, and antioxidants just like cilantro. It can benefit your health and well-being. But how do you harvest basil properly so that it keeps growing and producing more leaves?   If these are some of the things you want to know, I have you covered! In this article, I will answer all these questions and more and give you everything you need to know about harvesting basil! So, keep on reading this blog till the end to learn more…  How to Harvest Basil Leaves? The first thing you need to know about harvesting basil is when to do it. The best time to harvest basil leaves is in the morning when the plant is still fresh and moist. Avoid harvesting basil in the afternoon or evening when the plant is dry and wilted. Also, avoid harvesting basil when it is raining or wet, as this can cause the leaves to rot or mold. Steps to Harvest Basil Leaves To harvest basil leaves, you will need a pair of scissors or a sharp knife and a basket or a bowl to collect the leaves. You can also use your fingers to pinch off the leaves, but be careful not to damage the stem or the plant. Here are the steps to follow: Start from the top of the plant, and look for the stems with leaf clusters. These are called the terminal buds, and they are where the basil flowers will grow. You want to remove these buds, as they will make the plant stop producing new leaves and focus on flowering and seeding. This will reduce the flavor and quality of the basil leaves. Cut or pinch off the stem just below the terminal bud, leaving about a quarter of an inch of stem above the next pair of leaves. This will encourage the plant to grow two new stems from the leaf nodes and produce more leaves. You can also cut or pinch off any other stems that are too long or leggy and leave about four to six pairs of leaves on each stem. Repeat this process for all the stems that have terminal buds, and collect the leaves in your basket or bowl. You can also harvest some of the lower leaves but leave enough leaves on the plant to allow it to photosynthesize and grow. You should not harvest more than a third of the plant at a time, as this can stress the plant and reduce its growth and health. After harvesting, rinse the leaves with water and pat them dry with a paper towel. You can use them fresh or store them for later use. How to Harvest Basil So It Keeps Growing One of the benefits of harvesting basil is that it stimulates the plant to grow more leaves and branches and prevents it from flowering and seeding. However, you need to harvest basil regularly and correctly, so that it keeps growing and producing more leaves. Here are some tips to follow. For instance, you must harvest basil: At least once every two weeks, or more often if you see the terminal buds forming. This will keep the plant bushy and compact and prevent it from becoming woody and bitter. From different parts of the plant, and not always from the same spot. This will ensure that the plant grows evenly and does not become lopsided or uneven. Before it flowers. This is because the flowers will reduce the flavor and quality of the leaves. If you see any flowers forming, remove them as soon as possible. You can also pinch off the flowers and use them as edible garnishes or decorations, as they have a mild and sweet flavor. Before the frost, as the cold weather will kill the plant. You can either harvest the whole plant and store it for later use, or bring it indoors and keep it in a sunny and warm spot. You can also propagate the plant by taking cuttings and rooting them in water or soil and grow new plants for the next season. How to Harvest Basil Without Killing The Plant? Harvesting basil is different from harvesting lettuce or other plants. The process is good for the plant and you, as you can enjoy the fresh and aromatic leaves in your dishes. However, you need to be careful not to harvest too much or too often, as this can harm and kill the plant. Here are some dos and don'ts of harvesting basil without killing it: Do harvest basil from the top of the plant, not the bottom or the middle. This will allow the plant to grow stems and leaves from the lower nodes and maintain its shape and structure. Don't harvest basil from the main stem or cut it too close to the ground. This will damage the plant and prevent it from growing new stems and leaves. Leave at least four to six pairs of leaves on each stem and about an inch of stem above the ground. Do harvest basil gently and carefully, and not roughly or forcefully. This will avoid injuring the plant and exposing it to diseases or pests. Use a sharp and clean tool, such as scissors or a knife, and make clean and smooth cuts. You can also use your fingers to pinch off the leaves but be gentle and precise. Don't harvest basil when it is stressed or unhealthy, such as when it is wilting, yellowing, or diseased. This will weaken the plant and make it more susceptible to further damage. Wait until the plant recovers and looks healthy and green before harvesting. You can also water and fertilize the plant to help it grow and thrive. Do harvest basil when it is young and tender, not old and tough. This will ensure the leaves are fresh, flavorful, and not bitter or woody. Harvest basil when the leaves are about two to three inches long before they curl or turn brown. How to Pick Basil Leaves? Picking basil leaves is another way to harvest and use the leaves in your dishes. You can pick basil leaves with your fingers or with a pair of tweezers, depending on your preference and convenience. Here are some tips on how to pick basil leaves. For instance, you can pick it: From the top of the plant, not the bottom or the middle. This will allow the plant to grow stems and leaves from the lower nodes and maintain its shape and structure. From the stems that have terminal buds, not from those that have none. This will prevent the plant from flowering and seeding and producing more leaves. You can also pick some of the lower leaves but leave enough leaves on the plant to allow it to photosynthesize and grow. Gently and carefully, and not roughly or forcefully. This will avoid injuring the plant and exposing it to diseases or pests. Use your fingers to pinch off the leaves or a pair of tweezers to pluck them off. Be gentle and precise, and do not pull or tug on the leaves or the stems. When they are young and tender and not when they are old and tough, this will ensure the leaves are fresh, flavorful, and not bitter or woody. Pick basil when the leaves are about two to three inches long before they curl or turn brown. How to Store Basil Leaves? Storing basil leaves is a great way to preserve and enjoy them for later use. You can store basil leaves in different ways, depending on how long you want to keep them and how you want to use them. Here are some of the best ways to store basil leaves: Refrigerate Them You can refrigerate basil leaves for up to a week, by wrapping them in a damp paper towel and placing them in a resealable plastic bag or an airtight container. This will keep them moist and fresh, and prevent them from wilting or drying out. However, you should not wash them. Freeze Them You can freeze basil leaves for up to six months, by blanching them in boiling water for a few seconds, and then plunging them in ice water to stop the cooking process. This will preserve their color and flavor, and prevent them from browning or oxidizing. Then, pat them dry with a paper towel, and place them in a resealable plastic bag or an airtight container. You can also chop them and mix them with some olive oil, and freeze them in ice cube trays. This will make it easier to use them in soups, sauces, or dressings. Dry Them You can dry basil leaves for up to a year, by hanging them upside down in a warm and dry place, such as a closet or a pantry. This will dehydrate them and concentrate their flavor, and make them last longer. However, you should avoid drying them in direct sunlight, as this can bleach them and reduce their quality. You can also dry them in an oven or a microwave, but be careful not to burn them or overcook them. Once they are dry, you can store them in a glass jar or a spice container, and crush them or grind them before using them. Make Pesto You can make pesto with basil leaves, by blending them with some garlic, pine nuts, parmesan cheese, and olive oil. This will create a delicious and versatile sauce that you can use for pasta, sandwiches, salads, or dips. You can store pesto in the refrigerator for up to a week, or in the freezer for up to six months. You can also customize pesto by adding other herbs, nuts, cheeses, or spices, according to your taste and preference. How to Cut Basil? Cutting basil is a simple and easy way to harvest and use the leaves in your dishes. You can cut basil with scissors, a knife, or your fingers, depending on your preference and convenience. Here are some tips on how to cut basil: Wash and dry the basil leaves before cutting them to remove any dirt or insects. You can rinse them under running water or soak them in a water bowl with a few drops of vinegar. Then, pat them dry with a paper towel or spin them in a salad spinner. Cut the basil leaves just before using them, to preserve their flavor and aroma. If you cut them too early, they will lose their freshness and wilt. You can also bruise or damage the leaves if you cut them too roughly or with a dull tool. Cut the basil leaves according to the size and shape that you need for your recipe. You can either leave them whole or chop them finely or coarsely. You can also cut them into ribbons or strips, by stacking several leaves together, rolling them up, and slicing them thinly. This is called the chiffonade technique, and it creates a beautiful and elegant garnish. Cut the basil leaves with a sharp and clean tool, such as scissors or a knife, and not with a blender or a food processor. This will avoid bruising or crushing the leaves and releasing their oils and juices. You can also use your fingers to tear or pinch off the leaves but be gentle and careful. How to Use Basil Leaves? Using basil leaves is a fun and easy way to add flavor and aroma to your dishes. You can use basil leaves in different ways, depending on your mood and occasion. Here are some of the best ways to use basil leaves: Fresh You can use fresh basil leaves to garnish and enhance your dishes, such as salads, soups, pizzas, and pastas. Also you can use fresh basil leaves to make salads, such as caprese salad with tomatoes, mozzarella cheese, and basil, or Greek salad with cucumbers, feta cheese, and basil. You can also use fresh basil leaves to make drinks, such as lemonade, tea, or cocktails, with basil, lemon, sugar, and water. Cooked You can use cooked basil leaves to flavor and season your dishes, such as sauces, stews, curries, and casseroles. Also you can use cooked basil leaves to make dishes, such as tomato sauce with basil, garlic, and onion, or chicken with basil, cream, and mushrooms. You can also use cooked basil leaves to make breads, such as focaccia with basil, olive oil, and salt, or muffins with basil, cheese, and eggs. Preserved You can use preserved basil leaves to store and enjoy them for later use, such as freezing, drying, or making pesto. Also you can use preserved basil leaves to make dishes, such as pesto pasta with basil, garlic, pine nuts, and parmesan cheese, or roasted vegetables with basil, olive oil, and salt. You can also use preserved basil leaves to make snacks, such as crackers with basil, cheese, and honey, or popcorn with basil, butter, and salt. Wrapping It Up! Basil is a wonderful herb that you can grow and harvest in your garden or indoors. It has a fresh and aromatic flavor that can enhance any dish, and a rich and nutritious profile that can benefit your health and well-being. By following the tips and tricks in this article, you can learn how to harvest basil properly, so that it keeps growing and producing more leaves, how to cut basil, pick basil leaves, and store them for later use, and how to use basil leaves in different and delicious ways. Read Also: Some Facts You Need to Know About Rainwater Harvesting Asparagus 101: When, How, And How Often To Harvest? Exploring Ideas For A Biophilic Home Design

READ MOREDetails
Moving Company

Great Tips for Picking the Right Moving Company

When the time comes to move, most people don’t really know where to start and how to pack and move methodically. The worst of all is that they don’t know what to look for when searching for a moving company. How to pick the right company to help you move? After all, it’s not like you do that every day. That is why we reached out to professionals at Move Central in San Diego. They share some of the points you should look into when choosing your moving company. Here are Great Tips for Picking the Right Moving Company: 1. Shop Around Some people are quite satisfied to call a single company, get a quote, and immediately accept the deal and go through with the move. Whereas that might save you some time, it may not be so beneficial for your wallet and your overall experience. Most experts will tell you that you should shop around. Ask at least 3 companies for a quote with the same parameters and see what each of them offers. Some may be more expensive, but include insurance or wait times as a bonus, whereas others might be cheap, but not offer any additional benefits outside the most basic transportation service. Once you have your quotes, compare them, determine what your priority is and go for the one which fits your needs the best. If you don’t see what’s out there, you may end up missing out on some perks. 2. Ask Around Americans tend to move a lot more and more easily than most other nations, including Canada. Whether it is job prospects, climate, or something else, you are much more likely to move upwards of 10 times over your lifetime. That gives you a pretty good advantage when it comes to picking a moving company. Chances are that you know people who moved recently. Ask your friends, family, or colleagues about their experiences with moving companies. Online reviews are a great resource, but they can only tell you a part of the story. With your friends and family, you can ask about details that may be omitted in an online review. 3. Insured and Licensed Is the Best Way to Move In order to ensure that your move goes without a hitch and problem, you should only hire reputable moving companies, rather than going for a Craigslist ad or something similar. The reason is simple – reputable moving companies are insured and licensed by The U.S. Department of Transportation Federal Motor Carrier Safety Administration. Whether you are moving out of state or just looking for a local move, it is easy to check if the company is licensed. A reputable company will certainly promote that and offer proof, but if you want to ensure, there is a website to check that manually. 4. Ask for Some Details If you have decided on a company that sounds reasonable to you, you can have them come over and give you a quote. This is an ideal opportunity to ask them for details and observe them working. If they don’t seem professional or aren’t sure of what they are doing, it is possible that they are not as skilled as their online ads suggest. Another big point to remember is that a reputable moving company will certainly have their own moving vans, and likely some uniforms for their workers. That may seem like a small thing, but if the company is serious about the business, they need to be willing to invest in the equipment – in the case of moving companies, it is a moving van, dollies, and similar loading and unloading equipment. Whatever company you end up hiring, have a great move, and enjoy your new home. Read Also: Factors To Consider While Preparing For A Move A List of Last-Minute Things You Should Check before You Move House

READ MOREDetails
modern dining room

5 Tips for Creating a Modern Dining Room

The dining room is more than just a space where meals are taken. It is the heart of the home and the one place that brings people together. As a space where families get to spend time and enjoy delicious meals, it is only right that homeowners would want it to be stylish and luxurious. The modern dining room comes in two types; the formal dining room is a separate area from the kitchen. On the other hand, open-plan dining where the kitchen connects to the living space. For the past years, the open plan dining has gained traction among homeowners, and the formal dining room is becoming more uncommon. Why? Because the large open plan is more practical and allows them to save space. Thus, the modern dining room concept has typically become the kitchen area that transitions into the living area. So how do you proceed with creating a modern dining room? Whether you are doing an extreme dining makeover or making a few tweaks to make your dining room, there are so many options to explore to give your space a modern tone. These tips will help you give your dining space a refreshing modern vibe. 1.Add a centerpiece When creating a modern dining room, it is essential also to decorate the dining table. A contemporary table centerpiece could spice up your dining room, giving it that modern look you are going for. Depending on your style, centerpieces go from a simple vase of flowers and candles to a decorative bowl with fruits. You can even customize one by DIYing decorations. Greenery centerpieces like succulents or snake plants would also do an excellent job bringing life into space. A bonus is they are low maintenance, and you won't have to deal with withered plants frequently. Mixing different statement-making materials with bold and neutral colors to decorate the room will give it a sophisticated look. Apart from elevating the dining room's overall appearance, a fantastic centerpiece will transform your dining into a classy space. 2.Integrate wooden furniture Wooden furniture has a lot to offer in the dining room. It's simple, and its natural attribute can bring style to the room. However, before you go in over your head with displaying cabinets and sideboards, start with the basics; dining table and chairs. However, you should consider adding a wooden dining table handcrafted to meet your preferred style and needs. There is a vast choice of wooden dining tables you can add to update your dining area. A large dining design would do a great job adding comfort. Team your dining table with classic chairs to give your dining space a whole new look. Anne Quin furniture offers to handcraft modern style dining tables at affordable rates. If you crave a luxurious dining set, you can learn more about Anne Quin furniture on their site. 3.Light it up One way to make a statement in your dining space is by adding a modern lighting fixture. Pendant lightings are on-trend, and most importantly, they work perfectly in the dining room. Always remember to choose a soothing light because you want people to be comfortable. The pro tip is the bigger you go, the better it is for the room's appeal. You can choose a single large hanging pendant or install a group to make a bolder statement in the room. There are many shops filled with affordable lighting fixtures, so you have free reign, one that marries well with the existing décor and finishes in the area. A beautiful lighting fixture will bring the room together and boost its visual appeal. 4.Add a banquette A modern dining space is about mixing different aspects: classic, elegant, and contemporary. Create a relaxed vibe in the room by adding a banquette near the dining table. A banquette is an ultimate steal when modernizing your dining space; homeowners get to enjoy a modern vibe while adding more storage space. It also offers a flexible seating option which is a bonus. You can top the banquette with colorful plush pillows to cheer up the area and add comfort. 5.A gallery wall Modern dining styles are about breaking the norm, and many homeowners are embracing going bold in their dining areas. To give the room a purposeful look, you can choose to add modern art or a couple of picture frames.   Since most modern furniture tends to be sleek and cold, a wall of art would create a warm look and maintain a contemporary tone at the same time.   A beautiful piece of contemporary art will bring in some color to finish the dining room. Family photos or botanical-inspired prints could add personality to your dining space. However, ensure you use matching frames to give the room a cohesive look.   Trust us; displaying them in your dining room would look twice as good as it would on your social media. How to Create a Cozy Dining for A Rented Apartment  Moved from your hometown for work?  Want to know how to create a cozy environment? Especially in the dining space? Here is how you can.  Moving to a new city for work is exciting. But first, you need an apartment.   Then, you’ll want to make that space feel like home — especially the dining area where you’ll gather for meals and memories. Here’s how to create great dining in a rented space.  Purchase a Compact Dining Set  In a rented apartment, the space is often limited! Yes, it is a nuisance, but we have to do the most   A small round-dining table with two comfortable chairs can make the space feel intimate, and it doesn’t take up that much space. You can choose it to your liking if you prefer modern, rustic or in between.  Think About your Lighting Options  Lighting is so important to help create a warm and inviting space. A great floor lamp or a simple set of string lights can add a nice glow to your dining area.   If you’re able to, I would love the idea of installing a pendant light above the table as well.  Use Rug To Define Space  Add some seasonal greenery or flowers. A geometric rug in neutral tones will ground a black dining room and contrast the heavy pattern of your living room.  Try to keep the rug color the same as your kitchen floor for a seamless blending. This also creates a focal point, which is where all the cooking and cleaning will go on.  Sometimes, less is more when it comes to a beautiful black dining room.  Add Personal Touches  Stop searching for the perfect inspiration from the latest AD. Just do what feels right to keep it cozy!  Make the space your own with personal decorations. A small gallery wall with your favorite photos, a vase of fresh flowers, or a few candles can add a homey feel to your dining area. These touches make the space uniquely yours, even in a rental.  Keep it Functional  Lastly, make sure your dining space works for you. When space is tight, use furniture that can serve double duty. For example, a bench with built-in storage or a table that you can fold & move out of the way when not needed.  There you have it – an inviting and cozy eating space in your apartment.   A place where you can enjoy meals, put your feet up, and recharge as you immerse yourself in your home sweet home.  Final Notes!  Even though the kitchen wins many people’s hearts, the dining area will always be a special place in the home. As seen above, the simplicity and minimalism that a modern dining design calls for taking.   Different forms. These are a slew of tips you can incorporate to give your dining area a modern feel.  Remember to go for designs that complement one another to give your room a seamless pattern. If you remember these things and find the right design combo, you should be good to go.   Have fun and happy redesigning!   Read Also: Ideas to Give Luxury Feel to Your Condo How to Make your Home Look Beautiful in the Upcoming Holidays 5 Tips For Designing a Tiny House How You Can Choose the Ideal Ceiling Light for Your Living Area

READ MOREDetails