Best Low Maintenance Plants To Buy In 2024

Published on: 24 March 2022 Last Updated on: 14 March 2024
low maintenance plants

I have always enjoyed gardening, spending time in nature, and a general affliction towards plants. However, once professional commitments started taking up too much time, I was left with ‘no time to stand and stare’. Whatever time I had left, most of it went behind work, and my plants started shriveling up. Do you relate?

If this sounds relatable, then keep reading to find out what I did to change things and give my plants the time they need. Well, for starters, I started investing more in low-maintenance plants. These plants can easily thrive well under low lights and can quickly bounce back in case of one or more missed watering. So soon, I was able to spot the change!

10 Best Low Maintenance Plants To Buy In 2024:

It was a discovery that I thankfully stumbled upon. It made things so much easier for the anthophilous inside me that I was motivated to write about it. If you are also planning to purchase a few low-maintenance plants, then scroll down to find out more on the same!

1. Cacti

Cacti

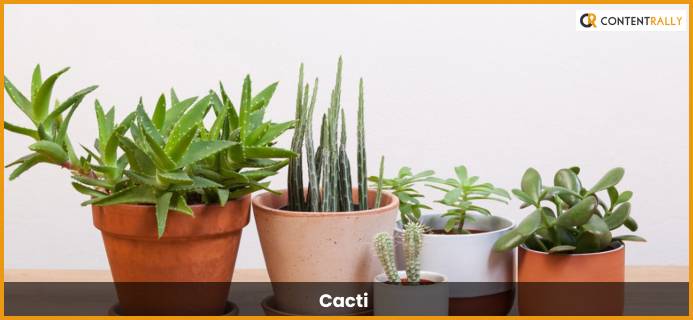
If you have long and irregular work schedules, then Cacti is probably the best low-maintenance indoor plant. Cacti plants can thrive well in light that’s natural and requires water only once every week during summer and spring. During winter and fall, you just need to water your cacti once in three weeks.

Price: 18 dollars (for four)

Why Do We Love It?

  • Can be grown easily
  • Can be cared for easily
  • Great option as a gift

2. Air Plants

Air Plants

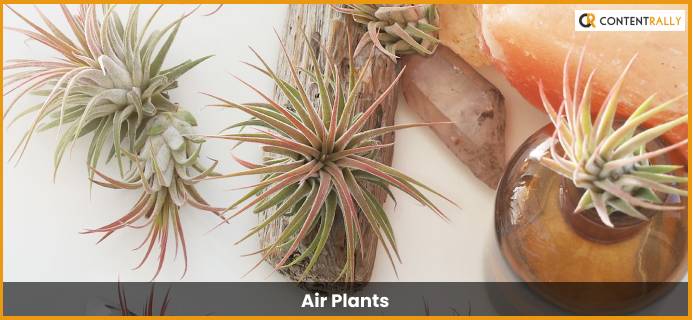
Air plants are great alternatives for low maintenance plants – they do not even need soil for survival. All that you have to do in this case is dunk these plants in the water for 2 to 3 hours, once every ten days. Now is that not perfect? This is entirely doable every 10 days while you spend your afternoon sunk knee-deep in work.

Price: 14 dollars (for five)

Why Do We Love It?

  • Easy to maintain
  • Very affordable
  • Saves time

3. Pothos

Pothos

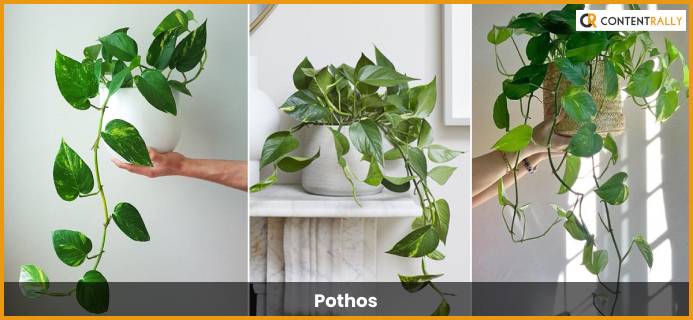
Pothos is also referred to as Devil’s Ivy and is one of the best types of low-maintenance house plants. The best part? These plants can thrive well in both light and darkness. So if you keep it in your low-light cubicle, the plant will survive, and the same goes for brightly lit areas. Also, it can survive when you forget to water the plant.

Price: 18 dollars (for five)

Why Do We Love It?

  • Air-purifying properties
  • Value for money
  • It comes in a grower’s pot

4. ZZ Plant

ZZ Plant

The ZZ Plants thrive the best in brightly lit rooms, but that does not mean they cannot survive in moderate or low lights. Just like cacti, you don’t need to water them every day. Moreover, it’s a pretty sturdy plant. When you notice that the leaves are falling off, simply water it properly, and you will soon notice the plant from bouncing right back.

Price: 26 dollars

Why Do We Love It?

  • Can thrive in both natural and artificial light
  • Sturdy and durable
  • Great option as a gift

5. Spider Plants

Spider Plants

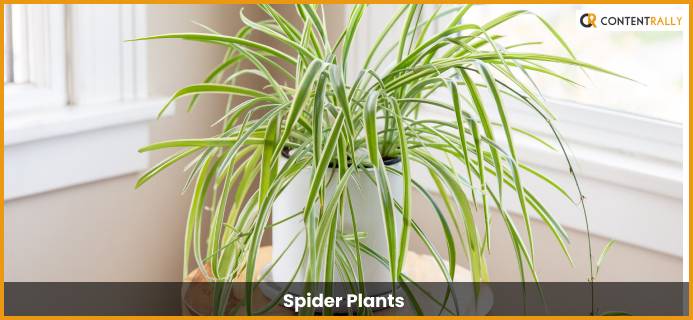
Spider plants are pretty great options if you are looking for low-maintenance plants. These spidery plants tend to dry out in between two watering sessions. In addition, spider plants thrive pretty well under indirect light, and as a result, these plants can flourish well even inside windowless, dark offices.

Price: 12 dollars

Why Do We Love It?

  • Can thrive well in both natural and artificial light.
  • Air-purifying properties.
  • Great option as a gift for apartments, office cubicles, dorm rooms, and the like.

6. Snake Plants

Snake Plants

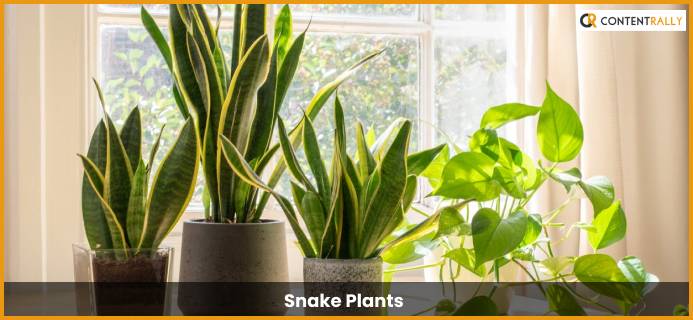
There are low-maintenance plants, and then there are Snake plants. These are not just great as low-maintenance outdoor potted plants but also as plants for low-lit indoor cubicles. Simply put, snake plants are great alternatives for those offices where you get just thirty minutes for grabbing your lunch – let alone watering your plants.

Price: 38 dollars

Why Do We Love It?

  • Has higher carbon dioxide absorbing efficiency and releases oxygen at night.
  • Has premium air-purifying properties. 
  • Versatile – can be planted in a pot or directly into the ground.

7. Succulents

Succulents

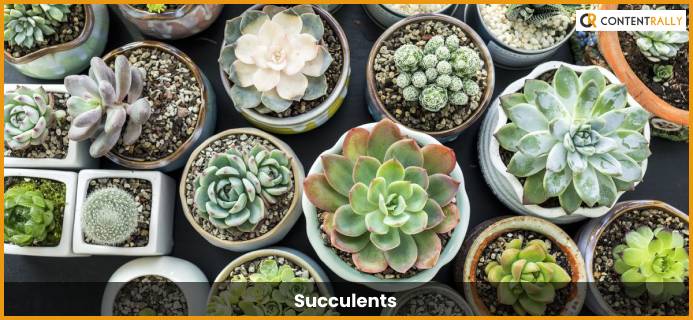
Succulents are amazing not because they can be easily maintained but mostly because it has thick leaves that store water. As a result, these plants needed to be watered once a week. Also, these thrive well in dry air and sunlight. No wonder succulents are the best low-maintenance outdoor potted plants.

Price: 19 dollars (for five)

Why Do We Love It? 

  • Easy to grow and maintain
  • Very affordable
  • Perfect for DIY or doing your home decor

8. Bamboo

Bamboo

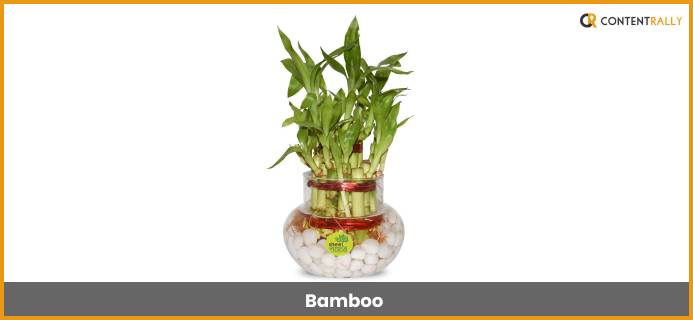
Considered to be a lucky plant, Bamboo needs some light for thriving. This technically means Bamboo plants are great for those cube desks at work. If anyone is starting a new job, it’s best to gift them a bamboo plant wishing them good luck. Also, these plants give any workspace a Feng Shui boost.

Price: 28 dollars

Why Do We Love It?

  • Easy to grow and maintain
  • Value for money
  • Ideal gift for everyone

You May Also Like This:

9. Peace Lily

Peace Lily

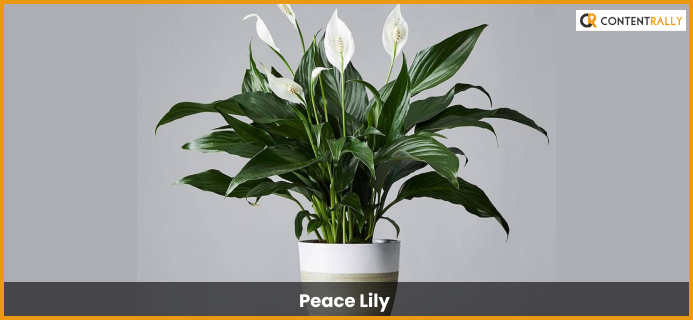
Peace lilies look beautiful, and they also happen to be very easy to grow and maintain. All you need to do is keep misting the leaves and moisturize the soil regularly. However, make sure you are not overwatering the plant, and you should keep the plant away from direct sunlight.

Price: 24 dollars

Why Do We Love It?

  • Thrives in indoor light
  • Has health benefits
  • Easy to maintain and care for

10. Red Aglaonema

Red Aglaonema

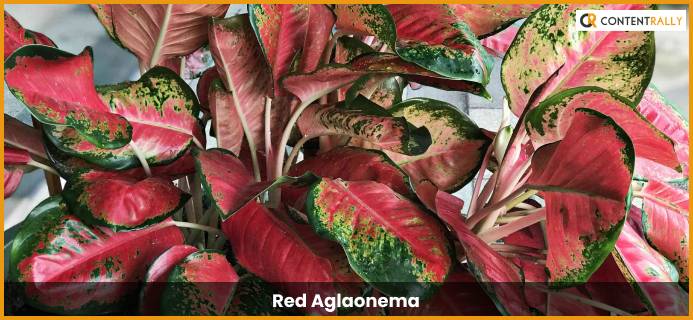
Did you know that the Red Aglaonema is new and happening presently? The leaves are all reddish-pink, while the stems are pink. This low-maintenance plant simply amps your cubicle’s personality a few notches higher. Naturally, these will appear brighter in well-lit rooms, buts they can also thrive well under low light.

Price: 21 dollars

Why Do We Love It?

  • Sturdy and durable
  • Adds texture and color to different spaces
  • Ideal for dorm or room decor

11. Dusty Miller

Often called silver ragwort, this icy-looking plant can withstand shade but prefers bright light. The distinctive, silvery leaves become more green-gray in shaded areas, which is also a visually pleasing effect. Its foliage is the main attraction, though it produces small, bright yellow blooms in midsummer.

12. Ribbon Grass

Because they spread easily, these variegated blades make an excellent ground cover option. They do not mind shade or sun, but they do love moisture. When planted as a border in your garden, they create a charming link between the grass and the garden. Just make sure to use your shovel to create a sharp trench to keep it from getting into your flowers.

13. Cosmos

The name “cosmos” comes from the Greek word for “harmony” or “ordered universe,” and Mexican priests gave these happy little flowers this name due to their perfectly arranged, uniform petals. You’ll have blooms from spring into autumn because these annual flowers reseed and grow well in full sun.

14. Butterfly Bush

Some of the longest-blooming shrubs are these sun-loving plants. They are drought- and insect-resistant and have a vibrant range of colors that are perfect for summer. The plants will naturally draw a large number of hummingbirds and butterflies throughout the fall season.

Frequently Asked Questions (FAQs):

Q1. What Is The Most Low Maintenance Plant?

Ans: The most low maintenance plants are,
⦿ Aloe vera
⦿ ZZ plant
⦿ Snake plant
⦿ Spider plant, and
⦿ Cast-iron plant 

Q2. What Are The Easiest Plants To Take Care Of?

Ans: The easiest plants to take care of are,
⦿ Cast-iron plant
⦿ Snake plant
⦿ ZZ plant
⦿ Spider plant
⦿ Aloe Vera.

Q3. What Is The Most Durable House Plant?

Ans: The most durable house plants are,
⦿ ZZ plant
⦿ Snake plant 
⦿ Chinese money plant
⦿ Bromeliads
⦿ Chinese Evergreen Plant.

Wrapping Up: 

Remember that it is always a good idea to check the resources available through your local extension service, even if the plants you choose are designated for your USDA Plant Hardiness Zone and the light and soil conditions of your site. By taking into account factors like wind, humidity, rainfall, and more, you can determine what grows best in your area. It’s worth noting that not all plants labeled as “deer-resistant” will withstand deer damage.

Are you looking for additional strategies to work in the garden more efficiently rather than more laboriously? Invest in a base of well-established evergreen shrubs; you’ll be grateful for it come winter. Fast-growing vines can make a big difference for an ugly fence or garden wall without requiring a lot of work.

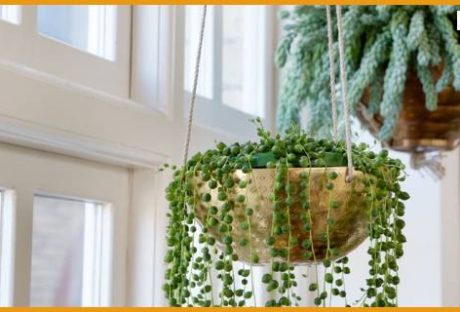
Additionally, check out container plants and outdoor hanging plants if your garden is limited to a patio or balcony

Low-maintenance plants are pretty popular presently. Mostly because they are easy to grow and maintain. So what are you waiting for? Invest in some low-maintenance plants today, and let us know which one are you buying first.

Read Also:

  1. Planting & Harvesting Mint
  2. List of White Flowers in the world
  3. All You Need To Know About Resurrection Plant and its Facts

Barsha Bhattacharya is a senior content writing executive. As a marketing enthusiast and professional for the past 4 years, writing is new to Barsha. And she is loving every bit of it. Her niches are marketing, lifestyle, wellness, travel and entertainment. Apart from writing, Barsha loves to travel, binge-watch, research conspiracy theories, Instagram and overthink.

View all posts

Leave a Reply

Your email address will not be published. Required fields are marked *

Related

Appliance Repair Process

Appliance Repair Process Getting Your Appliances Back In Top Shape

In today's fast-paced world, household appliances have become an integral part of our lives. From refrigerators to washing machines, these appliances simplify our daily chores, making our lives more convenient. However, like any other machine, appliances are prone to wear and tear over time.  When your trusty appliance breaks down, it can disrupt your routine and be a source of frustration. But fear not! In this article, we'll walk you through the appliance repair process, helping you understand what to expect when seeking professional appliance repair services. Appliances can malfunction for various reasons, such as wear and tear, electrical issues, or mechanical failures. When your appliance starts acting up, the first step is to identify the problem accurately. This is where professional appliance repair toronto downtown services come into play. Basic Aspects Of The Repair Process Repair of electronic appliances is quite a comprehensive process. It will be an expansive discussion. This is the reason people try to ensure that they give the work to experts. However, let's try to understand them here in brief to gather a clear idea on the subject.  1. Saving Money  Electronic appliances, especially quality ones, usually serve customers with satisfaction. However, after theft, they face some issues, and consumers generally make the decision to replace it with a new one. But if you are investing to get a new machine, you have to spend a lot of money. It can entirely derail your budget. Why not get them repaired? Repairing these malfunctioning gadgets saves you extra dollars.  2. Convenience One of the great benefits of repairing the old appliance is the convenience. Be it the Television, washing machine, or some other gadget, you definitely have your convenience. You are used to this very quality. But sometimes the new gadgets or appliances fail to satisfy the consumers. Notwithstanding the expenditure, you may not be happy. Repairing an old appliance can make your life quite convenient.  3. Safety When an electronic appliance stops functioning, it may be unsafe for people, especially kids. These malfunctioning appliances can disrupt the electronic connection within the house. So to stop further damage to the appliance and maintain the safety of the people, you have to be mindful of the repair of your appliances. So, get these applications to the best of your understanding and ensure that you have them.  4. Assessment And Diagnosis The first process in this system is the assessment and diagnosis. First, you have to look at the types of issues that you are facing with your appliance. The problem requires the replacement of certain components. The problem may also have a link with repairs.  A. Identifying The Issue The initial phase of the appliance repair process involves identifying the root cause of the problem. Skilled technicians use their expertise to pinpoint the issue: a faulty motor, a broken thermostat, or a malfunctioning control board. B. Diagnostic Tools And Techniques Technicians utilize advanced diagnostic tools and techniques to ensure accurate problem identification. These tools help assess the appliance's functionality and determine the necessary repairs. 5. Choosing the Right Appliance Repair Service Appliances’ care is under your hand. If you take adequate care of your appliance right from the beginning, then it will help you increase the shelf life of your appliance. But when the appliance goes out of order, then, its better that you take the assistance of the right repair services. They are professionals and they will provide you with the best suggestion on wha exactly you have to do it fix the issue.  A. Research And Reviews Selecting a reputable appliance repair service is crucial. Conduct thorough research and read reviews to gauge the reliability and customer satisfaction of different service providers in your area. B. Credentials And Experience Ensure that the repair service you choose has certified technicians with ample experience in repairing appliances of various brands and models. C. Getting A Quote Before proceeding with the repair, request a detailed quote from the service provider. This should include the cost of parts, labor, and any additional charges. Related: How To Repair Home Appliances and Use Humidifiers 6. Repairing Your Appliance When you are repairing an appliance, you may have to replace one of many components. At the same time, you may do some repairing of that component and fix the problem. It will depend on not one but a group of elements.  Parts Replacement If your appliance requires replacement parts, the technician will use genuine components to ensure optimal performance and longevity. Repair Techniques Technicians employ effective repair techniques, ensuring that the appliance functions as good as new. These may include soldering, rewiring, or recalibrating components. Quality Assurance The longevity of the electric appliance depends primarily on not one but many elements. The electric appliance, whether it is a refrigerator or, say, a washing machine, branded goods generally offer better products. Quality repair  standards and their maintenance depend on some other elements and including; Testing And Inspection After repairing your appliance, thorough testing and inspection are carried out to verify that it's working correctly. This step ensures that the issue is fully resolved. The repair service with a good enough name and fame would always love to ensure zero tolerance towards any negligence.  Warranty And Guarantees Reputable repair services provide warranties and guarantees on their work. It also offers you peace that your appliance is in good hands. Warranty on the repair provides confidence to the people that their investment will not go to waste under any circumstances. Preventive Maintenance To avoid future breakdowns, performing preventive maintenance on your appliances is essential. Here are some tips: Clean filters and vents regularly. Check for loose or damaged wires. Schedule routine check-ups with a professional technician. Conclusion The appliance repair process may seem daunting when your valuable appliances malfunction, but with the right knowledge and a trusted repair service, you can have them back in top shape in no time. Remember to prioritize regular maintenance to prolong the lifespan of your appliances and minimize the need for repairs. Finally, take the assistance of an experienced repair services to save yourself from loss of further damage.  Read Also: Vampire Appliances And Electronic Costs Best Practices That Extend The Life Of Your Appliances How Can Appliance Repair Services Help You

READ MOREDetails
Artificial Grass

How To Install Artificial Grass In Your Garden – Installation Guide Step By Step

Artificial grass or fake grass is more popular than ever. The best part is you don’t have to hire a professional to install artificial grass in your garden. With the help of this article, you can do it by yourself with the help of your friends or family members.   With proper installation, you don’t have to maintain your artificial grass in the long run. You just have to keep it neat and clean with a spray. On the other hand, maintaining real grass seeds is very difficult and may not be possible for busy individuals who don’t get enough time to maintain the same. If you still love natural grasses and want to play games on grass, you can consider growing them that may give you a real feeling of natural grasses.  What Is Artificial Grass? Artificial grass is basically a material made up of artificial, human-made fibers that seem like real grass, but in reality, it is not! This saves you both money and time in the long run.  This fake grass was first installed in the multipurpose sports stadium. This grass has made leaps and looks real. On the other hand, this type of grass is designed for those individuals who don’t have enough time to plant grass seeds. Why Should You Consider Artificial Grass? Artificial grass may have various benefits for consumers. It saves you both time and money and is regarded as an excellent landscaping option.  The best part about artificial grass is that it does not require any water and includes less maintenance. You can also consider centipede grass seed for this because it also requires low maintenance and can grow in any condition.  Real grass can die, but artificial turf can last for more years. Moreover, you don’t have to buy any fertilizers or pesticides to maintain your fake grass. However, there are various pros and cons of artificial grass that you need to consider before buying. You can buy good quality artificial turf with the help of turf near me feature on EasyTurf to make it last for a longer time. How To Install Artificial Grass In Your Garden – Step By Step Guide Installing artificial turf is not as easy as it seems. To do this work, you need a good amount of time and hard work. Also, be prepared to get your hands dirty to install the fake grass on your lawn. Now, there are four elements to almost every installation that can reduce the cost of installing fake grass are: Tools used Seaming system Material waste Subbase material Here are the major steps to follow in order to install artificial grass in your garden in 2021. 1. Measure Your Area It is obvious that the area of the garden will differ for everyone. First, you need to measure the length and width of the area that you want to install with the artificial grass. Thus, measuring the area is an important factor that you need to consider at the earliest. 2. Gather Tools And Equipment The second step to install artificial grass in your garden is to gather vital tools and equipment for the same. You cannot complete the task without the use of a Stanley knife, geotextile weed killer, a turf cutter, and accessories such as tape and glue.   3. Remove The Existing Surface Now, it’s time to remove the existing surface with your hand if the area is small. However, you need to use a turf cutter if the lawn is very big. You can also plan this before removing the existing surface. 4. Compact The Ground Another step to install artificial turf in your garden is to compact the ground. You can take the help of a roller or a vibrating plate to meet your objectives. You need to follow this step again later.  5. Place Grass Edging Down Placing this is not mandatory but optional. If you have a desire to use timber or other edgings, you can follow this step. However, you need to ensure that your final grass line should not be smaller than edging. This is generally done to enable water to run off the turf.  6. Lay Your Sand Or Stone Base Another step to install fake grass in your backyard is to lay your sand or stone base, and this is one of the most vital factors that you need to consider. Place at least 40mm of compact sand and add more wet sand if the sand is dry. Then, you need to compact the ground again.  7. Roll Out Your Underlay And Grass Now, roll out your underlay grass first. By keeping in mind not to disturb the weed-killing underlay, roll out the artificial grass on top of that. In this step, you need to do it very carefully.  8. Let The Grass Settle One of the most vital things to do while installing your artificial turf is to let your grass settle after you have completed the above steps. This is generally done to stop the grass from creasing or wrinkling. 9. Trim The Edges After completing the above steps, you have successfully installed artificial grass. Trimming is the only thing left now. Trim and cut the artificial grass from the edges neatly. You can use a sharp Stanley knife for trimming. 10. Brush The Grass Up And Relax! Before brushing up the artificial grass, you need to pin it down using landscape pins. You need to brush up again to bring the fibers of the artificial turf upright. Now, it’s time to sit back and relax and enjoy the artificial grass in the garden.  The Final Thoughts The best part about artificial grass is that it saves you lots of time and effort that you can spend on other important projects. Once you lay your artificial grass in your garden, it will always be green without any maintenance. Isn’t this amazing? Let me know your views about this in the comment section below. Reference: https://www.buzzgrass.com/how-to-install-artificial-grass/ More Resources: 5 Best Vegetables You Should Try Growing In Your Garden 7 Secrets to keeping your Lawn Tidy and Green All You Need To Know About Resurrection Plant and its Facts

READ MOREDetails
Your House

How To Keep Your House Clean – A Beginner’s Guide

Starting the process of tidying up and arranging your home might feel overwhelming, but it's incredibly rewarding. A clean, organized space not only brings a sense of calmness but also sets the stage for enjoyable moments with loved ones.  This beginner's manual on cleaning and organizing equips you with the essentials to kickstart your journey towards a serene living environment. So, let's get started with it. Step - 1: Begin Your Journey with Something Small Beginning with a small area can help alleviate the overwhelming feeling of cleaning and organizing your home. For example, starting in just one room or a tiny section within a room can reduce the stress associated with the task.  Once you've tidied up and organized that small space, it tends to inspire further progress.  It's like a chain reaction— as soon as you initiate the process, you'll often find the motivation to continue. The sense of accomplishment from cleaning that initial space acts as a catalyst, propelling you to tackle more cleaning and organizing tasks. Step - 2: Declutter Your Rooms. All of Them! Before diving into organizing, it's crucial to declutter thoroughly.  Start with a smaller space like your fridge. Empty its content, discarding expired or inedible items. Clean all of the surfaces using a damp cloth and your preferred all-purpose cleaner.  When clearing out various areas in your home, prioritize keeping only the things you truly need or cherish. If it's challenging to part with certain items, remember they might serve someone else while giving you more room at home.  Consider donating or selling belongings you no longer adore. Discard broken, incomplete, or heavily worn-out items. Items that are no longer in use—like old toys, baby gear, clothes, or furniture—can find new homes through donation or sale.  This decluttering not only creates space for other purposes but also makes it easier to access and appreciate the things you genuinely value and use. Step 3: Get a Cleaning Caddy for Yourself Before starting your home cleaning routine, it's helpful to prepare a portable cleaning kit that you can easily carry around.  You don't need a multitude of cleaners or tools—just include what you'll actually use. Your cleaning kit can be as simple as a bucket, plastic bin, canvas bag with handles, or any larger container that suits your convenience.  Whether store-bought or homemade, the key is to have a portable solution that suits your needs as you move from room to room. Step 4: Keep the Surfaces Clean After completing the decluttering process, it's crucial to tidy up the space before organizing. Quickly cleaning the area will impart a fresh feel, enhancing the likelihood of maintaining its cleanliness for an extended period. Here are some cleaning tips that you might need… Create a cleaning caddy for easy access to supplies.  Then clean from higher surfaces downward to catch falling debris as you progress.  Utilize a vacuum attachment to clear drawers, shelves, cabinets, or closets of any remaining debris.  Use a damp microfiber cloth to wipe surfaces, ensuring thorough cleaning. Remove any items that don't belong in the cleaned area. Step - 5: Organize Everything The crucial element in home organization is to gather similar items together.  Whether it's your refrigerator, pantry, kitchen cabinets, bathroom, living room, kids' rooms, closets, or garage, arranging items of the same kind is essential for easy access and visibility. Scattered items make it difficult to locate what you need and can lead to clutter.  By grouping similar items, you create a clear system that helps in both finding items and guiding your family when it comes to tidying up. I: How to Organize Your Kitchen? It's beneficial to begin organizing your kitchen by focusing on a small area first, as this can inspire you to tackle other spaces. The kitchen often serves as the hub of a home and sees frequent use, making it a great starting point.  Once you've sorted out your kitchen, the task of taking care of the rest of your house becomes more manageable. A smart step in this process is to begin with your refrigerator. Streamlining your fridge organization can serve as a catalyst for organizing other areas. II: Organizing Your Fridge Arranging your refrigerator involves categorizing similar food items–together for better organization. With adjustable shelves and doors, along with additional bins, you can optimize the space quite easily. Clear plastic bins are particularly helpful as they allow easy visibility of their contents. They're convenient for accessing snacks, packing lunches, and planning meals.  Here are examples of foods that should be grouped together either in bins, on shelves, or in drawers for a more organized fridge... Bagged fruits and vegetables  Cheeses and lunch meals  Fresh vegetables and fruits Sauces and condiments  Salad dressings III: Organizing the Other Parts of Your House After you've sorted one area, take the same approach to the rest of your house.  Use the refrigerator organization tips as a template for each room: clear out unnecessary items, tidy up, and then arrange everything neatly.  Remember, the key is to tackle each room gradually to avoid feeling swamped, following the same method each time. If there are any similar types of items available in your house, group them together. Clean the area once you are done with the former step. Get rid of anything and everything that you don't want to use. Step 6: Disinfect the Surface Areas and Countertops Clean the hard surfaces around your home thoroughly, including countertops, appliances, cabinets, doorknobs, light switches, TV remotes, and phones.  Disinfect surfaces that are commonly touched to reduce the spread of germs.  Create a natural disinfectant by combining one-fourth to half a cup of white or apple cider vinegar with one cup of water. They'll work like magic for you. Make It a Group Activity Collaborating as a team is a top-notch method for swiftly tidying up a house. Plan ahead with your family for a designated time and distribute specific chores among everyone.  Joining forces not only injects some enjoyment into the cleaning process but also ensures a sparkling home in no time. You can also opt for a reputable cleaning service that can help you with the process. It can seem a little more expensive than usual, but it's much more sustainable per see. Read Also: Vancouver House Cleaning Services with Local Home Cleaners Near You What You Need to Look for When Hiring House Cleaning Service 5 Hotel Housekeeping Tricks You Need To Clean Your Bathroom

READ MOREDetails