How To Harvest Weed: A Beginner’s Guide To Cannabis Cultivation

how to harvest weed

If there is one thing that most people try to know after searching for the legalities of growing weed, it is about “how to harvest weed?”

If this is something that you are searching for, I have you covered!

You see, weed, or marijuana, is a controversial plant to talk about. You might want to grow it for medicinal and recreational purposes. But the “What if people…” thoughts might put you off! This is because harvesting or growing weed is not like harvesting potatoes. There are several other things associated with the same.

But don’t you worry, my friend! If you are trying to search for the best ways to harvest weed, both indoors and outdoors, you need to look no further! Keep on reading this blog till the end to learn more…

Is Growing Marijuana Legal?

Is Growing Marijuana Legal

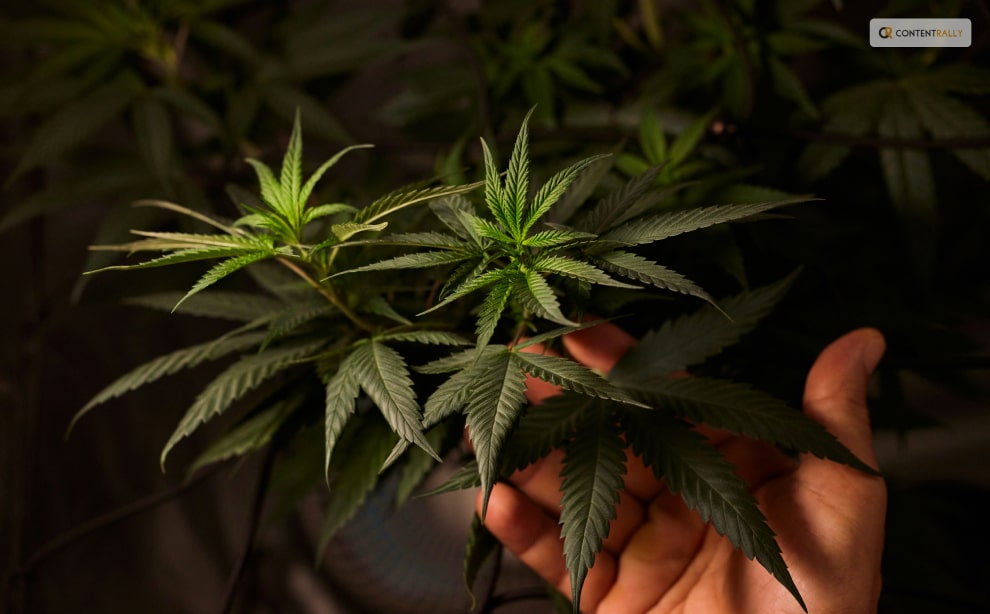
Marijuana, also known as cannabis, weed, pot, or ganja, is a plant that contains several psychoactive compounds. It can alter one’s mood, cognition, and perception. Marijuana has been used for several reasons and purposes for thousands of years, ranging from medicinal to spiritual.

But its legal status has been a matter of debate and controversy in many countries. So, is growing marijuana legal?

The answer depends on where you live, how much you grow, and what you use it for. In some countries, such as Canada, Uruguay, and South Africa, growing marijuana for personal use is legal or decriminalized as long as you follow certain rules and regulations.

In other countries, such as the United States, Australia, and the Netherlands, growing marijuana is legal or tolerated in some states or regions but illegal or restricted in others. In many countries, such as China, India, and Saudi Arabia, growing marijuana is illegal and punishable by harsh penalties, regardless of the amount or purpose.

Various factors, such as the potential benefits and harms of marijuana use, the social and cultural attitudes towards marijuana, the economic and political interests of different groups, and the international treaties and agreements on drug control influence the legal status of marijuana.

The legal status of growing marijuana is also subject to change as new laws and policies are enacted or revised and further research and evidence are presented.

Growing marijuana is a complex and controversial issue that has no simple or universal answer. The best way to find out if growing marijuana is legal in your area is to consult the relevant authorities and sources, and to be aware of the risks and consequences of your actions. Remember, just because something is legal, does not mean it is safe, ethical, or advisable.

When Should You Plant Weed?

When Should You Plant Weed?

Spring is here, and you know what that means: it’s time to get your marijuana seeds ready for planting outdoors.

This is the most important crop of the year because you can get the biggest harvest of all.

Some old-timers like to plant their seeds on the first full moon of March. They say this way, the seeds get some light at night and don’t grow too tall too fast.

But sometimes, it’s still too chilly in March, and not everywhere has the same weather. If you live in a colder place, your plants will grow slower and suffer from the cold and the wind. They will be weaker and more likely to get bugs and diseases

So, what should you do in this case?

Well, you can wait a month or two longer. A seed that sprouts in a nice climate from April onwards will grow bigger and better than one that sprouts in March in the same place

But growing plants for so long is not easy.

You must watch out for all kinds of things: bugs, diseases, nutrients, transplanting, pruning, training… It’s a six-month-long job requiring constant attention

Things to Keep in Mind

Things to Keep in Mind 

If you want a good quality and quantity of weed there are several things that you need to keep in mind. Want to know what they might be? I have you covered! Here are some of the things that you’ll need:

  • Fertilizers for growth and flowering: You can choose whatever fertilizers you like, organic or chemical. Organic ones, like humus, guano, and flower boosters, will give you a tasty and aromatic weed, but less of it. Chemical ones, like those from specific brands, will give you more buds, but less flavor.
  • Insecticides for insects like whiteflies, mites, or thrips: It’s better to use them as a prevention, so you don’t get any nasty surprises.
  • An anti-fungal product that works well against powdery mildew: Propolix or other chemical products are good, but you have to use them from the beginning.
  • Bacillus Thuringiensis: This is for caterpillars and other worms. Use it as soon as the flowers start to show, which is when these critters start to show up. Around May/June.
  • Stakes or wires to support the branches during the flowering stage.

Soil and Other Conditions to Grow Weed or Marijuana

Soil and Other Conditions to Grow Weed or Marijuana

It’s obvious that this is the most common grow medium, probably because it’s easy to find and has some nutrients already in it. Weed grown in soil is also more delicious and fragrant. And, no, it’s not hard to grow in soil – just plant your (favorite) strain in the soil, and you’re good to go.

That’s it. Of course, there are different kinds of soil, and some are better than others. High-quality potting soil will make your life easier and faster. You might also want to add some extra nutrients to make your weed grow better.

Or you can make your own super soil. If you decide to buy soil, we suggest you go for the best brands, or at least those with a good soil mix. They should have things like earthworm castings, alfalfa meal, humic acid, etc.

Can You Grow Weed Without Soil?

Want to try something different? Go soilless. You’ll see some quicker growth (and bigger harvests). And, conveniently, growing weed in soilless mediums is pretty similar to growing it in soil. The only difference is that you’ll have to give the nutrients yourself because soilless mediums don’t have any. Some examples of soilless mediums are coco coir, vermiculite, perlite, etc.

What About Hydroponic Grows? Is it Complicated?

No, hydroponic growth is not complicated. It’s as easy as picking your setup (hydroponic system), getting your nutrients, and sprouting your seeds. And you’ll get some amazing benefits: super-fast growth, huge yields, and super-strong weed.

Sounds good, right? Don’t believe everything you hear because some information can mess up your growth. But with the right setup and care, you can be sure of a plentiful harvest.

What It Needs to Survive and Thrive: How to Grow Weed Plant?

What It Needs to Survive and Thrive: How to Grow Weed Plant?

If you want to grow the best weed possible, you need to know your plant well. Here are some of the main things that a weed plant needs to thrive, and how it works.

Light

Light is the fuel that drives photosynthesis and growth in a weed plant. The fan leaves are like solar panels that absorb light. The more light you give your plants, the more buds they will produce. 

But be careful not to give them too much light. If you grow indoors, keep your lights at a safe distance from your plants, or you might burn them and ruin your nugs. And if your plants get too hot, they will dry out faster and need more water and attention.

Weed plants usually need at least six hours of sunlight a day when they grow outdoors. This is called “full sun”. When they grow indoors, they usually get between 12 and 18 hours of artificial light a day, depending on their stage of growth.

Weed is a photoperiod plant, which means that the amount of light it gets every day affects when it flowers and makes buds. Outdoors, this happens when the days get shorter in the fall. Indoors, you can make this happen by changing the light cycle from 18 to 12 hours a day.   

Water

Water is essential for all plants, including weed. Water provides hydrogen for photosynthesis, and also carries nutrients from the soil to the plant through the roots, and throughout the whole plant.  

Water also helps the plant stay firm and flexible, by creating pressure on the cell walls. This allows the plant to bend with the wind or reach for more light. 

Plants also lose water through their leaves, like humans sweat, to cool down. This is called transpiration, and you can see it as droplets on the leaf tips.  

This may sound obvious, but you only need to water the soil or the medium where your weed plant grows, not the leaves or the plant itself. We suggest that you water a lot, but not too often, rather than a little, but more frequently. This way, the roots can dry out a bit and get more oxygen from the soil. 

Nutrients

A marijuana plant needs several nutrients to grow and flower. The main nutrients it needs are: 

  • Nitrogen: Nitrogen helps a weed plant grow during the vegetative phase, when it makes more mass, stems, branches, and leaves. It is part of chlorophyll, the green pigment that helps the plant use light for photosynthesis.
  • Phosphorus: Phosphorus is important for storing and using energy, as well as for root growth and bud development. It helps the plant take up nutrients and build its structure.
  • Potassium: Potassium helps with many of the plant’s metabolic activities, such as respiration, transpiration, and enzyme activation. It also helps the plant fight off diseases and pests. 
  • Calcium: Calcium is a minor nutrient, but it still plays a role in keeping the plant’s cell walls intact, and helping the plant absorb other nutrients. 
  • Magnesium: Magnesium is part of chlorophyll, and helps the plant make glucose from photosynthesis. Without it, the plant can’t turn light into energy. 

CO2

Plants breathe in CO2 through tiny holes in their leaves called stomata. During photosynthesis, plants turn CO2 into glucose, which they use to grow and flower. 

Some indoor growers use a “CO2 burner”, which is a device that adds a little bit of CO2 to the air, to make the plants grow faster and bigger. But this is usually too much for home growers. 

Wind/airflow

Wind or airflow is good for your plants, because it brings fresh air and CO2, which they need to grow.  

Airflow also prevents mold and diseases, by removing moisture from the inside of the plant, so it doesn’t get too wet. You can also use a technique called scragging, which spreads out the branches and lets more air in.

Wind or airflow also makes your plant stronger and healthier, by making its stalks and branches thicker and sturdier. When a plant bends with the wind, it produces a hormone called auxin, which stimulates growth.

What to Keep in Mind While Harvesting Weed?

What to Keep in Mind While Harvesting Weed?

You probably know that different strains of weed need different amounts of time and sun to grow well. Sativas, which come from places near the equator, like a long and sunny summer to get fully ripe.

Indicas, which come from colder and harsher places, are usually faster to finish. But there are exceptions, of course. Some indicas are slow and some sativas are quick.

The best time of day to cut down your outdoor plants is in the morning, before the sun gets too strong. You don’t want them to be wet from dew, but you also don’t want them to be exposed to too much sunlight, which can ruin their flavor.

You can also harvest at night when it’s cooler, but the morning is better because the plants are fresher and haven’t been under the sun all day.

1. Watch the weather 

As your buds get bigger and heavier and the season changes from summer to fall, the weather can change too. Depending on where you live, you might get some cold snaps or rainstorms.

These are not the end of the world, but you do need to pay attention to the weather and maybe decide on the spot when to harvest your plants, balancing their ripeness with the risk of losing them.

2. Harvesting in Lower Temperatures 

According to sources, most weed plants can handle a light freeze—28-32°F for up to three hours—without any problem. But a hard freeze, anything lower or longer, can be a disaster. 

Frost can make ice crystals form in the plant cells, hurting them. The leaves will look droopy and then turn dark and crunchy. The worse the frost, the more damage to the plant.

Remember that plants in pots are more sensitive to temperature changes than plants in the ground, so they are more likely to get frost damage.

3. Rainy Harvests 

Rain is not a big deal by itself, but it depends on how long and how hard it rains. If it’s going to stop soon and dry up fast, you can leave your almost ready plants outside. But if the rain is going to stay, mold is waiting—better to harvest sooner than later.

Covering your plants can help, but the air will still be humid. You can use some tall stakes and a tarp to cover them, but make sure to take them off when the rain or cold is over. In this way, the plants can warm up and breathe.

When to Harvest Weed Plant? 

When to Harvest Weed Plant? 

The type of plant growing determines when to harvest cannabis. Sativa, hybrid, and indica are the three primary kinds of cannabis seeds. Are you curious about the best time to harvest marijuana?

Let me break it down for you!

Sativa strain plants typically take longer to mature and give off a stronger cerebral height. However, Indica plants yield larger blooms and a more sedative, paralyzing high.

When an Indica and a Sativa are crossed, hybrids that enable flowers to have both traits are created. While Sativa cultivars blossom in 10 to 16 weeks (about three and a half months), Indica varieties flower in 8 to 10 weeks (about two and a half months) on average.

The cannabis plant can be found in hybrid form halfway between the two main species. It is important to understand that flowering times might vary based on environmental factors like temperature and duration of day.

Thus, the questions of when and how to harvest cannabis remain unanswered. Knowing what you want to achieve with your cannabis plants can help you decide when to harvest them.

Let’s say you are growing cannabis for therapeutic purposes. Is there a unique method for harvesting cannabis in this case? If so, it is imperative to harvest the plant at the height of its cannabinoid content.

But if you are cultivating cannabis seeds for fun purposes, then it is best to harvest marijuana at its peak maturity.

How to Harvest Weed?

How to Harvest Weed?

Once you’ve decided when to harvest your cannabis, it’s critical to understand how to harvest cannabis plants correctly. It’s simple to harvest cannabis; you just need to cut the stem off at the root. But it’s best not to pull the branch out of the ground since this could damage it and reduce its yield.

It is crucial to properly dry the cannabis after harvesting it before stocking it. Hanging it upside down in a room with lots of ventilation and little light exposure is the best method to accomplish this, like a wardrobe. In order to efficiently dry cannabis, proper ventilation is necessary because it inhibits the growth of mold.

Before you proceed to store it, ensure that you let your cannabis rest for some time. This can range anywhere from three to seven days. This is a great way to ensure that the leaves are dried and ready for you to store.

Wrapping It Up! 

In case you were searching for the best ways on how to harvest weed, I hope that this blog has been of help to you. If there are any other queries related to the same, please feel free to let me know. All that you need to do is scroll down till you reach the bottom of the page. Then leave your suggestions in the box below. And I will be there to answer them all for you!

More Resources:

Ankita Tripathy loves to write about food and the Hallyu Wave in particular. During her free time, she enjoys looking at the sky or reading books while sipping a cup of hot coffee. Her favourite niches are food, music, lifestyle, travel, and Korean Pop music and drama.

View all posts

Leave a Reply

Your email address will not be published. Required fields are marked *

Related

Garden Edging

Garden Edging for Beginners

Edging offers a beautiful touch to your garden, but many people think of edging as expensive and time-consuming. It also protects the flowerbeds, lawns, and other plants by creating a boundary for them. Edging makes the perennials and annual flower beds look clearer and more polished. Also, you can paint the brick and concrete edging to create a color theme for your garden. However, you need to consider the plan and design of the garden before creating an edging, and it can be challenging for beginners. Let us know more about edging for beginners that they can use for their home garden. Consider the available space: The amount of available space plays a special role in designing garden edging. For instance, it would not be good to choose large slabs of boulders to create an edging in a small garden. Small brick edging, metal sheets, and plastic sheets are more suitable to use as edging in small gardens. However, if you have sufficient space or a large garden, you can go with any type or style. Make your garden look new by using the most creative edging solutions. Once you are able to decide on what will work best, you will be able to completely transform the garden space and wow everyone who sees it. Plan your budget: You need to plan the budget for your garden because it's a way to narrow down your options. Planning your budget also helps you to save time as you will exactly know what things you can buy within your budget. Now let us know various types of edgings that you can use in your garden. Edging trees might look simple enough, but a lot of things can go wrong if you are not familiar with the processes. If you are looking to make the most out of your budget, you can consider Tree Service Arlington for garden edging. They are professionals that will get the best work done so that you do not have to keep thinking and worrying about overgrown trees on your property. Using funds and spending them on experts will also help you save on expenditures over the long run. Steel, Aluminum, and Plastic: The simplest and most subtle edge of the landscape that effectively separates a lawn from a garden is made of steel, aluminum, or plastic strips 4 inches deep. The metal lawn edge easily bends into beautiful, smooth curves and prevents grassroots from spreading. However, painted aluminum and steel provide the most elegant and sophisticated look of garden edging as it almost disappears into the grass and garden bed. Plastic garden edge types have a prominent black bump on the top edge. They all work best on a reasonable basis; If you have a lot of drops and climbs, it's easy to install a paving edge. Plastic edging: The plastic aging may not look so glamorous, but it is relatively simple and highly convenient to install. As it's available in small sections, you can easily stall one part at a time that requires you to dig the ground with a trench to sink in the edge. The primary benefit of plastic edging is that it is inexpensive and long-lasting. Paver stones: Concrete pavers are another form of material that have a long life and are nearly indestructible. One disadvantage of paver stones is that they are heavy to handle and take time to install. So, you need to take off from work for a few days to perform heavy digging and installation of paving stones. Paving stones are durable and last longer than any other material available for edging. Natural rock: Mother durable material after paving stones that you can use to create an edging. They are available in a variety of shapes, sizes, and colors. They are very easy to install as all you need to do is the edges of each garden bed. However, as they have irregular shapes, you need to choose rocks of similar shape and size to create the most pleasing visual impact. You can visit a garden center for a nursery to buy natural rocks for your garden. Flagstone: Black stones are available in a variety of shades and thicknesses. You can directly place the flat species of flagstone along your garden edge or stack them to create a retro-style look for your landscape. Most local nurseries and garden centers offer some varieties of flagstones. They look pretty in your garden and last for years to come. Brick: Bricks are easily available in every area and are very convenient to install any landscape. All you need is to lay the bricks keeping their wide side down. The challenging part of the installation of bricks is to level them right. A simple way to level them is to use a string or line level or a rubber mallet. Bricks last longer and are relatively cheaper than other materials. Mazzega's landscaping offers premium-quality landscaping materials for residential and commercial use in Kelmscott. If you are located in or near Kelmscott, they can help you in choosing a suitable garden edging solution and offer landscaping materials. In addition to a physical store, they also have an online shop where you can order products on their website. Final Words: These were some garden edging tips for beginners. Creating garden edging is not difficult if you take help from a professional landscaping service. The difficulty level of installation depends on the type of material you choose for landscaping. Following these tips can help you to create a garden edging for landscape owners. Read Also: How to Maintain a Bright and Beautiful Garden During Winter How To Install Artificial Grass In Your Garden – Installation Guide Step By Step How to Choose the Right Containers for Your Container Garden How to Maintain Your Garden Railings?

READ MOREDetails
Apartment

6 Types Of Signs Every Apartment Resident Should Know About

Signage plays a crucial role in communicating important information and guiding residents and visitors at apartment complexes. From practical wayfinding signs to eye-catching banners advertising available units, the right signs can make all the difference.  This blog explores the array of sign options that apartment managers have at their disposal to effectively convey messages, improve accessibility, and enhance curb appeal. We’ll look at everything from illuminated “Vacancy” signs to inform potential renters of availability to parking designation signs that help maintain order in lots. Metal laser cut signage like building and unit number markers also make it easier for emergency responders, delivery drivers, and visitors to navigate complexes. Plus, promotional banners can attract interest from passersby. With a thoughtful signage strategy, managers can ensure their apartment community puts its best face forward while helping residents and guests seamlessly get where they need to go. Effective Safety Signage for Apartment Complexes Strategic safety signs are a must for any apartment community, helping to mitigate risk and give residents peace of mind. Required by law in many cases, these symbols and warnings serve an important function by alerting residents and visitors to potential hazards, emergency resources, and proper protocols.  Exit signs with directional arrows provide critical guidance in the event of a fire or other emergency evacuation. Highly visible hazard signs denoting slippery floors or wet paint caution people to avoid dangerous conditions. Signs indicating the locations of safety equipment like fire extinguishers and defibrillators can save critical seconds in an emergency. Parking and traffic signs help maintain order in complex lots and garages. Warning symbols for loud noises, falling objects, or other construction hazards around work zones keep passersby safe. When properly placed around an apartment community, these simple but essential signs convey a message of preparedness and attention to safety that gives residents confidence in their building management. Contemporary Signage for an Inviting Apartment Atmosphere An apartment community's signage makes a strong first impression on prospective residents. To keep pace in a competitive market, modern, stylish signs are a must in showcasing an up-to-date, inviting atmosphere.  Sleek, backlit LED signs at a complex's entrance identify the property while seamlessly blending contemporary aesthetics. Likewise, stylish building IDs with minimalist lettering and colors that pop evoke modern tastes. Parking signs with clean lines and high-visibility reflective vinyl or thermoplastic lettering also exude a contemporary vibe.  Inside leasing offices, wayfinding signage with intuitive pictograms, sans-serif fonts, and bright accent colors speaks to today's sensibilities. Outdoor banners sporting vibrant images, short impactful phrases, and a distinctive modern style attract the gaze of passersby. Signs with polished, contemporary finishes appeal aesthetically and communicate professionalism and quality. By partnering with an innovative sign company, apartments can keep their image fresh, memorable, and inviting for new generations of renters. Promotional Signage for Apartment Events Special events help apartment communities build a sense of togetherness and camaraderie among residents. To generate buzz and boost participation, targeted signage is an invaluable promotional tool. Eye-catching vinyl banners prominently displayed at a complex's entrance build anticipation and awareness of upcoming holiday parties, poolside barbecues, and other resident events. Sandwich boards stationed in high-traffic common areas like mailrooms spread the word on everything from movie nights to fitness classes. For events like trick-or-treating or a pet parade that will draw outside visitors, roadside signs posted nearby grab attention from passersby.  Temporary signage like corrugated yard signs, A-frame sidewalk signs, and posters hung in common spaces ensure residents receive frequent reminders leading up to each event. The vibrant, festive designs set a fun tone. After an event concludes, a thoughtful "Thank You" sign shows appreciation for those who participated. With the right signage strategy, apartment managers can generate buzz and bring their community together around special activities and gatherings year-round. Clear Identification Signs for Apartment Buildings A clear signage strategy is essential in any apartment community to help residents and guests easily identify buildings, units, and common spaces. Proper identification guides traffic, minimizes confusion, and improves the overall living experience.   Illuminated building numbers and address signs ensure emergency responders can quickly locate the correct structures. Unit number signs on floors and doors give each residence a sense of identity. Room ID signs labeled with easy-to-read text and icons help differentiate laundries, fitness centers, lobbies, and other shared amenities. Custom room name signs add personality to spaces like game rooms or theaters.  Well-designed identification signage also reinforces security. Authorized access signs for private lobbies or gated garages deter unwanted visitors. And placards labeling restricted areas like electrical rooms or roof access help keep people safe.  Finally, a clear wayfinding signage strategy with directionals pointing to different building exits or parking areas simplifies navigation. With thoughtful placement and durable materials, identification signage provides clarity, security, and convenience for years of daily use. Accessible Signage for ADA Apartment Compliance In apartment complexes, proper ADA-compliant signage is a legal requirement to accommodate residents and guests with disabilities. Following ADA guidelines help ensure equal access and inclusion for all. Signs must have high visual contrast between lettering and background without glare or shadows. Grade 2 braille placed below the text provides accessibility for the blind and visually impaired. Raised characters and pictograms allow signs to be interpreted non-visually by touch.  Accessible signs use simple, intuitive icons that transcend language barriers. Directional signs assist with wayfinding. Room signs identify amenities. Informational signs indicate accessible routes, entrances, exits, and areas of rescue assistance. Stairway signs guide users towards ramps.  By law, permanent spaces like unit entrances and common rooms require ADA signs. Temporary signs like parking warnings should also follow recommendations. With a thoughtful sign plan incorporating contrast, braille-raised characters, and icons, apartment complexes demonstrate their commitment to creating a welcoming, navigable environment for all residents and visitors. Intuitive Wayfinding Signage for Apartment Complexes A clear wayfinding signage strategy is essential for any apartment community, allowing residents and guests to seamlessly navigate between buildings, amenities, and parking areas. Intuitive signs reduce frustration and reflect thoughtful management. Directional signs posted at complex entrances and key intersections point visitors toward leasing offices, guest parking, and specific buildings. Trailblazer signs on main walkways provide ongoing orientation. Arrows, international symbols, and maps further aid navigation at junctions.  Building directories found in main lobbies centralize location information for amenities like fitness centers, pools, and business centers. Illuminated unit number signs outside stairwells and elevators confirm users are on the correct floor. Parking signs with color coding and space numbers help distinguish lots and spaces.  With thoughtful placement and highly visible reflective materials, wayfinding signage ensures visitors quickly find their destination. This cuts down on circling, enhances first impressions, and communicates a resident-focused environment. Simply put, good wayfinding equals good management. Conclusion An effective signage plan is invaluable for any apartment community, serving practical and aesthetic purposes. From illuminating building numbers that assist emergency response to wayfinding signage guiding foot traffic, signage provides orientation, security, accessibility, and visual appeal. Managers must consider permanent signage needs like room IDs and ADA compliance and options for changeable messaging to promote leasing availability or resident events. The finishes and design details of all signs should align with the complex's contemporary style and branding. Utilizing sign types from digital displays to sidewalk A-frames provides flexibility. With the help of an experienced sign company, managers can develop a comprehensive signage strategy tailored to their complex's specific spaces, needs, and aspirations. From influencing first impressions to sustaining long-term functionality, signage positively impacts apartments in countless ways. When thoughtfully designed, fabricated, and placed, signage cements an apartment community's identity as an inviting, navigable place residents are proud to call home. Read Also: How to Make Your Student Apartment Feel Like Your Own House? Things You Can Do to Your Apartment to Raise Its Value 5 Interior House Painting Tips

READ MOREDetails
led_flood_lighting

A Rundown of the Basic Led Lighting

“This blog shares some basic options available for LED lighting a house.” What is LED? The term LED refers to “Light-emitting diodes”. When these lights first made their appearance in the market, people were skeptical about their use as they emitted a bluish-white light, a bit unconventional for homes. But things have changed now. Advancement in technology and continuous researchers have made this high-efficiency LED lights to produce, the warm yellow hue that homeowners prefer in their interior. Read also: Secrets to the Perfect Bedroom Light People, worldwide have now shifted from the traditional incandescent bulbs to LED lighting in spite of their high initial cost, because of their efficiency. This high efficiency LED home lighting, ensures lower power bills, better quality of lighting and last much longer than a normal lamp. The other feature of these lamps is their versatility, which has made people switch from traditional bulbs to LED lighting. These lamps offer a varied range in lighting- from soft, cool lights to warm and crisp ones. They come in a wide range of designs and lets you play with the interior lighting scheme. Some of the variety in which LED lights are available for home décor are:  Tape, Ropes, Smart Bulbs, Pucks, Panels, and more. Here is a quick rundown of the basic options that you get with High-Efficiency LED Home Lightings inside your home:  LED Tape Lighting A flexible lighting option that can be used in two shades to create a light and shadow ambiance in a room, preferably bathrooms and kitchens. Use the usual “white” LED tape above the kitchen cabinets for a bright glow and stick “soft and warm” LED tape under the cabinets for warm illumination. LED tape light is a flexible tape of circuit boards with LED chips come with a self- adhesive back for easy installation anywhere. The tape can be cut according to preferred size. The chips are the lights that come in a range of brightness options. Read More: The Right Light Set-Up For Your Band LED Panel Lights The LED Panels are multiple of LED light chips, enclosed within a metal channel covered by a transparent acrylic case. They are brighter than the LED tapes as more LED chips are included in one space. The Panels come in a wide range of color options and can be dimmed and brightened as preferred. The LED Panels are of great use in bathrooms, for illuminating a bathroom vanity. Attached along the entire length of the mirror below and above, they give a soft, dramatic look. These panels are ideal for bathroom use as they are protected additionally by the acrylic case. LED Smart Bulbs The latest technology has brought LED Smart Bulbs in the market. The “smartness” factor in these bulbs comes from their management through smartphones, and other similar gadgets or the Wi-Fi network of a home. They allow the use of a wide spectrum of colors in lighting and also the control of the light warmth.  Use LED Smart Bulbs with Industrial Steampunk Pipe Light fixtures and change the look of your home. Ideal for a kitchen with a modern, minimalist look. Create a dramatic atmosphere by using these Industrial Steampunk Pipe Light Fixtures above the kitchen island to brighten up space and highlight it as well. You can also use this light fixture to lighten up the kitchen working space. Other than a kitchen, Industrial Steampunk Pipe Light Fixtures with LED Smart bulbs can also be used in studies as well as the poolside with appropriate interior planning. LED Puck Lighting LED lights create a pool of light in an area and let off less heat than Xenon puck lights. They are ideal for illuminating inside the cabinets and small corner spaces. The discs are ideal for creating a drama with light and shadow as the areas that fall outside the light focus, are left in the dark. You can get LED Puck lights in individual units or in kits as well. LED Ropes Ideal for outdoor lighting of a home, for patios, poolside, walkways LED Ropes to offer a soft bluish light. These are actually LED chips encased in a round plastic tube. The durability of the plastic and its waterproof nature makes LED Rope a better option of outdoor lighting. Read More:  Create A Stunning Outdoor Space With These Residential Landscape Lighting Tips Secrets To The Perfect Bedroom Light

READ MOREDetails