


Category: Lifestyle
ContentRally is a leading source of reliable news and trending topics on Lifestyle. Get hard-to-find insights and advice on Lifestyle from industry-specific leaders.

How To Become A Speech Language Pathologist? Get To Know Here!
Speech Pathologists can easily identify speech and swallowing issues, which would help find several impactful treatment methods. A speech pathologist can specialize in several domains, such as helping adults or children. Or else they can focus on the specific speech-language disorder. Many candidates like you want to know how to become a speech language pathologist. Well, their intentions are always to achieve goals. Besides, you also must be passionate about your career, especially in health care. In this case, you must also improve your communication skills, which might help you become a speech pathologist. Recently, a speech pathologist received intensive education and training to diagnose and treat patients with speech impediments. It means you can easily afford to complete your education for this career, like a nurse anesthetist. Even more, it would help if you learned how to pursue your career to decide whether it is right for you easily. How to Become a Speech Language Pathologist? Becoming a speech pathologist means you are going through the practice of appraising, evaluating, and treating children and other adult patients. Below, I will discuss how to become a speech language pathologist. 1) Earn A Bachelor's Degree The first step in beginning your career path is to earn a bachelor's degree. In this case, an ardent speech pathologist can get a bachelor's degree in communication disorders and communication sciences. This kind of program degree includes research methodology, statistics, linguistics, language disorders, and so on in the child and the anatomy of hearing and speech mechanism issues. Apart from that, you might earn your undergraduate degree in a subject such as English, psychology education, or linguistics like you must need to earn for pursuing the data scientist career. 2) Obtain A Master's Degree In Speech Language Pathology Once you earn a bachelor's degree, you can pursue your master's degree in speech language pathology. By selecting the graduate degree program, you must ensure its accreditation from the American Speech Hearing Association. This type of master's degree involves practical clinical hours under the administration of a licensed speech pathologist. In this case, you would be getting experience working with patients. The requirements for these practical hours vary from state to state, ranging from 300 to 375. 3) Complete The Post-Graduate Fellowship You can apply for the post-graduate fellowship once you hold your graduate and undergraduate degrees. In this case, licensure is necessary for pursuing your career as a speech language pathologist likewise you must be required to get the license to pursue your career as an artificial intelligence architect. This fellowship program is the phase of practical training a candidate can complete under the mentorship and supervision of an ASHA-certified and licensed speech pathologist. Your state requires you to acquire a temporary one-year license to finish your fellowship. You can also apply for this license, and then you can easily garner a copy of your master's degree and submit the clinical fellowship plan. 4) Take The National Exam in Speech-language Pathology Once you complete your undergraduate and graduate fellowship programs, you can apply for the post-graduate fellowship. This is necessary for licensure. This fellowship is the phase of several other practical trainings that a candidate can complete under the mentorship and supervision of an ASHA-certified. There are other requirements which vary from state to state. However, most other states need a fellowship duration of 36 weeks (about 8 and a half months) or 1260 hours (about one month, three weeks), with 80% of this time. In this case, your state might require that you obtain a temporary one-year license to finish your fellowship. If you are interested in applying for this license, you can garner a copy of your master's degree and then submit the clinical fellowship with your supervisor's signature. 5) Apply For the Certification Multiple states require speech pathologists. In this case, you must gain a certificate of clinical competency in speech-language pathology. You can also apply for this certificate. It happens after you finish your master's degree successfully. Once you receive the certificate, then, you must expect to take at least 30 hours to continue these education courses, which happens every three years to maintain this. 6) Obtain The License to Practice in Your State Once you are done with the certificate, you obtain the license to practice in your state. Eventually, it involves submitting your exam results, a criminal background check, and an application fee. Other states have the exact requirements, such as passing the jurisprudence exam on the state's laws and rules. In this case, you must keep your license as a speech pathologist. After that, you can complete the necessary renewal requirements your state outlines. 7) Prepare Your Resume and Cover Letter You must apply for the speech pathologist job once you can obtain the necessary education, license, and qualifications. You must begin seeking a job by writing a cover letter and resume. In this case, it includes education and an outline of the clinical experience you gained through your education. What Are the Reasons for Becoming a Speech Pathologist? If you want to become a speech pathologist, it often requires several years of education. However, there are still multiple benefits to working as a pathologist. Below, I will discuss the reasons for becoming a speech pathologist. 1) Gain Options for Employment Did you know that speech pathologists can work in several environments? On the other hand, this can enhance your employment options. For example, some speech pathologists work in hospitals, others work independently with clients, or you can start their practices. There are some locations where a speech pathologist can work, such as: Rehabilitation locations Hospitals Residential Healthcare locations Universities and Colleges Elementary Schools Preschools Private Facilities State Government Agencies Corporate research facilities, and so on. 2) Earn the Competitive Salary Another significant factor in becoming a speech pathologist is your salary. In this case, a speech pathologist's earnings depend on their experiences, education, and performance. The average national salary for a speech pathologist is around $111,685 per year. Other factors include the speech pathologist's location, training, etc. 3) Help Others Multiple speech pathologists can work closely with children and help them overcome speech disorders. Somehow, it would become difficult to communicate with others. Aside from that, in this position, you could help others develop their social skills, and you can quickly improve the quality of your life. Speech pathologists can significantly affect their clients and promptly enhance their lives by developing speech and swallowing challenges. 4) Specialize In Several Years It depends on your interests, and here, you can specialize in a particular area of speech pathology. Some pathologists can choose to work exclusively with adults and children. In this case, they can focus on several areas of speech pathology, such as language disorders or other mechanical issues. There are other specialties and areas of speech pathologists who might consider such things as: Travel Speech Adult Speech Cognition Communication Pathology Management Pediatric speech and so many others. 5) Develop Your Professional Skills Speech pathologists can work with multiple individuals, which allows them to learn more about other disorders. Moreover, it will also help you to develop your professional skill sets and help you understand other potential treatments and disorders. As the field continues to grow, you can learn about other improving techniques for treatment. In this way, you can improve your research skills. 6) Work With Unique Patients Being a speech pathologist, you can get the opportunity to work with other clients for several years of life. This includes learning English for the first time—especially for those facing several communication challenges and seeking treatments for lifelong conditions. It makes this easier for pathologists who want to meet new people and interact with those with exciting backgrounds. If you enjoy learning more about new people, ensure you have built a diversified network. In particular, it is one of the most significant career choices for those pursuing careers in a healthcare center. 7) Research In the Laboratory If you want to become a speech pathologist, you will get an excellent opportunity to work with clients throughout your career. On the other hand, it will make it easier for other pathologists who want to meet new people and interact with people from a diverse and exciting background. If you want to enjoy learning more about new people and if you want to build your network, then pursuing your career as a speech pathologist is a viable choice. 8) Consider Self-employment There are several types of speech pathologists. In this case, one kind of speech pathologist wants to work in hospitals, and another wants to work independently. Speech pathologists can enjoy controlling their schedules and other workloads and enjoy working independently as speech pathologists. Being a speech pathologist, you might open your private practice and maintain your clients and other professionals. In Conclusion I have discussed everything about how to become a speech language pathologist above in this article. As a speech pathologist, you can quickly identify speech and swallowing issues and help them find effective methods. Aside from that, being a speech pathologist, you must have some significant regular responsibilities to help you pursue your career. I hope you find this article helpful. If you have queries, then comment below! Learn More About: What Soft Skills Do You Need As A Live-in Carer? Speech Therapists Unlocking The Power Of Communication The Road To Psychiatry: A Timeline Of Education And Training
READ MOREDetails
How To Become A Nurse Anesthetist? Step-by-step Guide For 2026
After researching the fact, it has been seen that a nurse anesthetist is a highly professional and trained specialized healthcare professional. In this case, a nurse anesthetist administers anesthesia to patients undergoing multiple medical procedures. Many people have the same question as you: how to become a nurse anesthetist? The job role of a nurse anesthetist is like that of a bakery. This means several steps are implicated, but every step is essential in making a delicious dessert. Conversely, you must gather the necessary ingredients, such as completing a Bachelor of Science and obtaining a nurse's license. Nurse anesthetists are registered nurses with other training in anesthesia and related fields. In this case, registered nurses function as data scientists. Furthermore, they are responsible for monitoring other vital signs, adjusting levels, and supporting the patients before and after surgery. The Step-by-step Guide to How to Become a Nurse Anesthetist For 2026: Nurse Anesthetist involves a high level of independent decision-making. To become a nurse, you must prepare by receiving a thorough education and solid experience. Below, I will discuss the step-by-step guide on how to become a nurse anesthetist in 2026. 1) Get The BSN The first step to becoming a nurse anesthetist is to complete a bachelor's degree in science in nursing. In this case, this undergraduate degree program typically takes four years to finish. However, if you already have a diploma or an associate degree in nursing, then you might move more quickly through this program. While completing the BSN, it must maintain a grade point average of at least 3.0. It is a must to apply for the CRNA program, especially in the future. 2) Obtain A State Licensure as an R.N. If you still need to be licensed as an R.N., you must obtain a nursing license. This will be applicable once you have completed your BSN degree. If you want to become licensed, you must pass the National Council Licensure Examination for Registered Nurses. Furthermore, you can take the NCLES in the state where you wish to practice nursing. In this way, you will become familiar with state requirements, especially for the initial licensing and renewal. 3) Gain Experience in an Accurate Care Setting If you want to become a nurse anesthetist, then you must plan to work in an acute care setting. This would be applicable for at least a year before applying to become a nurse anesthesia program. After that, every program requires a minimum of one year of nursing experience in acute care, and you would get several chances to accept becoming a nurse anesthetist. 4) Earn Your Master's Or Doctoral Degree Nurse Anesthetists are advanced practice registered nurses. This means that they must earn a master's degree or any doctoral degree to practice. Currently, multiple programs accept candidates for the Master of Science in Nurse Anesthesia. It typically takes around two years to complete the master's degree or even any doctoral degree. In this case, the minimum requirement to get employed as a CRNA is to pursue a doctorate in anesthesia practice. At the same time, CRNAs are also working with master's degree, which would continue working in the same role. What are the requirements to earn your master's degree? Proof of the valid R.N. license. Make sure one to two years, you must run your career as an ICU RN. Ensure you have earned a BSN degree. Must earn a 3.0 GPA overall in BSN courses. Ensure you have completed the required prerequisites. It would help if you had job shadow experience with CRNA. Make sure you have specialized certifications in Nurse Anesthetists. Being a nurse anesthetist, you must check the background upon admission. 5) Become A CRNA Once you finish the program to become a CRNA, you will have one final round to obtain the license. The National Certification Examination is a computerized exam that takes about three hours to complete. On average, once you have passed the test, you are eligible to begin working as a CRNA. Multiple clinical experiences are listed on your resume. In this case, it might differ considerably from that of other candidates. For example, consider shadowing a pediatric cardiac anesthesia team member, where you will get some highly specialized clinical experience. What Are the Reasons for Becoming a Nurse Anesthetist? Did you have any idea why you would consider yourself a nurse anesthetist? Below, I will discuss why you want to become a nurse anesthetist. 1) Rewarding If you want to become a nurse anesthetist, you are pursuing a highly rewarding career like an artificial intelligence architect. In this role, you would get several work opportunities that would ensure patients that their surgical procedures are running smoothly. Above all, it depends on your employment, which means you might work in faster-paced and high-stakes environments where you could help stabilize patients. Furthermore, this would prevent several other complications. 2) Challenging Another reason to become a nurse anesthetist is to enjoy being challenged in the workplace. Above all, it can be an exciting career option. In this case, nurse anesthetists would also regularly offer physical and intellectual challenges. Multiple professionals in this role often spend several hours of their day. Being fit and having stamina will help a nurse anesthetist perform a job better. This is also an excellent career for those who would love to enjoy multiple complicated problem-solving and analytical thinking. 3) Encourages Professional Development Nurse Anesthetists commit to continuing professional development since there are multiple medical research changes where you can see how healthcare professionals approach their roles. After researching the face, new medical research might reveal a safer procedure for delivering anesthesia to multiple other patients. Additionally, multiple medical facilities might update their policies and procedures in response to new research to find several new solutions. 4) Flexible Scheduling Options Multiple nurse anesthetists might have some schedule flexibility. Since numerous other patients make their appointments with surgeons and other nurse anesthetists. Aside from these, such professionals have options for choosing their availability, depending on the working environment. 5) Extensive Job Opportunities Nursing Anesthetist is one of the most remarkable and high paying careers. If you want to become a nurse anesthetist, you will have many job opportunities. Based on the U.S. Bureau of Labor Statistics research, nurse anesthetists' employment rate you were increased between 2020 and 2030. Advanced practice nurses who have extensive training will provide specialized care services. 6) Allows For The Independent Work Advanced practice professionals and nurse anesthetists frequently function autonomously in their essential roles. There are other types of nurses who are different from nurse anesthetists. It means you don't have a direct supervisor or aren't required to work under the direction of any administrator. However, they do typically work alongside other members of the surgical team. It includes the lead surgeon, supportive nurses, and so on, whose responsibilities are all to focus on giving a specific type of care. 7) Diverse Workplace Settings Nurse Anesthetists can qualify to work in several roles and settings. In this case, they would most commonly work in multiple medical facilities such as clinics, hospitals, and others that might work in research facilities. 8) Various Career Options Nurse anesthetists have many options, especially in workplace settings. However, most nurses work in health care as surgical support professionals, whereas others can directly choose to work in academics and research. In this case, there are other alternative career options for nurse anesthetists. This means they will educate students looking to become nurses. Another option is to pursue a career as a medical writer, or you can work in any legal consultation role. In Conclusion I have already discussed the step-by-step guide to how to become a nurse anesthetist above in this article. Recently, nurse anesthetists must earn a high level of multiple credentials to permit their careers. These professionals typically begin by earning an associate's or bachelor's degree in nursing. I hope you like this article. If you have doubts, then comment below! Learn More About: How To Become A Travel Nurse? Achieving Academic And Clinical Placement Success For Nurses Navigating Healthcare: Exploring The Harvest Tech Achievers ETF
READ MOREDetails
Nail Kit Essentials: A Guide To Perfect Home Manicures
Nail kits have revolutionized the self-care practice of manicures, offering salon-style results at home. With innovations allowing for easier polish applications, professional designs, and long-lasting wear, a manicure from home is simply what most women want. Moreover, a nail kit helps you master the art of nail care at home and offers both satisfaction and therapeutic benefits. Whether you're saving money or unsure about going to the salon, DIY manicures provide a more affordable and therapeutic alternative. However, having a nail kit is about more than just beautifying your nails. It also helps you find a quick fix against chipping, warping, glops, bubbles, or smudging. So, let us explore the items you must include in your nail kit for the best manicure experiences at home. What To Include In A Nail Kit? When preparing your nail kit, you must include some extremely important items. These items can be divided into two parts— Items to enhance nail health. Items to beautify nails. Read Also: The Profound Impact Of Well-Groomed Nails On Confidence Natural Nail Care Kit Given below are your essentials to maintain healthy nails: Cuticle Oil Cuticle oil is a natural remedy that can stimulate nail growth. It helps protect the nail and cuticle from trauma and improves the nail's health and appearance. Moreover, this oil protects the polish from damage, ensuring a lasting shine. Also, cuticle oil keeps skin moisturized, promoting strong and healthy nails. This item is rich in coconut oil and Vitamin E Jojoba Seed, which hydrates the skin around nail beds, reduces hangnails and prevents dryness. Applying once or twice daily and massaging into cuticles can result in immediate results. Therefore, regular use promotes healthy nail growth, prevents splitting or peeling, and keeps nails looking their best. Nail Filer Filing nails gives them a customized shape and strengthens and prevents chipping. Therefore, a nail filer is one of the most important items in your nail kit. For optimal results, file nails at least once a week. Filing is crucial for nail polish preparation as it prolongs the life of the polish or gel nails. Moreover, to file nails properly, trim the tip and adjust the length, move the file in one direction, file the sides straight toward the tip, and create a curve around the side. Moreover, nails grow faster in summer than in winter. Therefore, filing them regularly is essential to enjoy long-lasting gel nails. Nail And Hand Lotion One of the main causes of brittleness and breaking in nails is moisture loss. Using hand lotion encourages healthy nail development and reduces moisture loss. Exposure to drying elements like dishwashing, sun, or paperwork increases the need for frequent moisturizers. Therefore, rubbing lotions or creams prevents drying and peeling, stimulating blood circulation in the matrix. Moreover, topical lotions treat nails from weakness, cracking, discoloration, and crookedness. They help strengthen nails, protecting them from color changes, increasing thickness, and stimulating growth. You can use non-sticky creams to soften hands, hydrate them, and protect them from environmental damage. Polishing & Coating Kit Once you’re done packing your kit with the health-boosting items, let us come to the beautifying kit for nails. Here are some of the most important items you must add: Press-On Nails The nail industry constantly evolves and plays a crucial role in our beauty lives. Maintaining nails can be challenging due to costs and time constraints. Therefore, these DIY nail options, such as press-on nails, help you find the perfect solution to replace professional nail salon services. Press-on nails are easy to apply, durable, and resistant to chipping or loss of shine. They can be cleaned with alcohol, filed down, and glued back on if needed. These strong plastic nails can last long and be used for showering, but they should be kept dry for extended periods to prevent flimsiness. Gel Polishes In recent years, the nail polish industry has expanded, with gel nail polish emerging as a new alternative to traditional acrylics and acrylics. Gel polish requires curing under a UV or LED lamp, unlike regular polish, which is dried naturally. Moreover, its quick-drying, durable formula prevents chipping and smudging, and the gel color remains bright and shiny. Gel manicures can last up to one month, with the only long-term side effect being nail growth. However, gel nail removal is more complex and time-consuming than regular lacquer, but the convenience of a single manicure is worth the effort. As a new product, there's confusion about its benefits, removal process, and differences between regular and gel polishes. Minimalist French Manicure Minimalist nails are elegant and clean, suitable for any occasion. They can be in subtle colors like white, black, grey, or muted tones. The art features thin lines, small dots, and geometric shapes, making natural nails part of the overall look. The French manicure is a classic minimalist nail design with a natural base coat and white tip, presenting a modern and fresh look. Moreover, a micro French manicure is a subtle design with a thin line at the tips, showcasing the natural nail. Both designs are trendy and elegant, making them perfect for any occasion due to their simplicity and elegance. Base & Top Coats When selecting a nail kit, the colorful polishes, and fun nail tips are undoubtedly thrilling, but they're not the only considerations. Moreover, a high-quality base and top coat are essential for achieving a salon-grade manicure at home. Also, a base coat or primer for gel or acrylic nail systems safeguards your natural nails and provides superior adhesion for a durable manicure. These coats safeguard your manicure and deliver a polished finish. Tools For Innovation Achieving a clean and polished manicure can be difficult, especially when securing a comfortable grip on the brush. Fortunately, many nail beautifying brands offer universal accessories to make maneuvering those pesky, slim polish brushes a breeze. Therefore, with these tools, anyone can achieve a striking, salon-grade manicure from their home. Nail Care Is Self Care A variety of nail products in a kit allows for various possibilities and styles. Seek manicure kits in multiple hues and textures, such as glittering metallics and traditional cremes. For those who prefer more creative options, consider kits with nail art tools like dotting or striping tape. This kit provides everything for a gel or French manicure at your fingertips, making it cost-efficient over time. Therefore, before starting the manicure, wash your hands thoroughly and use a tissue to wipe each nail with nail polish remover. Moreover, you can use cotton balls. However, they contain lint and leave a residue. If you don't want extra cleaning, use a lint-free facial cotton pad instead. This kit provides everything you need for a gel manicure at home. Read Also: Polish Your Creativity: A Colorful Journey into Self-Care With Nail Polish Amazing Beauty Tips For Women Of All Ages How Long Do Gel Nails Last?
READ MOREDetails
Ways Upper Cervical Treatment Can Transform Your Health And Wellness
Sitting for long hours at your desk during the workday, do you feel a nagging discomfort in your upper back and neck? Thus, upper back and neck pain can happen to anyone, and it can be debilitating. Moreover, you can experience chronic pain in several different ways, depending on the root cause. There is one way you can resolve the issue, and that is through undergoing chiropractic treatment. Cervical chiropractic treatment is an effective alternative to traditional medicine and is increasingly seen as a natural procedure for resolving spine-related issues. In this article, you will discover different ways upper cervical treatment can transform your wellness and health. What Is Upper Cervical Chiropractic Treatment? Chiropractic care is a treatment approach that includes manual manipulation of the spines. Some trained healthcare professionals or chiropractors use special tools or their hands to offer treatment. Thus, the main goal of spinal adjustment is to relieve pain and enhance mobility. Here is what you can expect during a visit for cervical chiropractic treatment: Consultation services. Physical examination. Imaging through X-rays and other visual aids. Adjustment. Does Upper Cervical Chiropractic Treatment Work? The upper cervical chiropractic treatment can greatly enhance your health by aligning the upper cervical spine. Similarly, when your upper cervical spine is out of alignment, you can suffer from an array of complications, some of which are: Neck pain. Sleep disturbance. High blood pressure. Fibromyalgia and fatigue. Back pain. Autoimmune disease. Sinus congestion. Blackouts. Brain fog. Seizures. Congestion and ear infections. Upper cervical chiropractic care might increase the blood flow to the brain, which is one reason treatment can assist patients effectively. Moreover, you can combine holistic chiropractic with conventional medicine practices as well. Ways Upper Cervical Treatment Can Transform Your Health There are times when chiropractic will help you treat your back pain. However, as per recent studies, various health issues can be treated effectively. This is because of the positive chiropractic approach to the entire body. So, are you looking for a holistic and natural approach to improve your overall well-being? Here is a list of ways upper cervical treatment can help you treat your health and boost your well-being. 1. Better Neck And Back Health One of the prevalent benefits of chiropractic treatment is that it heals neck and back pain. However, the traditional spinal alignment is significant for improving mobility and treating pain. Thus, your spine aligns with the back and neck, and you will experience decreased tension, reduced pain, better posture, and central nervous system functions. However, when the central nervous system functions as it should, you will experience an improvement in overall health, and the body functions better. 2. Effective Pain Management The involvement of chiropractic treatment caters to the effective functioning of the central nervous system, which leads to better pain management. Thus, chiropractic is an effective treatment procedure for people who are suffering from injuries, migraines, fibromyalgia, and pain caused by other conditions. Similarly, when the spine is not aligned correctly, it can affect different nerves. This can further lead to critical conditions like sciatica. Bringing the spine to its right position will help you relieve the compression of nerves and alleviate pain. However, chiropractic is used regularly to heal sport-related injuries for pro athletes, weekend warriors, and everyone in between. 3. Stronger Immune System It is true that regular chiropractic treatment leads to a better immune system. When your spine is properly aligned, the central nervous system can function much more efficiently and effectively. This is the reason why the body is better able to receive effective messages from the brain. Similarly, when the spine is out of alignment, the information sent and retrieved by the central nervous system cannot complete its path as it should. Furthermore, the organs and other functioning units are not operating as they should be. Hence, this might translate to a better functioning immune system, leading to a better health condition. 4. Improved Activity Pain management is a part of this, but regular treatment further assists flexibility and mobility. This, in turn, helps reduce the risk of injury, allowing them to be more active. When you are mobile, you are better able to stay active. This means it is easier to maintain a healthy lifestyle when exercising constantly. Therefore, as we age, we tend to lose our flexibility. Thus, starting chiropractic care early is essential. On the other hand, even older individuals have experienced effective results from chiropractic care. Furthermore, chiropractic care effectively offers a great boost to your overall wellness and health. When you make it a part of your regular regime, you will likely experience fewer sick days and a greater ability to move more. 5. Gentle Adjustment Many people associate chiropractic care with back cracks and uncomfortable adjustment. However, the chiropractic care wellness center offers gentle and subtle treatment procedures for those looking for upper cervical treatment. The professionals believe in providing a patient-centered approach that addresses the main reasons rather than merely treating symptoms. Some people experience light pressure as they are already undergoing the procedure. Hence, you will be surprised by sudden twists and other movements. Similarly, if you undergo treatment from the wellness center, you do not have to worry about experiencing discomfort and pain during your treatment. 6. Improved Balance And Posture Misalignment in the upper spine can affect the entire body, causing pain issues and poor balance postures. Thus, rectifying the misalignment with a gentle approach can assist in aching symptoms and restore balance and proper posture in the body. Similarly, even slight misalignment can affect chronic symptoms, and correcting them can reduce them, improving the quality of life. Consider Chiropractic Treatment Today However, if you are under the treatment of a chiropractic healthcare professional, few risks are involved. Therefore, select a wellness center or a NUCCA-registered chiropractor professional, as there are professionals offering treatment. Thus, take control of your health today and experience the transformative benefit of specific upper cervical chiropractic care. Schedule your appointment with the skilled team and start your journey towards better wellness, improved blood pressure, and a better life. Read Also: The miraculous benefits of Aqua Yoga Life with Braces: Tips from Surrey’s Orthodontic Experts OpenAI Hires Back Sam Altman, The Previous CEO After Employees Rebels
READ MOREDetails
Importance Of Digital X-Ray Tests In Modern Healthcare Services
In healthcare professionals' dynamic and complex world, X-rays are a basic tool, providing unparalleled insights into body structures. While healthcare revolutionized diagnostic practices, weighing both sides of their uses is important. Thus, one of the greatest advances is the switch from analog X-ray systems to digital X-ray machines. This alteration in healthcare practice not only offers new scopes for diagnosis but also comes out with many other significances compared to conventional ones. In this article, we will emphasize the significance of digital X-rays and make it clear why they are vital in modern healthcare services. Importance Of Digital X-Rays Within Modern Healthcare Service Below is a list of the importance of digital X-rays within modern healthcare services. 1. Is More Accurate Digital X-ray systems stand out because they offer rapid and accurate diagnoses. Similarly, they are significantly effective in emergency situations when the patient is suffering critically. For example, in situations of trauma, an X-ray can quickly showcase the injury and extent of a fracture, leading to immediate treatment decisions. On the other hand, they are valuable in detecting different health conditions, such as lung infections and dental issues, allowing appropriate and prompt medical treatment decisions. Hence, it is the accuracy and speed that not only benefit patient care but also enhance the efficiency of medical care facilities. 2. Non-Invasive And Convenient One of the major reasons healthcare prefers to adapt to digital X-rays is because of their non-invasive nature. Thus, this makes it a patient-friendly diagnostic choice, avoiding the risk and discomfort of invasive procedures. Similarly, this means less discomfort and anxiety for patients, as X-rays need minimal preparation and less recovery time. Therefore, the convenience of X-rays extends with the widespread availability in hospitals, dental offices, and clinics. This makes it a readily accessible tool that healthcare professionals can use for different medical aids. 3. Comprehensive Application The versatility of X-rays lies in the broad range of applications across the medical discipline. They are integral to orthopedics in assessing bone injuries and lung examinations. In addition, it is also used in dentistry for oral assessment and even in cardiology for analyzing certain heart conditions. Furthermore, specialized x-rays procedures like XRD services offer real-time imaging, resolve complex medical treatments, and guide surgical procedures. Similarly, the portable system allows better care for those in remote communities. Thus, this versatility makes x-rays indispensable for comprehensive patient care and capable of addressing different diagnostic requirements. 4. Provides Improved Image Quality Digital X-rays provide pictures of higher resolutions than those made by conventional x-rays machines. Thus, the technology enhances image processing, offering clear and precise pictures. They are of great importance while examining minor irregularities that are associated with different diseases. Hence, it increases the chance of conducting a correct diagnosis. In addition, digital X-rays can be tweaked after capturing, thereby adjusting the brightness and contrast level. In addition, the ability to change the image enhances the optimal preparation of an image for a typical condition. Moreover, the diagnostic system can be utilized in different disease disorders. 5. Reduced Radiation Exposure The digital x-rays have been engineered to generate less harmful radiation than conventional X-ray machines. Hence, the ability to reduce patients' and healthcare specialists' exposure to radiation is one of the significant healthcare concerns. Similarly, the problems with ionized radiation exposure are less, making digital x-rays safe for frequent and routine diagnostic procedures. However, the digital x-ray equipment comes with a special dose setting where you can reduce the radiation dose. Hence, these attributes ensure that as little radiation is used to generate a diagnostic picture as possible. 6. Faster Results A major significance of digital x-rays is their fast response time. In comparison to conventional x-rays, it requires the development of films. Therefore, digital x-rays give immediate results that can be reviewed instantly. It becomes imperative during emergencies, leading to better decisions when dealing with a patient. Furthermore, x-rays are easily transmitted electronically to other departments and hospitals, facilitating health workers' work. Thus, digital distribution of medical images enhances consultation, joint diagnosis process, and second opinions. 7. Enhanced Retrieval Digital X-ray images can be stored and recorded electronically, reducing the need to store physical film and including retrieval requirements. Rather than filling up space, the medical images are electronically archived in an orderly manner, thereby making them easily available. Thus, this is useful in the healthcare center in tracking health status alterations among patients and allows easy access and review of patient histories. Therefore, having a convenient way of storing digital images in electronic health records further assists in achieving effective coordination of care offered by healthcare professionals. 8. In Long Run Saves Money Although buying digital X-ray machines is usually more expensive than conventional x-rays, their lifetime cost is always lower. Therefore, cost-effectiveness is attained by eliminating chemicals and films, lowering maintenance requirements, and boosting operational efficiency. In addition to that, the flexibility of digital x-rays caters to greater profits within healthcare facilities. Why Is Radiology Significant In Healthcare? Here is a list of reasons why radiology is significant in the healthcare services: Based on radiology requirements, it can offer enough guidance for treating the disease. Similarly, the radiographers who conduct therapy utilize highly complex equipment to deliver proper treatment. Screening offers a preventive measure emphasizing catching disease early to provide effective treatment. Similarly, detecting disease at an early stage assists in early treatment that prevents it from altering into a fatal condition. Moreover, it improves the scope of evolution and treatment of better technology. Tracking and evaluating disease with radiology assists the patient in seeing changes that occur in their condition. This eventually assists doctors in assessing whether to continue with the current treatment and look for another alternative. Summing Up Digital X-ray technology heralds one of the biggest milestones within medical imaging, signifying great progress compared to traditional and old X-ray systems. Thus, with superior image quality, faster results, lower radiation exposure than traditional films, and streamlined retrieval, it is obvious that digital X-rays are a must-have within healthcare services. Hence, digital X-rays play a bigger part in improving patient safety and the diagnostic process. Read Also: Are X-Rays Dangerous? When You Need To Go To A Chiropractor: Here’s What Experts Say The Upsides Of Choosing Urgent Care Facilities For Immediate Medical Attention
READ MOREDetails
How To Teach Your Child The Value Of Money When They Want A New Wardrobe?
As children grow, their desire for the latest fashions and trendy clothes often outpaces their understanding of the value of money. This situation can be particularly challenging for parents and foster carers, who must strike a delicate balance between nurturing their child's interests and instilling crucial financial literacy skills. Whether you're a parent or foster carer, teaching your child the value of money in the context of wanting a new wardrobe can be a valuable life lesson that extends far beyond clothing choices. Set A Clothing Budget One of the most effective ways to teach children the value of money is by involving them in the budgeting process. Sit down with your child and discuss a reasonable clothing budget for the year or a specific period. Explain the various expenses your household faces, such as rent, utilities, and food, and help them understand that money is a finite resource that must be allocated wisely. Once you've established a clothing budget, encourage your child to prioritize their wants and needs. This exercise not only teaches them to make informed choices but also instills a sense of responsibility and appreciation for the cost of items they desire. Encourage Saving And Earning Although you will receive an allowance to go towards the costs of caring for a child if you are long-term fostering, this won’t always cover keeping up with the latest trends! Instead of immediately fulfilling your child's desire for a new wardrobe, suggest that they contribute to their clothing fund. For this purpose, they might save a portion of their allowance or earn money through age-appropriate chores or tasks. This approach reinforces the concept that money is earned through hard work and that achieving certain goals requires patience and discipline. You could even create a visual representation, such as a jar or a chart, to track their progress toward their clothing goal. Celebrate small milestones along the way to keep them motivated and engaged in the process. Teach Wise Shopping Habits Once your child has saved enough money for their desired wardrobe, it's an excellent opportunity to teach them wise shopping habits. Accompany them to the stores and demonstrate how to compare prices, look for sales and discounts, and distinguish between wants and needs. Encourage them to consider the longevity and versatility of the items they choose rather than impulse purchases driven solely by trends. This lesson not only promotes financial responsibility but also fosters sustainable consumption habits that can benefit the environment in the long run. Reinforce Gratitude And Appreciation As your child acquires their new wardrobe, take the time to reinforce the value of gratitude and appreciation. Remind them of the effort and sacrifices made to obtain these items, whether it was your financial contribution or their hard-earned savings. Encourage them to care for their clothing properly, ensuring it lasts as long as possible. This practice not only instills a sense of respect for material possessions but also teaches them the importance of responsible consumption and reducing waste. Teaching your child the value of money when they want a new wardrobe is a valuable life lesson that extends far beyond fashion choices. By using these tips, you will equip them with essential financial literacy skills that will serve them well throughout their lives. Read Also: From Gym To Workplace: A Complete Guide To Lead A Healthy Lifestyle Why Is It Important To Teach Your Kids Valuable Money Lessons? Children grow quickly; in the blink of an eye, they start to understand everything. Nowadays, kids have started to learn about money from a very young age. Here are some reasons why you should maintain transparent communication with them and teach valuable lessons when they are shopping a lot. 1. Make Them Accustomed To Financial Conversations Growing kids is not easy to tackle. They ask so many questions, not just about money but about so many things. So, to start, you have to make them acquainted with the entire discussion. What is money, why is it so important in life, and how can we save it more? They must know the difference between relentless shopping and meaningful buying. Don’t make things complicated by teaching them about investments because they are too young to understand them. 2. They Start Learning To Make Decisions This is the very first time you need to let go of the leash. They get the freedom to make decisions about their life, at least money-wise. Make them understand that if you do not need clothes now and then, you should not keep buying them unnecessarily. Instead, they can just save the money and use it when it starts to pour. Not literally, though; unprecedented situations can occur at any point in life. And they must be better prepared for it. Making decisions is fine unless they are not going on a different track. 3. Life Is Tough Than It Appears It’s so hard to break it to them that the world is not as strawberry and vanilla as it appears in movies and books. Financial help is never expected from a stranger because who knows what it might lead to. Instead, teach them that every penny counts when it comes to surviving the world alone. Young kids have no worries about financial decisions, but a good habit goes a long way. With small responsibilities at a young age, they will continue to grow more responsible as they age. The Bottom Line It is common for kids to have desires about worldly leisures. As parents, we try to give the best to our children. Along with that, they should also understand the difficult side of life and learn how to make financial decisions. This is the key importance of teaching them valuable financial lessons. Wow, we made it to the end of the article. I hope you like it. If you did, do not forget to share your comments below. Also, tell us what we have missed in the list so that we can add them later. Thank you for reading! Read Also: 8 Awesome Health Benefits Of Dark Chocolate Ways To Balance Your Life With Healthy Hearing The Diet To Follow For A Healthy Gut
READ MOREDetails
How to Harvest Potatoes: A Complete Guide from Planting to Storage
If there is something that I have learned in life, it is about gardening. Well, almost everything if not all. And if there is one thing that took me some time to master, it was knowing how to harvest potatoes at home! Potatoes are one of the most versatile and popular vegetables in the world. They can be cooked in many different ways, such as boiled, baked, fried, mashed, or roasted. Moreover, they are also rich in carbohydrates, fiber, vitamin C, potassium, and antioxidants. But how do you grow and harvest your own potatoes at home? You see, potatoes are not like cilantro or other plants. These are tubers. In this article, I will show you everything you need to know about how to harvest potatoes, from planting to storage. So, if that is something that you are interested in knowing, then I have you covered! Keep on reading this blog till the end to learn more... How to Plant Potato Seeds or Tubers? The first step in how to harvest potatoes is to plant them. You can start with either potato seeds or tubers. Potato seeds are small, round, and black, and they are usually sold in packets. Potato tubers are the actual potatoes that you eat, and they have eyes or buds that can sprout new plants. You can buy certified seed potatoes from a nursery or garden center, or use organic potatoes from the grocery store. Here are some if the steps that you must take to plant them: Planting Potato Seeds To plant potato seeds, you need to sow them indoors in pots or trays filled with moist potting soil. Place them in a sunny spot and keep the soil moist but not soggy. The seeds will germinate in about two weeks and produce small green shoots. When the shoots are about 3 inches tall, you can transplant them outdoors in your garden or in containers. Planting Potato Tubers To plant potato tubers, you need to cut them into pieces, each with at least one eye. You can do this a few days before planting to let the cut surfaces heal and prevent rotting. Alternatively, you can plant whole small potatoes with several eyes. To prepare the soil, you need to loosen it and add some organic matter, such as compost or manure. You also need to make sure the soil is well-drained and slightly acidic, with a pH of 5.0 to 6.0. You can use a soil test kit to check the pH level and adjust it with lime or sulfur if needed. Planting Potato Pieces To plant the potato pieces, you need to dig a trench about 4 inches deep and 12 inches wide. Place the pieces about 12 inches apart, with the eyes facing up. Cover them with 3 inches of soil and water well. As the plants grow, you need to hill up the soil around them to cover the lower stems and prevent the tubers from being exposed to sunlight, which can turn them green and bitter. You can also mulch the soil with straw, leaves, or grass clippings to retain moisture and suppress weeds. How to Care for Your Potato Plants? The second step in how to harvest potatoes is to care for your potato plants. You need to water them regularly, especially during dry spells, to keep the soil moist but not waterlogged. You also need to fertilize them every two weeks with a balanced organic fertilizer, such as fish emulsion or seaweed extract. Also, you can add some wood ash or bone meal to provide extra potassium and phosphorus, which are essential for tuber formation. You also need to protect your potato plants from pests and diseases, which can reduce your yield and quality. Some of the common potato pests are: Colorado potato beetles, which are yellow and black striped insects that feed on the leaves and can defoliate the plants. You can handpick them and drop them in a bucket of soapy water, or use an organic insecticide, such as neem oil or pyrethrin. Potato leafhoppers, which are small, green, winged insects that suck the sap from the leaves and cause them to curl and yellow. You can spray them with a strong jet of water, or use an organic insecticide, such as garlic or hot pepper spray. Wireworms, which are thin, brown, worm-like larvae that bore into the tubers and cause holes and tunnels. You can trap them with pieces of carrot or potato buried in the soil, or use beneficial nematodes, which are microscopic worms that parasitize and kill the wireworms. Common Potato Diseases One of the most common reasons why a potato cannot grow or survive is the diseases. If you were wondering what some of these can be and how to deal with them, I have you covered! Some of the common potato diseases are: Late Blight: It is a fungal disease that causes brown spots on the leaves and stems, and black or brown lesions on the tubers. It can spread rapidly and destroy the entire crop. You can prevent it by planting resistant varieties, avoiding overhead watering, and removing any infected plants and tubers. You can also use a fungicide, such as copper or sulfur, as a preventive measure. Scab: This is a bacterial disease that causes rough, corky patches on the tubers. It does not affect the taste or edibility of the potatoes, but it reduces their appearance and storage quality. You can prevent it by planting resistant varieties, maintaining a slightly acidic soil pH, and avoiding excessive nitrogen fertilization. Potato Virus Y: Lastly, this is a viral disease that causes mosaic patterns, mottling, or yellowing on the leaves, and misshapen or knobby tubers. It can reduce the yield and quality of the potatoes, and it can be transmitted by aphids or infected seed potatoes. You can prevent it by planting certified virus-free seed potatoes, controlling aphids, and removing any infected plants and tubers. How to Determine When Your Potatoes Are Ready to Harvest? The third step in how to harvest potatoes is to determine when they are ready to harvest. This depends on the type and variety of potatoes you planted, and the size and maturity you want. There are two main types of potatoes: early and late. Early potatoes are ready to harvest in about 10 to 12 weeks (about 3 months) after planting, and they produce small to medium-sized tubers that are tender and thin-skinned. They are best for boiling, steaming, or roasting. Late potatoes are ready to harvest in about 15 to 20 weeks (about 4 and a half months) after planting, and they produce large, starchy tubers that are firm and thick-skinned. They are best for baking, mashing, or frying. Early Harvesting To harvest early potatoes, you can start digging them up when the plants begin to flower, or when the lower leaves start to yellow. You can use a garden fork or a spade to gently lift the plants and tubers from the soil, or you can use your hands to feel for the tubers under the soil. You can harvest as many or as few potatoes as you need, and leave the rest in the ground until you are ready to use them. You can also harvest some of the young, tender leaves and stems, which are edible and nutritious. Late Harvesting To harvest late potatoes, you need to wait until the plants have died back completely, or until the first frost. This allows the tubers to develop a thicker skin, which helps them store better. You can use a garden fork or a spade to dig up the entire row of plants and tubers, or you can use a potato digger, which is a special tool that lifts and separates the tubers from the soil. You need to be careful not to damage or bruise the tubers, as this can cause rotting or spoilage. How to Dig Up, Cure, and Store Your Potatoes? The final step in how to harvest potatoes is to dig up, cure, and store your potatoes. This is important to preserve the quality and shelf life of your potatoes, and to prevent them from sprouting, rotting, or shrinking. Here are the steps to follow: Digging Up After digging up your potatoes, you need to brush off any excess soil and remove any damaged, diseased, or green tubers. Do not wash your potatoes, as this can remove the protective skin and invite bacteria and fungi. You can wash them just before cooking or eating them. Curing You need to cure your potatoes for about two weeks in a cool, dark, and well-ventilated place, such as a basement, garage, or shed. This allows the skin to harden and heal any minor cuts or bruises and enhances the flavor and texture of the potatoes. The ideal temperature for curing is between 50°F and 60°F, and the ideal humidity is between 80% and 90%. You can spread your potatoes in a single layer on a newspaper, cardboard, or wooden crate, and avoid exposing them to light, which can turn them green and bitter. Storing You need to store your potatoes in a cool, dark, and dry place, such as a cellar, pantry, or closet. The ideal temperature for storage is between 40°F and 50°F, and the ideal humidity is between 65% and 70%. You can store your potatoes in paper bags, cardboard boxes, mesh bags, or wooden crates, and check them regularly for any signs of sprouting, rotting, or shriveling. You can also store your potatoes in a root cellar, which is an underground or partially underground structure that maintains a constant temperature and humidity. Additionally, you can also store your potatoes in a clamp, which is a mound of straw, hay, or leaves covered with soil, that insulates and protects the potatoes from frost and rodents. Wrapping It Up! If you want to know about how to harvest potatoes, I hope that this blog has been of help to you. However, if there are any other queries related to the same, please feel free to let me know. All that you need to do is scroll down till you reach the bottom of the page. Then leave your comments and suggestions in the box below. And I will be there to answer them all for you! Read Also: How to Harvest Lettuce: A Step-by-Step Guide for Fresh and Crispy Salads Everything You Need To Know About Harvesting Basil!
READ MOREDetails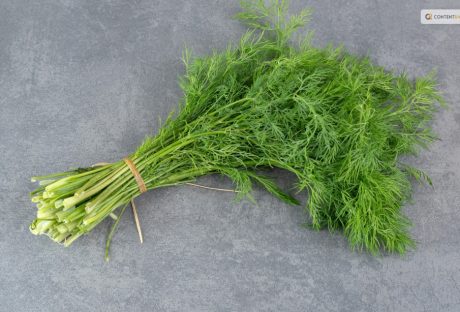
How to Harvest and Preserve Dill for Year-Round Use?
The tender, fern-like leaves of dill almost beg to be touched. If you want to cook them, trim the fresh dill foliage and gather the seeds for pickling. Or you can chop the feathery leaves and yellow umbels for attractive bouquets of homegrown flowers. In addition, black swallowtail caterpillars love to feed on it. Its tiny yellow blooms are great at drawing in a wide range of pollinators. Dill grows as an annual for summer harvests in USDA Hardiness Zones 2–8. In other parts, it may self-seed and is hardy in the winter in Zones 9–11. Here is everything you need to know about how to harvest dill. Keep reading for a comprehensive guide. How to Harvest Dill? Fresh dill clips easily, but it soon starts to droop. Sounds familiar to Cilantro, right? Its flower umbels may look lovely in a mixed bouquet, but after a few hours, don't be shocked if they start to wilt. When harvesting dill for recipes, use it as soon as possible because its flavor starts to fade after a few days. Cut off the flower stalks of dill after the yellow blooms have faded but before the seeds start to ripen and come away from the umbel. Cover the entire flower head with a small paper bag that has a few tiny holes for ventilation. Hang the plant upside down in a cool, dry place. Watch for the seeds to fall and collect them in the bag's bottom. The seeds should be kept in a cool, dry, and dark area in an airtight glass container. When and How to Plant Dill? Dill grows best outside and is simple to start from seed. Plant the seeds directly into the ground, 1/4 inch deep and spaced 1 to 2 inches apart, in the springtime following the last frost. If you want the dill plants to be able to self-sow, plant the seeds in tufts so the seeds can fall and sprout the following year. Or you can plant them in rows spaced about 6 inches apart. You might want to think about succession planting if you want a reliable supply of dill. During the growing season, start by planting a small number of seeds from the packet at a time and then a few more every week. Typically, seeds take 7 to 14 days to germinate. Also, dill can be grown from transplants grown in nurseries planted in the ground or in containers in spring. You can plant dill outside a few weeks before the last predicted spring frost because it can withstand light frost. To achieve lush growth and stop crowded seedlings from producing seed heads, which stops the production of foliage, thinning is essential. Every 12 to 24 inches, reduce the number of seedlings to just the strongest one once they reach 3 or 4 inches in height. As they get bigger, some start to flop. Plants can be kept upright by placing a stake or a sturdy twig in the ground close to the plant's base. To loosely secure the plant to the stake, use garden twine. You can start the dill seeds indoors four to six weeks prior to the last frost. And you can move the seedlings to the ground once the risk of frost has passed. Transplanting mature dill does not work well, so plant your seedlings where they will be able to grow and thrive. Where To Plant Dill? Dill should be planted in a spot with well-drained soil and at least 6 to 8 hours of daily full, direct sunlight. Particularly for cottage gardens, the delicate foliage gives garden beds and borders textural interest. Choose a location for your dill that will shield it from the wind if possible. Just like spinach, high winds can easily damage its stalks if you do not stake the dill. You can plant dill's fragrant foliage in perennial garden container plantings. Or you can plant them alongside other herbs or vegetables in a traditional kitchen garden. In an edible garden, cruciferous vegetables such as Brussels sprouts, collard greens, broccoli, and cabbage are good companion plants for dill. Dill draws beneficial insects like ladybugs and bees and drives away common brassica pests like loopers and cabbage worms. But avoid planting dill close to carrots. Carrots can be stunted by dill, and because they are closely related, dill can cross-pollinate with carrots to produce inferior hybrid plants. Planting dill close to tomatoes is also not recommended. Mature dill will probably stunt your tomatoes' growth, even though some studies have indicated that tomatoes and dill can be beneficial companions when they are young. How to Propagate Dill? Seed is the most effective method of dill propagation. Cuttings can also propagate Dill, though this isn't as dependable. Seed: Direct sow the dill seeds in early spring at a depth of 1/4 inch in a prepared garden bed. Dill does not tolerate transplanting well. Thin the seedlings so they are 12–24 inches apart when they are 3–4 inches tall. Cuttings: Using shears or scissors, cut off the stem with at least 3 to 4 inches of new growth to take a dill cutting. Place the cutting in a water-filled container, making sure to remove any leaves below the water's surface, and allow the roots to grow for two to three weeks. Fertilizer and rooting hormones are not required. Plant the dill in a container or on the ground once the roots are 2 to 3 inches long. Is Dill a Type of Weed? No, I am not talking about WEED weed (read: marijuana). Although dill isn't technically a weed, some individuals and spice companies call the plant dill weed, possibly due to its feathery leaves. Dill weed is a dried or fresh foliage plant. Flower umbels are yellow and used to make dill seeds. How Should Dill Be Stored for Optimal Quality? You can keep fresh dill in the fridge by wrapping its leaves in a moist paper towel. Or you can tuck its stems into a container of water. Fresh dill can be frozen by submerging it in water in ice cube trays. Place the cubes in cooked dishes that have enough moisture to withstand them. Dill seeds and leaves can also be easily dried for later use, though the flavor is a lot more muted. Water and Soil Sow dill in soil that is moist but well-drained. If there is a lot of clay in your soil, add organic matter to the top few inches to aid in drainage. If you have trouble with poor soil drainage, plant this herb in raised beds or containers. Growing dill requires proper irrigation. As the seeds germinate, keep the soil evenly moist. Dill plants require one to two inches of rain or extra water each week once they begin to grow. Humidity and Temperature Dill tolerates temperatures as low as 25ºF, but 70ºF is the ideal temperature for it. Dill often bolts, sending up flower stalks to set seeds when temperatures rise. This annual herb dies after it flowers and produces seeds. Get rid of the flowers to prolong the plant's growing season. Apply Fertilizer While most herbs, including dill, don't require extra fertilizer, you can give them once or twice during the growing season by applying a balanced 10-10-10 fertilizer. When planting, either mix a liquid fertilizer with water or etch a time-release fertilizer into the soil. Refer to the product label for instructions on how much to use. Trimming Dill should be pruned early in the growing season to prevent limb bending. Cut off the top leaves of the plant to promote more growth of the lower leaves. Food preparation and cooking can be done with anything that has been pruned. Repotting and Potting You can grow dill in pots on a sunny balcony or deck, even if you don't have an outdoor garden. Due to the deep taproot that dill plants have, choose a container that is at least 12 inches deep. Because clay and terracotta pots don't retain as much moisture as plastic or glazed ceramic pots. They are ideal for growing dill. Make sure the container you select has good drainage and is big enough to allow you to space your plants 12 to 24 inches apart. It is best to start over in a new, larger container. Especially if your dill plant outgrows its current one because it does not take well to transplant. If the temperature where you are planting is not too high, you can keep planting seeds into the summer. Types of Dill Dills can be of many types with each of their distinct looks and flavors. Here are the three different types of dill you can grow in your kitchen or backyard. Long Island Mammoth Also known as Long Island Mammoth this one is an old-time favorite. Its fern-like leaves can be dried and stored for a long time, or they can be harvested fresh. It produces big clusters of yellow flowers with flat tops. They turn into brown seed heads, and they can reach a height of five feet. Fernleaf Grown to a height of only 18 inches, Anethum graveolens, or Fernleaf, is a highly productive dwarf variety. It works well in container gardens or small in-ground beds. Its feathery, delicate foliage has a great flavor of dill. From midsummer into fall, it blossoms. Bouquet The 'Bouquet' cultivar produces plants up to thirty inches tall with fine bluish-green foliage. The enormous, six-inch-diameter yellow flower heads are ideal for drying, creating an enduring arrangement. Or you could chop them for fresh floral arrangements. How to Keep New Dill Fresh? Dill weed quickly wilts after harvesting and gradually loses its distinctive flavor and aroma. If you know how to store your freshly harvested dill, this shouldn't be a problem. Here are two straightforward techniques that you can use: Put It in the Crisper Drawer of the Refrigerator Loosely wrap the recently cut and cleaned leaves in damp kitchen towels before putting them in a container or sealed bag. Put the container in the crisper drawer of the refrigerator, which has a lower humidity than the other sections of the appliance. Utilize the herbs before they begin to wilt and dry out, which should happen in a few days. Put It in Water To make this method function, when harvesting the herb, you must cut off the entire stem. After gathering the stems, put them in a glass of water and seal the opening with a plastic bag. Every day, change the water. Unlike potatoes, dill leaves can remain fresh for up to a week when stored in this manner. How to Freeze Fresh Dill? Freezing is the best way to preserve extra dill for later use if you've harvested more than you can use at once or in a few days. Dill freezes most effectively when chopped into smaller pieces and added to ice cube trays with just enough water to cover the freshly minced dill. This allows the herbs to be kept for four months or longer. This will ensure you always have dill on hand for when a recipe calls for it. How to Dry Fresh Dill? Dried fresh dill is a popular method if you're searching for another way to store dill for a long time. The herb has many uses, even though it won't have as much flavor as when it's fresh or frozen. All year long, you can use it as a herb in cooked dishes or to make tea. Stick to hang-drying if you don't want much of the flavor to be lost. This is a very easy method to use. All you must do is gather a few dill leaves and then bind them with a string. Later, place them in an area with adequate ventilation upside down. Place them in an airtight container once they're crumbling and dry. Even though fresh dill is always preferable, make sure to save some for later use. Particularly if you don't have a year-round indoor herb and spice garden. Wrapping Up Growing dill is a great way to add flavor to fish and seafood dishes. A little goes a long way because fresh dill leaves have a strong licorice flavor. It is best that you add dill toward the end of cooking, in salads, or as a garnish for soups. Because once cooked, it tends to lose its flavor. If you have thoughts to share or questions to ask about how to harvest dill, please leave a comment below. We would love to hear from you! Read Also: Asparagus 101: When, How, And How Often To Harvest? How To Harvest Sunflower Seeds: A Fun And Easy Activity For The Whole Family How TO Harvest Lemongrass: Tips AND Tricks FOR Growing AND Using This Versatile Herb
READ MOREDetails
How To Harvest Weed: A Beginner’s Guide To Cannabis Cultivation
If there is one thing that most people try to know after searching for the legalities of growing weed, it is about “how to harvest weed?” If this is something that you are searching for, I have you covered! You see, weed, or marijuana, is a controversial plant to talk about. You might want to grow it for medicinal and recreational purposes. But the “What if people...” thoughts might put you off! This is because harvesting or growing weed is not like harvesting potatoes. There are several other things associated with the same. So, having someone like Stoned Genie can always come in handy! But don’t you worry, my friend! If you are trying to search for the best ways to harvest weed, both indoors and outdoors, you need to look no further! Keep on reading this blog till the end to learn more... Is Growing Marijuana Legal? Marijuana, also known as cannabis, weed, pot, or ganja, is a plant that contains several psychoactive compounds. It can alter one's mood, cognition, and perception. Marijuana has been used for several reasons and purposes for thousands of years, ranging from medicinal to spiritual. But its legal status has been a matter of debate and controversy in many countries. So, is growing marijuana legal? The answer depends on where you live, how much you grow, and what you use it for. In some countries, such as Canada, Uruguay, and South Africa, growing marijuana for personal use is legal or decriminalized as long as you follow certain rules and regulations. In other countries, such as the United States, Australia, and the Netherlands, growing marijuana is legal or tolerated in some states or regions but illegal or restricted in others. In many countries, such as China, India, and Saudi Arabia, growing marijuana is illegal and punishable by harsh penalties, regardless of the amount or purpose. Various factors, such as the potential benefits and harms of marijuana use, the social and cultural attitudes towards marijuana, the economic and political interests of different groups, and the international treaties and agreements on drug control influence the legal status of marijuana. The legal status of growing marijuana is also subject to change as new laws and policies are enacted or revised and further research and evidence are presented. Growing marijuana is a complex and controversial issue that has no simple or universal answer. The best way to find out if growing marijuana is legal in your area is to consult the relevant authorities and sources, and to be aware of the risks and consequences of your actions. Remember, just because something is legal, does not mean it is safe, ethical, or advisable. When Should You Plant Weed? Spring is here, and you know what that means: it's time to get your marijuana seeds ready for planting outdoors. This is the most important crop of the year because you can get the biggest harvest of all. Some old-timers like to plant their seeds on the first full moon of March. They say this way, the seeds get some light at night and don't grow too tall too fast. But sometimes, it's still too chilly in March, and not everywhere has the same weather. If you live in a colder place, your plants will grow slower and suffer from the cold and the wind. They will be weaker and more likely to get bugs and diseases So, what should you do in this case? Well, you can wait a month or two longer. A seed that sprouts in a nice climate from April onwards will grow bigger and better than one that sprouts in March in the same place But growing plants for so long is not easy. You must watch out for all kinds of things: bugs, diseases, nutrients, transplanting, pruning, training... It's a six-month-long job requiring constant attention Things to Keep in Mind If you want a good quality and quantity of weed there are several things that you need to keep in mind. Want to know what they might be? I have you covered! Here are some of the things that you'll need: Fertilizers for growth and flowering: You can choose whatever fertilizers you like, organic or chemical. Organic ones, like humus, guano, and flower boosters, will give you a tasty and aromatic weed, but less of it. Chemical ones, like those from specific brands, will give you more buds, but less flavor. Insecticides for insects like whiteflies, mites, or thrips: It's better to use them as a prevention, so you don't get any nasty surprises. An anti-fungal product that works well against powdery mildew: Propolix or other chemical products are good, but you have to use them from the beginning. Bacillus Thuringiensis: This is for caterpillars and other worms. Use it as soon as the flowers start to show, which is when these critters start to show up. Around May/June. Stakes or wires to support the branches during the flowering stage. Soil and Other Conditions to Grow Weed or Marijuana It's obvious that this is the most common grow medium, probably because it's easy to find and has some nutrients already in it. Weed grown in soil is also more delicious and fragrant. And, no, it's not hard to grow in soil – just plant your (favorite) strain in the soil, and you're good to go. That's it. Of course, there are different kinds of soil, and some are better than others. High-quality potting soil will make your life easier and faster. You might also want to add some extra nutrients to make your weed grow better. Or you can make your own super soil. If you decide to buy soil, we suggest you go for the best brands, or at least those with a good soil mix. They should have things like earthworm castings, alfalfa meal, humic acid, etc. Can You Grow Weed Without Soil? Want to try something different? Go soilless. You'll see some quicker growth (and bigger harvests). And, conveniently, growing weed in soilless mediums is pretty similar to growing it in soil. The only difference is that you'll have to give the nutrients yourself because soilless mediums don't have any. Some examples of soilless mediums are coco coir, vermiculite, perlite, etc. What About Hydroponic Grows? Is it Complicated? No, hydroponic growth is not complicated. It's as easy as picking your setup (hydroponic system), getting your nutrients, and sprouting your seeds. And you'll get some amazing benefits: super-fast growth, huge yields, and super-strong weed. Sounds good, right? Don't believe everything you hear because some information can mess up your growth. But with the right setup and care, you can be sure of a plentiful harvest. What It Needs to Survive and Thrive: How to Grow Weed Plant? If you want to grow the best weed possible, you need to know your plant well. Here are some of the main things that a weed plant needs to thrive, and how it works. Light Light is the fuel that drives photosynthesis and growth in a weed plant. The fan leaves are like solar panels that absorb light. The more light you give your plants, the more buds they will produce. But be careful not to give them too much light. If you grow indoors, keep your lights at a safe distance from your plants, or you might burn them and ruin your nugs. And if your plants get too hot, they will dry out faster and need more water and attention. Weed plants usually need at least six hours of sunlight a day when they grow outdoors. This is called “full sun”. When they grow indoors, they usually get between 12 and 18 hours of artificial light a day, depending on their stage of growth. Weed is a photoperiod plant, which means that the amount of light it gets every day affects when it flowers and makes buds. Outdoors, this happens when the days get shorter in the fall. Indoors, you can make this happen by changing the light cycle from 18 to 12 hours a day. Water Water is essential for all plants, including weed. Water provides hydrogen for photosynthesis, and also carries nutrients from the soil to the plant through the roots, and throughout the whole plant. Water also helps the plant stay firm and flexible, by creating pressure on the cell walls. This allows the plant to bend with the wind or reach for more light. Plants also lose water through their leaves, like humans sweat, to cool down. This is called transpiration, and you can see it as droplets on the leaf tips. This may sound obvious, but you only need to water the soil or the medium where your weed plant grows, not the leaves or the plant itself. We suggest that you water a lot, but not too often, rather than a little, but more frequently. This way, the roots can dry out a bit and get more oxygen from the soil. Nutrients A marijuana plant needs several nutrients to grow and flower. The main nutrients it needs are: Nitrogen: Nitrogen helps a weed plant grow during the vegetative phase, when it makes more mass, stems, branches, and leaves. It is part of chlorophyll, the green pigment that helps the plant use light for photosynthesis. Phosphorus: Phosphorus is important for storing and using energy, as well as for root growth and bud development. It helps the plant take up nutrients and build its structure. Potassium: Potassium helps with many of the plant’s metabolic activities, such as respiration, transpiration, and enzyme activation. It also helps the plant fight off diseases and pests. Calcium: Calcium is a minor nutrient, but it still plays a role in keeping the plant’s cell walls intact, and helping the plant absorb other nutrients. Magnesium: Magnesium is part of chlorophyll, and helps the plant make glucose from photosynthesis. Without it, the plant can’t turn light into energy. CO2 Plants breathe in CO2 through tiny holes in their leaves called stomata. During photosynthesis, plants turn CO2 into glucose, which they use to grow and flower. Some indoor growers use a “CO2 burner”, which is a device that adds a little bit of CO2 to the air, to make the plants grow faster and bigger. But this is usually too much for home growers. Wind/airflow Wind or airflow is good for your plants, because it brings fresh air and CO2, which they need to grow. Airflow also prevents mold and diseases, by removing moisture from the inside of the plant, so it doesn’t get too wet. You can also use a technique called scragging, which spreads out the branches and lets more air in. Wind or airflow also makes your plant stronger and healthier, by making its stalks and branches thicker and sturdier. When a plant bends with the wind, it produces a hormone called auxin, which stimulates growth. What to Keep in Mind While Harvesting Weed? You probably know that different strains of weed need different amounts of time and sun to grow well. Sativas, which come from places near the equator, like a long and sunny summer to get fully ripe. Indicas, which come from colder and harsher places, are usually faster to finish. But there are exceptions, of course. Some indicas are slow and some sativas are quick. The best time of day to cut down your outdoor plants is in the morning, before the sun gets too strong. You don't want them to be wet from dew, but you also don't want them to be exposed to too much sunlight, which can ruin their flavor. You can also harvest at night when it's cooler, but the morning is better because the plants are fresher and haven't been under the sun all day. 1. Watch the weather As your buds get bigger and heavier and the season changes from summer to fall, the weather can change too. Depending on where you live, you might get some cold snaps or rainstorms. These are not the end of the world, but you do need to pay attention to the weather and maybe decide on the spot when to harvest your plants, balancing their ripeness with the risk of losing them. 2. Harvesting in Lower Temperatures According to sources, most weed plants can handle a light freeze—28-32°F for up to three hours—without any problem. But a hard freeze, anything lower or longer, can be a disaster. Frost can make ice crystals form in the plant cells, hurting them. The leaves will look droopy and then turn dark and crunchy. The worse the frost, the more damage to the plant. Remember that plants in pots are more sensitive to temperature changes than plants in the ground, so they are more likely to get frost damage. 3. Rainy Harvests Rain is not a big deal by itself, but it depends on how long and how hard it rains. If it's going to stop soon and dry up fast, you can leave your almost ready plants outside. But if the rain is going to stay, mold is waiting—better to harvest sooner than later. Covering your plants can help, but the air will still be humid. You can use some tall stakes and a tarp to cover them, but make sure to take them off when the rain or cold is over. In this way, the plants can warm up and breathe. When to Harvest Weed Plant? The type of plant growing determines when to harvest cannabis. Sativa, hybrid, and indica are the three primary kinds of cannabis seeds. Are you curious about the best time to harvest marijuana? Let me break it down for you! Sativa strain plants typically take longer to mature and give off a stronger cerebral height. However, Indica plants yield larger blooms and a more sedative, paralyzing high. When an Indica and a Sativa are crossed, hybrids that enable flowers to have both traits are created. While Sativa cultivars blossom in 10 to 16 weeks (about three and a half months), Indica varieties flower in 8 to 10 weeks (about two and a half months) on average. The cannabis plant can be found in hybrid form halfway between the two main species. It is important to understand that flowering times might vary based on environmental factors like temperature and duration of day. Thus, the questions of when and how to harvest cannabis remain unanswered. Knowing what you want to achieve with your cannabis plants can help you decide when to harvest them. Let's say you are growing cannabis for therapeutic purposes. Is there a unique method for harvesting cannabis in this case? If so, it is imperative to harvest the plant at the height of its cannabinoid content. But if you are cultivating cannabis seeds for fun purposes, then it is best to harvest marijuana at its peak maturity. How to Harvest Weed? Once you've decided when to harvest your cannabis, it's critical to understand how to harvest cannabis plants correctly. It's simple to harvest cannabis; you just need to cut the stem off at the root. But it's best not to pull the branch out of the ground since this could damage it and reduce its yield. It is crucial to properly dry the cannabis after harvesting it before stocking it. Hanging it upside down in a room with lots of ventilation and little light exposure is the best method to accomplish this, like a wardrobe. In order to efficiently dry cannabis, proper ventilation is necessary because it inhibits the growth of mold. Before you proceed to store it, ensure that you let your cannabis rest for some time. This can range anywhere from three to seven days. This is a great way to ensure that the leaves are dried and ready for you to store. Wrapping It Up! In case you were searching for the best ways on how to harvest weed, I hope that this blog has been of help to you. If there are any other queries related to the same, please feel free to let me know. All that you need to do is scroll down till you reach the bottom of the page. Then leave your suggestions in the box below. And I will be there to answer them all for you! More Resources: Choosing a Medical Marijuana Dispensary Marijuana Addiction Treatment: 5 Steps to Avoid Relapse What Are Tarpenes? How Do They Work? – Cannabis Guide Medical Marijuana Can Take New Dimensions in the Treatment of Pets
READ MOREDetails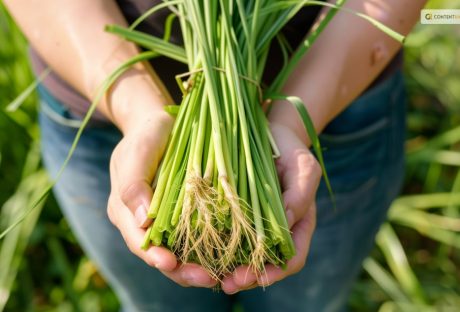
How TO Harvest Lemongrass: Tips AND Tricks FOR Growing AND Using This Versatile Herb
Lemongrass is a tropical herb that has a fresh and citrusy flavor and aroma. It is one of the most essential herb that is people widely use in Asian cuisines. They especially use it in Vietnamese, Thai, and Indonesian dishes. It is also a popular ingredient in teas, soups, curries, salads, and marinades. Lemongrass has many health benefits, such as improving digestion, boosting immunity, reducing inflammation, and relieving stress. But did you know that you can grow and harvest your own lemongrass at home? Yes, you can! Lemongrass is easy to grow and maintain, and can thrive in pots, containers, or gardens. You can enjoy fresh and organic lemongrass all year round, and save money and time from buying it at the store. In this article, I will show you how to harvest lemongrass, and share some tips and tricks for growing and using this versatile herb. By the end of this article, you will have a better understanding of how to harvest lemongrass, and how to make the most of this wonderful herb. So, if that is something that you want to know, I have you covered! Keep on reading this blog till the end to learn more… How to Grow Lemongrass? Lemongrass is a wonderful herb that can add a refreshing and citrusy flavor to your dishes, drinks, and teas. It is also a beautiful ornamental plant that can brighten up your garden with its tall, graceful stalks and fragrant leaves. Lemongrass is native to tropical regions, but you can grow it in cooler climates as well with some care and preparation. Here are the steps and conditions for growing lemongrass successfully at home: 1. Choose a healthy lemongrass plant or stalk You can buy a potted lemongrass plant from a nursery or garden center, or you can start your own from a fresh lemongrass stalk that you can find in most grocery stores or Asian markets. Look for a stalk that is firm, green, and has some roots at the base. Avoid any that are dry, brown, or moldy. 2. Prepare a sunny and warm spot for your lemongrass Lemongrass loves full sun and heat, so choose a location that gets at least six hours of direct sunlight per day. If you live in a colder region, you can grow lemongrass in a container that you can move indoors during the winter. Use a large pot with drainage holes and fill it with rich, loamy soil that is high in organic matter. You can also add some compost, manure, or leaf mold to improve the soil quality and fertility. 3. Plant your lemongrass in the soil If you bought a potted plant, simply transplant it to the ground or a larger container, making sure to bury the roots well and leave some space between the stalks. If you are starting from a stalk, peel off any dead or yellow leaves and trim the top part to about six inches. Place the stalk in a glass of water and keep it in a sunny windowsill until roots start to grow, which can take a few weeks. Then, plant the rooted stalk in the soil, leaving about two inches of the stem above the ground. Space the plants about two feet apart to allow them to spread 4. Water and fertilize your lemongrass regularly Lemongrass needs moist soil to thrive, so water it frequently and deeply, especially during hot and dry periods. A good rule of thumb is to water it once a week or whenever the top inch of the soil feels dry. You can also apply a layer of mulch around the plants to conserve moisture and prevent weeds. Lemongrass also benefits from a monthly dose of liquid organic fertilizer during the growing season, such as fish emulsion or seaweed extract. This will help it grow faster and produce more leaves and stalks. 5. Harvest and enjoy your lemongrass You can start harvesting your lemongrass when the stalks are about a foot tall and half an inch thick. Cut the stalks at the base with a sharp knife or scissors, leaving about two inches of the stem in the ground. Additionally, you can use the whole stalk, or peel off the outer layers and use only the tender inner part. You can also harvest the leaves and use them fresh or dried for teas and infusions. Lemongrass can be stored in the refrigerator for up to two weeks, or in the freezer for up to six months. You can also dry it and store it in an airtight container for later use. How to Harvest Lemongrass? Harvesting lemongrass is a simple and satisfying process that can be done in a few steps. Here are the basics of how to harvest lemongrass: Choose the right time The best time to harvest lemongrass is when the stalks are about 12 inches tall and 0.5 inches thick. This usually happens after 3 to 4 months of planting. You can harvest lemongrass throughout the year, as long as the temperature is above 40°F. You can also harvest lemongrass in batches, leaving some stalks to grow and regenerate. Cut the stalks To harvest lemongrass, you need a sharp knife or scissors, and a clean cutting board. Cut the stalks at the base, as close to the soil as possible. You can cut as many stalks as you need, or as many as you can use within a week. You can also trim off the leaves, as they are not edible and can be used for other purposes. Wash and store the stalks After cutting the stalks, wash them under running water, and pat them dry with a paper towel. You can store the stalks in the refrigerator, wrapped in a damp paper towel, and placed in a plastic bag. They can last for up to a week. You can also freeze the stalks, chopped or whole, in a freezer bag. They can last for up to 6 months. Dividing Lemongrass: What is It and How to Do It? Dividing lemongrass is a great way to propagate and maintain this aromatic and flavorful herb. Lemongrass is a perennial plant that grows in clumps of stalks and leaves. Over time, these clumps can become crowded, woody, and less productive. By dividing lemongrass, you can rejuvenate the plant, increase its yield, and share it with others. Here are the steps and reasons for dividing lemongrass: 1. When to divide lemongrass? The best time to divide lemongrass is in the spring, after the last frost date when the plant is actively growing and has new shoots. You can also divide lemongrass in the fall if you live in a warm winter climate or if you plan to overwinter the divisions indoors. Avoid dividing lemongrass in the summer, when the heat and drought can stress the plant and reduce its survival rate. 2. How to divide lemongrass? To divide lemongrass, you must dig up the entire plant and separate it into smaller sections. You can use a shovel, a sharp knife, or your hands to do this. Each section should have at least one inch of root and several healthy stalks and leaves attached. You can trim the leaves to about six inches to reduce water loss and make the divisions easier to handle. Discard any old, brown, or damaged parts of the plant. 3. Where to plant lemongrass divisions? You can plant lemongrass divisions in the same spot where you dug up the parent plant or in a new location with full sun, moist and well-drained soil, and plenty of organic matter. You can also plant lemongrass divisions in containers at least 10 inches deep with drainage holes. Space the divisions about two feet apart to allow room for growth. Plant the divisions at the same depth as they were before, with the crown just below the soil surface. 4. How to care for lemongrass divisions? Lemongrass divisions need regular water and fertilizer to establish and thrive. Water them deeply and frequently, especially during the first few weeks and during hot and dry periods. You can also apply a layer of mulch around the plants to conserve moisture and prevent weeds. Fertilize the plants once a month with a liquid organic fertilizer, such as fish emulsion or seaweed extract, during the growing season. Protect the plants from frost in the winter by moving them indoors or covering them with a frost cloth. 5. How to harvest and use lemongrass divisions? You can start harvesting lemongrass divisions when they are about a foot tall and half an inch thick. Cut the stalks at the base with a sharp knife or scissors, leaving about two inches of the stem in the ground. You can use the whole stalk, peel off the outer layers, and use only the tender inner part. Additionally, you can also harvest the leaves and use them fresh or dried for teas and infusions. Lemongrass can be stored in the refrigerator for up to two weeks or in the freezer for up to six months. You can also dry it and store it in an airtight container for later use. How to Use Lemongrass in Food? Lemongrass has a long, green stalk with a bulbous base and grassy leaves. It has a lemony taste with a hint of mint and ginger. Lemongrass can be used fresh, dried, or powdered, depending on the recipe and preference. Here are some ways related to how to use lemongrass in different ways: Fresh lemongrass Firstly, fresh lemongrass is the most aromatic and versatile form of lemongrass. You can find it in the produce section of most supermarkets, Asian markets, or online. To prepare fresh lemongrass, you need to peel off the tough outer layers and trim off the root end and the top third of the stalk. You can use a sharp knife or scissors to do this. The part that you want to use is the pale and tender lower part of the stalk. After that, you can slice it thinly, chop it finely, or bruise it with a pestle or the back of a knife. Slicing or chopping is good for salads, stir-fries, curries, and marinades, while bruising is good for soups, stews, and broths. You can also make a paste by pounding or blending lemongrass with other ingredients, such as garlic, ginger, chilies, and cilantro. A paste is great for adding flavor to meats, seafood, tofu, and rice. You can store fresh lemongrass in the refrigerator for up to two weeks or in the freezer for up to six months. Dried lemongrass Secondly, dried lemongrass is less potent than fresh lemongrass but still has a nice, lemony flavor. You can buy it in whole or sliced form or dry your lemongrass by hanging the stalks in a warm and airy place until they are brittle. Dried lemongrass is good for making teas, infusions, and herbal blends. You can also use it to flavor soups, stews, and broths, but you must soak it in hot water for about 20 minutes before adding it to the pot. Additionally, you can store dried lemongrass in an airtight container in a cool, dark place for up to a year. Powdered lemongrass Lastly, powdered lemongrass is the most convenient form of lemongrass, as it does not require any preparation. You can buy it in spice shops, Asian markets, or online. Powdered lemongrass has a mild and sweet flavor and can be used in baking, desserts, sauces, and dressings. You can also sprinkle it over salads, soups, and stir-fries for a touch of freshness. The shelf life of powdered lemongrass is also great. For up to six months, you can store powdered lemongrass in an airtight container in a cool and dark place. How to Use Lemongrass in Other Things? Apart from cooking, you can use lemongrass in many other ways. Some of the best and most popular uses of this herb are as follows: Beautifying You can use lemongrass to make your own beauty products, such as soap, lotion, or shampoo. You can infuse the stalks or the leaves with oil, such as coconut, olive, or almond oil. Moreover, you can also add other ingredients, such as honey, aloe vera, or essential oils. You can use the products to cleanse, moisturize, or scent your skin and hair. Healing You can use lemongrass to treat various ailments, such as headaches, colds, or infections. You can inhale the steam from boiling the stalks or the leaves, or apply the oil to your temples, chest, or throat. Additionally, you can also drink the tea, or gargle with the syrup. You can use the products to relieve pain, inflammation, or congestion. Wrapping It Up! If you want to know how to harvest lemongrass, I hope that this blog has been of help to you. If there are any other queries about the same, please feel free to let me know. All that you need to do is scroll down till you reach the bottom of the bottom of the page. Then leave your suggestions and comments in the box below. And I will be there to answer them all for you! Learn More About: Everything You Need To Know About Harvesting Basil Asparagus 101: When, How, And How Often To Harvest? How to Harvest Spinach the Right Way: A Step-by-Step Guide
READ MOREDetails
How To Harvest Sunflower Seeds: A Fun And Easy Activity For The Whole Family
Sunflowers are not only beautiful and cheerful, but they also produce delicious and nutritious seeds that you can enjoy as a snack or use in various recipes. Harvesting sunflower seeds is a fun and easy activity that you can do with your whole family. It is also a great way to teach your kids about nature, gardening, and healthy eating. In this article, I will show you how to harvest sunflower seeds in a few simple steps, as well as some tips and tricks to make the most of your sunflower harvest. If you enjoyed reading my blog on harvesting lettuce, you will enjoy reading this one! So, if that is what you are interested in knowing, I have you covered! Keep reading this blog till the end to learn more… How to Grow Sunflower Seeds: A Simple and Rewarding Gardening Project? Sunflowers are one of the most iconic and cheerful flowers in the world. They are also one of the easiest and most rewarding plants to grow from seeds. Sunflowers can brighten up your garden, attract pollinators, provide shade, and produce edible seeds that you can harvest and enjoy. In this part of the article, I will show you how to grow sunflower seeds in a few simple steps, as well as some tips and tricks to make the most of your sunflower growing experience. How to Choose Sunflower Seeds? The first step to growing sunflower seeds is to choose the right seeds for your garden. Sunflowers come in a wide range of sizes, colors, shapes, and types. Some of the most common types of sunflowers are: Giant sunflowers These are the tallest and largest sunflowers, reaching up to 15 feet in height and 12 inches in diameter. They produce huge and heavy flower heads that are filled with large and plump seeds. They are ideal for creating a dramatic and impressive display in your garden, as well as for harvesting large quantities of seeds. Some examples of giant sunflowers are Mammoth, Titan, and Kong. Dwarf sunflowers These are the smallest and shortest sunflowers, growing up to 3 feet in height and 6 inches in diameter. They produce smaller and lighter flower heads that are easier to manage and maintain. They are ideal for growing in containers, pots, or small spaces, as well as for adding a splash of color and charm to your garden. Some examples of dwarf sunflowers are Teddy Bear, Sunny Smile, and Little Becka. Colored sunflowers These are the most diverse and colorful sunflowers, ranging from yellow, orange, red, pink, purple, brown, and even green. They produce medium-sized flower heads that are attractive and eye-catching. They are ideal for creating a vibrant and varied display in your garden, as well as for cutting and arranging in bouquets or vases. Some examples of colored sunflowers are Autumn Beauty, Moulin Rouge, and Lemon Queen. Things to Consider While Choosing Sunflower Seed When choosing sunflower seeds, there are several things that you need to keep in mind. For instance, you should also consider the following factors: Climate and season of your area Sunflowers are warm-season plants that need full sun and warm temperatures to grow and bloom. They are best planted in late spring or early summer, after the last frost, when the soil is warm and moist. If you live in a cold or frost-prone area, you can start your seeds indoors and transplant them outdoors when the weather is favorable. Soil and water conditions of your garden Sunflowers are adaptable and tolerant plants that can grow in most types of soil, as long as they are well-drained and fertile. They prefer slightly acidic to neutral soil with a pH of 6.0 to 7.5. They also need regular watering, especially during the germination and flowering stages. However, they can withstand some drought and dryness once they are established. Space and support available in your garden Sunflowers are large and sturdy plants that need ample space and support to grow and thrive. They should be planted at least 2 to 3 feet apart from each other and from other plants, to avoid overcrowding and competition. They should also be staked or tied to a fence, a trellis, or a pole, to prevent them from bending or breaking under their own weight. How to Plant Sunflower Seeds? Once you have chosen your sunflower seeds, you can proceed to the next step. Planting sunflower seeds is a simple process that involves preparing, sowing, and caring for the seeds. Here is how to do it: Prepare the Soil Prepare the soil by loosening it with a fork or a spade. Ensure that you remove debris, weeds, or rocks. You can also enrich your soil by adding some compost, manure, or fertilizer, to boost its fertility and drainage. Make sure the soil is moist but not soggy, and has a temperature of at least 50°F. Sow the Seeds Sow the seeds by making holes or furrows in the soil, about 1 to 2 inches deep and 2 to 3 feet apart. You can use a ruler, a stick, or your finger to make the holes or furrows. Drop one or two seeds in each hole or furrow, and cover them lightly with soil. You can also sprinkle some water over the seeds to help them settle in the soil. Nurture Care for the seeds by watering them regularly, but not excessively, to keep the soil moist but not wet. You can also mulch the soil with straw, grass clippings, or leaves, to retain moisture and prevent weeds. You should also protect the seeds from birds, squirrels, or other animals, by covering them with a net, a cage, or a cloche. You should also thin the seedlings when they are about 4 to 6 inches tall, by removing the weaker or smaller ones, and leaving only the strongest and healthiest ones. How to Grow Sunflower Seeds? After planting your sunflower seeds, you can watch them grow and enjoy their beauty and bounty. Growing sunflower seeds is a rewarding and satisfying experience that requires minimal maintenance and care. Here are some tips and tricks to grow sunflower seeds successfully: Water Water your sunflowers regularly, but not excessively, to keep the soil moist but not wet. Sunflowers need about 1 to 2 inches of water per week, depending on the weather and the soil conditions. You can use a hose, a sprinkler, or a drip irrigation system to water your sunflowers. You should water them in the morning or evening, and avoid wetting the leaves or the flower heads, to prevent fungal diseases. Fertilizer Fertilize your sunflowers occasionally, but not excessively, to boost their growth and flowering. Sunflowers need a balanced fertilizer that contains nitrogen, phosphorus, and potassium, such as a 10-10-10 or a 20-20-20 formula. You can apply the fertilizer once or twice during the growing season, following the instructions on the label. You should avoid over-fertilizing your sunflowers, as this can cause them to grow too tall and weak, and make them prone to pests and diseases. Pruning Prune your sunflowers occasionally, but not excessively, to improve their shape and health. Sunflowers do not need much pruning, as they are naturally self-pruning and self-cleaning. However, you can prune them to remove any dead, damaged, or diseased leaves, stems, or flowers, to prevent infection and improve air circulation. You can also prune them to control their height and spread, by pinching or cutting off the tips of the main stem or the side branches. You should use clean and sharp scissors or pruners to prune your sunflowers and do it in the morning or evening when the plants are less stressed. When to Harvest Sunflower Seeds? The first step to harvesting sunflower seeds is to know when they are ready. Sunflowers typically bloom in the summer and their seeds mature in late summer or early fall. You can tell when your sunflowers are ready to harvest by looking at their appearance and feel. Here are some signs that your sunflowers are ready to harvest: Petals have fallen off or turned brown. The back of the flower head has turned yellow or brown. Seeds have developed black and white stripes. The seeds are plump and firm to the touch. If you are not sure if your sunflowers are ready to harvest, you can do a simple test by rubbing your thumb over the seeds. If they come off easily, they are ready to harvest. If they are still attached to the flower head, they need more time to ripen. How to Harvest Sunflower Seeds? Once you have determined that your sunflowers are ready to harvest, you can proceed to the next step. Harvesting sunflower seeds is a simple process that involves cutting, drying, and storing the seeds. Here is how to do it: Cut the flower heads from the stems using a sharp knife or scissors. Leave about 12 inches of stem attached to the flower head for easier handling. Place the flower heads in a dry and well-ventilated area, such as a garage, shed, or porch. You can hang them upside down or lay them flat on a screen or rack. Make sure they are not touching each other to prevent mold and rot. Let the flower heads dry for about two weeks or until the seeds are completely dry and hard. You can check the dryness by biting or cracking a seed. If it is crunchy and not moist, it is dry enough. Remove the seeds from the flower heads by rubbing them gently with your hands or a soft brush. You can also use a fork or a spoon to scrape them off. Discard any debris, such as petals, leaves, or insects. Store the seeds in an airtight container, such as a glass jar, a plastic bag, or a metal tin. Label the container with the date and the variety of sunflower. Keep the container in a cool and dark place, such as a pantry, a cupboard, or a basement. How to Enjoy Sunflower Seeds? Now that you have harvested your sunflower seeds, you can enjoy them in various ways. You can eat them raw or roasted, salted or unsalted, shelled or unshelled. You can also use them in salads, soups, breads, muffins, granola, trail mix, pesto, butter, and more. Sunflower seeds are rich in protein, fiber, healthy fats, vitamins, minerals, and antioxidants. They can help manage high cholesterol, blood pressure, and inflammation and boost your immune system, brain function, and mood. Here are some tips and tricks to enjoy your sunflower seeds: Roast To roast your sunflower seeds, spread them in a single layer on a baking sheet and bake them in a preheated oven at 300°F for about 15 to 20 minutes, stirring occasionally, until golden and crisp. You can season them with salt, pepper, garlic, onion, paprika, cumin, or any other spices you like. Shell To shell your sunflower seeds, you can use your teeth, your fingers, or a nutcracker. You can also soak them in water for a few hours to make them easier to shell. To remove the shells, you can blow them away with a fan, a hair dryer, or your mouth, or you can shake them in a colander or a sieve. Sunflower Seed Butter To make sunflower seed butter, you need to blend the shelled and roasted sunflower seeds in a blender until it turns smooth and creamy. You can add a little oil, honey, salt, or vanilla to enhance the flavor and texture. You can use sunflower seed butter as a spread for toast, crackers, or fruit, or as a dip for pretzels, celery, or carrots. Pesto To make sunflower seed pesto, blend roasted and shelled sunflower seeds with fresh basil, garlic, olive oil, lemon juice, salt, and pepper in a food processor or a blender until smooth and thick. You can use sunflower seed pesto as a sauce for pasta, pizza, or sandwiches, or as a dressing for salads or roasted vegetables. Wrapping It Up! Harvesting sunflower seeds is a fun and easy activity that you can do with your whole family. It is also a great way to enjoy the beauty and bounty of nature, as well as the health benefits of sunflower seeds. By following the steps and tips in this article, you know how to harvest sunflower seeds in a few simple steps, as well as enjoy them in various ways. I hope you found this article helpful and informative. If there are any other queries related to the same, please feel free to let me know. All that yo need to do is scroll down till you reach the bottom of the page. Then leave your comments and suggestions in the box below. And I will be ether to answer them all for you! Learn More About: Best Material for Garden Sheds: A Guide for Everyone Asparagus 101: When, How, And How Often To Harvest? Best Gardening Tips For Beginners: Adopting A Relaxing Hobby
READ MOREDetails
CBG vs. CBN: Navigating The Lesser-Known Cannabinoids
While cannabis usage and exploration are evolving, the shadow of its most popular cannabinoid pair, THC and CBD, may finally be lifting on two newbies to this magical family tree within the flower we all know and love Cannabigerol (CG) and Cannabinol (CBN). With the preponderance of experience from the familiar fun of THC-induced highs to the meditative balm of CBD’s therapeutic benefits, these less-well-known cannabinoid compounds may come as a surprise – and cannabis connoisseurs may just find them to be a treat for the CBD-toned brain. And as one who’s dipped a toe into all things cannabis-related personally and professionally, I’d like to share some insights into these so-called minor cannabinoids, but in a major, professional, and trusted way. Hail to the unknown and underappreciated! Enter CBG and CBN, stage left Research, personal experience, and murmurs of the ganja community are about to collide for your entertainment and perhaps enlightenment about these two oft-overlooked members of the cannabis clan. What Are CBG and CBN? To get the lowdown, it’s a good idea to figure out exactly what CBG and CBN are. CBG, or cannabigerol, is sometimes referred to as the ‘mother of all cannabinoids’ because, in its acidic CBGA form, it’s the precursor molecule of several other cannabinoids. Non-psychoactive, it’s believed to have a number of potentially beneficial therapeutic actions. The other compound is CBN or cannabinol, which results when THC ages and breaks down. It’s mildly psychoactive but nowhere near as much as cannabis itself. The Unique Promise of CBG CBG first came onto my radar when I was researching botanical solutions to gut ailments. Word on the street was that the cannabinoid could potentially provide immense relief – an assertion ostensibly supported by CBG’s reported anti-inflammatory and analgesic effects. In my case, I found some of that buzz to be spot-on. Soon after adding this cannabinoid to my routine, I took note of some discernible improvements with respect to my digestive comfort. I didn’t experience transformative results right out of the gates but, over time with continued use, those uncomfortable days grew less frequently. Studies also indicate that CBG might have neuroprotective, anticancer, and antibacterial effects. CBG might be the ultimate versatile cannabinoid for physical relief and preventative health benefits. The Calming Effects of CBN The first time I used CBN was to help a friend sleep better. She’d tried meditation and melatonin without much luck. Both made her light and scatterbrained and though she could manage her insomnia with the sheer force of will, she was curious to try another approach. I was curious, too, and decided to experiment alongside her. My own sleep patterns were never great, even on nights when I could turn off the TV (and the iPad) in time to hit the sheets by midnight. Alongside her, I found CBN to be a relaxing sleep aid. I wouldn’t call it a ‘sleeping pill’ as it doesn’t put you down for the night quite the same way that sort of remedy does. But there are lots of nights when I need a nudge toward rest, times when my mind is filled with deadlines and to-dos. On those occasions, a CBN-infused tincture has become an excellent tool for inducing a Guitar-Strum-Country-And-Western brain noodle. CBN is also being tested as a pain reliever, anti-inflammatory, and neuroprotectant (a compound with the ability to reduce cell death associated with stroke, traumatic brain injury, and neurodegenerative disorders). Human trials are just beginning, but the outlook appears encouraging. Personal Experience: A Balancing Act My experience trying to understand the world of CBG vs CBN has been confusing, enlightening, and, above all, very informative. I have learnt that, while both cannabinoids can supplement our lives, they have to be used at the right time to work for specific needs. CBG has become my ally during the day, a cannabinoid that makes me feel slightly better than usual but does not have any psychoactive effects. CBN will stay in my nighttime routine, not as a substitute for sleeping pills but as a way to create a more prone state. Pros and Cons Pros - CBG: Potential digestive aid and anti-inflammatory. Non-intoxicating, making it suitable for daytime use. Versatile benefits span from neuroprotection to antibacterial effects. Pros - CBN: Promotes relaxation and may improve sleep quality. Mildly psychoactive, offering a gentle experience. Potential pain reliever and anti-inflammatory properties. Cons - CBG: Low availability and more expensive due to lower yields from cannabis plant. Research is still emerging, making definitive conclusions about its efficacy premature. Cons - CBN: Effects can vary greatly among individuals; not everyone may experience significant sleep benefits. Because it’s apparently derived from the degradation of THC, its legal status can be unclear in some places. Final Thoughts This journey of discovery into CBG and CBN has both amazed me and taught me a lot. My experiences have generally been good ones, but reactions can differ – start small and work up from there, to be sure. While the research is still emerging, it’s possible that CBG and to some extent, CBN can transcend their minor cannabinoid status and join the ranks of CBD and THC. For cannabis connoisseurs and curious neophytes alike, this new frontier means looking deeper than ever into the increasingly multilayered beauty and therapeutic promise of the plant. Cheers to good science and many more cannabinoids on the horizon. Read Also: How Does CBD Affect Your Drug Tests? How CBD Oil Capsules Are Changing People’s Lives What is Cannabis Oil and how does CBD Oil Work?
READ MOREDetailsPopular

Technologies For Creating A Startup Idea
20 Feb 2023

How to Download Facebook Videos on Android?
07 Feb 2019

7 Rules of Effective Ecommerce Web Design
28 Jan 2021

Why Are Online Transactions Convenient?
07 Dec 2023
