Why Gamers Need Headphones

Published on: 02 July 2019 Last Updated on: 21 August 2019
Headphones

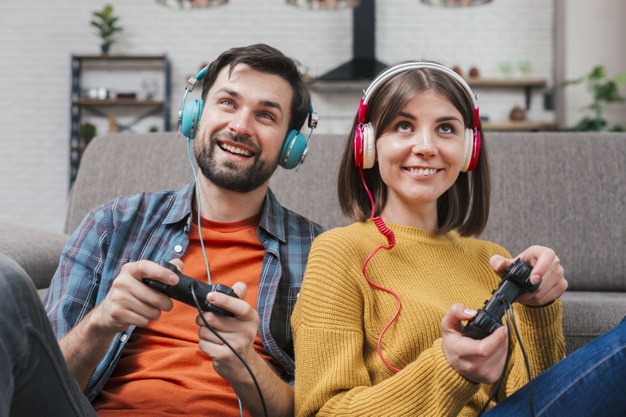
If you are a passionate gamer and have spent a lot of money on gaming platforms and accessories, then trust me, you don’t want to compromise on the sound. Why? To be honest, this question has a straightforward answer because if you are a gamer, then you don’t want to miss out even slight detail as it could lead to the end of the session for you if not picked on time and acted accordingly. No matter it’s the hint of enemy approaching, or a plane, a car, a grenade or a gun fired in the game you want to know at that exact moment otherwise it could be the end for you. This requires detail, and for that, you want to immerse yourself into it, and there’s nothing better than a headset to do it, but there are certain aspects you need to keep in check while going for a headset which includes comfort, noise isolation, wired or wireless. Check out some of the best gaming headphones currently available on the market via this list.

In case your headset is not comfortable, and you prefer to play games for extended sessions, then it could lead to fatigue. So, the design, along with sufficient padding provided on the earcups and headband is a crucial thing to consider. Moreover, how good is the noise isolation, well in case you are playing in an atmosphere where there’s distraction due to noise then you could miss up on detail. To achieve better in these terms, you need an earphone which provides sufficient noise isolation in terms of ambient sounds. Additionally, what is best in terms of connectivity? Wired or wireless. Honestly, it’s a never-ending debate as both have their pros and cons. Wired delivers sound better and is not impacted by surroundings in case of any sort of interference which wireless is prone to. Furthermore, wired is not dependent on the battery, as I said earlier if you prefer to go for longer sessions of gaming you certainly don’t want to charge it in the middle of a game at any crucial stage. On the other hand, with wired you are bound to a certain range and you have to handle cord if your headphones are not up to your standards of gaming then you can check excellent recommendations on Headphonesaholic.

Are Regular Headphones Good for Gaming?

Headphones

It’s among the most debated questions, but there are some differences as well as similarities in both cases. As for routine or regular headsets, they are mainly focused on audio drivers, comfort, and build on the other hand the gaming ones are focused on comfort, surround sound, design, platform, and mic. Well, as I said, you could notice that comfort is considered in both cases as it’s a necessity, but what is surround sound and why gaming headsets are focused on it? That’s the thing which makes gaming earphones debatable as audiophiles consider it as an artificial boost to enhance the experience and are certainly not like. There are two types of surround sound, one is real, and the other is virtual surround sound. In the real, all the drivers are supposed to work in harmony, giving you a realistic sound, and the virtual is based on software. Moreover, major companies also focus on the platforms when it comes to gaming headphones as it could be PS4 or Xbox so depending on the platform you are using these companies try to design them according, so it suits your requirements as well as needs. In most of the regular headsets, the mic is usually missing as it’s not considered that important, but for gaming headsets it’s essential. As nowadays the games are usually multiplayer or with more than two players such as the famous release of Pubg etc. These games allow users to communicate with each other, and it requires a great mic to do it.

Lastly, I would say that although there are significant differences between the gaming headsets and regular ones, you can still use the type to play games. However, if you are passionate about it, then you should choose one which is specially designed for gaming purpose.

Read Also:

Content Rally wrapped around an online publication where you can publish your own intellectuals. It is a publishing platform designed to make great stories by content creators. This is your era, your place to be online. So come forward share your views, thoughts and ideas via Content Rally.

View all posts

Leave a Reply

Your email address will not be published. Required fields are marked *

Related

Soldering Iron

How to Use a Soldering Iron

Of all techniques and methods used to join surfaces, metal sheets, Iron, and other objects together, soldering is highly preferred because it does not cause any type of damage to the items being joined together. This is because the solder used to stick them together has a lower melting point than most metals and it offers durable yet reversible bonds between the items. In addition to that, although there are a few key differences between the two types of soldering gear used, they share a similar trait and they’re both easily operable, which we will discover more in this article What Is Soldering? There are several types of soldering using different filler metals called solder, but, they all use the same concept which is heating a filler metal between two items so that it melts and fills the seam between the two items. Soldering is done using either individually bought soldering gear, which allows you to choose the type of tool that is most suitable for the project you are planning to work on, or a soldering station which usually is a standard combination of a soldering iron and a power supply. Soldering Iron  In order to learn how to use a soldering iron, one must first know its basic parts and the science behind its mode of operation. It is simply a tool that connects to a power supply, it consists of a handle that doesn’t conduct heat and a tip that heats up very quickly to high temperatures so it can melt the solder, it also cools down fast. To Be More Specific, The Main Parts Of Soldering Iron Are: Soldering tip: All soldering irons contain iron tips which are the only part that heats up; it doesn’t ooze out the solder as most people think, it simply heats the metals being joined so that when the solder is applied, it melts, but more often than not, the solder would stick on the tip. Luckily, most tips are interchangeable so, you can replace your tip in case of damage or in case you need a specialized tip to suit your uses; bear in mind that tips vary in size and shape, thus, they vary in their uses as well. Wand: The wand is the handheld part of the iron that the tip is attached to. It can be made from a large number of materials that poorly conduct heat or isolate it completely so as to prevent heat from the tip from transferring to the part where the wand makes contact with the skin. Inside the wand, there are wires and metal contacts that conduct and convert the electricity from the power outlet to heat. The contradicting functions of a wand are the reason why most people prefer to buy high-quality wands from renowned brands. Of course, there are other extras and accessories like brass sponges, cradles, and tip tinner which can be purchased individually or found in soldering stations which is actually one of the advantages of soldering stations; but, the two main parts will always remain the tip and the wand. Step 1: Safety First of all, before using a soldering iron, you must be familiar with standard safety precautions since the iron tends to get really hot; not to mention the fact that solder is literally molten metal. So, it would be smart of you to wear protective gear such as; safety goggles and protective gloves, because your fingers are most likely to come into contact with the tip during the first few times. You also should keep in mind to tie your hair and avoid wearing loose-fitting clothes. Moreover, it is preferable to work in a well-ventilated area since some types of solder contain lead which produces toxic fumes, it is also important to thoroughly clean your hands after handling lead-based material. Step 2: Preparing The Tip The tip should be regularly cleaned of any old solder because when old solder solidifies, it turns into a heat isolator due to oxidization resulting in a totally inefficient and highly wasteful soldering process. Not only that but also, slow heating means that you will have to hold the iron to the items being joined for a longer time; it would be highly inconvenient for you and very damaging for sensitive objects like PCBs. So, when the iron is fully heated, softly drag the tip against a sponge to remove old solder. You want to aim for a shiny tip. After cleaning the tip, you should “tin” the tip; to make it last longer and conduct heat better through newfound layers of solder. Same as above, on a fully heated iron, apply a little piece of solder and lightly coat the tip with tinner; then, immediately start soldering while cleaning and tinning the tip between every couple of joints for maximum conductivity and efficiency. Step 3: Actual soldering With your dominant hand holding the iron and the other holding a piece of solder, touch the area where the object comes into contact with the solder and hold it there for about a second then slide the solder underneath the tip while pushing the solder rod further according to how much solder you need. Then, make sure to pull back the solder first while holding the tip in position until all the solder melts; it usually takes about five seconds or less. Solder cools down fast so, you will not need to blow on the joint since it will only lead to a weak joint which can be identified by its oxidized, unclear, and grainy appearance. What you want to get is a smooth connection, not a lump. Finishing touches : After you’ve had enough soldering for the day, clean and in the tip again before you put it into storage, it helps increase its lifespan. As you may have noticed, soldering is not that hard of a task, it only requires soldering gear, steady hands, and concentration. So, go ahead, start soldering, and don’t be afraid to get creative. Read Also: Is Polyester Stretchy? – Its Materials & Properties [Detailed Explanation] Top 6 Different Types Of Scarves Names And Its Benefits How to Thicken Chili – Tried and Tested

READ MOREDetails
Alexa device issue

How To Troubleshoot The Alexa Not Responding Issue? [Fixed]

Alexa is a virtual assistant, which works with an echo dot in order to fulfill all the demands of its users. With its thousands of attractive features, Alexa has made the life of its users super easy and also entertaining at the same time.  With its hi-tech features, Alexa can do almost everything from controlling smart home lights to set reminders, playing songs, jokes, news, quizzes, and much more things. But due to some reasons, you may find your Alexa not responding to the commands that you are giving it.  Do not worry if you are facing the Alexa not responding issue. Here we have the most effective and easiest troubleshooting steps to fix this issue.  Troubleshoot The Alexa Not Responding Issue: Here are the troubleshooting steps that you need to follow for solving the Alexa not responding issue with your echo dot. There are a bunch of reasons for what you may be facing this Alexa not working issue.  So, let’s head towards the troubleshooting steps.  1. Check The Microphone Button There are many instances when we find that the reason behind Alexa not responding is because the microphone is damaged or we forget to turn the button on. The microphone button is one of the most common reasons for this issue.  So, check the microphone button first. If the issue persists and it seems that everything is totally fine there. You can step to the next process.  2. Reboot The Device This is one of the most effective and easiest ways in the whole troubleshooting process of Alexa is not responding issue. There is not much trouble, all you need to do is just restart the device and the issue will get resolved. But this restarting has a definite name called power drain, and it is more than just powering off the power button and power on it again.  Here is the step-by-step guide for the power drain process. First, you need to check the power light. In case it is showing blue light, that means the device is able to hear you but simply the Alexa device is unresponsive to your commands.  Disconnect the power cable from the power source for at least 30 seconds. Wait for a little while, and after that, connect the power cord again with the power outlet. Now, when your device is ready completely, try to give it any command again. If the issue is resolved, then it is fine. But in case the issue of Alexa not responding continues, head to the next step.  3. Echo Dot Hard Reset In case the above described troubleshoot does not work for your echo dot. Here is the step-by-step guide to hard reset. You will find the reset button at the bottom of the device. You can use a pin to press the button. As soon as you press the button, the device will power off. Here, you need to wait for a little and then power the device on again. All the settings of the device will then reset to the original.  4. Disable And Enable Alexa Privacy If Alexa not responding after all the above-mentioned troubleshooting steps, now is the time to enable Alexa privacy and in order to do so, follow the below steps. You will find a button at the end of Alexa’s nucleus screen. You need to press the button. This button is to enable the privacy of Alexa. If you press the button again, the device will hear you again. Give a command to Alexa in order to check whether the issue is resolved or not.  5. Check Your WiFi Connection Behind the “Alexa not responding” issue, there is a huge chance that maybe your wifi connection is not working properly. That is why Alexa is finding it difficult to respond to your commands.  Well, let me tell you that if you do not have a proper internet connection, there will be no use for this Alexa device. So, check the router now. In case you find anything wrong, contact your network service provider.  6. Try Changing The Position  In case you have placed your echo dot device far from your router or in someplace where it is having issues connecting with the router. This can be the main reason why you are experiencing “Alexa not responding.”  Make sure that you are placing Alexa within the wifi range. The place should be accessible to yours as well so that your echo dot device can connect with the network properly and also can hear you clearly.  7. Set Echo And Smartphone On The Same Network Always keep in mind that the smartphone that you are using and Alexa have to be connected within the same network. In case they are connected with different routers or your phone is not connected with the router’s network, you will face the “Alexa not responding issues.” Connect both of them on the same router’s network in order to resolve the issue.  8. WiFi Congestions If you have connected a lot of devices within the same router’s network, it may create the “Alexa not responding” issue. Due to excessive wifi congestions, your echo dot is not able to respond to your given commands. Remove or disconnect some other devices, and then try to give your device command and check if the issue is resolved.  Still Alexa Not Responding? All the steps that I have told you in this troubleshooting guide are enough for resolving Alexa not responding to voice issue. But if you face the same problem after performing all the troubleshooting steps. You should contact Alexa customer care. Call on the Alexa helpline number and ask for help.  More Resources:  Benefits Of Having A Cordless Vacuum Cleaner At Home What is type c cable, and is it worth buying

READ MOREDetails
Button cell battery chart

Button Cell Battery Chart- know about it more

Did your flashlight battery run out? If yes, then it will be good if you buy a new battery for your flashlight according to the recommendation from the manufacturers. If you follow the instructions or manuals given by the manufacturer inside then you can save your device from damages and wrong type of batteries. While you are replacing the batteries make sure to check the details such as battery type, capacity, chemistry, dimensions, max pulse current, self-discharge rate, etc. It may sound complicated however it is necessary for good performance of the gadget. Here we have small tips related to battery and its safety- You must never recharge the battery with the wrong charger as well as do not charge primary batteries or it may explode and cause fires. Do not swallow the battery; keep your kids away from it. These NiMH and lithium batteries do not contain toxic metals but they are dangerous and when swallowed electrolytes will close the circuit in the body as well as cause chemical reaction which caused the ultimate death of a person. Battery types: Coin/ button cell battery: These are grouped under no- rechargeable batteries. It is common in key chains, watches, remote controls, and hearing aids. There are various chemistry types of this battery like silver oxide, alkaline, and mercury oxide. In addition, most of the manufacturer interchangeably makes use of similar labels for silver oxide and alkaline batteries. If you look at the button cell battery chart then you can find out the difference and also know about the button battery sizes. Alkaline: Alkaline coin/button cell batteries are cheap and reliable batteries. 1.5 volts is the nominal voltage of this battery but when you use this battery its voltage drops with time. The real capacity of this battery is dependent on the device cut off voltage. If it is to be used in electronic equipment where there is the requirement of the constant high voltage then the so-called capacity of this battery is low. In such gadgets the need for replacement of the battery is quick. However, if the alkaline battery is to be used in gadgets that can tolerate low battery voltage, then its so-called capacity will be larger and you need not replace batteries in them so soon. Typical labels for alkaline batteries are LR##, AG##, LR###, etc. The normal capacity of alkaline LR44 is about 110-130 mAh and it is lower than equivalent silver oxide battery. Common Shelf life for it is 5 years. Silver Oxide: These button/coin cell batteries are a well-known type of batteries. They are not very expensive and have a shelf life of about 10 or more years. They have constant voltage while an operation that is identical to the nominal voltage of the alkaline batteries. Typical labels of this battery type are SR##, SG##, SR###, etc. Typical capacity of these types of batteries ex- Silver oxide SR44 is 150-200 mAh and it is more than equivalent alkaline LR44 while less than zinc-air. Zinc Air: These are used widely in hearing aid devices. They are having slightly lesser nominal voltage (1.4 to 1.45 V) however this voltage is quite similar or higher than the alkaline batteries voltage while using. In addition to this, these batteries got the largest capacity and chemistry. Typical capacity- 600-700 mAh and it is the much larger capacity when compared to silver oxide. These batteries are not common because of different reasons, however, one of the common reasons is that they work by using air, and when electrolyte dries out, it is dead and needed to be replaced. Depending on manufacturer and model, after the protective tab of these batteries is removed, leave it for some minute in the air then use it for weeks. It has a shelf life of 4-5 years. Mercury oxide: These types of batteries are no longer in the use because of their impact on the environment. They require slightly lower voltage (~1.35V) they have good capacity. The typical capacity of battery MR44 is 180-200 mAh and it is quite similar to silver oxide SR44. If a small portion of these batteries is swallowed then it can induce vomiting. Cylindrical batteries: These are commonly used in devices such as remote control devices, key chains, bikes, electric tools, etc. Cylindrical batteries are divided into 2 groups such as- Non-rechargeable or primary batteries rechargeable or secondary batteries It is to be noted that the primary batteries must never be charges. Also, keep in mind that does not recharge batteries with NOT designed charger. The nominal voltage of the non-rechargeable cell is 1.5V regardless of whether they are alkaline or carbon-zinc batteries. These are interchangeable nit alkaline batteries that have huge capacity and they are used more than the zinc-carbon batteries. For Primary lithium batteries, nominal voltage is 3V; they have a larger capacity and are light weighted. In addition to this, they tend to be highly expensive than the zinc-carbon as well as alkaline batteries and are utilized in high power gadgets such as cameras, flashlights, etc. Secondary cells’ nominal voltage is dependent on its chemistry. These batteries are smaller and packed with enough energy but if mistreated then it may burst or explode. Hence, make sure you refer a button cell battery chart before replacing or using any batteries in your device. nickel Cadmium battery it is also referred to as NiCd batteries and they have the nominal voltage of 1.2 V. it can generate large current however it has limited capacity as well as number of charging/ discharging cycles. Nickel metal hydride- it is also referred to as NiMH batteries and it offers good capacity, low rate of self-discharge, good shelf life, etc along with reasonable rates. Lithium secondary batteries- they have a voltage ranging from 3.3-3.7V and are labeled as 3.7 or 3.6V batteries. They have a large capacity, improved safety, and a higher drain. For more information about batteries, you can refer button cell battery chart. We hope you have gained enough knowledge about batteries and their usage. Hurry up and go replace your batteries. Read Also: Car Battery Maintenance 101 Add Accuracy To Your Testing With The Help Of Multimeter The Latest Way Of Transportation: Electric Motor Scooters

READ MOREDetails